Blue Shell Hanging Crochet Organizer Pattern
Advanced
For experienced crocheters who enjoy complex shaping, fine detail, and ambitious construction
Multi-Day Project
A rewarding 12+ hour journey — perfect for dedicated crafters who love detailed work.
Handmade Gift
A beautiful keepsake — free forever. Read online or print at home.
About This Blue Shell Hanging Crochet Organizer Pattern
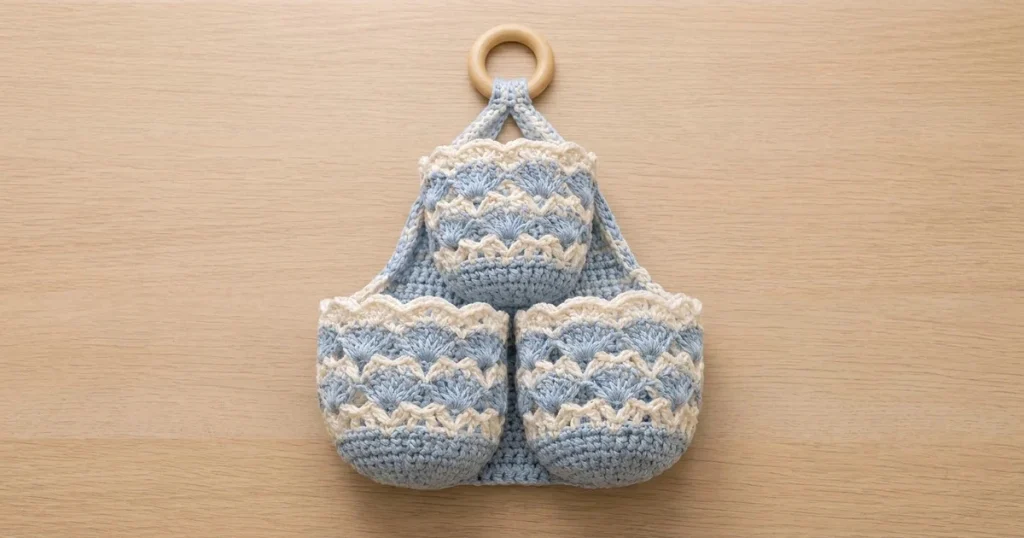
This crochet hanging organizer pattern pairs three rounded powder-blue pockets with cream lace outlines and scalloped rims. Two pockets sit side by side beneath a centered upper pocket, all supported by a triangular blue backing and a natural wooden ring.
Allow approximately 12–16 hours for the shaped backing, separately worked pocket bases, alternating shell-and-arch rounds, and reinforced assembly. This advanced project suits crocheters comfortable reading stitch placement carefully and adjusting seams while the organizer hangs. It is intended for lightweight storage such as yarn notions, folded cloths, or small accessories.
Materials
- DK cotton yarn in powder blue Approximately 220 g / 550 m
- DK cotton yarn in warm cream Approximately 70 g / 175 m
- 3.5 mm crochet hook Or size needed for gauge
- Smooth wooden ring Approximately 7 cm outside diameter, with a 1 cm thick band
- Stitch markers At least six, including two contrasting colors
- Tapestry needle, scissors, ruler, and blocking pins For joining and finishing
- Strong cotton sewing thread and sewing needle For reinforcing strap seams
Abbreviations
chchainscsingle crochetdcdouble crochetsl stslip stitchinc2 sc in one stitchsc2togsingle crochet two stitches togetherMRmagic ringst / stsstitch / stitchesRS / WSright side / wrong sideGauge, Size, and Construction Notes
- Use US crochet terminology. Gauge in blocked sc: 18 sts and 22 rows = 10 cm. Make a swatch at least 12 cm square and measure its center.
- Pocket shell gauge: one 8-stitch repeat measures approximately 4.5 cm across when gently flattened. One blue shell round plus its following cream arch round measures approximately 2.2 cm vertically. Check this on the first pocket.
- Target pocket measurements: approximately 13–14 cm wide when flattened and 13–14 cm tall. The backing measures approximately 27 cm across its bottom and 23 cm tall before edging. Overall height includes the suspension straps and wooden ring.
- Work pocket bases in continuous rounds through Round 11, marking the first stitch. Work subsequent rounds joined with the RS facing. Chains used to start sc rows or rounds do not count as stitches.
- Each shell contains 7 dc. Its center is the fourth dc. A valley is the single sc between adjacent shells. Chain spaces are counted separately from sc in the arch-round totals.
- There is no stuffing, face, or safety-eye placement: this is an open storage organizer. Keep the pocket interiors empty during construction.
Triangular Backing — Make One in Powder Blue
- Foundation: ch 50. Row 1: sc in second ch from hook and each remaining ch; turn. 49 sts. This is the bottom edge.
- Row 2: ch 1, sc across; turn. 49 sts.
- Row 3: ch 1, sc2tog, sc in next 45 sts, sc2tog; turn. 47 sts.
- Row 4: ch 1, sc across; turn. 47 sts.
- Rows 5–48: repeat the following pair of rows 22 times. First row: ch 1, sc2tog, sc in every st up to the final 2 sts, sc2tog; turn. Second row: ch 1, sc across; turn. Counts after each pair: 45, 43, 41, 39, 37, 35, 33, 31, 29, 27, 25, 23, 21, 19, 17, 15, 13, 11, 9, 7, 5, then 3 sts.
- Row 49: ch 1, sc in each of the 3 sts. Fasten off. Mark this narrow edge as the top.
- Edging: with RS facing, join blue at the bottom-right corner. Work 49 sc across the foundation edge, ch 1; work 49 sc up the first sloping edge, placing one in each row end, ch 1; work 3 sc across the top, ch 1; work 49 sc down the other sloping edge, ch 1. Join to first sc. 150 sc and four ch-1 corner spaces. Do not add extra sc in the corners.
- Fasten off and wet-block flat. Aim for a straight bottom edge and matching slopes without stretching the fabric thin.
Rounded Pocket Bases — Make Three in Powder Blue
- Round 1: 6 sc in MR. 6 sts. Tighten the ring securely.
- Round 2: inc in each st around. 12 sts.
- Round 3: repeat (sc, inc) 6 times. 18 sts.
- Round 4: repeat (2 sc, inc) 6 times. 24 sts.
- Round 5: repeat (3 sc, inc) 6 times. 30 sts.
- Round 6: repeat (4 sc, inc) 6 times. 36 sts.
- Round 7: repeat (5 sc, inc) 6 times. 42 sts.
- Round 8: repeat (6 sc, inc) 6 times. 48 sts.
- Round 9: sc in each st around. 48 sts.
- Round 10: sc in each st around. 48 sts.
- Round 11: sc in each st around. 48 sts. Sl st in next st to level the round; this joining sl st does not count as a stitch. Fasten off blue.
Shell Pocket Walls and Cream Scallops — Repeat for Each Pocket
- Round 12, cream setup arches: join cream in the first sc of Round 11, ch 1. Repeat (sc in next available st, ch 3, skip 3 sts) 12 times, beginning the first sc in the joining stitch. Join to first sc. 12 sc and 12 ch-3 spaces. Fasten off.
- Round 13, blue shells: identify the 12 sc anchors from Round 12 and number them 1–12 in the working direction. Join blue in anchor 1, ch 1, sc in that anchor. Skip the following ch-3 space, work 7 dc in anchor 2, skip the following ch-3 space. Repeat (sc in next anchor, skip next space, 7 dc in next anchor, skip next space) 5 times. Join to first sc. 6 shells and 6 valley sc; 48 sts. Fasten off.
- Round 14, cream outlines: join cream in the center dc of the first shell, ch 1, sc in that dc. Ch 3, skip the remaining 3 dc of that shell, sc in the next valley sc, ch 3, skip the first 3 dc of the next shell. Repeat (sc in center dc of next shell, ch 3, skip 3 dc, sc in next valley sc, ch 3, skip 3 dc) 5 times. Join to first sc. 12 sc and 12 ch-3 spaces. Fasten off.
- Round 15, blue shells: join blue in the first cream sc positioned over a valley, ch 1, sc in that anchor. Skip the following ch-3 space, work 7 dc in the next anchor, skip the following space. Repeat (sc in next anchor, skip next space, 7 dc in next anchor, skip next space) 5 times. Join to first sc. 6 shells and 6 valley sc; 48 sts. Fasten off. These shells are offset from those in Round 13.
- Round 16: repeat Round 14 in cream, beginning in the center dc of any blue shell. 12 sc and 12 ch-3 spaces. Fasten off.
- Round 17: repeat Round 15 in blue, beginning in a cream sc over a valley. 6 shells and 6 valley sc; 48 sts. Fasten off.
- Round 18: repeat Round 14 in cream. 12 sc and 12 ch-3 spaces. Fasten off.
- Round 19, cream scalloped rim: repeat Round 15 using cream, beginning in a cream sc over a blue valley. 6 shells and 6 valley sc; 48 sts. Fasten off and weave in ends on the inside without drawing the arches tight.
- Gently block each pocket around a small bowl or rolled towel, keeping its base rounded and its opening unflattened. Remove the support and let the pocket dry completely before assembly.
Suspension Straps — Make Two in Powder Blue
- Foundation: ch 5. Row 1: sc in second ch from hook and each remaining ch; turn. 4 sts.
- Rows 2–24: ch 1, sc in each st across; turn. 4 sts in every row. Each strap measures approximately 2.2 cm wide × 11 cm long before folding.
- Fasten off, leaving a 60 cm sewing tail. Block both straps to equal lengths.
- Mark the first 2 cm and last 2 cm of each strap as sewing tabs. The intervening length forms a loop around the wooden ring.
Pocket Placement and Structural Joining
- Lay the backing RS up with its wide edge at the bottom. Mark the midpoint of the bottom edge. Position the two lower pockets side by side, their inner sides touching at this centerline and their lowest points level with the backing’s bottom edge. Their outside edges may extend slightly beyond the backing.
- For each lower pocket, identify the back half of its circumference: 24 stitch positions, or three shell repeats. Mark the two side boundaries. Keep the front half and all cream rim scallops free.
- With blue yarn, secure the back wall to the backing along Round 11, using one small backstitch through each of the 24 marked pocket stitches and corresponding backing fabric. Ease the backing evenly without pulling the pocket flat.
- Add two vertical seams per pocket at the marked side boundaries, sewing from Round 11 to Round 18. Catch the dense stitch anchors where available, keeping the cream arches free. Add a short central tack through the back of the base at Round 7 to prevent the lower pocket swinging forward.
- Center the upper pocket above the lower pair. Place its lowest point approximately 11.5 cm above the backing’s bottom edge. Its cream rim should sit approximately 1–2 cm below the backing’s narrow top. Pin, then secure its back half along Round 11 and both side boundaries as for the lower pockets.
- Check all placements while the backing hangs temporarily from its top. If the lower rims crowd the upper pocket, move the upper pocket slightly upward before completing its seams. Preserve access to all three openings.
- At each lower pocket’s upper outer attachment point, add a second pass of blue stitching over a 1 cm square of backing fabric. Reinforce both upper-pocket side attachments in the same way.
Attach the Wooden Ring
- Position the ring above the backing with its opening centered over the triangle. Place the left strap’s first sewing tab on the front of the upper left slope, just behind the upper pocket. Place the right strap symmetrically on the upper right slope.
- Use attachment points approximately 3 cm below the backing’s narrow top, one on each slope. Sew each 2 cm tab flat with blue yarn, making a rectangle around its perimeter and two diagonal lines through its center.
- Pass each free strap end through the ring and fold it back down behind its original attachment tab. Keep both loops equal so the ring hangs centrally. Sew the rear tabs to the backing with the same rectangle-and-diagonal stitching.
- Reinforce the four tab seams with strong cotton thread, taking small stitches through the strap fabric and backing. Keep thread ends buried between the layers.
- Hang the organizer and check that both straps share the weight. Adjust a strap seam before final fastening if the backing tilts.
Finishing
Weave in every remaining end through several stitches, changing direction once to secure it. Smooth the cream scallops with your fingers and check that no joining stitch closes a pocket opening. The blue bases should remain softly rounded while the backing rests flat against the wall.
Hang the finished organizer from a secure hook that fits the wooden ring. Add lightweight contents gradually and watch for stretching at the strap tabs or pocket corners. Empty it before washing; hand-wash the crochet gently while keeping the wooden ring out of the water, reshape the pockets, and dry flat.
Tips for Success
- Mark every fourth dc immediately after completing a shell round. These six markers identify the exact centers for the cream outline round.
- Keep each ch-3 arch relaxed enough to span three dc. Tight arches squeeze the blue shells and reduce the pocket opening.
- Attach pockets through their backs only. Slide a piece of cardboard inside each pocket while sewing to help prevent catching the front wall.
- Pin and check the full arrangement while hanging before completing the vertical seams; the rounded bases shift slightly under their own weight.
Common Mistakes to Avoid
- Working into the ch-3 spaces during a blue shell round changes the structure. Use only the 12 sc anchors, alternating one sc and one 7-dc shell.
- Starting the next shell round over a previous shell center loses the staggered layout. Begin its first sc in an anchor positioned over a valley.
- Counting the joining slip stitch as a base stitch creates an extra repeat position. Round 12 must use exactly the 48 sc from Round 11.
- Sewing the whole upper rim to the backing flattens the opening and hides the scallops. Attach at Round 11 and the side boundaries, leaving Round 19 free.
- Pulling attachment seams tight makes the backing pucker. Unpick the tight section and resew with the pocket held in its natural rounded shape.
Ways to Customize This Pattern
- Use dusty sage or soft gray in place of powder blue, keeping cream for the arches and rim.
- Make all three pockets in different muted colors while retaining a single backing color and matching cream outlines.
- For smaller contents, hand-sew a cotton lining inside each pocket, with its top edge ending below Round 19. Shape the lining to the completed pocket and include seam allowance.
- For a larger organizer, use thicker cotton and a matching hook throughout. Swatch again and scale the backing, strap lengths, and ring to the actual pocket measurements.
Frequently asked questions
Each cream outline round places anchors over both shell centers and valleys. Beginning the next blue round with a sc over a valley places its shells over the preceding shell centers and shifts the valley positions, producing the layered fan texture.
This construction is intended for lightweight items. Heavy bottles can stretch the lace, backing, and suspension tabs. Keep contents light and check the attachment seams regularly.
Your shell gauge may be looser than your sc gauge. Block and measure the first pocket before making the others. Two flattened pockets should span approximately 27–28 cm together; adjust hook size if they differ substantially.
Start with firm cotton fabric and careful blocking. The rounded bases and three-sided attachment seams provide support. If you need a firmer opening, add a fitted fabric lining below the cream scallops and keep the organizer’s contents lightweight.
The finished Blue Shell Hanging Crochet Organizer Pattern

