Blush Ballerina Crochet Curtain Pattern
Advanced
For experienced crocheters who enjoy complex shaping, fine detail, and ambitious construction
Single-Day Project
A satisfying project you can complete in a single afternoon or evening.
Handmade Gift
A beautiful keepsake — free forever. Read online or print at home.
About This Blush Ballerina Crochet Curtain Pattern
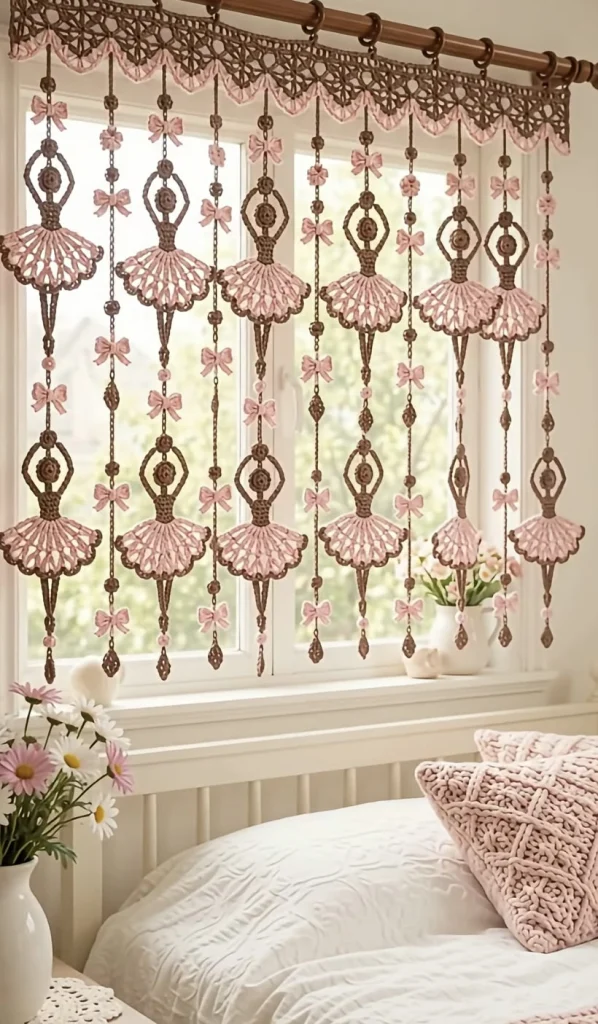
This ballerina crochet curtain pattern turns cocoa cotton and blush pink lace into a decorative window hanging. An openwork valance supports ten flat ballerina silhouettes, with raised oval arms, round heads, fitted bodices, pointed legs, and spreading pink skirts. Narrow ornament strands carry small bows and diamond pendants between the dancers.
The design follows the reference’s brown-and-pink palette and airy construction. These are unstuffed crochet appliqués assembled into a curtain, with plain heads and no added facial features. Allow approximately 35–45 hours for crocheting, blocking, and assembly. The project suits experienced crocheters who enjoy fine cotton, precise lace work, and careful placement of separate motifs.
Materials
- Cocoa brown fine / sport cotton Approximately 650 m; choose a smooth, firmly plied yarn
- Blush pink matching cotton Approximately 450 m
- Crochet hook 2.5 mm, or size needed for gauge
- Tapestry needle and small sewing needle For motif assembly and reinforced hanging attachments
- Matching brown sewing thread For securing attachment points
- Locking markers, ruler, blocking mat, and rustproof pins For consistent motif dimensions
- Curtain rings with closed attachment eyes 13 rings suitable for your rod
- Optional washable fabric stiffener For the skirts and pendants; follow its label
Abbreviations
chchainsl stslip stitchscsingle crochethdchalf double crochetdcdouble crochetinc2 sc in the same stitchsc2togsingle crochet 2 stitches togetherMRmagic ringst / stsstitch / stitchesGauge, Dimensions, and Construction
- Use US crochet terminology throughout. Blocked sc gauge: 24 sts and 28 rows = 10 × 10 cm. Make a swatch of at least 30 sts and 32 rows, wet-block it, and measure the center.
- For an additional lace check, work one skirt using the instructions below. Target blocked skirt dimensions are approximately 17 cm across the lower edge and 7 cm deep. Lace dimensions depend on both stitch height and blocking.
- The finished curtain measures approximately 120 cm wide and 100 cm from the top of the valance to the lowest pendant. The valance blocks to approximately 8 cm deep. Ring height is additional.
- Make one valance, ten ballerinas, four ornament strands, 27 brown medallions, 19 brown diamonds, 35 pink bows, and ten pink connector buttons. Each ballerina contains a separate bodice, head, arm arch, skirt, and two legs.
- Turning ch 1 never counts as a stitch. A starting ch 3 counts as one dc where stated. Work flat rows back and forth. Work heads and medallions in continuous rounds, marking the first stitch.
- All hanging cords are made to measured lengths after gentle stretching. Position measurements below are taken on the fully blocked work. Leave 15 cm sewing tails on motifs and 20 cm tails on cords.
Cocoa Openwork Valance
- Foundation: With brown, ch 290.
- Row 1: Sc in the second ch from the hook and each remaining ch. Turn. 289 sc.
- Row 2: Ch 1, sc in each st. Turn. 289 sc.
- Row 3: Ch 1, sc in first st; repeat (ch 3, skip 3 sts, sc in next st) 72 times. Turn. 73 sc and 72 ch-3 spaces.
- Row 4: Ch 1, sc in first sc; repeat (3 sc in next ch-3 space, sc in next sc) 72 times. Turn. 289 sc.
- Row 5: Repeat Row 3. 73 sc and 72 ch-3 spaces.
- Row 6: Repeat Row 4. 289 sc.
- Row 7: Repeat Row 3. 73 sc and 72 ch-3 spaces.
- Row 8: Repeat Row 4. 289 sc.
- Row 9: Repeat Row 3. 73 sc and 72 ch-3 spaces.
- Row 10: Repeat Row 4. 289 sc.
- Row 11: Repeat Row 3. 73 sc and 72 ch-3 spaces.
- Row 12: Repeat Row 4. 289 sc.
- Row 13: Ch 1, sc in first st; repeat (skip 2 sts, 7 dc in next st, skip 2 sts, sl st in next st) 48 times. Fasten off. 48 shells, 48 joining sl sts, and the initial sc.
- Pink edging: With the right side facing, join pink in the initial sc of Row 13. Ch 1, sc there. For each shell, sc in its first 3 dc, work (sc, ch 2, sc) in its fourth dc, sc in its last 3 dc, and sl st in the following brown sl st. Repeat for all 48 shells. Fasten off. Each shell receives 8 sc and one ch-2 point.
- Wet-block to 120 cm wide, opening the mesh evenly and pinning the scallops. The approximate depth is 8 cm; do not stretch vertically just to force that measurement.
Ballerina Bodices — Make 10
- Foundation: With brown, ch 9. Work from the shoulder edge toward the waist.
- Row 1: Sc in second ch from hook and each remaining ch. Turn. 8 sc.
- Row 2: Ch 1, sc in each st. Turn. 8 sc.
- Row 3: Ch 1, sc2tog, sc in next 4 sts, sc2tog. Turn. 6 sc.
- Row 4: Ch 1, sc in each st. Turn. 6 sc.
- Row 5: Ch 1, sc in each st. Turn. 6 sc.
- Row 6: Ch 1, sc in each st. Fasten off, leaving a sewing tail. 6 sc.
- Surface detail: With a separate brown length, embroider three short horizontal bars across the middle 4 sts, one each between Rows 2–3, 3–4, and 4–5. Keep them relaxed so the bodice remains flat.
Round Heads — Make 10
- Round 1: With brown, 6 sc in MR. Tighten the ring. 6 sc.
- Round 2: Inc in each st. 12 sc.
- Round 3: Repeat (sc in next st, inc) 6 times. 18 sc.
- Slip stitch in the next st and fasten off, leaving a sewing tail. The finishing sl st is not an additional counted stitch. Leave the disk flat and unstuffed.
- With a separate brown strand, make six relaxed straight stitches radiating from the center toward the boundary between Rounds 2 and 3. These suggest the textured rosette heads in the reference. Do not add eyes or a mouth.
Raised Arm Arches — Make 10
- Foundation: With brown, leave a sewing tail and ch 33.
- Row 1: Sl st in second ch from hook and each remaining ch. Fasten off with a sewing tail. 32 sl sts.
- Block each strip to approximately 12 cm long. Bend into an arch, with the midpoint forming the joined hands above the head. The two ends will attach to the two upper corners of the bodice.
- Pin the arch so its midpoint sits approximately 4 cm above the shoulder edge. Bow the sides outward to make an opening approximately 4.5 cm wide. Secure both ends to the bodice with several small stitches.
Blush Lace Skirts — Make 10
- Foundation: With pink, ch 7. This is a separate flat fan, worked from the waist down.
- Row 1: Work 2 dc in second ch from hook and in each remaining ch. Turn. 12 dc.
- Row 2: Ch 3, dc in first st, ch 1, dc in same st; skip next st. Repeat (dc, ch 1, dc in next st; skip next st) 5 times. Turn. 13 dc and 6 ch-1 spaces. The first group has 3 dc, including the starting ch 3; each other group has 2 dc.
- Row 3: Ch 1. Work (2 dc, ch 2, 2 dc) in each of the 6 ch-1 spaces, leaving all intervening dc unworked. Turn. 24 dc and 6 ch-2 spaces.
- Row 4: Ch 1. Work (3 dc, ch 2, 3 dc) in each ch-2 space. Turn. 36 dc and 6 ch-2 spaces.
- Row 5: Ch 1. Work (4 dc, ch 2, 4 dc) in each ch-2 space. Fasten off pink. Do not turn. 48 dc and 6 ch-2 spaces.
- Row 6: Join brown in the first dc of Row 5. Ch 1; for each of the 6 shells, sc in its first 4 dc, work (sc, ch 2, sc) in its ch-2 space, and sc in its last 4 dc. Fasten off. 60 sc and 6 ch-2 points.
- Block the fan to approximately 17 cm wide and 7 cm deep. Pin each brown point separately. Sew its six foundation chains across the six waist stitches of the bodice, keeping the fan centered.
Pointed Legs — Make 20
- Foundation: With brown, leave a sewing tail and ch 25.
- Row 1: Sl st in second ch from hook and next 5 ch, sc in next 10 ch, hdc in last 8 ch. Fasten off, leaving a sewing tail. 24 sts: 6 sl sts, 10 sc, and 8 hdc.
- Block each leg to approximately 9 cm long. The hdc end is the upper leg; the narrow sl-st end is the pointed foot.
- For each dancer, sew the upper ends to the back of the waist, behind the skirt, approximately 1 cm apart. Angle the strips inward and sew the final 1 cm of the feet together. Keep the upper portions separate to retain the long triangular opening.
Brown Medallions — Make 27
- Round 1: With brown, 6 sc in MR. Tighten the ring. 6 sc.
- Round 2: Inc in each st. 12 sc.
- Sl st in next st and fasten off with a sewing tail. Each flat medallion measures approximately 1.5–2 cm across.
- Reserve 10 medallions for the dancers’ joined hands, 5 for the spaces between the two dancers on each dancer drop, and 12 for the four ornament strands.
Open Diamond Pendants — Make 19
- Foundation: With brown, ch 12 and sl st in first ch to form a ring without twisting.
- Round 1: Ch 1; repeat (3 sc in ring, ch 2) 4 times. Join with sl st in first sc. 12 sc and 4 ch-2 spaces.
- Round 2: Ch 1; repeat (sc in next 3 sc, work 2 sc in next ch-2 space) 4 times. Join with sl st in first sc. 20 sc.
- Fasten off. Block each ring as a narrow diamond, approximately 1.5 cm wide × 3 cm long, with the original ch-2 spaces at its four corners.
- Reserve 9 diamonds for the bottom ends of the nine drops, 2 additional diamonds for each of the four ornament strands, and 2 additional diamonds for the centers of the outermost dancer drops. Total: 19.
Pink Connector Buttons — Make 10
- Round 1: With pink, 6 sc in MR. Join with sl st in first sc, tighten the ring, and fasten off. 6 sc.
- Use one button at the joined feet of each ballerina. These are flat crochet details, with no stuffing or purchased beads.
Pink Bows — Make 35
- Foundation: With pink, ch 9.
- Row 1: Sc in second ch from hook and each remaining ch. Turn. 8 sc.
- Row 2: Ch 1, sc in each st. Fasten off with a 25 cm tail. 8 sc.
- Pinch the rectangle at its midpoint. Wrap the tail firmly around the center five times, then secure it through the back of the wraps.
- For the tails, make a separate ch-13 strand and fasten off. Fold it at the midpoint and stitch that midpoint behind the bow center. Trim and secure yarn ends without trimming the chain itself.
- Reserve 3 bows for each of the 5 dancer drops and 5 bows for each of the 4 ornament strands. Total: 35.
Assemble the Ten Ballerinas
- Pin one head inside each arm arch, with the bottom of the head touching the center of the bodice’s shoulder edge. Sew a 1 cm section of the head’s lower edge to the bodice.
- Use two small stitches to tack the head’s upper sides to the inner arm edges where they naturally meet. Keep the arch open around the head.
- Sew one brown medallion over the midpoint of the arm arch to form the joined-hands ornament. This is also the upper hanging attachment.
- Check that the skirt and both legs are firmly sewn to the waist. Sew one pink connector button over the joined feet.
- Block the complete motif to approximately 26 cm tall and 17 cm wide. Measure from the top of the hands medallion to the bottom of the pink foot button. Let it dry completely before making the hanging cords.
Make Five Double-Ballerina Drops
- For all connecting cords, chain in brown until the gently stretched chain reaches the stated finished length. Fasten off with sewing tails. Different chain gauges require different chain counts, so measure the finished cord itself.
- For each drop, make four cords measuring 7 cm, 10 cm, 10 cm, and 10 cm. These measurements exclude the sewing tails.
- Lay the drop vertically on a blocking mat. Attach the 7 cm cord to the first dancer’s hands medallion. Attach the first 10 cm cord from that dancer’s foot button to the second dancer’s hands medallion.
- Attach the next 10 cm cord to the second dancer’s foot button. Sew one bow at the midpoint of each of these three cords. Sew one reserved brown medallion onto the middle cord, approximately 2 cm above its bow.
- For the two outermost drops only, sew one additional diamond flat over the middle cord, approximately 2 cm below its bow. These diamonds decorate the cord and do not add length.
- Sew the final 10 cm cord to the free lower end of the third cord. Sew one diamond to its bottom end, allowing the diamond to extend 3 cm below the cord. The two lower cords form a continuous 20 cm section below the second dancer.
- Each completed drop measures approximately 92 cm: 7 cm top cord + 26 cm dancer + 10 cm middle cord + 26 cm dancer + 20 cm lower cords + 3 cm pendant. Secure cord junctions with overlapping sewing tails.
Make Four Ornament Strands
- With brown, make one chain cord measuring 89 cm after gentle stretching. Fasten off with long sewing tails. Repeat to make four cords.
- Lay each cord straight on a measuring surface. Sew pink bows at 10, 27, 44, 61, and 78 cm from its top end.
- Sew brown medallions centered at 19, 53, and 84 cm from the top.
- Sew diamonds centered at 36 and 70 cm from the top, tacking both their upper and lower points to the cord. These are overlays and do not increase the cord’s length.
- Sew one diamond by its upper point to the bottom end of each cord. Its 3 cm length brings the finished strand to approximately 92 cm.
- Secure each bow through its center wraps and to two adjacent chain links. Secure each medallion to at least two chain links so it cannot rotate freely.
Join the Curtain and Attach Rings
- Lay the blocked valance right side up. Use its straight foundation edge as the top. Number the foundation stitches 1–289 from left to right.
- Mark nine vertical drop positions aligned with foundation stitches 13, 46, 79, 112, 145, 178, 211, 244, and 277. At gauge, these positions are approximately 5, 18.75, 32.5, 46.25, 60, 73.75, 87.5, 101.25, and 115 cm from the left edge.
- Alternate a ballerina drop and an ornament strand, beginning and ending with a ballerina drop. The five dancer positions are therefore approximately 5, 32.5, 60, 87.5, and 115 cm.
- At each marked position, pass the drop’s upper sewing tail through the nearest Row 12 stitch and through the corresponding scallop valley below it. Stitch back and forth at least four times, spreading the attachment over three adjacent Row 12 stitches. Reinforce with matching sewing thread.
- Attach 13 curtain rings along the top foundation edge at stitches 1, 25, 49, 73, 97, 121, 145, 169, 193, 217, 241, 265, and 289. Sew each ring eye around three adjacent foundation stitches; at the two ends, use the nearest three available stitches.
- Hang the curtain for 24 hours before final trimming of sewing tails. If a drop settles longer than its neighbors, shorten its top cord by folding a small section behind the attachment and stitching the fold securely.
Finishing
Weave every yarn end through the back of several stitches, reverse direction, and weave through again. Keep the dancers facing forward and smooth the skirts with your fingers. If you use washable stiffener, apply it lightly to the skirts and diamond pendants, then dry the curtain flat with the lace points pinned into shape.
Hang the finished piece from its rings and check that the pink bows face the room. The open spaces between the dancers should stay clear, and the lower pendants should sit close to one level. This is decorative window lace; place its long hanging strands out of reach of young children and pets.
Tips for Success
- Use the same blocked ballerina as a placement template for all ten motifs. Matching the arm height and skirt spread makes the repeated silhouettes look deliberate.
- Pin all six skirt points before stretching the intervening lace. This distributes the fan evenly without pulling one shell wider than its neighbors.
- Make the slip-stitch arm strips loosely. A tight slip-stitch row shortens the arch and can squeeze the head out of position.
- Support each drop through Row 12 of the valance. The scalloped edging alone is too flexible to hold the motif alignment reliably.
- Measure cords after gently stretching them, then let the curtain settle before making the final height adjustment.
Common Mistakes to Avoid
- Missing a mesh space changes the valance width. Each mesh row must contain 72 spaces; each following solid row must return to 289 sc.
- Working into every dc on skirt Rows 3–5 creates a dense ruffle. Work only into the six chain spaces, leaving the previous row’s dc unworked.
- Sewing the pointed ends of the legs to the waist reverses their shaping. Attach the wider hdc ends behind the skirt and join the narrow slip-stitch ends below.
- Adding the decorative diamonds between cord sections lengthens the curtain unevenly. Only the bottom diamond extends beyond a cord; the other diamonds are sewn over it.
- Attaching motifs before blocking can leave the dancers uneven. Block the pieces first, assemble one sample, then match the remaining motifs to it.
Ways to Customize This Pattern
- Use dusty rose for the skirts and pale blush for the bows while retaining cocoa for the silhouette and valance.
- Make a shorter café curtain with one dancer per dancer drop. Omit the second dancer and middle 10 cm cord; shorten each ornament strand by 36 cm and redistribute its decorations.
- Adjust the valance width in multiples of 24 foundation stitches, approximately 10 cm at gauge. Begin with a foundation chain of 24 times your chosen repeat count, plus 2; Row 1 will have 24 times that count, plus 1 sc.
- Use the same skirt pattern in ivory for a quieter palette, keeping the pink bows and connector buttons as small accents.
Frequently asked questions
No. The heads are flat disks, the bodices are shaped rows, and the limbs are narrow crochet strips. Keeping every part unstuffed helps the curtain hang close to the window.
The starting ch 3 provides the outer edge while the two additional dc frame the first chain space. The following row uses only the six chain spaces, so the extra edge stitch does not change the six-shell repeat.
The valance has no rod pocket. Use the specified rings, or sew the straight top edge to a separately made fabric rod-pocket strip. Keep all nine drop attachments reinforced through Row 12.
Remove the rings if required by their care instructions. Lay the curtain in shallow cool water, gently press it clean, and lift it supported on a towel. Avoid wringing. Dry flat, separating the drops and repinning the skirts and diamonds.
The finished Blush Ballerina Crochet Curtain Pattern

