Blush Garden Floral Crochet Table Runner Pattern
Advanced
For experienced crocheters who enjoy complex shaping, fine detail, and ambitious construction
Single-Day Project
A satisfying project you can complete in a single afternoon or evening.
Handmade Gift
A beautiful keepsake — free forever. Read online or print at home.
About This Blush Garden Floral Crochet Table Runner Pattern
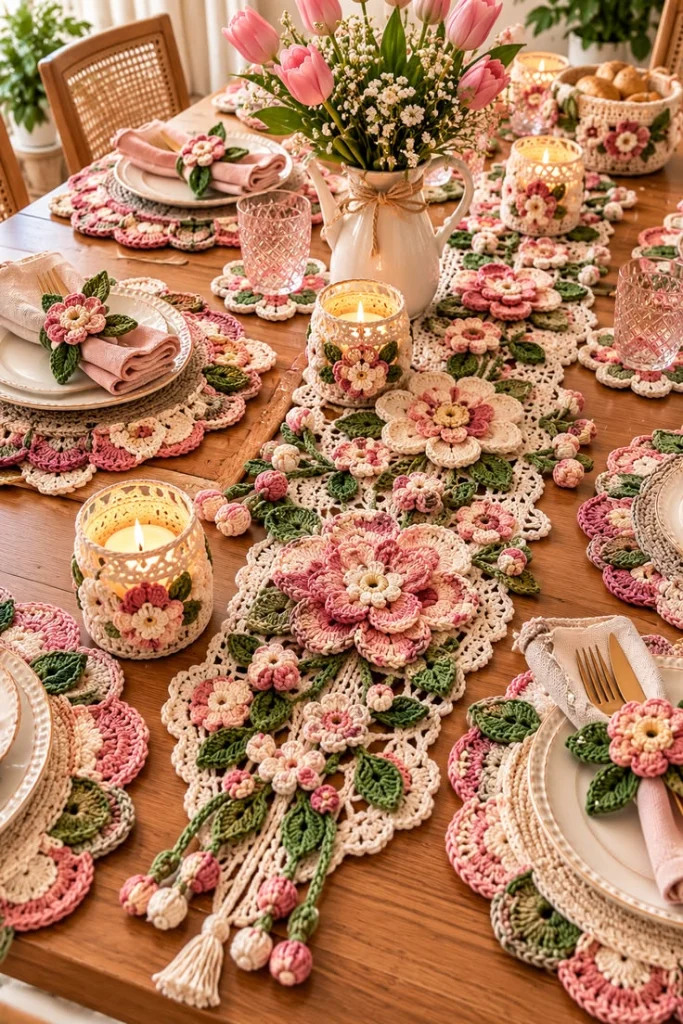
This floral crochet table runner pattern brings the reference photograph’s cream lace, layered pink blossoms, olive leaves, and dangling flower buds into a richly textured centerpiece. Large flowers sit above a rectangular mesh foundation, while smaller blossoms and embroidered stems connect them into a trailing garden.
The advanced work lies in shaping and layering separate motifs, managing their weight on an open foundation, and arranging the embroidered stems and suspended buds. Allow approximately 30–40 hours for the runner. This pattern covers the central runner; the coordinating placemats, napkin decorations, and candle sleeves shown in the photograph are separate items.
Materials
- Smooth sport-weight cotton, approximately 125 m per 50 g Cream: 250 g; blush pink: 100 g; dusty rose: 100 g; olive green: 100 g; deep green: 50 g; pale butter yellow: 25 g
- 3.0 mm crochet hook Adjust if needed to obtain gauge
- Tapestry needle and fine embroidery needle For assembly and surface embroidery
- Stitch markers, rustproof pins, and blocking mats Mark corners and block motifs separately
- Small amount of washable polyester stuffing For 12 hanging buds only
- Scissors, ruler, and a 10 cm piece of firm card For measuring and tassels
Abbreviations
chchainsl stslip stitchscsingle crochethdchalf double crochetdcdouble crochettrtreble crochetMRmagic ringinc2 sc in the same stitchdecsingle crochet 2 stitches togetherst / stsstitch / stitchesGauge, Dimensions, and Working Notes
- Use US crochet terminology. Foundation gauge after washing and blocking: 22 stitch positions and 12 rows = 10 cm in the mesh pattern. Each dc and each ch-1 space counts as one stitch position.
- For a swatch, ch 26. Work dc in the fourth ch from the hook and in each remaining ch: 24 stitch positions, including the starting ch-3. Turn. Ch 3, then repeat (ch 1, skip 1, dc in next st) 11 times; dc in the final st. Work 14 mesh rows total, repeating this arrangement and working into the dc stitches of the preceding row. Measure the central area after blocking.
- The runner’s foundation measures approximately 25 × 65.8 cm. Its scalloped border brings it to approximately 29 × 70 cm. Each end’s longest decoration extends about 10 cm beyond the border.
- Starting ch-3 counts as a dc in foundation rows. Starting ch-1 and joining sl sts never count as stitches. Work flower disks in joined rounds and buds in continuous rounds.
- Leave 25–35 cm sewing tails on appliqués. Secure each yarn change by completing the previous stitch’s final yarn-over with the new color, then weave in both ends after assembly.
Cream Mesh Foundation
- Row 1: With cream, ch 57. Dc in the fourth ch from the hook and each remaining ch. The skipped 3 chains count as the first dc. Turn. (55 dc)
- Row 2: Ch 3, skip the first dc beneath the turning chain; repeat (ch 1, skip next st, dc in next st) 27 times. Turn. (28 dc and 27 ch-1 spaces; 55 positions)
- Rows 3–79: Ch 3, then repeat (ch 1, skip next ch-1 space, dc in next dc) 27 times, working the last dc into the top of the previous turning ch-3. Turn after each row except Row 79. (55 positions per row)
- Mark all four corner stitches. Do not fasten off. Check that there are 79 rows and 27 mesh openings across each mesh row.
Cream Scalloped Border
- Round 1: Ch 1. Across the top edge, work 1 sc in each dc and each ch-1 space: 55 sc. Ch 2 to turn the corner. Work 2 sc around each of the 79 row ends down the first long side: 158 sc. Ch 2. Work 55 sc across the unused foundation-chain edge, one beneath each original dc position. Ch 2. Work 2 sc around each of the 79 row ends up the second long side: 158 sc. Ch 2 and join to the first sc. (426 sc and four ch-2 corner spaces)
- Round 2, first short edge: Ch 1. Repeat (skip 2 sc, 5 dc in next sc, skip 2 sc, sc in next sc) 9 times; sc in the final sc. Work (sc, ch 2, sc) in the corner space. (9 shells; all 55 edge stitches consumed)
- Round 2, first long edge: Repeat (skip 2 sc, 5 dc in next sc, skip 2 sc, sc in next sc) 26 times; sc in each of the final 2 sc. Work (sc, ch 2, sc) in the corner space. (26 shells; all 158 edge stitches consumed)
- Round 2, remaining edges: Repeat the short-edge instructions across the second short edge and the long-edge instructions across the second long edge, including their corner groups. Join to the first dc of the first shell. (70 shells; 432 stitches and four ch-2 spaces around the completed round)
- Fasten off. Wet-block to approximately 29 × 70 cm, opening the mesh gently and pinning each shell into a smooth curve. Let dry completely.
Large Flower Back Layers — Make 3
- Round 1: With cream, work 6 sc in MR. Join. (6)
- Round 2: Ch 1, inc in each st. Join. (12)
- Round 3: Ch 1, repeat (sc in next st, inc in next st) 6 times. Join. (18)
- Round 4: Ch 1, repeat (sc in next 2 sts, inc in next st) 6 times. Join. (24)
- Round 5: Repeat (sl st in next st, 5 tr in next st, sl st in next st) 8 times. Join to the first sl st. (8 petals; 56 stitches including petal sl sts)
- Fasten off. Block each flower to approximately 10–11 cm across. Keep the central disk flat while allowing the petals to cup slightly.
Large Flower Middle Layers — Make 3
- Round 1: With blush pink, work 6 sc in MR. Join. (6)
- Round 2: Ch 1, inc in each st. Join. (12)
- Round 3: Ch 1, repeat (sc in next st, inc in next st) 6 times. Join. (18)
- Round 4: Ch 1, repeat (sc in next 2 sts, inc in next st) 6 times. Join. (24)
- Round 5: Repeat (sl st in next st, 5 dc in next st, sl st in next st) 8 times. Join to the first sl st. (8 petals; 56 stitches including petal sl sts)
- Fasten off. Make two layers in blush and one in dusty rose for subtle variation. Expected diameter: approximately 8–9 cm.
Large Flower Inner Layers — Make 3
- Round 1: With dusty rose, work 6 sc in MR. Join. (6)
- Round 2: Ch 1, inc in each st. Join. (12)
- Round 3: Ch 1, repeat (sc in next st, inc in next st) 6 times. Join. (18)
- Round 4: Repeat (sl st in next st, 5 hdc in next st, sl st in next st) 6 times. Join to the first sl st. (6 petals; 42 stitches including petal sl sts)
- Fasten off. Make two dusty rose layers and one blush layer. Expected diameter: approximately 5–6 cm.
Small Flowers — Make 8
- Round 1: With cream, blush, or dusty rose, work 6 sc in MR. Join. (6)
- Round 2: Ch 1, inc in each st. Join. (12)
- Round 3: Ch 1, repeat (sc in next st, inc in next st) 6 times. Join, changing color on the final joining sl st. (18)
- Round 4: In the contrasting color, repeat (sl st in next st, 5 dc in next st, sl st in next st) 6 times. Join to the first sl st. (6 petals; 42 stitches including petal sl sts)
- Fasten off. Make 3 with cream disks and blush petals, 3 with blush disks and dusty rose petals, and 2 with dusty rose disks and cream petals. Expected diameter: approximately 6–7 cm.
Raised Yellow Centers — Make 11
- Round 1: With pale butter yellow, work 6 sc in MR. Join. (6)
- Round 2: Ch 1. In each of the 6 stitches, work a bobble as follows: yarn over, insert hook into the stitch, draw up a loop, yarn over and draw through 2 loops; repeat this partial dc action 3 more times in the same stitch, then yarn over and draw through all 5 loops. Ch 1 after each bobble. Join to the first bobble. (6 bobbles and 6 ch-1 spaces)
- Fasten off. Push the bobbles toward the right side. These centers remain unstuffed and will be sewn over the flower disks.
Shaped Leaves — Make 24
- Round 1: With olive green, ch 10. Starting in the second ch from the hook, sc in next 2 ch, hdc in next 2 ch, dc in next 3 ch, hdc in next ch, and 3 sc in the final ch. Rotate to work along the opposite side of the chain: hdc in next ch, dc in next 3 ch, hdc in next 2 ch, sc in next 2 ch. Join to the first sc. (19 stitches)
- Round 2: Ch 1, sc in next 8 sts, sc in next st, (sc, ch 2, sl st in second ch from hook, sc) in next st, sc in next st, sc in next 8 sts. Join. (20 sc and one pointed chain projection)
- Fasten off with a sewing tail. Make 16 olive leaves and 8 deep green leaves. Expected size: approximately 5 × 2.5 cm each.
- With a separate strand of deep green, embroider a loose stem-stitch vein along each olive leaf’s foundation chain. Use olive on deep green leaves. Draw the vein up slightly to give the leaf a shallow fold; do not cinch it into a tube.
Hanging Flower Buds — Make 12
- Round 1: With cream, blush, or dusty rose, work 6 sc in MR. Mark the first stitch and continue in a spiral. (6)
- Round 2: Inc in each st. (12)
- Rounds 3–4: Sc in each st. (12 per round)
- Round 5: Dec 6 times. Add a very small amount of stuffing before closing. (6)
- Fasten off, thread the tail through the front loops of all 6 stitches, draw closed, and secure. With a separate matching strand, pass from the closed base over the outside to the MR five times, spacing the strands evenly. Tighten gently to form five shallow bud lobes.
- Make 4 buds in each color. Each bud should measure approximately 1.5–2 cm long.
Bud Calyxes and Hanging Cords — Make 12
- Round 1: With olive green, work 6 sc in MR. Join. (6)
- Round 2: Repeat (sl st in next sc, ch 3, sl st in second ch from hook, sc in next ch) 6 times. Join to the first sl st. (6 narrow calyx points)
- Fasten off with a sewing tail. Sew one calyx over the closed end of each bud, spreading its points around the upper portion of the bud.
- For each cord, join olive yarn through the calyx center, ch 12, 18, or 24, then sl st in the second ch from the hook and every remaining ch. Fasten off at the calyx. Make 4 cords of each length. The free folded end of the cord attaches to the runner; the bud sits at the opposite end.
- At each short end of the runner, attach 2 cords of each length across the central 15 cm. Adjust attachment positions so the longest buds extend approximately 10 cm beyond the border.
Cream Tassels — Make 2
- Wrap cream yarn around the 10 cm card 24 times. Slide a separate 30 cm strand beneath the loops at one end and tie tightly.
- Remove the bundle and cut the loops at the opposite end. Wrap another strand around the bundle approximately 1.5 cm below the tied top, making 8 snug turns. Knot securely and bury the ends inside the tassel.
- Trim each tassel to approximately 9 cm. Use the top ties to attach one tassel to the middle of each short edge. Keep the attachment short enough that the tassel extends approximately 10 cm beyond the border.
Flower Layering and Layout
- For each of the 3 large flowers, stack one cream back layer, one pink middle layer, and one contrasting inner layer. Rotate the middle layer so its petals fall between the cream petals. Center the smaller six-petal layer above them.
- Sew through all three disks around their centers, then add 6–8 small anchoring stitches around the middle disk. Keep the outer petal edges free. Sew a yellow center over the joining stitches.
- Add the remaining 8 yellow centers to the small flowers. Sew around each center’s inner disk so the bobbles remain raised.
- Place the blocked foundation right side up. Measure lengthwise from one end of the rectangular mesh, excluding the border. Position the large flower centers at 13, 33, and 53 cm, all approximately on the centerline.
- Position small flower centers at approximately 5, 21, 26, 40, 46, 61, 16, and 49 cm along the panel. Alternate them left and right, placing centers approximately 5–7 cm from the centerline. Adjust the last two to fill visible gaps without covering neighboring yellow centers.
- Arrange 6 leaves around each large flower and distribute the remaining 6 leaves among the small flowers. Point some leaves lengthwise and others toward the scalloped edge. Pin the complete arrangement before sewing.
Finishing
Sew the leaves first, anchoring their center veins and bases to several mesh intersections. Leave their tips slightly lifted. Attach each large flower through its back disk and the bases of four evenly spaced outer petals. Secure small flowers through their disks and two opposite petal bases. Catch the mesh intersections with each stitch so the appliqués do not hang from individual chain strands.
Using olive yarn, embroider a gently curving stem down the runner with loose chain stitches approximately 6 mm long. Work short branches toward the leaves and small flowers, passing behind the large blossoms. Secure the yarn every few stitches on the reverse without drawing the mesh together. Add the hanging buds and tassels, then weave in every remaining end.
Lay the finished runner flat and lightly dampen any areas disturbed during assembly. Reshape the lace and petals with your fingers and let everything dry fully. Display with LED candles; keep raised cotton flowers and fringe away from flames and hot dishes.
Tips for Success
- Count the 27 mesh spaces every few rows. A missed final turning-chain stitch makes the foundation taper.
- Block flower layers separately before stacking them. This keeps the cream petals visible beneath the pink layers.
- Pin the entire arrangement and lift the runner gently before sewing. Reposition any heavy cluster that makes the mesh sag.
- Keep leaf veins and embroidered stems loose enough that the foundation retains its blocked width.
- Use only a pinch of stuffing in each bud. Firm stuffing spreads the sculpting strands and makes the buds look round rather than closed.
Common Mistakes to Avoid
- Working border stitches into mesh holes instead of stitch positions creates too few stitches. Across each short edge, count 55 sc before beginning the shells.
- Including corner chains in the shell repeats shifts the scallops. Work each edge independently and place its corner group only in the ch-2 space.
- Sewing every petal edge flat removes the layered effect. Unpick those stitches and secure the disks and selected petal bases instead.
- Pulling embroidery tightly puckers the lace. Loosen the affected stitches before securing their ends.
- Attaching cords to one chain strand can distort the edge. Stitch each cord into two neighboring border stitches with several passes.
Ways to Customize This Pattern
- Reverse blush and dusty rose on alternate large flowers while retaining the cream back layers and yellow centers.
- For a longer runner, add rows in multiples of 3. Each 3 added rows provide approximately 2.5 cm of length and 6 additional border sc per long edge, accommodating one extra shell on each side. Add another flower cluster as space permits.
- For a wider runner, add foundation chains in multiples of 6. Each extra 6 chains adds 3 mesh openings and one short-edge shell; keep the final single sc after the shell repeats.
- For a dining table used daily, omit the hanging cords and tassels and sew the buds in small clusters beside the flowers.
Frequently asked questions
No. It includes the central cream runner, layered flowers, leaves, embroidered stems, hanging buds, and tassels. The other table accessories in the reference are separate pieces.
Assembly stitches or embroidered stems may be too tight. Lay the runner over its original blocked outline, loosen the pulling stitches, and resew with enough slack for the mesh to lie flat. Heavily overlapping motifs can also restrict the fabric.
Place the vase on a flat, stable section of the table. Raised flower layers create an uneven surface. If you want a central vase space, move the middle large flower toward one side and leave a clear area larger than the vase base.
Follow the cotton yarn’s care instructions and wash gently by hand. Support the wet runner with both hands, press out water in a towel, and dry flat with cords separated and tassels combed straight. Avoid wringing or hanging the wet lace.
The finished Blush Garden Floral Crochet Table Runner Pattern

