Blush Hearts Filet Crochet Table Runner Pattern
Advanced
For experienced crocheters who enjoy complex shaping, fine detail, and ambitious construction
Single-Day Project
A satisfying project you can complete in a single afternoon or evening.
Handmade Gift
A beautiful keepsake — free forever. Read online or print at home.
About This Blush Hearts Filet Crochet Table Runner Pattern
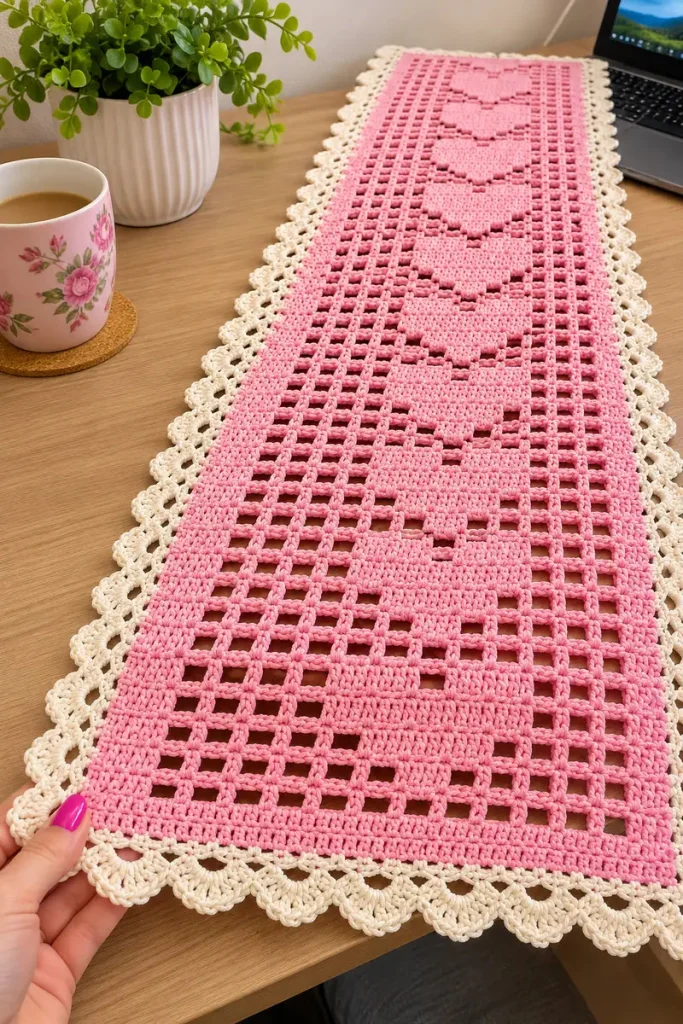
This heart filet crochet table runner pattern creates a long blush-pink panel with ten solid hearts framed by open mesh, narrow solid side bands, and a cream scalloped edge. The design follows the reference’s flat rectangular construction and soft two-color palette. Each heart is worked into the fabric, so there are no appliqués to sew down.
Allow approximately 25–35 hours for the crochet and finishing, plus drying time. This advanced project suits crocheters comfortable reading counted repeats, maintaining filet tension, and distributing an edging around a rectangle. The detailed instructions include a written heart chart, exact panel counts, and a border layout that accounts for all four corners.
Materials
- Blush-pink fine / sport weight mercerized cotton Approximately 1,200 m; about 400 g at 150 m per 50 g, including a swatching allowance
- Cream cotton in the same weight Approximately 300 m; about 100 g at 150 m per 50 g
- 2.5 mm crochet hook Adjust if needed to obtain blocked gauge
- Locking stitch markers At least eight, for panel bands and border corners
- Tapestry needle and scissors For securing color joins and ends
- Measuring tape, rustproof pins, and blocking mats Enough space to block the full runner flat
Abbreviations
chchainscsingle crochethdchalf double crochetdcdouble crochetsl stslip stitchst / stsstitch / stitchesOopen filet cell: ch 2, skip 2 stitch positions, dc in the next positionSsolid filet cell: dc in each of the next 3 stitch positionsGauge, Dimensions, and Filet Method
- Blocked gauge: 22 dc stitch positions and 11 dc rows measure 10 × 10 cm. One three-position filet cell is approximately 1.36 cm wide; one row is approximately 0.91 cm high. This produces rectangular mesh openings like those in the reference.
- Make a pink swatch: ch 35. Foundation row: sc in the second ch from the hook and in each remaining ch, giving 34 sc. Next row: ch 3, counting as the first dc, skip the first sc, then work S once, O nine times, and S once. There are 11 cells and 34 stitch positions.
- Repeat that dc row until the swatch contains 14 dc rows. Turn after every row. Wash and block without stretching the openings excessively. Measure a central section, excluding the solid bands. Change hook size and repeat if necessary.
- For every panel dc row, ch 3 and count it as the first dc; skip the first stitch before working the cells. The final dc of the row goes into the top of the previous row’s turning ch. Turn after completing each row.
- When an S cell crosses an open cell below, work 2 dc into its ch-2 space and 1 dc into its ending dc. When it crosses solid fabric, work into the next 3 dc. For an O cell above an open cell, ch 2 over the old ch-2 space and dc into its ending dc. For an O above solid fabric, ch 2, skip 2 dc, and dc into the next dc.
- The pink panel measures approximately 34.5 × 123 cm, including its foundation row. The cream edging adds approximately 2 cm on each side, giving a finished size near 39 × 127 cm. Border depth varies with tension.
Pink Panel: Foundation and End Band
- Foundation chain: with pink, ch 77. Keep this chain relaxed, or use a slightly larger hook for the chain only.
- Row 1: sc in the second ch from the hook and in every remaining ch. Turn. Count: 76 sc.
- Row 2: ch 3, skip the first sc, dc in each of the next 75 sc. Turn. Count: 76 dc including the turning ch.
- Row 3: ch 3, skip the first dc, dc in each of the next 75 dc. Turn. Count: 76 dc including the turning ch.
Written Heart Chart and Side Bands
- Every motif row begins with the counted ch-3 dc, followed by S twice. Next work the 21-cell chart line specified below, then finish with S twice. The two outer S cells on each side form the solid lengthwise bands. Total: 25 cells and 76 stitch positions.
- The 21-cell chart consists of four open cells, a 13-cell heart field, and four open cells. The chart lines below already include those four open cells on each side. Do not add extra mesh cells.
- Chart line A, heart tip: O ten times, S once, O ten times. Count: 21 cells.
- Chart line B: O nine times, S three times, O nine times. Count: 21 cells.
- Chart line C: O eight times, S five times, O eight times. Count: 21 cells.
- Chart line D: O seven times, S seven times, O seven times. Count: 21 cells.
- Chart line E: O six times, S nine times, O six times. Count: 21 cells.
- Chart line F: O five times, S eleven times, O five times. Count: 21 cells.
- Chart line G: O four times, S thirteen times, O four times. Count: 21 cells.
- Chart line H: O four times, S five times, O three times, S five times, O four times. Count: 21 cells. This opens the central notch between the upper lobes.
- Chart line I: O five times, S three times, O five times, S three times, O five times. Count: 21 cells. This rounds off the tops of the two lobes.
- Chart line J, spacer: O twenty-one times. Count: 21 cells.
- All chart lines are symmetrical. Read the same written line on both sides of the work; there is no need to reverse the sequence after turning.
First Heart: Rows 4–16
- Row 4: ch 3, S twice, chart line A, S twice. Turn. Count: 25 cells; 76 stitch positions.
- Row 5: ch 3, S twice, chart line B, S twice. Turn. Count: 25 cells; 76 stitch positions.
- Row 6: ch 3, S twice, chart line C, S twice. Turn. Count: 25 cells; 76 stitch positions.
- Row 7: ch 3, S twice, chart line D, S twice. Turn. Count: 25 cells; 76 stitch positions.
- Row 8: ch 3, S twice, chart line E, S twice. Turn. Count: 25 cells; 76 stitch positions.
- Row 9: ch 3, S twice, chart line F, S twice. Turn. Count: 25 cells; 76 stitch positions.
- Row 10: ch 3, S twice, chart line G, S twice. Turn. Count: 25 cells; 76 stitch positions.
- Row 11: repeat Row 10. Count: 25 cells; 76 stitch positions.
- Row 12: repeat Row 10. Count: 25 cells; 76 stitch positions.
- Row 13: ch 3, S twice, chart line H, S twice. Turn. Count: 25 cells; 76 stitch positions.
- Row 14: ch 3, S twice, chart line I, S twice. Turn. Count: 25 cells; 76 stitch positions.
- Row 15: ch 3, S twice, chart line J, S twice. Turn. Count: 25 cells; 76 stitch positions.
- Row 16: repeat Row 15. Count: 25 cells; 76 stitch positions.
Remaining Hearts and Final End Band
- Rows 17–29: repeat Rows 4–16 for heart 2. Every row has 25 cells and 76 stitch positions.
- Rows 30–42: repeat Rows 4–16 for heart 3. Every row has 25 cells and 76 stitch positions.
- Rows 43–55: repeat Rows 4–16 for heart 4. Every row has 25 cells and 76 stitch positions.
- Rows 56–68: repeat Rows 4–16 for heart 5. Every row has 25 cells and 76 stitch positions.
- Rows 69–81: repeat Rows 4–16 for heart 6. Every row has 25 cells and 76 stitch positions.
- Rows 82–94: repeat Rows 4–16 for heart 7. Every row has 25 cells and 76 stitch positions.
- Rows 95–107: repeat Rows 4–16 for heart 8. Every row has 25 cells and 76 stitch positions.
- Rows 108–120: repeat Rows 4–16 for heart 9. Every row has 25 cells and 76 stitch positions.
- Rows 121–133: repeat Rows 4–16 for heart 10. Every row has 25 cells and 76 stitch positions.
- Row 134: ch 3, skip the first dc, then work S twenty-five times across the entire width, filling every mesh cell. Turn. Count: 76 dc including the turning ch.
- Row 135: ch 3, skip the first dc, dc in each of the next 75 dc. Count: 76 dc including the turning ch. Fasten off pink.
- Check the completed panel: one sc foundation row, 134 dc rows, and ten hearts. Each heart occupies 11 rows and is followed by two open spacer rows. The heart tips point toward the foundation end.
Cream Border: Foundation Round
- Lay the pink panel flat with your preferred side facing up. Keep that side facing throughout the border; do not turn between rounds. A starting ch 1 never counts as a stitch.
- Round 1: join cream in the first stitch of Row 135 at a corner. Ch 1 and sc in that stitch, then sc in each of the remaining 75 stitches across the short end. Ch 2 for the corner. Short-side count: 76 sc.
- Continue Round 1 down the first long side: work 2 sc around each of the 134 dc row ends, then 2 sc around the side of the foundation sc row. Ch 2 for the corner. Long-side count: 270 sc.
- Continue across the foundation edge: work 1 sc into the underside of each of its 76 foundation stitches. Ch 2 for the corner. Short-side count: 76 sc.
- Work up the remaining long side: 2 sc around the side of the foundation sc row, then 2 sc around each of the 134 dc row ends. Ch 2 and sl st to the first sc. Long-side count: 270 sc. Round total: 692 sc and four ch-2 corner spaces. Mark every corner space.
Cream Border: Count Adjustment and Lace Arches
- Round 2: ch 1. Across the first 76-stitch short side, sc in each of the first 25 sts, work 2 sc in the next st, sc in each of the next 24 sts, work 2 sc in the next st, and sc in each of the final 25 sts. Count: 78 sc. Ch 2 over the corner space.
- Continue Round 2: sc in each of the 270 sts along the long side, then ch 2 over its corner space. Work the second short side exactly as the first, giving 78 sc, then ch 2. Sc in each of the final 270 sts, ch 2, and sl st to the first sc. Round total: 696 sc and four ch-2 corner spaces.
- Round 3 setup: fasten off, then rejoin cream with a sc in the corner space immediately before a short side. This is the first corner anchor. Each side’s stitch count excludes the corner spaces.
- Across the first short side: repeat the following 25 times: ch 3, skip 2 sc, sc in the next sc. This uses 75 of the 78 side stitches. Ch 3, skip the final 3 sc, and sc in the next corner space. Count: 26 arches.
- Across the first long side: repeat the following 89 times: ch 3, skip 2 sc, sc in the next sc. This uses 267 of the 270 side stitches. Ch 3, skip the final 3 sc, and sc in the next corner space. Count: 90 arches.
- Repeat the short-side instructions across the second short side, then the long-side instructions across the second long side. At the final corner, finish the last arch with a sl st into the starting corner sc instead of making another sc there. Round total: 232 ch-3 arches and 232 sc anchors.
Cream Border: Scalloped Shells
- Round 4: sl st into the first ch-3 arch and ch 1. Into that arch work sc, hdc, 3 dc, hdc, sc. This seven-stitch group is one shell.
- Work the same seven-stitch shell into every remaining ch-3 arch. Skip all anchor sc between arches. At corners, work one shell into each adjacent arch; do not add a separate corner shell.
- Sl st to the first sc and fasten off. Count: 232 shells, comprising 1,624 stitches, excluding the joining sl st. There are 26 shells along each short side and 90 along each long side.
Finishing
Weave pink ends through the dense end bands and cream ends through the foundation edging, reversing direction once so they stay secure. No sewing, stuffing, or attached motifs are needed. All hearts belong to the continuous filet panel, and all cream rounds are joined directly to its edge.
Soak the runner according to the cotton label, gently squeeze out the water, and roll it in a towel. Lay it flat and square the pink rectangle first. Pin the end bands straight, then ease the mesh into even columns. Spread the cream shells with your fingers and pin their centers lightly, keeping the four corners flat. Let the runner dry completely before removing the pins. Aim for approximately 39 × 127 cm, allowing your swatch and the fabric’s natural tension to guide the final measurements.
Tips for Success
- Place markers after the two starting solid cells and before the two ending solid cells. The heart chart always occupies the same 21 cells between them.
- Mark the central cell of the chart. The heart tip must land there, and the three-cell notch must sit directly above it.
- Check the first heart before repeating it nine more times. Its widest section spans 13 cells, with four open cells between the heart and each side band.
- Place a temporary marker every ten dc row ends before edging. Work two cream sc around each row-end post rather than splitting its strands.
- Keep the cream shells relaxed. Pulling the final sc of each shell tight can curl the outer edge even when the foundation round is correct.
Common Mistakes to Avoid
- Adding a dc after the turning chain shifts the entire chart. The ch 3 already counts as the first dc; skip the first stitch before beginning the first S cell.
- Putting three dc into a mesh space makes the following boundary dc an extra stitch. Fill an open cell with two dc in its space and one dc in its ending dc.
- Continuing solid cells across chart line H closes the heart notch. After the first five solid cells in the heart field, work three open cells before the second lobe.
- Including corner spaces in the border side counts changes the arch placement. Count only sc along each side: 78 on the short sides and 270 on the long sides after Round 2.
- Forcing a tight long edge flat during blocking can distort the mesh. If the cream foundation pulls the panel inward, undo that edging and remake it with looser sc or a slightly larger hook.
Ways to Customize This Pattern
- Make a shorter six-heart runner by working six complete 13-row motif repeats, then the two final solid rows. The panel has 83 rows total. Each long side receives 166 sc in border Round 1 and Round 2. In Round 3, work 54 standard arches, then ch 3, skip the final 4 sc, and sc in the corner, giving 55 arches per long side. Keep the short-side instructions unchanged.
- Reverse the palette with a cream filet panel and blush scallops. Use the main-color quantity for cream and the border quantity for blush.
- Use a slightly deeper rose for the panel while keeping the cream border to emphasize the solid hearts against a dark wooden table.
- For a restrained edge, finish after cream Round 2. The runner will be narrower and shorter by approximately 2 cm overall, depending on your border gauge.
Frequently asked questions
No. Each heart is formed by solid dc cells inside the open filet mesh. The pink panel is worked continuously from one short end to the other, so there are no appliqué edges or sewing lines.
The reference shows a repeated column of hearts with a consistent orientation. Each repeat starts with its tip and finishes with two lobes. Keep the same chart sequence for all ten hearts to preserve that arrangement.
Yes, but the runner will be smaller at the same stitch count. Swatch first and divide 76 by your stitch positions per centimeter to estimate the pink panel width. Divide 134 by your dc rows per centimeter to estimate its length, then allow for the foundation row and cream edging.
Most arches end in a side stitch after skipping two stitches. The final arch ends in the corner space instead, so it skips the final three side stitches. This uses every stitch and creates exactly 26 short-side arches and 90 long-side arches.
Follow the yarn label and test the pink cotton for color bleeding before making the runner. Wash gently, reshape the filet rectangle while damp, and lay it flat to dry. Smooth the cream shells individually so they keep their rounded outline.
The finished Blush Hearts Filet Crochet Table Runner Pattern

