Blush Rose and Daisy Crochet Wreath Pattern
Advanced
For experienced crocheters who enjoy complex shaping, fine detail, and ambitious construction
Single-Day Project
A satisfying project you can complete in a single afternoon or evening.
Handmade Gift
A beautiful keepsake — free forever. Read online or print at home.
About This Blush Rose and Daisy Crochet Wreath Pattern
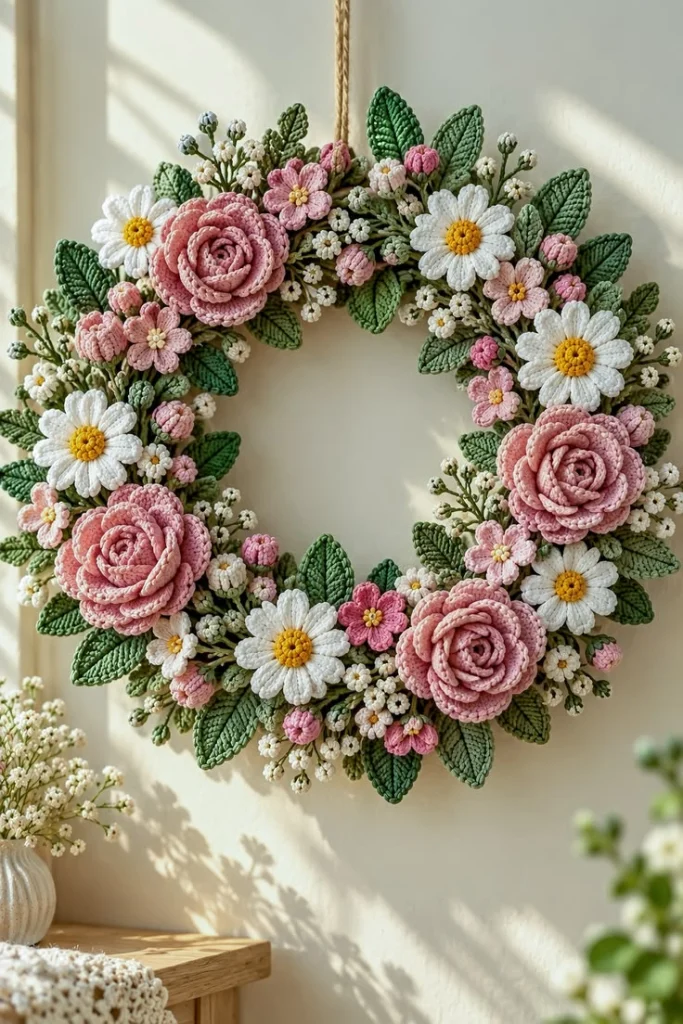
This crochet floral wreath pattern combines layered blush roses, white daisies with golden centers, small pink blossoms, and dense green foliage. Inspired by the reference photograph, it creates a full circular arrangement with an open center, softly overlapping flowers, and a natural hanging cord.
The flowers are made separately and sewn onto a covered wreath form, allowing you to adjust their placement before securing them. Allow about 30–40 hours for the complete wreath. This advanced project suits crocheters comfortable with small stitches, shaped petals, surface embroidery, and careful assembly across several layers.
Materials
- Sport-weight cotton, approximately 125 m per 50 g 150 g moss green; 50 g dark green; 50 g sage; 100 g blush pink; 50 g dusty pink; 25 g rose pink; 100 g ivory white; 25 g golden yellow
- Crochet hook 2.5 mm, or size needed for gauge
- Firm foam wreath form with a circular tube cross-section 30 cm outer diameter, 18 cm inner diameter, 6 cm tube diameter
- Polyester stuffing Small amounts for flower centers and buds
- Tapestry needle, fine embroidery needle, scissors, stitch markers, and rustproof pins For shaping and assembly
- Strong sewing thread matching the foliage For concealed attachment stitches
- Natural braided cord 70 cm of approximately 4 mm cord for hanging
- Optional fabric stiffener For leaf tips only; test on a spare swatch
Abbreviations
MRmagic ringchchainsl stslip stitchscsingle crochethdchalf double crochetdcdouble crochettrtreble crochetinc2 sc in the same stitchdecinvisible single crochet decrease over 2 stitchesBLOback loop onlyst / stsstitch / stitchesGauge, Dimensions, and Pattern Notes
- Use US crochet terminology. Gauge in flat sc is 22 sts and 24 rows per 10 cm after gentle blocking. Make a swatch at least 12 cm square and measure its center.
- The cover measures approximately 19.1 × 75 cm before seaming. Finished roses should measure approximately 8–9 cm across; daisies approximately 6–7 cm; leaves approximately 4–5 cm long. These component dimensions are estimates and depend on tension.
- Work spiral rounds unless joining is expressly stated. Mark the first stitch. Turning chains and joining slip stitches do not count as stitches. Numbers in parentheses give completed stitch counts.
- Make 4 roses, 6 daisies, 10 open pink flowers, 16 buds, 60 tiny ivory flowers, 32 large leaves, 16 small leaves, and 12 branching filler stems.
- This is a decorative wreath. No eyes or facial details are used. Stuff only the daisy centers and buds; keep roses and foliage unstuffed.
Wreath Cover
- With moss green, ch 43. Row 1: sc in the second ch from the hook and each remaining ch. (42)
- Rows 2–180: ch 1, turn, sc in every st. (42 each row)
- Fasten off with a long sewing tail. Bring Row 1 and Row 180 together and whipstitch their 42 corresponding stitches to form a broad band. This seam runs across the tube of the form.
- Place the band around the wreath form. Bring its two long edges together along the back of the ring. Match the 180 row ends on each edge and sew one corresponding pair at a time, enclosing the form. Ease the fabric evenly around the inner and outer curves.
- The cover should sit firmly without deep folds. If your measured length differs, add or remove complete 42-stitch rows before joining; record the final row count for your own form.
Layered Blush Roses — Make 4
- With dusty pink, ch 61. Row 1: sc in the second ch from the hook and every remaining ch. (60)
- Row 2: ch 1, turn, sc in every st. Change to blush pink in the final pull-through of the last sc. (60)
- Row 3: ch 1, turn. For each of the first 4 petals, work sl st in next st, sc in next st, 3 dc in next st, sc in next st, sl st in next st. Each petal uses 5 base sts and produces 7 sts. (20 base sts used; 28 sts made)
- Continue Row 3: for each of the next 4 petals, work sl st in next st, sc in next st, 5 dc in next st, sc in next st, sl st in next st. (20 more base sts used; 36 sts made)
- Finish Row 3: for each of the final 4 petals, work sl st in next st, sc in next st, 7 dc in next st, sc in next st, sl st in next st. All 60 base sts are now used. (44 sts in this group; 108 sts across Row 3)
- Fasten off, leaving approximately 100 cm for sewing. Starting at the end with the smallest petals, roll the first 2 petals tightly to form a center. Wrap the remaining petals around it, offsetting each new layer so the petal centers cover the gaps beneath.
- Keep the straight foundation edge level beneath the flower. Sew through the foundation edge after each half-turn, catching the previous layers. Spread the largest petals outward and secure the base with several crossing stitches. Leave an attachment tail.
Daisy Centers and Backs — Make 6 Sets
- Center, golden yellow, Round 1: 6 sc in MR. (6)
- Round 2: inc in every st. (12)
- Round 3: repeat sc in next st, inc, 6 times. (18)
- Round 4: repeat sc in next 2 sts, inc, 6 times. (24)
- Round 5: sc in every st. Sl st in the first st and fasten off. (24)
- Back, moss green: repeat Rounds 1–4 of the center, then sl st in the first st and fasten off with a long sewing tail. (24)
- Before adding petals, embroider 12 small golden French knots across each yellow dome. Keep their thread ends inside. Set the green back aside until the petals are complete.
Daisy Petals — 12 Per Daisy
- Hold the yellow center with its right side facing. Join ivory white with a sl st in the back loop of any Round 5 stitch. This joining stitch does not consume a stitch for the repeat below.
- Petal repeat: ch 9. Working back along the chain, sc in second ch from hook, hdc in next ch, dc in next 4 ch, hdc in next ch, sc in last ch. (8 sts along the chain)
- Anchor the petal with a sl st through the back loop of each of the next 2 center stitches. Work the first anchor into the stitch immediately following the original joining stitch.
- Repeat the petal and its two anchors 12 times total. The final anchor enters the original joining stitch, completing one circuit of all 24 center stitches. Fasten off. (12 petals)
- Place the green back behind the center. Sew its 24 edge stitches to the yellow center’s 24 edge stitches beneath the petal anchors. Add a small pinch of stuffing before closing the last quarter. Keep the center gently domed.
Open Pink Flowers — Make 10
- With golden yellow, Round 1: 5 sc in MR. Sl st in first sc. Fasten off. (5)
- Round 2: join blush pink in any sc for 6 flowers and rose pink for 4 flowers. In the same st work ch 2, 3 dc, ch 2, sl st. For each of the remaining 4 center sts, work sl st, ch 2, 3 dc, ch 2, sl st, all in that st. (5 petals; 15 dc total)
- Fasten off with a sewing tail. Shape the petals into a shallow cup. Add 3 golden French knots over the center, keeping the five petal bases visible.
Pink Buds and Green Calyxes — Make 16 Sets
- Make 10 buds in blush pink and 6 in rose pink. Bud Round 1: 6 sc in MR. (6)
- Round 2: inc in each st. (12)
- Rounds 3–4: sc in every st. (12 each round)
- Round 5: dec 6 times. (6) Stuff lightly before the opening becomes too small. Fasten off and draw the tail through the six front loops to close.
- With a separate matching strand, make 5 evenly spaced long stitches from the closed base to the MR top. Pull just enough to create shallow petal divisions. Secure at the base.
- Calyx Round 1, sage green: 5 sc in MR. Sl st in first sc. (5)
- Calyx Round 2: in each of the 5 sc, work sl st, ch 4, then sl st in second ch from hook, sc in next ch, hdc in last ch; sl st back into the same base sc. (5 pointed sepals)
- Fasten off with a long tail. Sew the calyx center to the closed base of a bud. Bring the five sepals upward against the pink sides and tack each near its lower half.
Large Veined Leaves — Make 32
- Make 14 dark green, 10 moss green, and 8 sage leaves. Ch 13. Work into one loop of each chain so the opposite loops remain available.
- Round 1, first side: sc in second ch from hook, hdc in next 2 ch, dc in next 3 ch, tr in next 2 ch, dc in next 2 ch, hdc in next ch. Work 3 sc in the final ch to turn the tip. (14 sts so far)
- Continue around the opposite side of the foundation: hdc in next ch, dc in next 2 ch, tr in next 2 ch, dc in next 3 ch, hdc in next 2 ch, sc in last ch. Do not join. (25 total)
- Round 2: sc in next 12 sts, 3 sc in next st, sc in next 12 sts. The increase sits in the middle stitch of the three-stitch tip. Sl st in first sc and fasten off with a long tail. (27)
- Embroider a stem-stitch vein along the foundation chain from base to tip. Add 4 diagonal straight-stitch veins on each side. Use a slightly lighter green on dark leaves and moss green on sage leaves.
- Pin into a shallow lengthwise fold and lightly steam without touching the iron to the yarn. Let dry completely before attaching.
Small Leaves — Make 16
- Make 8 moss green and 8 sage leaves. Ch 9.
- Round 1: sc in second ch from hook, hdc in next 2 ch, dc in next 3 ch, hdc in next ch, 3 sc in final ch. Continue along the opposite side: hdc in next ch, dc in next 3 ch, hdc in next 2 ch, sc in last ch. (17)
- Round 2: sc in next 8 sts, 3 sc in next st, sc in next 8 sts. Sl st in first sc and fasten off. (19)
- Embroider a central vein and 2 diagonal veins on each side. Leave a tail for attaching the base.
Tiny Ivory Blossoms — Make 60
- With ivory, make an MR. Work ch 2, dc, ch 2, sl st into the ring 5 times. (5 petals, with 1 dc in each petal)
- Pull the ring closed. Fasten off with a 20 cm attachment tail and secure the starting tail on the back.
- Add one tiny golden straight stitch across the center of 24 blossoms. Leave the remaining 36 centers ivory for the soft white filler effect in the reference.
Branching Filler Stems — Make 12
- With sage, ch 19. Sl st in second ch from hook and next 4 ch. (5 sl sts; 13 foundation chains remain)
- First side branch: ch 6, sl st in second ch from hook and next 4 ch. Return to the main stem by working sl st in each of its next 4 unused foundation chains. (5 branch sl sts; 9 main chains remain)
- Second side branch: ch 7, sl st in second ch from hook and next 5 ch. Sl st in the next 4 unused main foundation chains. (6 branch sl sts; 5 main chains remain)
- Third side branch: ch 5, sl st in second ch from hook and next 3 ch. Sl st in the final 5 unused main foundation chains. (4 branch sl sts; main stem complete)
- Fasten off with a long tail. Sew one tiny blossom to the main stem tip and one to each of the three side-branch tips. This uses 48 blossoms. Keep the remaining 12 for individual gap fillers.
Arrangement and Joining
- Lay the covered form flat and mark 12 o’clock. Tie the cord around the covered tube at this point, with the knot on the back. Tie the cord ends together to create a hanging loop with an approximately 25 cm drop. Secure the cord wrap to the cover with several sewing stitches.
- Pin the 32 large leaves first. Place 20 around the outer edge, with tips extending approximately 3–4 cm beyond the form. Place the other 12 toward the opening, keeping the visible opening approximately 14–16 cm wide. Alternate greens and directions.
- Sew the base and lower third of every leaf to the cover. Add one concealed stitch through its central vein where needed, leaving the pointed end free.
- Pin roses at approximately 10:30, 3:30, 5:00, and 7:30. Sew each foundation base to the cover at 6 evenly spaced points, catching several cover stitches at each point. Leave the outer petals free.
- Pin daisies at approximately 9:30, 1:30, 2:45, 4:30, 6:15, and 8:30. Shift each slightly inward or outward to prevent the flowers from forming a rigid single row. Sew through the green back at 4 points.
- Place the 10 open pink flowers between the larger flowers. Sew through their centers and add one concealed attachment under two opposite petals.
- Arrange the 16 buds in 8 pairs. Tuck one small leaf behind each pair, then distribute the remaining 8 small leaves through visible gaps. Sew buds through their calyx bases and attach leaves through their lower thirds.
- Distribute the 12 filler stems around the ring, allowing the white flowers to sit above the foliage. Couch each main stem to the cover at its base and at both branch junctions. Tack each blossom back to a nearby leaf or flower base so the branches stay supported.
- Add the remaining 12 individual ivory blossoms wherever the green cover remains conspicuous. Stitch through their centers, concealing the attachment beneath a petal.
Finishing
Hang the wreath briefly before securing the last tails. Check that the roses stay upright, the daisies face forward, and the open center remains rounded. Add concealed support stitches wherever a heavy flower tips away from the ring.
Weave each tail through several stitches on the back of its piece, reverse direction, and trim. Remove every pin. Lift and shape the rose petals with your fingers, spread the daisy petals, and turn a few leaves outward to give the arrangement depth. Keep the finished wreath indoors and dust it gently with a soft brush.
Tips for Success
- Complete one rose, one daisy, and one leaf before making the full batches. Check their scale together against the 30 cm form.
- Keep the rose foundation edges level as you roll. This creates a broad, sewable base and prevents a tall cone-shaped flower.
- Pin all major flowers before sewing any of them. The four rose positions establish the balance of the entire wreath.
- Use the embroidered leaf vein as an attachment line when a leaf needs extra support; stitches disappear along that ridge.
- Support filler stems against neighboring foliage. Their soft crocheted branches hold their arrangement through couching stitches.
Common Mistakes to Avoid
- A loose cover can rotate under the flowers. Check its fit before seaming and shorten the band by complete rows if needed.
- Rose petals can disappear when the strip is wound too tightly. Keep only the first two petals tight and loosen each outer wrap.
- Daisy petals bunch when both anchors enter one stitch. Advance across two separate center stitches for every petal.
- Overstuffed buds lose their petal divisions. Use a small pinch of filling and tighten the five dividing stitches gradually.
- Heavy flowers can sag when attached only at the center. Use the specified multiple attachment points around each flower base.
Ways to Customize This Pattern
- Use ivory for the rose petal row while keeping dusty pink foundations for pale roses with a shaded center.
- Work all open five-petal flowers in rose pink to create stronger pink accents among the blush roses.
- Embroider sage veins on every dark leaf for a more pronounced botanical texture.
- For a less projecting arrangement, sew the large leaves closer to the outer edge of the form and keep their tips within a 35 cm overall diameter.
Frequently asked questions
Yes. Measure around the tube and multiply that measurement in centimeters by 2.2 stitches per centimeter to estimate the cover width. Measure the ring at the center of its tube and multiply by 2.4 rows per centimeter for the cover length. Round to whole stitches and rows, then pin-fit before sewing. The written 42-stitch, 180-row cover is specifically for the stated form.
No wire is required. The leaves are supported by their attachment stitches, and each filler stem is couched to the wreath and neighboring foliage. Add another concealed tack if a branch falls forward.
The foundation edge has probably spiraled upward during rolling. Remove the securing stitches from the outer wraps, level the foundation edges, and spread the larger petals farther outward before sewing again.
Dusting and gentle spot cleaning are best because the foam core and densely layered flowers dry slowly. Test colorfastness on spare yarn first, and avoid soaking the completed wreath.
The finished Blush Rose and Daisy Crochet Wreath Pattern

