Blush Rose and Ivory Crochet Table Runner Pattern
Advanced
For experienced crocheters who enjoy complex shaping, fine detail, and ambitious construction
Single-Day Project
A satisfying project you can complete in a single afternoon or evening.
Handmade Gift
A beautiful keepsake — free forever. Read online or print at home.
About This Blush Rose and Ivory Crochet Table Runner Pattern
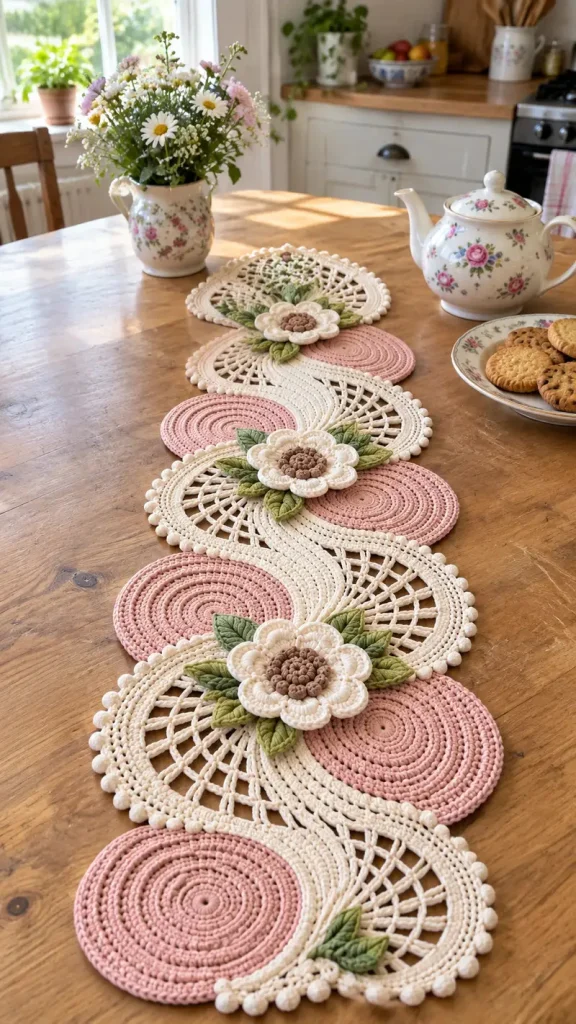
This crochet table runner pattern combines dusty blush circles, ivory lace fans, and layered cream flowers with textured taupe centers. Clusters of sage and olive leaves sit across the joins, while small ivory bobbles trace the open fans. The alternating motifs create the flowing, scalloped outline seen in the reference.
The runner is assembled from six separate circle-and-fan motifs, three large flowers, and eighteen shaped leaves. Allow approximately 30–40 hours for the crochet, careful joining, embroidery, and blocking. This advanced project suits crocheters comfortable with counted lace, working into remaining loops, dimensional flowers, and assembling motifs on a full-size layout.
Materials
- Sport-weight mercerized cotton, approximately 125 m per 50 g Ivory: 300 g; dusty blush: 200 g; sage: 50 g; olive: 50 g; taupe: 50 g. Quantities include a working allowance.
- Crochet hook 3.0 mm, or size needed for gauge
- Tapestry needle and fine embroidery needle For structural seams and leaf veins
- Locking stitch markers At least twelve
- Rustproof blocking pins, blocking mats, and tape measure A washable full-size paper layout is useful for assembly.
- Scissors and contrasting waste yarn For marking centers and attachment points
Abbreviations
chchainsl stslip stitchscsingle crochethdchalf double crochetdcdouble crochettrtreble crochetinc2 sc in the same stitchMRmagic ringBLOback loop onlyFLOfront loop onlyRSright sideWSwrong sidest / stsstitch / stitchesspchain spacebobbleWork 5 unfinished dc in one stitch, retaining the last loop of each; yarn over and pull through all 6 loops. Counts as 1 stitch.popcornWork 5 dc in one stitch, remove hook, insert through first dc, retrieve dropped loop, and pull through. Counts as 1 stitch.Gauge, Construction, and Counting
- Use US crochet terminology. Target blocked gauge: 20 sc and 22 rows = 10 cm in a flat sc swatch. Lace gauge is checked by the finished motif measurements rather than by a separate mesh swatch.
- The circle has a radius of approximately 5.75 cm. Its attached half-circle fan extends the radius to approximately 10.5 cm. Each motif measures approximately 16.25 cm across its widest horizontal line and 21 cm from the upper fan endpoint to the lower endpoint.
- Make six identical motifs. Rotate every second motif 180 degrees during assembly so the lace fans alternate sides. Join short sections of their outer fan borders to form a continuous runner.
- Work circles in joined rounds without turning. Beginning ch 1 never counts as a stitch. Join to the first actual stitch; do not crochet into the joining sl st.
- For fan rows, beginning ch 3 counts as the first dc. Beginning ch 1 does not count. Turn after every fan row unless instructed otherwise.
- For all other pieces, turning chains do not count unless expressly stated. Counts exclude joining slip stitches and non-counting chains. Keep the RS of every piece identifiable with a marker.
Dusty Blush Circles — Make 6
- Round 1: With blush, work 6 sc in MR; close ring and join. (6 sts)
- Round 2: Ch 1, inc in every stitch; join. (12 sts)
- Round 3: Ch 1, repeat (sc, inc) 6 times; join. (18 sts)
- Round 4: Ch 1, repeat (sc in next 2 sts, inc) 6 times; join. (24 sts)
- Round 5: Ch 1, repeat (sc, inc, sc in next 2 sts) 6 times; join. (30 sts)
- Round 6: Ch 1, repeat (sc in next 4 sts, inc) 6 times; join. (36 sts)
- Round 7: Ch 1, repeat (sc in next 2 sts, inc, sc in next 3 sts) 6 times; join. (42 sts)
- Round 8: Ch 1, working BLO, repeat (sc in next 6 sts, inc) 6 times; join. (48 sts)
- Round 9: Ch 1, repeat (sc in next 3 sts, inc, sc in next 4 sts) 6 times; join. (54 sts)
- Round 10: Ch 1, working BLO, repeat (sc in next 8 sts, inc) 6 times; join. (60 sts)
- Round 11: Ch 1, repeat (sc in next 4 sts, inc, sc in next 5 sts) 6 times; join. (66 sts)
- Round 12: Ch 1, repeat (sc in next 10 sts, inc) 6 times; join. (72 sts) Fasten off. The staggered increases keep the outline round; the BLO rounds leave two subtle raised rings.
- Number the final-round stitches 1–72 clockwise with RS facing. Mark stitches 1 and 37: the fan uses these endpoints and the 35 stitches between them, for 37 attachment stitches total.
Ivory Lace Fans — Make 1 on Each Circle
- Row 1, RS: Join ivory in circle stitch 1. Ch 3, repeat (ch 1, skip next circle stitch, dc in next circle stitch) 18 times, ending in marked stitch 37. Turn. (19 dc and 18 ch-1 spaces)
- Row 2: Ch 3, repeat (ch 1, dc in next dc) 18 times, working the final dc into the top of the previous beginning ch 3. Turn. (19 dc and 18 ch-1 spaces)
- Row 3: Ch 3, repeat (ch 2, dc in next dc) 18 times. Turn. (19 dc and 18 ch-2 spaces)
- Row 4: Ch 3, repeat (ch 2, dc in next dc) 18 times. Turn. (19 dc and 18 ch-2 spaces)
- Row 5: Ch 3, repeat (ch 3, dc in next dc) 18 times. Turn. (19 dc and 18 ch-3 spaces)
- Row 6: Ch 3, repeat (ch 3, dc in next dc) 18 times. Turn. (19 dc and 18 ch-3 spaces)
- Row 7: Ch 1, sc in first dc, repeat (3 sc in next ch-3 space, sc in next dc) 18 times. Turn. (73 sc)
- Row 8: Ch 1, sc in first stitch, repeat (sc in next 11 sts, inc) 6 times. Turn. (79 sc)
- Row 9: Ch 1, sc in first stitch, repeat (sc in next 12 sts, inc) 6 times. Turn. (85 sc)
- Row 10: Ch 1, sc in first stitch, repeat (sc in next 13 sts, inc) 6 times. Do not turn. (91 sc) Fasten off.
- With RS facing, label these last 91 stitches F1–F91 from one fan endpoint to the other. The physical direction is unimportant as long as each motif is labeled consistently before rotation.
- Block the fan into a smooth semicircle. Spread the chain spaces evenly, keeping the pink circle flat. The fan endpoints lie on a line through the circle center. Do not pull the fan into a pointed crescent.
Fan Endpoint Edges
- With RS facing, join ivory at the circle end of either straight fan edge. Work 2 sc around each of the six dc row ends, then 1 sc into each of the four sc row ends. (16 sc)
- Fasten off without adding a corner stitch into F1 or F91. Repeat on the second straight edge. Each motif now has two tidy radial edges of 16 sc each.
- Weave these tails into the dense cream border, leaving the mesh open. Reblock the endpoints if the new edging draws them inward.
Join the Six Motifs
- Place all motifs RS up on a blocking surface. Put motif 1 with its fan opening to the right. Place motif 2 above it, rotated 180 degrees so its fan opens left. Continue upward, alternating fan direction through motif 6.
- On each motif, call the outer-border endpoint nearest the top of the runner U and the opposite endpoint L. Each is either F1 or F91 depending on rotation. Count inward along the curved border from each endpoint and mark its first 13 stitches, including the endpoint itself.
- Bring motif 1’s U group against motif 2’s L group, with their border edges touching. Match endpoint stitch to endpoint stitch, then match the other 12 stitches in order away from the endpoints. Pin all 13 pairs. Adjust the motif positions so both circles remain flat.
- Using ivory and a tapestry needle, mattress stitch the 13 pairs through the outer-facing loops of the border stitches. Keep the seam flexible and edge-to-edge. Secure the seam at both ends without pulling it shorter.
- Join motif 2 U to motif 3 L, motif 3 U to motif 4 L, motif 4 U to motif 5 L, and motif 5 U to motif 6 L in exactly the same way. There are five seams, each joining 13 pairs of stitches.
- Lay the full runner flat. Its centerline may drift gently from side to side; preserve that movement. Approximately 110 × 31 cm is the intended blocked size, but the measured motifs and relaxed seam geometry determine the final dimensions.
Ivory Bobble Borders
- Work only along exposed curved fan borders. Leave all 13-stitch seam groups unworked. The first and last motifs each have 78 exposed border stitches; the four interior motifs each have 65.
- For each 78-stitch exposed arc: With RS facing, join ivory at its first stitch, ch 1, repeat (sc in next 2 sts, bobble in next stitch) 26 times. Fasten off. (78 sts, including 26 bobbles)
- For each 65-stitch exposed arc: With RS facing, join ivory at its first stitch, ch 1, sc in first stitch, repeat (sc in next 3 sts, bobble in next stitch) 16 times. Fasten off. (65 sts, including 16 bobbles)
- Push every bobble to the RS. The end motifs have slightly closer bobble spacing to frame the runner tips. Do not continue the bobbles across the pink circles or the straight fan edges.
Ivory Flower Foundations — Make 3
- Round 1: With ivory, work 6 sc in MR; join. (6 sts)
- Round 2: Ch 1, inc in every stitch; join. (12 sts)
- Round 3: Ch 1, repeat (sc, inc) 6 times; join. (18 sts)
- Round 4: Ch 1, repeat (sc in next 2 sts, inc) 6 times; join. (24 sts)
- Round 5: Ch 1, repeat (sc in next 3 sts, inc) 6 times; join. (30 sts)
- Round 6: Ch 1, working BLO, repeat (sc in next 4 sts, inc) 6 times; join. (36 sts) Keep the 30 unused front loops of Round 5 available for the inner petal layer.
- Round 7: Ch 1, repeat (sc in next 5 sts, inc) 6 times; join. (42 sts) Fasten off. This flat foundation remains unstuffed.
Outer Flower Petals — 7 per Flower
- With RS facing, join ivory in any foundation Round 7 stitch. Each petal occupies exactly 6 foundation stitches. Number these six positions locally as stitches 1–6.
- Petal Row 1: Ch 1, sc in stitch 1, hdc in stitch 2, 2 dc in stitch 3, 2 dc in stitch 4, hdc in stitch 5, sc in stitch 6. Turn. (8 sts)
- Petal Row 2: Ch 1, sc in first stitch, hdc in next, 2 dc in each of next 4 sts, hdc in next, sc in last. Turn. (12 sts)
- Petal Row 3: Ch 1, sc in each of the 12 sts. Fasten off. (12 sts) This narrow final row gives the petal a softly raised rim.
- Join ivory in the next unused foundation stitch and repeat Rows 1–3 six more times. All 42 foundation stitches are used once. Weave tails into the underside of the foundation rather than along the petal rims.
Inner Flower Petals — 6 per Flower
- Hold the flower RS facing. Join ivory in any unused front loop of foundation Round 5. Each inner petal occupies 5 consecutive loops.
- Petal Row 1: Ch 1, sc in first loop, hdc in next loop, 3 dc in next loop, hdc in next loop, sc in last loop. Turn. (7 sts)
- Petal Row 2: Ch 1, sc in first stitch, hdc in next, 2 dc in each of next 3 sts, hdc in next, sc in last. Turn. (10 sts)
- Petal Row 3: Ch 1, sc in each of the 10 sts. Fasten off. (10 sts)
- Repeat over the remaining loops to make 6 inner petals, using all 30 loops. Arrange these petals over the gaps between outer petals as far as their attachment positions allow; the unequal petal counts create a natural layered outline.
Taupe Textured Flower Centers — Make 3
- Round 1: With taupe, work 6 sc in MR; join. (6 sts)
- Round 2: Ch 1, work (popcorn, sc) in each stitch around; join to the first popcorn. (12 sts: 6 popcorns and 6 sc)
- Round 3: Ch 1, repeat (sc in next popcorn, 2 sc in next sc) 6 times; join. (18 sts)
- Round 4: Ch 1, repeat (popcorn in next stitch, sc in next stitch, 2 sc in next stitch) 6 times; join. (24 sts: 6 popcorns and 18 sc)
- Round 5: Ch 1, repeat (sc in next stitch, popcorn in next stitch) 12 times; join. (24 sts: 12 sc and 12 popcorns) Fasten off, leaving a 45 cm sewing tail.
- Push the popcorns to the RS. Center the piece over the ivory foundation and sew its final round down with small stitches. Catch the foundation only, leaving the petals free. Let the center dome slightly without adding stuffing. Expect a center approximately 4–4.5 cm across.
Shaped Leaves — Make 18
- Make 9 leaves in sage and 9 in olive. For each leaf, ch 11. Work around both sides of the chain, starting in the second chain from the hook.
- Round 1, first side: Sc in next 2 chains, hdc in next 2, dc in next 3, hdc in next, sc in next, 3 sc in final chain. Rotate to work into the unused loops on the other side of the foundation chain.
- Round 1, second side: Sc in next chain, hdc in next, dc in next 3, hdc in next 2, sc in next 2; join to first sc. (21 sts total: 9 on each side plus 3 at the tip)
- Round 2: Ch 1, sc in next 2 sts, hdc in next 2, dc in next 3, hdc in next, sc in next, inc in next stitch, (sc, ch 2, sl st in second chain from hook, sc) in next stitch, inc in next stitch, sc in next, hdc in next, dc in next 3, hdc in next 2, sc in next 2; join. (24 perimeter sts, plus one small chain point)
- Fasten off with a 35 cm sewing tail. The chain-start end is the leaf base; the chain point is the tip. Block to approximately 5 × 2.5 cm.
- Using olive on sage leaves and sage on olive leaves, embroider a central stem from base to tip with small backstitches. Add three short diagonal vein stitches on each side. Keep the embroidery loose enough to preserve the leaf’s shallow curve.
Place the Flowers and Leaves
- Place one flower over each of the seams between motifs 1–2, 3–4, and 5–6. Position the center over the dense joined border, leaving most of each blush circle visible.
- Arrange six leaves beneath each flower: three sage and three olive. Fan three toward each side of the seam, alternating colors. Tuck their bases beneath the flower foundation and point their tips across the neighboring solid borders.
- Sew each leaf base securely to the dense crochet beneath it. Add a second small attachment approximately halfway along the central vein. If a leaf extends over mesh, catch a dc post at an intersection rather than pulling on a single chain.
- Sew each flower foundation to both adjoining motifs with at least eight small attachment stitches distributed around its underside. Keep the petals free and avoid sewing through the bobbles.
- At the two joins without flowers, reinforce each end of the existing seam with three additional small stitches through the dense cream border. Keep these stitches on the WS.
Finishing
Weave every remaining tail through dense stitches in two directions. Check the underside for long floats, and remove all markers. The runner is an unstuffed decorative textile; its texture comes from the petals, popcorn centers, embroidered leaves, and bobble border.
Soak briefly according to the yarn label, press out water in a towel, and lay the runner flat. Pin the blush circles round, open the fan spaces evenly, and shape the alternating edges without stretching the seams. Lift the flower petals with your fingers and leave them unpinned so they retain their shape. Let the runner dry completely before moving it.
Tips for Success
- Keep the fan’s 19 dc columns aligned. Mark the center, tenth dc on each mesh row to help distribute the two halves evenly during blocking.
- Measure all six blush circles before attaching the fans. A diameter difference greater than about 5 mm will make the alternating outline uneven.
- Pin all five joins before sewing the first seam. This lets you adjust the overall flow while every motif is still movable.
- Make the taupe popcorns with a slightly relaxed final pull-through. Tight closures make the centers stiff and difficult to sew down.
- Attach flowers through their foundations. Sewing through petal tips flattens the layered effect and can pull the runner out of shape.
Common Mistakes to Avoid
- Counting only 36 circle stitches for the fan: the attachment spans half the circle but includes both endpoints, so it uses 37 stitches and produces 18 spaces.
- Adding dc into the chain spaces on later mesh rows: work each dc into the next dc column. The chain lengths change, but the number of columns stays at 19.
- Forgetting that a popcorn counts as one stitch: Round 3 of the center uses each popcorn top once, keeping the increase to 18 stitches.
- Edging over the joining groups: reserve all 13 stitches at each joined endpoint. Bobbles inside those seams create hard lumps and prevent an even join.
- Pulling the leaf veins tight: loosen or replace the embroidery if the leaf folds sharply along its center. A shallow cup is enough.
Ways to Customize This Pattern
- Use muted rose for alternate circles and pale blush for the others, keeping all fans ivory for a coordinated two-tone rhythm.
- Make four motifs for a shorter runner, with flowers at joins 1–2 and 3–4. Keep the same 13-stitch joining groups and make twelve leaves.
- Make eight motifs for a longer table, adding a fourth flower at join 7–8 and six more leaves. Block the complete layout before estimating its final length.
- For a lower profile, omit the inner petal layer and leave its foundation loops unused. Keep the outer petals and textured center unchanged.
- Replace the contrasting leaf embroidery with matching yarn for a softer botanical detail while retaining the shaped leaf outlines.
Frequently asked questions
A semicircular attachment has 36 stitch-to-stitch intervals. Including the starting and ending stitches gives 37 attachment points. Alternating a skipped stitch with a dc creates exactly 18 mesh spaces.
Place objects on the flat blush circles or on a separate stable mat. The raised flowers and bobbles create an uneven surface. This cotton runner is decorative and is not a substitute for a heat-resistant trivet.
First check that each mesh row has 19 dc columns and 18 spaces. If the counts are correct but the fan still ruffles, remake the fan with a hook 0.25 mm smaller while keeping the circle unchanged. Verify one blocked motif before repeating the adjustment.
Follow the yarn label, using gentle hand washing when permitted. Support the full runner when lifting it wet, press it in a towel, and dry it flat. Reshape the petals and popcorn centers with your fingers; do not iron them flat.
The finished Blush Rose and Ivory Crochet Table Runner Pattern

