Advanced
For experienced crocheters who enjoy complex shaping, fine detail, and ambitious construction
Weekend Project
A satisfying weekend make — start Friday, finish Sunday, enjoy forever.
Handmade Gift
A beautiful keepsake — free forever. Read online or print at home.
About This Blush Rose Granny Square Bedspread
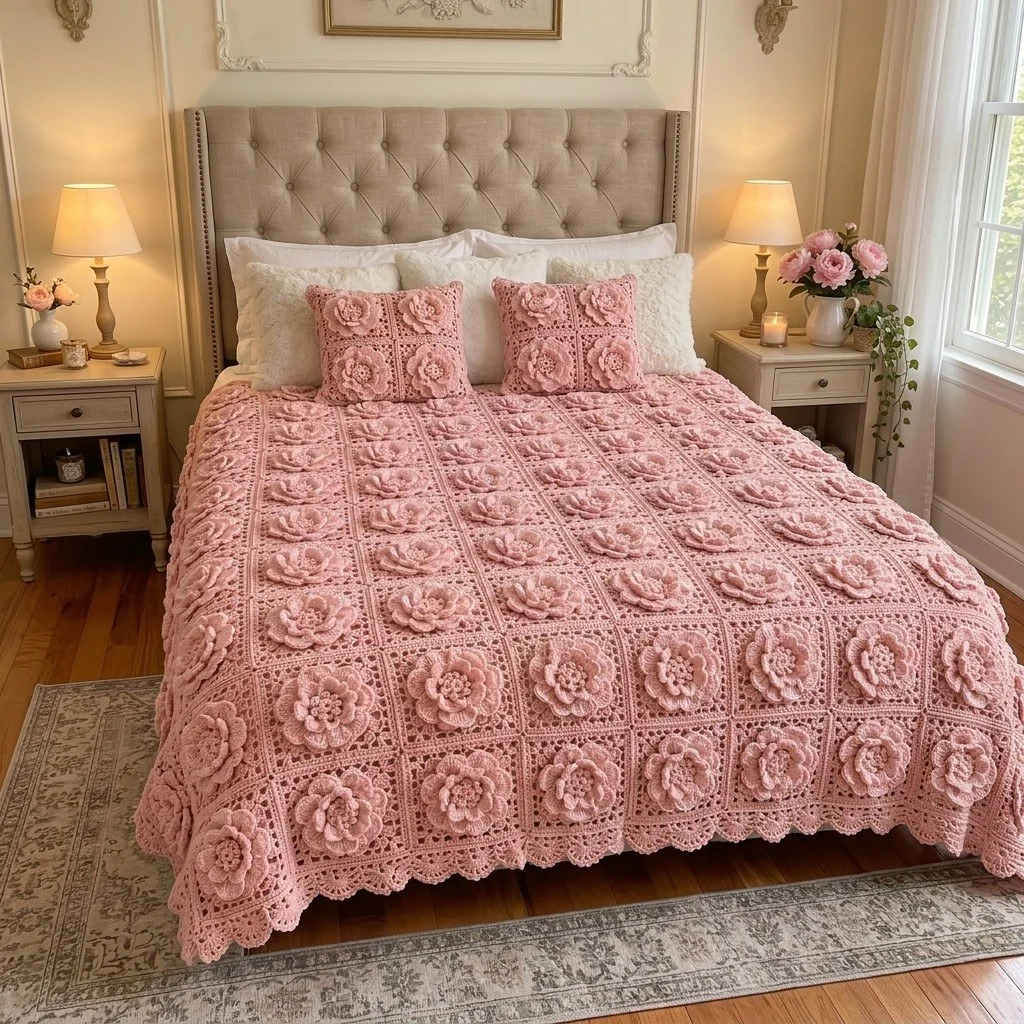
This crochet rose granny square bedspread pattern turns one shade of blush pink yarn into 108 squares, each with a four-layer rose standing up off a lacy openwork frame. The roses are not appliquéd on afterwards. They grow out of the centre of the square, layer by layer, with each new ring of petals worked behind the one before it around the posts of hidden stitches. That construction is what gives the finished blanket its deep, soft texture and why the surface still looks dimensional from across the room.
It is a long project, not a hard one in any single moment. Expect roughly 60 to 80 hours in total, most of it spent on the squares themselves — about 30 to 40 minutes each once you have the rhythm. The openwork frame round and the scalloped border are the only parts that need real concentration, and the stitch counts are written out for every round so you can check yourself as you go. Work a handful of squares, block them, then settle in: this is a project that travels well and rewards being picked up in short sessions.
It suits a confident crocheter who already knows how to work in the round and is comfortable with post stitches and chain-space corners. The payoff is a bedspread that reads as heirloom rather than homemade: all one tonal blush, squared off cleanly, with a 198-scallop edge that drapes over the sides of the bed. Make fewer squares for a sofa throw, more for a king bed — the maths scales in 15 cm steps.
Materials
- DK weight cotton or cotton-blend yarn in blush pink approx. 3,400–3,800 g (34–38 x 100 g balls, roughly 8,500–9,500 m)
- 4.0 mm crochet hook or the size that gives you gauge
- Tapestry needle blunt tip, large eye, for joining and weaving
- Stitch markers at least 8, to mark corner spaces
- Blocking mats and rustproof pins enough for 4–6 squares at a time
- Spray bottle with water for wet blocking the squares
- Tape measure to check square size every few motifs
- Small sharp scissors
Abbreviations
MRmagic ringchchainsl stslip stitchscsingle crochethdchalf double crochetdcdouble crochetBPscback post single crochetBLOback loop onlyst(s)stitch(es)sp(s)space(s)rndroundreprepeatskskipGauge and Layout
- Gauge: one finished square measures 15 cm x 15 cm after blocking, worked in DK yarn on a 4.0 mm hook.
- Check gauge on your first square. If it comes out larger than 15 cm, drop to a 3.75 mm hook; if smaller, go up to a 4.5 mm hook.
- Layout for the bedspread shown: 9 squares across x 12 squares down = 108 squares, giving a joined panel of approx. 135 cm x 180 cm.
- The border adds approx. 5 cm on every side, for a finished size of approx. 145 cm x 190 cm (fits a double bed with a short drop, or a queen as a topper).
- For a sofa throw, work 6 x 8 = 48 squares (approx. 100 cm x 130 cm before border). For a king bed, work 11 x 13 = 143 squares.
- Every square is worked in one colour, blush pink, with no colour changes. Make all 108 squares before joining.
Rose Centre (make 108)
- Rnd 1: 6 sc in MR, sl st to first sc, pull ring closed. (6 sc)
- Rnd 2: ch 1, 2 sc in each st around, sl st to first sc. (12 sc)
- Rnd 3: ch 1, *sc in next st, ch 3, sk next st*, rep from * 6 times total, sl st to first sc. (6 sc, 6 ch-3 loops)
- Rnd 4 (petal layer 1): in each ch-3 loop work (sc, 3 dc, sc), sl st to first sc. (6 petals of 5 sts each)
- Rnd 5: fold the petals forward towards you. Working behind them, *ch 4, BPsc around the post of the next sc from Rnd 3*, rep from * 6 times total, sl st to the base of the first ch-4. (6 ch-4 loops)
- Rnd 6 (petal layer 2): in each ch-4 loop work (sc, 5 dc, sc), sl st to first sc. (6 petals of 7 sts each)
- Rnd 7: working behind the Rnd 6 petals, *ch 5, BPsc around the post of the next BPsc from Rnd 5*, rep from * 6 times total, sl st to the base of the first ch-5. (6 ch-5 loops)
- Rnd 8 (petal layer 3): in each ch-5 loop work (sc, 7 dc, sc), sl st to first sc. (6 petals of 9 sts each)
- Rnd 9: working behind the Rnd 8 petals, *ch 6, BPsc around the post of the next BPsc from Rnd 7*, rep from * 6 times total, sl st to the base of the first ch-6. (6 ch-6 loops)
- Rnd 10 (petal layer 4, outermost): in each ch-6 loop work (sc, 9 dc, sc), sl st to first sc. (6 petals of 11 sts each)
- Rnd 11: working behind the Rnd 10 petals, *ch 7, BPsc around the post of the next BPsc from Rnd 9*, rep from * 6 times total, sl st to the base of the first ch-7. (6 ch-7 loops) Do not fasten off.
Squaring the Motif
- Rnd 12: ch 1, work 8 sc in each of the 6 ch-7 loops, sl st to first sc. (48 sc) Place a marker in the first sc — this is st 1.
- Rnd 13 (establish corners): ch 3 (counts as first dc), dc in same st, ch 2, 2 dc in same st (first corner made in st 1), *dc in each of next 11 sts, (2 dc, ch 2, 2 dc) in next st*, rep from * twice more, dc in each of last 11 sts, sl st to top of ch-3. Corners fall in sts 1, 13, 25 and 37. (60 dc, 4 ch-2 corner sps; 15 dc along each side between corner sps)
- Rnd 14 (solid round): sl st into next dc and into corner ch-2 sp, ch 3, dc in same sp, ch 2, 2 dc in same sp, *dc in each dc to next corner sp, (2 dc, ch 2, 2 dc) in corner sp*, rep from * twice more, dc in each dc to end, sl st to top of ch-3. (76 dc, 4 ch-2 corner sps; 19 dc per side)
- Rnd 15 (openwork round): sl st into corner ch-2 sp, ch 3, dc in same sp, ch 2, 2 dc in same sp, *(ch 1, sk 1 dc, dc in next dc) 9 times, dc in last dc of side, (2 dc, ch 2, 2 dc) in corner sp*, rep from * twice more, (ch 1, sk 1 dc, dc in next dc) 9 times, dc in last dc, sl st to top of ch-3. (56 dc, 36 ch-1 sps, 4 ch-2 corner sps; each side reads 14 dc and 9 ch-1 sps)
- Rnd 16 (final round): sl st into corner ch-2 sp, ch 3, dc in same sp, ch 2, 2 dc in same sp, *working along the side, dc in each dc and 1 dc in each ch-1 sp (23 dc), (2 dc, ch 2, 2 dc) in corner sp*, rep from * twice more, dc in each dc and ch-1 sp along last side, sl st to top of ch-3. (108 dc, 4 ch-2 corner sps; 27 dc per side)
- Fasten off, leaving a 15 cm tail. Weave in all ends on the wrong side now — do not leave 108 squares’ worth of ends for the end of the project.
Blocking the Squares
- Mist each square lightly with water on the wrong side. Do not soak — heavy water will crush the petals.
- Pin the square face up on the blocking mat at all four ch-2 corner sps, stretching gently to a true 15 cm x 15 cm. Check both diagonals measure the same.
- Pin the outer edge of each side at two or three points so the dc round lies straight rather than bowing.
- With your fingers, lift and separate the four petal layers so each ring sits slightly above the one beneath it. Leave the petals unpinned.
- Leave to dry fully, 6 to 12 hours. Block in batches of 4 to 6 while you crochet the next squares.
- Stack the dry squares in piles of 12 — one pile per row of the finished layout — so joining stays organised.
Joining the Squares
- Lay out all 108 squares, 9 across and 12 down, with all petal fronts facing up and all starting corners pointing the same way.
- Join in vertical columns first. Hold two squares with wrong sides together and the right sides facing out, matching the 27 dc of one side to the 27 dc of the next.
- Thread a long strand onto the tapestry needle. Whip stitch through the back loops only of both squares, one stitch per dc pair: 27 whip stitches per seam, plus one stitch through each ch-2 corner sp at the start and end. (29 stitches per seam)
- Keep the tension even and loose enough that the seam flexes — a tight seam will pucker and the blanket will not drape over the bed edge.
- Continue down the column until 12 squares are joined, then fasten off and weave in. Repeat for all 9 columns.
- Now join the 9 columns to one another the same way, working along the full 12-square length. At every four-square intersection, pass the needle through the corner spaces of all four squares once to close the small hole.
- Weave in all seam ends. Press the seams flat with your palm; do not iron.
Scalloped Border
- Rnd 1 (set-up): join yarn with a sl st in any outer corner ch-2 sp. Ch 1, work 4 sc in that corner sp, then *sc in each of the 27 dc along each square side and 1 sc in each seam line (251 sc along a short edge of 9 squares, 335 sc along a long edge of 12 squares), 4 sc in next outer corner sp*, rep from * around, sl st to first sc. (1,188 sc)
- Count carefully here. The total must be a multiple of 6 for the scallops to line up — add or skip a single sc at a seam line if your count is off.
- Rnd 2 (scallops): ch 1, sc in first st, *sk 2 sts, 7 dc in next st, sk 2 sts, sl st in next st*, rep from * around, ending with the last sl st in the first sc. (198 scallops of 7 dc each)
- Rnd 3 (picot edge): sl st in each of the first 3 dc of the scallop, (sl st, ch 3, sl st) in the 4th dc of the scallop, sl st in each of the last 3 dc, sl st in the sl st between scallops. Rep around all 198 scallops, sl st to join. (198 picots)
- Fasten off and weave in the ends along the back of the border so they do not show through the openwork.
Finishing
Lay the finished bedspread flat on a clean sheet, right side up, and mist the border and the seams only. Pin the outer edge so each scallop sits in a smooth half-circle rather than a point, and pin the four corners square. The squares are already blocked, so you are only settling the joins and the edging. Leave it to dry fully before moving it — a wet bedspread of this weight will stretch out of shape if you pick it up.
Once it is dry, go over the surface with your fingers one square at a time and lift any petal layers that got flattened during joining. The outer petals of Rnd 10 should sit lowest and widest, with the three inner layers stepping up towards the centre bud. Spread the bedspread on the bed with the long edge running head to foot and an even drop on both sides. Check the back for any missed ends before it goes into use, since they are much harder to find once the blanket is in place.
Tips for Success
- When you work a BPsc behind the petals on Rnds 5, 7, 9 and 11, fold the previous petal layer firmly towards you with your left thumb. If you let it flop back, you will catch petal stitches in the post stitch and the layer will lie flat instead of standing up.
- Mark st 1 of Rnd 12 with a stitch marker before you start Rnd 13. The 48 sc look identical, and if your four corners do not land on sts 1, 13, 25 and 37 the square will come out as a rhombus.
- Make your squares in batches of nine and measure every batch. Tension drifts over a project this long, and a 1 cm difference between early and late squares will show as a wobble in the joined rows.
- Use a split-ring marker in the ch-2 corner space you are heading towards on Rnds 14, 15 and 16 — the openwork round in particular is easy to lose your place in when the petals block your view of the edge.
- Weave in each square’s ends the moment you fasten off. Leaving them is the single fastest way to stall this project at the 80-square mark.
Common Mistakes to Avoid
- Working the petal layers too tightly. If Rnds 6, 8 and 10 feel stiff, the dc groups will cup the petals into tubes. Keep the chain loops of Rnds 5, 7, 9 relaxed and let the petals curve softly instead.
- Skipping the wrong stitch on Rnd 15. Each side must end with a plain dc in the last dc after nine (ch 1, sk 1, dc) repeats. If you end on a ch-1, the corner will sit crooked — count 19 dc consumed per side before the corner.
- Whip stitching through both loops when joining. Through both loops the seam becomes a hard ridge that stops the bedspread draping. Back loops only gives a flat, flexible seam that disappears between squares.
- Blocking the squares face down. The weight presses the roses flat and they do not fully recover. Always pin face up and leave the petals free.
- Starting the border before counting. If Rnd 1 of the border is not a multiple of 6, you will discover it three-quarters of the way around Rnd 2 with a half-scallop left over. Count the set-up round twice.
Ways to Customize This Pattern
- Work the rose in a half-shade deeper blush than the square frame for a subtle tonal version — change colour at Rnd 12, where the petals are already finished and the join is hidden behind the outer petal layer.
- Drop petal layer 4 (Rnds 9 and 10) and go straight from Rnd 8 to a ch-7 loop round. The roses become smaller and flatter, the square still finishes at 15 cm, and you save roughly 20% of the yarn and time.
- Alternate rose squares with plain squares in a checkerboard: work Rnds 1, 2 and 12 to 16 only on the plain ones, filling the centre with a 48-sc flat circle. This halves the texture and makes the blanket lighter for warmer months.
- Swap the picot edge of border Rnd 3 for a row of (sl st, ch 3, sl st) worked only in the centre dc of every second scallop, for a flatter, more tailored hem on a bed with a footboard.
- Make the matching square motif into a 3 x 3 panel, 45 cm across, and use it as a cushion front with a plain dc back.
Frequently asked questions
Roughly double. A plain 15 cm DK granny square uses around 15 g; one of these rose squares uses closer to 30–33 g because the four petal layers are stacked on top of each other rather than side by side. For 108 squares plus the 198-scallop border, budget 3,400–3,800 g. Weigh your first finished square and multiply — that is the only number worth trusting.
They flatten while wet and come back as they dry, as long as you dry the bedspread flat and face up. Wash cold on a gentle cycle in a large machine or in the bath, press out the water without wringing, and lay it on towels with the petals facing the ceiling. Never tumble dry it and never hang it wet — the weight will pull the squares out of shape at the seams.
Yes, but you need to adapt Rnd 16, which has no chain spaces along the sides. Replace the plain dc round with (dc, ch 1, sk nothing) spacing, then join into the neighbouring square’s ch-1 spaces every second stitch. The simpler route is to keep Rnd 16 as written and whip stitch through back loops — with 108 squares, the flat seam and the ability to lay everything out before committing are worth the extra evening.
Up to about 3 mm difference, yes — blocking will even them out. Beyond that, sort the squares into two piles by size and place the slightly larger ones along the outer edges and the drop at the sides of the bed, where a small difference is hidden by the fall of the fabric. Keep the most consistent squares for the centre panel, which is the part people actually look at.
About 30–40 minutes once the petal layers become automatic, so three squares an evening is a realistic pace and 108 squares lands at roughly five to six weeks of regular evenings. Joining and the border add another 8–10 hours. Blocking in batches of six while you crochet the next batch keeps the project moving instead of leaving one huge blocking session at the end.
The finished Blush Rose Granny Square Bedspread

