Blush Rose Square Doily Crochet Pattern
Beginner Friendly
Perfect for those just starting their crochet journey, with clear instructions and simple techniques
Single-Day Project
A satisfying project you can complete in a single afternoon or evening.
Handmade Gift
A beautiful keepsake — free forever. Read online or print at home.
About This Blush Rose Square Doily Crochet Pattern
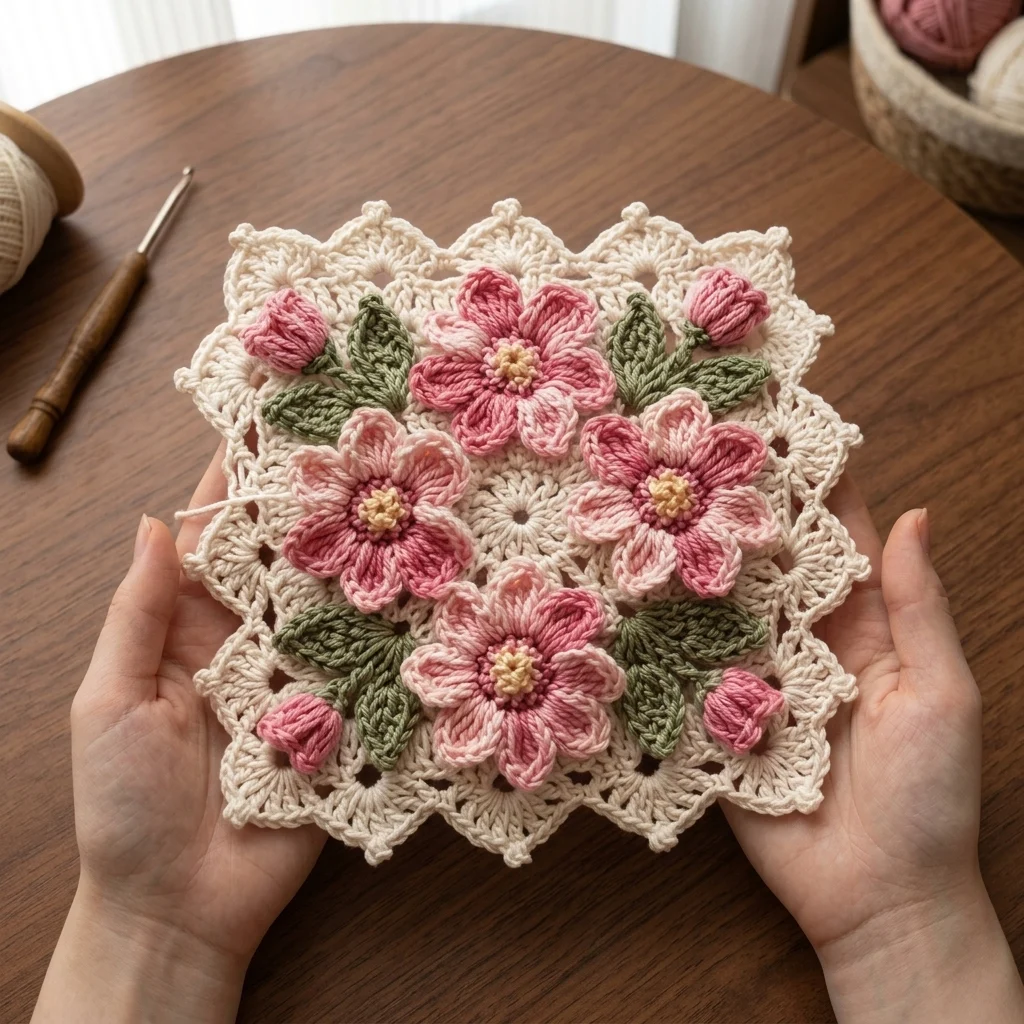
This crochet flower square doily pattern builds a cream lace square base, worked from the center outward in a classic granny-style construction, then tops it with 4 layered blush pink flowers, each with a soft cream-to-pink gradient and a golden textured center. Sage green leaf sprays and small rosebud accents fill the corners and gaps between blooms, and a delicate scalloped picot border frames the whole piece.
What makes this design distinctive is the flower construction: each bloom uses two petal colors, a paler pink round layered behind a deeper rose round, worked as individually shaped petals rather than flat lace loops, so every flower has real curve and dimension. Filling the square’s negative space with leaf sprays and rosebuds, rather than leaving the lace base plain, is what gives this doily its full, garden-like density despite its compact size. Expect to spend 10-14 hours total across the base, 4 flowers, and all the leaf and bud accents.
This is an advanced pattern, best suited to someone comfortable working a granny-style square base alongside individually shaped, layered flower petals, rather than someone wanting a single flat technique throughout.
Materials
- DK weight cotton yarn, cream ~50g, base and border
- DK weight yarn, pale pink ~20g, outer flower petals
- DK weight yarn, deep rose pink ~15g, inner flower petals
- DK weight yarn, golden yellow ~5g, flower centers
- DK weight yarn, sage green ~20g, leaves
- DK weight yarn, dusty rose ~10g, rosebud accents
- Crochet hook 3.25 mm (US D/3)
- Tapestry/yarn needle
- Steam iron and pressing cloth, or blocking mat and pins
- Sharp scissors
Abbreviations
chchainsl stslip stitchscsingle crochethdchalf double crochetdcdouble crochetMRmagic ringch-spchain spacepicotch 2, sl st in first ch of the 2st(s)stitch(es)reprepeatFOfasten offSquare Lace Base
- With cream, ch 4, sl st in first ch to form a ring. Round 1: ch 3 (counts as first dc), 2 dc in ring, ch 2, *3 dc in ring, ch 2; rep from * 2 more times (4 corner groups total). Sl st to join at top of ch-3.
- Round 2: sl st into next ch-2 corner sp, ch 3, (2 dc, ch 2, 3 dc) in same sp, *ch 1, (3 dc, ch 2, 3 dc) in next corner sp; rep from * around. Sl st to join.
- Round 3: repeat Round 2’s structure, adding 1 more ch-1 space between corner groups on each side to widen the square. Sl st to join.
- Round 4: repeat once more, widening each side by 1 more ch-1 space, to reach the finished square size shown in the photo. Sl st to join, FO leaving a long tail.
Scalloped Picot Border
- With cream, join at any corner. Round 5: *sc in next st, ch 3, picot, ch 1, sl st in same st; rep from * evenly around the entire square, working extra picot-scallop repeats at each of the 4 corners to keep them pointed rather than rounded.
- Join with sl st to first st and FO. Weave in all ends.
Flower Motif (make 4)
- With golden yellow, 8 sc in MR, work a second round in a raised texture: sc around in BLO for a slightly domed center. Sl st to join, FO leaving a short tail.
- With deep rose pink, join in any st of the center. Round 1 (inner petals): work each of 6 petals individually: ch 2, (sc, hdc, 2 dc, hdc, sc) in 2nd ch from hook, sl st into the next base st. Repeat 6 times evenly around.
- With pale pink, join behind Round 1, in the base sts between inner petals. Round 2 (outer petals): work each of 6 petals individually, slightly longer: ch 3, (sc, hdc, 2 dc, hdc, sc) in 2nd ch from hook, sl st into the next base st. Repeat 6 times evenly around.
- FO leaving a long tail for attaching. Fold outer petals slightly back so the two color rounds separate visually. Repeat for 4 flowers total.
Leaf Sprays (make approximately 8, in sage green)
- Ch 8. Starting in 2nd ch from hook: sl st, sc 1, hdc 2, dc 1, 3 dc in last ch.
- Continue down the other side: dc 1, hdc 2, sc 1, sl st in last ch.
- FO leaving a short tail for attaching. Repeat for approximately 8 leaves total, 2 per flower.
Rosebud Accents (make approximately 4, in dusty rose)
- Ch 2. Round 1: 5 sc in 2nd ch from hook, do not join, work in a continuous spiral.
- Round 2: sl st into the first sc, then work a small spiral fold: ch 2, sl st into the same st, to build a tight, closed bud shape rather than open petals.
- FO leaving a short tail for attaching. Repeat for approximately 4 total, 1 tucked near each flower.
Assembly
- Position the 4 flowers evenly across the blocked square base, roughly in a loose diamond arrangement matching the photo, and pin.
- Sew each flower down firmly through its center into the base below.
- Tuck 2 leaves behind each flower, angling them outward toward the nearest corner, and tack down at their base.
- Tuck a rosebud accent near each flower, in the gap toward the nearest edge of the square, and tack down.
Finishing
Once every flower, leaf, and bud is attached, turn the piece over and check for any element held by only a single stitch; add a second point wherever something feels loose. Weave in all remaining tails. Steam-block gently, keeping the flower petal layers slightly domed rather than pressed flat, and pin the picot border points open evenly at each corner. Let it dry completely flat before using as a doily or trivet.
Tips for Success
- Block the plain square base and border before attaching any flowers, so the base sits flat and square underneath everything else.
- Work each flower’s petals individually as instructed rather than in one continuous round, since this is what gives the petals their gentle curve and dimension.
- Fold outer petal rounds back deliberately after attaching each flower, for real separation between the two petal colors.
- Keep the 4 flowers positioned in a balanced diamond rather than clustering them to one side, checking the overall layout from a distance before sewing anything down.
- Work the corner picot repeats in the border round carefully; skipping the extra repeats there rounds off what should be a pointed corner.
Common Mistakes to Avoid
- Working flower petals in one continuous round instead of individually loses the curved, dimensional shape. Fix: work each petal as its own small piece anchored with a sl st, as instructed.
- Attaching flowers before blocking the base causes it to distort once steamed later. Fix: block the plain square and border first, then applique the flowers.
- Placing all 4 flowers too close to the center leaves the corners looking bare. Fix: spread flowers into a genuine diamond pattern reaching toward all 4 sides.
- Skipping extra picot repeats at the square’s corners rounds them off instead of keeping them pointed. Fix: add the extra scallop repeats at each corner as instructed.
- Sewing flowers down around their outer petals instead of through the center flattens their dimension. Fix: stitch through the center only so petals stay raised.
Ways to Customize This Pattern
- Scale the base up with a heavier yarn and larger hook for a small table topper instead of a doily-sized piece.
- Swap the blush pink flowers for a warm yellow or cream for a different seasonal palette.
- Reduce to 1 large centered flower instead of 4 smaller ones for a simpler, faster version.
- Add a small ribbon loop at one corner for hanging as a decorative piece instead of a flat doily.
- Make a matching set of 4-6 in the same or varied colors for a coordinated coaster set.
Frequently asked questions
Yes. Switch to a bulkier yarn and larger hook, keeping all stitch counts the same; the whole design scales up proportionally without pattern changes.
This usually means the petals were worked as one continuous round rather than individually. Each petal needs its own small chain-and-shell structure anchored back into the center with a slip stitch to get the curved shape.
A single pink shade will still look complete, though you’ll lose the subtle depth the two-tone petals create. If using one color, consider working the outer round slightly larger than the inner to keep some visual layering.
Work extra picot-scallop repeats specifically at each of the 4 corner points, rather than spacing repeats evenly around the whole perimeter. This concentration of stitches at the corners is what keeps them sharp.
The finished Blush Rose Square Doily Crochet Pattern

