Blush Rose Trellis Crochet Curtain Pattern
Advanced
For experienced crocheters who enjoy complex shaping, fine detail, and ambitious construction
Single-Day Project
A satisfying project you can complete in a single afternoon or evening.
Handmade Gift
A beautiful keepsake — free forever. Read online or print at home.
About This Blush Rose Trellis Crochet Curtain Pattern
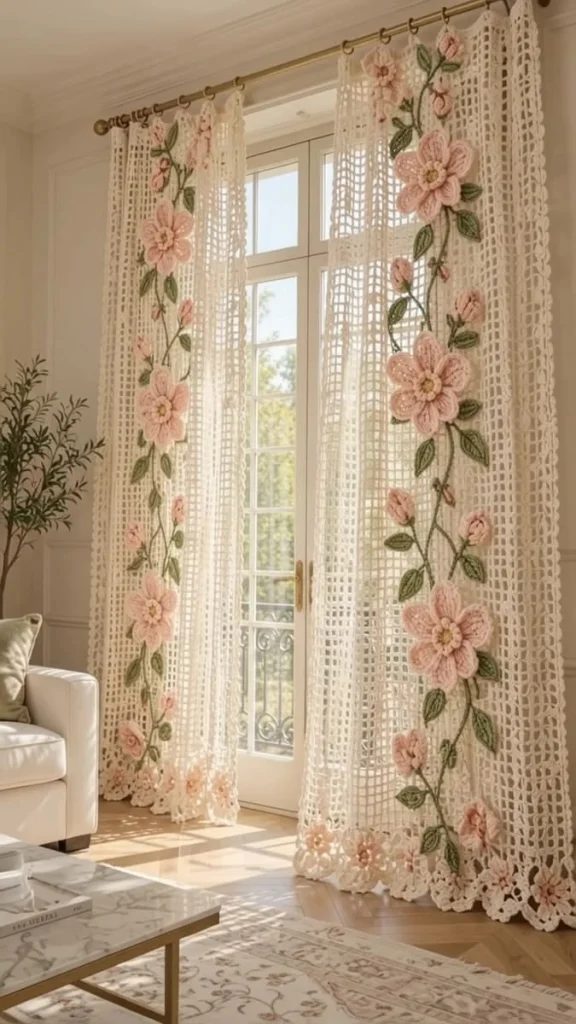
This floral crochet curtain pattern recreates the soft ivory lattice, raised blush flowers, and winding green stems of the reference curtains. Two long panels frame the window, with mirrored floral trails and a row of joined flowers forming a decorative lower edge.
The construction combines counted filet mesh, layered flower appliqués, shaped leaves, folded buds, and embroidered stems. Allow approximately 70–100 hours for the pair. This is an advanced project for crocheters comfortable blocking large pieces, working into reserved stitch loops, and positioning appliqués without distorting an open background.
Materials
- Sport-weight cotton in ivory Approximately 3,000 m for two panels, including tabs, borders, and a swatch allowance
- Matching cotton in blush pink Approximately 650 m
- Matching cotton in muted sage green Approximately 350 m
- Matching cotton in pale butter yellow Approximately 40 m
- 3.0 mm crochet hook Adjust as necessary for gauge
- Tapestry needle, stitch markers, measuring tape, rustproof pins, and blocking mats Use a large clean surface for panel blocking
- Sewing thread matching the appliqués and a sharp sewing needle Optional for discreet attachment
- Curtain rod Up to approximately 3 cm diameter for the specified tabs
Abbreviations
chchainsl stslip stitchscsingle crochethdchalf double crochetdcdouble crochettrtreble crochetMRmagic ringst / stsstitch / stitchesRS / WSright side / wrong sideGauge, Dimensions, and Construction
- Use US crochet terminology. In blocked mesh, 6 spaces measure 10 cm across and 10 rows measure 10 cm vertically. Each space consists of ch 2 between dc posts; therefore 6 spaces span 18 stitch-width units.
- For the swatch, ch 38. Foundation row: sc in the second ch from the hook and each remaining ch: 37 sc. Mesh row 1: ch 5, turn; this counts as the first dc and ch-2 space. Skip the first sc beneath the turning chain and the next 2 sc, dc in the next sc; repeat [ch 2, skip 2 sc, dc in next sc] 11 times. There are 12 spaces and 13 dc posts.
- Swatch rows 2–14: ch 5, turn, dc in the next dc; repeat [ch 2, dc in next dc] 11 times, placing the final dc in the third chain of the previous turning chain. Each row has 12 spaces and 13 posts. Measure across the central 6 spaces and over 10 rows after blocking.
- Separate sc gauge for the tabs is approximately 18 sc and 22 rows per 10 cm. A finished tab strip measures approximately 3.3 × 11 cm before its attachment ends are overlapped.
- Each panel has a 60 cm-wide mesh body. Its 180 mesh rows measure approximately 180 cm high; the foundation and edging bring the rectangular panel to about 62 × 182 cm. The hanging tabs add approximately 6 cm. Hem flowers overlap the bottom edge, with their lowest tips extending approximately 5–6 cm below it.
- Make two mesh panels, sixteen tabs, eighteen layered flowers, eighteen flower centers, twelve buds, and forty leaves. Eight flowers decorate the vertical vines; ten form the two floral hems. No stuffing or safety eyes are used.
Ivory Mesh Panels — Make Two
- Foundation: with ivory, ch 110. Sc in the second ch from the hook and in each remaining ch: 109 sc. Turn.
- Mesh row 1: ch 5, counting as the first dc and ch-2 space. Skip the first sc beneath the turning chain and the next 2 sc, dc in the next sc; repeat [ch 2, skip 2 sc, dc in next sc] 35 times. Count 36 ch-2 spaces and 37 dc posts. The row spans all 109 foundation stitches.
- Mesh row 2: ch 5, turn, dc in the next dc; repeat [ch 2, dc in the next dc] 35 times. Work the final dc in the third chain of the previous turning chain: 36 spaces and 37 posts.
- Mesh rows 3–180: repeat mesh row 2. Mark every tenth row at both side edges. Keep 36 spaces and 37 posts throughout. Fasten off after row 180.
- Weave in the foundation and finishing tails. Block both panels to matching dimensions before adding borders. Identify the RS and label the panels left and right.
Ivory Panel Borders
- Border round 1: with RS facing, join ivory at the upper right corner. Ch 1, work 3 sc in that corner post, then [2 sc in the next ch-2 space, sc in the next post] 36 times across the top. Add 2 more sc to the last post to complete its 3-sc corner.
- Continue down the first side: work 2 sc around each of the 180 mesh-row ends, then 3 sc in the foundation-row end at the bottom corner.
- Continue across the bottom: work 1 sc in each of the 109 unused foundation-chain loops, then 3 sc in the opposite foundation-row end.
- Continue up the second side: work 2 sc around each of the 180 mesh-row ends. Join to the first sc with a sl st. The round contains 949 sc. The top corner posts belong to the top edge; do not work additional side stitches into them.
- Mark the middle sc of each 3-sc corner. Border round 2: ch 1, sc in each stitch around, placing 3 sc in each marked corner stitch. Join with a sl st: 957 sc. Fasten off. This border adds approximately 1 cm to each edge.
Hanging Tabs — Make Sixteen
- With ivory, ch 7. Row 1: sc in the second ch from the hook and each remaining ch: 6 sc.
- Rows 2–26: ch 1, turn, sc in each stitch: 6 sc per row. The turning chain never counts as a stitch. Fasten off with a 35 cm sewing tail.
- Block each strip to approximately 3.3 × 12 cm. Fold in half with short ends aligned. Overlap both short ends onto the WS of the upper border by approximately 1 cm and sew through both layers and the border. The loop projects approximately 5 cm above the border and accommodates a rod around 3 cm in diameter.
- Attach eight tabs per panel, centered above mesh-post positions 0, 5, 10, 15, 21, 26, 31, and 36, counting the first post as position 0. Keep the outer tab edges inside the panel edges.
Layered Blush Flowers — Make Eighteen
- Round 1: with blush, work 5 sc in an MR. Join with a sl st to the first sc: 5 sc. Joining sl sts and starting chains do not count as stitches.
- Round 2: ch 1, work 2 sc in each stitch around. Join: 10 sc. Number these stitches 1–10 with stitch 1 at the join.
- Round 3, front petal arches: ch 1, sc in the front loop of stitch 1, ch 3, skip stitch 2; repeat [sc in the front loop of the next stitch, ch 3, skip the next stitch] 4 times. Join to the first sc: 5 arches and 5 anchor sc. Keep every back loop of round 2 free.
- Round 4, front petals: in each ch-3 arch work [sc, hdc, 5 dc, hdc, sc]. Join to the first sc: 5 petals, 9 stitches per petal, 45 stitches total. Fasten off.
- Round 5, back petal arches: with the WS facing you, join blush to the unused back loop of round-2 stitch 2. Ch 1, sc in that loop, ch 5; repeat [skip the next round-2 back loop, sc in the following back loop, ch 5] 4 times. Join to the first sc. The five anchors occupy stitches 2, 4, 6, 8, and 10, offset from the front petals.
- Round 6, back petals: turn the flower so the RS faces you and work into the arches behind the front petals. In each ch-5 arch work [sc, hdc, 7 dc, hdc, sc]. Join: 5 petals, 11 stitches per petal, 55 stitches total. Fasten off, leaving a long attachment tail.
- Spread the back petals between the front petals. Block lightly to approximately 10–12 cm across without flattening the layered centers. Use ten flowers for the hems and eight for the vines.
Butter-Yellow Flower Centers — Make Eighteen
- Round 1: with pale yellow, work 6 sc in an MR. Join: 6 sc.
- Round 2: ch 1, work 2 sc in each stitch. Join: 12 sc. Fasten off with a 25 cm tail.
- Sew one center over the middle of each flower with small stitches through the central blush rounds. Add five loosely tensioned French knots in yellow across each center, using two wraps per knot. Secure the embroidery on the back.
Shaped Sage Leaves — Make Forty
- With sage, ch 11. Work down the chain: sl st in the second ch from the hook, sc in the next ch, hdc in the next ch, dc in each of the next 2 ch, tr in each of the next 2 ch, dc in the next ch, hdc in the next ch, and 3 sc in the final ch. This side uses all 10 available chains and produces 12 stitches.
- Rotate to work along the opposite side of the foundation chain. Leave the chain containing the 3 sc and work into the next 9 chains: hdc, dc, tr, tr, dc, dc, hdc, sc, sl st. The leaf has 21 stitches around its perimeter. Fasten off with a 30 cm sewing tail.
- With a separate strand of sage, embroider a straight central vein from the narrow tip to the rounded base. Add three short diagonal veins on either side. Keep the embroidery loose enough for the leaf to lie flat.
- Block to approximately 5–6 cm long. Reserve sixteen leaves for the eight large vine flowers, twelve for the buds, and twelve for the spaces between floral groups.
Folded Rosebuds and Green Calyxes — Make Twelve
- Bud row 1: with blush, ch 10. Sc in the second ch from the hook and in each remaining ch: 9 sc.
- Bud row 2: ch 1, turn; sc in the first stitch, hdc in the next stitch, 2 dc in each of the next 5 stitches, hdc in the next stitch, sc in the final stitch: 14 stitches.
- Bud row 3: ch 1, turn; sc in the first 2 stitches, 2 sc in each of the next 10 stitches, sc in the final 2 stitches: 24 sc. Fasten off with a 30 cm tail.
- Roll the short strip loosely from one end, keeping the foundation edge aligned at the base and the wider edge open at the top. Sew through the foundation edge to secure the roll. Flatten the back slightly so the bud sits against the mesh.
- Calyx foundation: with sage, ch 5. Sc in the second ch from the hook and each remaining ch: 4 sc.
- Calyx points: ch 1, turn. In each of the 4 sc work [sl st, ch 4, sl st in the second chain from the hook, sc in the next chain, hdc in the final chain, sl st in the same base sc]. This creates four pointed sepals. Fasten off.
- Wrap the calyx foundation around the bud base, overlap its ends slightly, and sew securely. Arrange three sepals around the sides and one against the back.
Mirrored Vines and Flower Placement
- Lay the blocked panels RS up. All measurements in this section start at the top and side edges of the mesh body, excluding the border and tabs. The left panel’s main vine is centered approximately 20 cm from its outer left edge; the right panel’s vine is centered approximately 20 cm from its outer right edge.
- Pin four large flowers to each vine at 27, 67, 107, and 147 cm below the mesh top. Alternate their centers 3 cm to either side of the vine centerline. Mirror this arrangement on the other panel.
- Pin six buds per panel at depths of 9, 47, 87, 122, 137, and 164 cm. Alternate the buds on opposite sides of the vine, approximately 7 cm from its centerline.
- With sage, make one surface sl-st line per panel, beginning 3 cm below the mesh top and ending 173 cm below it. Guide the line in shallow curves between the flowers and buds. Insert the hook through the mesh, catch yarn from the WS, and draw it through the loop on the hook. Make approximately one loose stitch per 5–7 mm, moving around adjacent mesh posts where needed so every stitch catches the fabric.
- Add a second parallel surface sl-st line 3–4 mm beside the first to create a substantial stem. Use the same method for short branches leading beneath every flower and bud. Leave the stems relaxed; the mesh must retain its blocked width.
- Sew two leaves beside each large flower and one beside each bud. Add the remaining twelve leaves as six extra leaves per panel, distributed between motifs. Attach along the center vein and at the base, leaving the outer edges softly raised.
- Sew each flower through its central rounds and at three evenly spaced back-petal points. Sew each bud through the calyx base and the back of the pink roll. Catch mesh posts rather than spanning open spaces with exposed sewing stitches.
Joined Floral Hems
- Reserve five layered flowers for each panel. Lay them RS up along the lower border, with centers at 6, 18, 30, 42, and 54 cm from the left edge of the mesh body.
- Position each flower center level with the bottom border so approximately half the flower hangs below it. Rotate the flowers until neighboring back petals touch. If your flowers block narrower than 12 cm, gently spread their outer petals and use short ivory joining bridges as described in the next step.
- Join adjacent flowers at their nearest back-petal tips with three small whipstitches. For a gap up to 2 cm, join ivory to one tip, ch the number required to reach the neighboring tip without tension, sl st to that tip, then sl st back along the chain and fasten off. Make one bridge per neighboring pair: four bridges per panel if needed.
- Sew the upper half of each hem flower to the panel border and to the first mesh row above it at three points. Keep the lower petals free. Secure the end flowers to the side borders as well.
Finishing
Weave in every tail through several solid stitches, changing direction once before trimming. Lay the panels side by side and check that the flower heights, tab positions, and lower floral edges mirror one another. Adjust any attachment that pulls a mesh opening out of shape.
Give the finished curtains a gentle wash according to the yarn label. Support their weight when lifting them, press out water in towels, and dry flat to the blocked measurements. Hang only when fully dry. After the first day on the rod, check the hems and gently redistribute the gathers so both panels hang evenly.
Tips for Success
- Count the 36 mesh spaces every tenth row. Catching a missing space early prevents a visible inward slope along the curtain edge.
- Block both bare panels together before placing flowers. Matching motifs cannot disguise different panel lengths.
- Pin the whole vine arrangement before sewing any flower. Check it from several steps away to judge the curve and spacing.
- Support the mesh flat while making surface stitches. A tight stem can shorten the panel and make the vine pucker.
- Keep the center and upper petals dimensional, but secure back-petal tips wherever the curtain will be handled frequently.
Common Mistakes to Avoid
- Working into the top of the ch-5 turning chain adds height and changes the edge. Put the last dc into its third chain.
- Using both loops for the front flower arches removes the attachment loops for the back layer. Work round 3 through front loops only.
- Attaching flowers before washing can cause the mesh and appliqués to shrink differently. Prewash the yarn or block every component first.
- Sewing across open spaces leaves visible threads. Move the attachment point to a nearby post or chain and hide the thread behind the appliqué.
- Hanging damp cotton encourages excessive lengthening. Dry the finished curtains flat before putting them on the rod.
Ways to Customize This Pattern
- Use dusty rose for back petals and pale blush for front petals while keeping the yellow centers and sage leaves.
- Change the width by adding or removing complete mesh spaces. For N spaces, chain 3N + 2 and work 3N + 1 foundation sc; each space changes the width by approximately 1.67 cm at gauge. Recalculate the border count and spread tabs no farther than about 10 cm apart.
- Change the length by adding or removing mesh rows before edging. Each row changes the body length by approximately 1 cm; reposition the vine motifs proportionally.
- For a quieter hem, use ivory for the ten hem flowers and retain blush for the eight flowers on the vertical vines.
Frequently asked questions
The open mesh filters light but offers limited privacy, especially after dark. Hang a separate plain voile or curtain lining behind the crochet if you need more coverage.
Measure from the top of the installed rod to your desired lowest petal. Allow approximately 5 cm above the panel for the tabs, 182 cm for the bordered rectangle, and 5–6 cm below it for the hem petals. Adjust the mesh-row count using your suspended swatch gauge.
Yes. Omit the tabs and place eight clip rings at the same marked positions per panel. Grip the solid upper border and account for the ring drop when calculating your finished hanging length.
Wash gently according to the cotton label, avoid wringing, and dry flat. While damp, lift the front petals with your fingers and reshape the folded buds. Avoid pressing the appliqués with an iron.
The finished Blush Rose Trellis Crochet Curtain Pattern

