Bobble Flower Hexagon Table Runner Crochet Pattern
Beginner Friendly
Perfect for those just starting their crochet journey, with clear instructions and simple techniques
Single-Day Project
A satisfying project you can complete in a single afternoon or evening.
Handmade Gift
A beautiful keepsake — free forever. Read online or print at home.
About This Bobble Flower Hexagon Table Runner Crochet Pattern
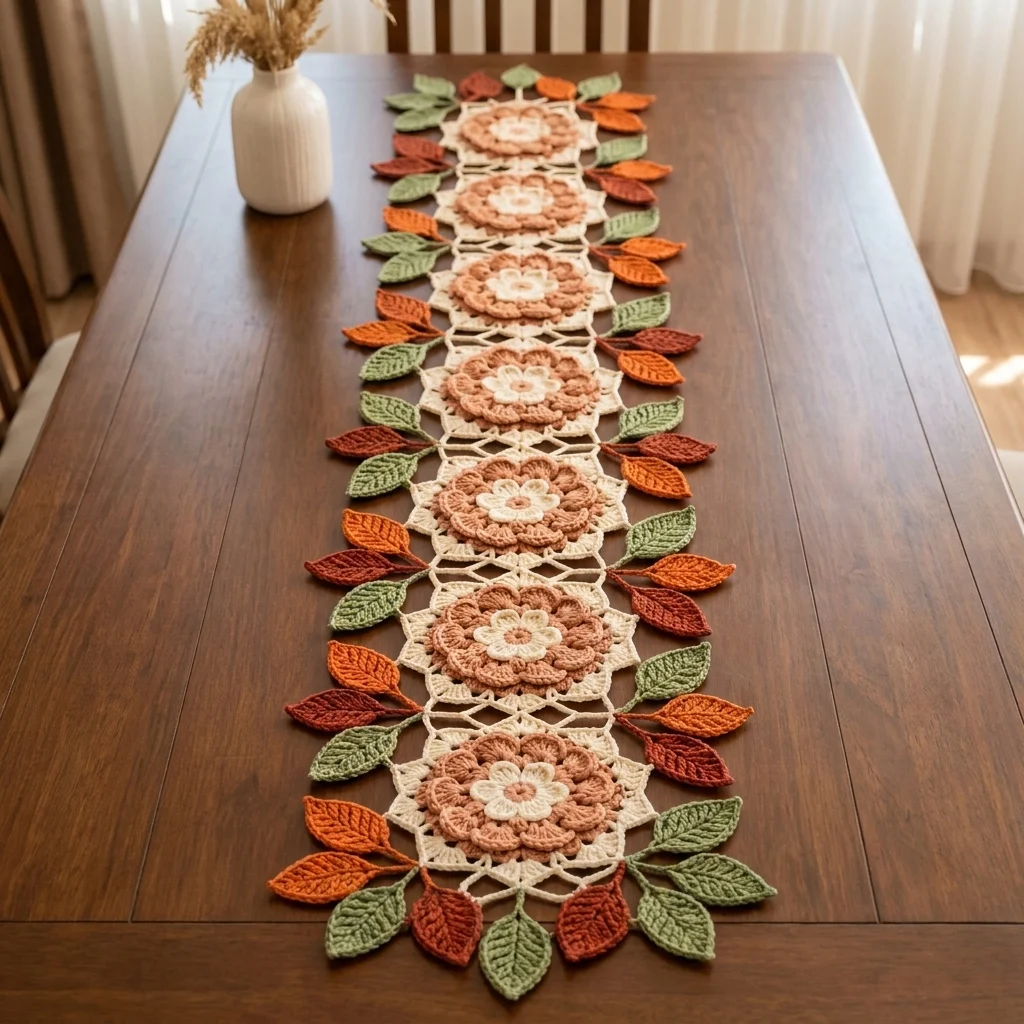
This crochet hexagon flower table runner pattern joins 8 cream hexagon motifs down a single line, each centered on a raised bobble-petal rose in dusty blush and cream. The hexagons connect directly edge to edge through a filet-mesh hexagon shape, and the whole strip is bordered on both long sides with individually made leaves in rust, olive, and sage green, angled outward like a vine running the length of the runner.
What makes this design distinctive is the flower construction: each rose center is built from two rounds of puffy bobble stitches rather than flat petals, giving it real dimension and a soft, dimensional texture against the crisp openwork hexagon around it. Framing that with a dense leaf border on both sides, rather than leaving the hexagon edges bare, is what gives the finished runner its full, layered silhouette. Expect to spend 20-24 hours total across 8 hexagon-flower motifs and roughly 50 leaves.
This is an advanced pattern, best suited to someone comfortable working bobble stitches inside a joined hexagon motif and hand-attaching a large leaf border, rather than someone wanting a single flat technique throughout.
Materials
- DK weight yarn, cream ~150g, hexagon mesh and outer petals
- DK weight yarn, dusty blush/rose ~60g, flower centers and inner petals
- DK weight yarn, rust orange ~40g, leaves
- DK weight yarn, olive green ~40g, leaves
- DK weight yarn, sage green ~30g, leaves
- Crochet hook 3.5 mm (US E/4)
- Tapestry/yarn needle
- Steam iron and pressing cloth, or blocking mat and pins
- Sharp scissors
Abbreviations
chchainsl stslip stitchscsingle crochethdchalf double crochetdcdouble crochetbobble5 dc worked in same st, yo and pull through all loops to closeMRmagic ringch-spchain spacest(s)stitch(es)reprepeatFOfasten offBobble Rose Center (make 8)
- Round 1, with dusty blush: 12 dc in MR. Sl st to join. (12 sts)
- Round 2 (inner bobble petals): *ch 2, bobble in next st, ch 2, sl st in same st; rep from * around all 12 sts. 12 petals.
- Round 3 (outer bobble petals), with cream: join in a base st between two inner petals. *ch 3, bobble in next base st, ch 3, sl st in same st; rep from * around. 12 larger petals layered behind the first set.
- FO leaving a short tail. Fold outer petals slightly back so both bobble rounds separate visually.
Hexagon Mesh Surround (make 8, in cream)
- Round 4: join cream behind the outer petal round. *ch 4, dc in same base st, ch 4, sl st in next base st; rep from * around to build 6 mesh points radiating out from the flower, spaced evenly to begin the hexagon shape. (6 mesh points)
- Round 5: working into each ch-4 space from Round 4, *(dc, ch 2, dc) in sp, sl st in next sp; rep from * around to widen each of the 6 points into a hexagon corner.
- Round 6: sc evenly around the entire outer edge of the hexagon, working 2 sc in each corner ch-2 sp to keep the hexagon shape crisp and even. Join with sl st, FO leaving a long tail for joining to the next hexagon.
- Repeat this entire sequence, Bobble Rose Center through Round 6, to make 8 hexagon-flower motifs total.
Joining the Hexagons
- Lay the 8 hexagons in a single vertical line, top edge to bottom edge.
- Using the long tail from Round 6, whipstitch each hexagon’s bottom edge to the next hexagon’s top edge, matching sc sts evenly across the join.
- Continue until all 8 hexagons are joined into one continuous strip.
Leaf Motif (make approximately 50: mix of rust, olive, and sage)
- Ch 9. Starting in 2nd ch from hook: sl st, sc 2, hdc 2, dc 2, 3 dc in last ch.
- Continue down the other side: dc 2, hdc 2, sc 2, sl st in last ch.
- FO leaving a short tail for attaching. Repeat for approximately 50 leaves total, mixing colors throughout, 25 per side.
Embroidering Leaf Veins
- Thread each leaf’s tail onto a tapestry needle.
- Work a single straight vein line up the center of each leaf from base to tip.
- Weave in the tail on the wrong side, or leave a short length free if that leaf will be joined at that point.
Blocking All Pieces
- Steam-block the joined hexagon strip flat, pinning each hexagon’s points evenly and keeping the joins straight.
- Steam and pin each leaf flat. Let dry completely before attaching the border.
Attaching the Leaf Border
- Working down one long side of the joined hexagon strip, position leaves pointing outward from the strip’s edge, angled slightly upward, spacing them evenly along the entire length, mixing rust, olive, and sage throughout.
- Whipstitch each leaf’s base to the outer edge of the hexagon strip, catching a few sts of the hexagon mesh for a secure hold.
- Repeat down the opposite long side, mirroring the leaf placement and color mix as closely as possible for visual balance.
- Leave the short ends of the strip as plain joined hexagon edges, or add 1-2 leaves angled outward at each end to finish the tips, following the photo.
Finishing
Turn the finished runner over and check for any leaf held by only a single stitch; add a second point wherever a leaf feels loose. Weave in all remaining tails. Give the whole runner a final light steam, keeping the bobble rose centers slightly puffed rather than pressed flat, and let it dry completely before moving it to the table.
Tips for Success
- Keep bobble stitch tension consistent across all 8 flowers; overly tight bobbles look small and flat compared to looser, fuller ones.
- Block each hexagon before joining; a pre-blocked hexagon makes the whipstitch seams between motifs sit flatter and more even.
- Space leaves evenly along each long side before sewing anything down permanently, checking that both sides match roughly in density.
- Mix leaf colors randomly along each border rather than repeating a fixed sequence, for a more natural, vine-like look.
- Angle leaves slightly upward and outward rather than flat against the table, to keep some of the dimensional look shown in the photo.
Common Mistakes to Avoid
- Working bobbles too tightly closed loses the puffy, rounded petal look. Fix: keep a slightly looser tension on the final yarn-over pull-through of each bobble.
- Joining hexagons with mismatched stitch counts along the seam causes the strip to twist slightly. Fix: count sc sts on both edges before whipstitching and adjust as needed.
- Leaving one side of the border denser than the other unbalances the whole runner visually. Fix: count total leaves per side before attaching and keep the numbers close.
- Skipping blocking on the hexagon strip before attaching leaves makes the border harder to align evenly. Fix: block the joined strip flat and square first.
- Sewing the rose center down flat while attaching the outer mesh accidentally flattens the bobble texture. Fix: keep stitching to the mesh rounds only, not through the flower center itself.
Ways to Customize This Pattern
- Reduce to 5 hexagons for a shorter runner suited to a smaller table.
- Swap the blush and cream rose colors for a bolder red and gold combination for a different seasonal palette.
- Use a single leaf color instead of mixing three for a simpler, more monochrome border.
- Widen the hexagon mesh rounds slightly for larger motifs and a chunkier finished runner.
- Scale the whole design down with a finer yarn and smaller hook for a set of matching hexagon coasters using the same motif.
Frequently asked questions
Work each bobble’s 5 dc a little looser than your normal tension, and make sure to pull the final yarn-over through all 6 loops in one smooth motion rather than tightening gradually, which flattens the bobble before it closes.
Yes. Add hexagons in pairs to keep the design visually balanced, and extend the leaf border on both sides to match the new total length.
Joining each leaf to the hexagon strip is enough structurally. Leaves don’t need to touch each other, since the photo shows them spaced with small gaps rather than densely packed edge to edge.
This usually means Round 5’s corner shaping was worked too loosely. Keep the (dc, ch-2, dc) corner groups snug against the ch-4 space below them to hold a crisper hexagon point at each of the 6 corners.
The finished Bobble Flower Hexagon Table Runner Crochet Pattern

