Boho Feather Bedspread and Pillow Shams Crochet Pattern
Beginner Friendly
Perfect for those just starting their crochet journey, with clear instructions and simple techniques
Single-Day Project
A satisfying project you can complete in a single afternoon or evening.
Handmade Gift
A beautiful keepsake — free forever. Read online or print at home.
About This Boho Feather Bedspread and Pillow Shams Crochet Pattern
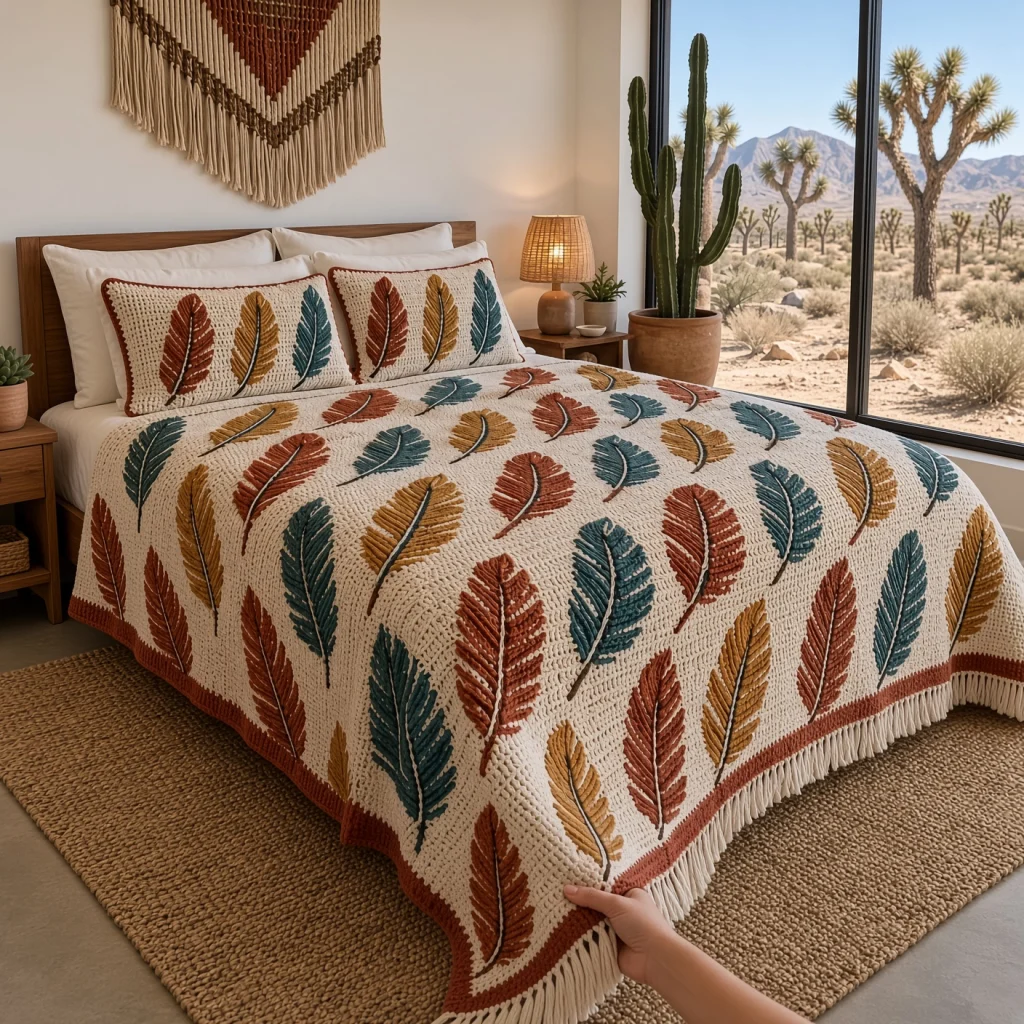
This boho feather crochet bedspread sets 64 feathers in rust, mustard and teal across a cream textured base, each one tilted slightly as if it has just floated down. A wide rust border and a long cream fringe frame the foot and sides, and two pillow shams each carry a trio of feathers in the three colors. It has the warm, sun-faded look of desert textiles.
Each feather is crocheted around a single foundation chain. Tall stitches fan out from the spine like real barbs, and a few skipped chains leave the small gaps that make crochet feathers look natural rather than leaf-like. A cream quill is added down the center with surface slip stitch. The base is worked in linen stitch in three long panels, so the feathers sit on a dense, woven-looking background.
The full set takes around 200 to 230 hours. Most of that is the base, which is a simple two-row repeat, while the feathers are quick, satisfying pieces of about half an hour each. It suits a crocheter who is comfortable with tall stitches, long projects and sewing on appliques neatly.
Materials
- Worsted weight yarn, cream about 6,600 m (33 skeins of 100 g / 200 m), for base, shams, quills and fringe
- Worsted weight yarn, rust about 600 m (3 skeins), for feathers and borders
- Worsted weight yarn, mustard about 200 m (1 skein)
- Worsted weight yarn, teal about 200 m (1 skein)
- 5 mm crochet hook
- Locking stitch markers about 70, for marking feather positions
- Stiff card 16 cm wide for cutting fringe
- Tapestry needle and scissors
- Two pillows 50 x 75 cm, for the shams
Abbreviations
chchainscsingle crochethdchalf double crochetdcdouble crochettrtreble crochetdtrdouble treble crochetsl stslip stitchsurf sl stsurface slip stitch: yarn held behind the work, insert hook from the front, pull up a loop and draw it through the loop on hookrev screverse single crochet (crab stitch), worked left to rightskskipspspacest(s)stitch(es)rndroundreprepeatRS / WSright side / wrong sideLinen Stitch Panels (make 3)
- With cream, ch 118.
- Row 1 (RS): sc in 2nd ch from hook, *ch 1, sk next ch, sc in next ch; rep from * across. (117 sts: 59 sc, 58 ch-1 sps)
- Row 2: ch 1, turn, sc in first sc, sc in next ch-1 sp, *ch 1, sk next sc, sc in next ch-1 sp; rep from * to last sc, sc in last sc. (117 sts: 60 sc, 57 ch-1 sps)
- Row 3: ch 1, turn, sc in first sc, *ch 1, sk next sc, sc in next ch-1 sp; rep from * to last 2 sc, ch 1, sk next sc, sc in last sc. (117 sts: 59 sc, 58 ch-1 sps)
- Rows 4-480: rep Rows 2 and 3 alternately, ending with a Row 2. (117 sts in every row)
- Place a marker at the end of every 30th row. These help when seaming and placing the feathers.
- Fasten off. Each panel measures about 73 x 240 cm. Block all three to the same length.
Joining the Panels
- Lay the panels side by side, RS up, with all foundation edges at the same end. This end is the foot of the bedspread.
- Hold two panels RS together and, with cream, sl st through both layers in each row end, matching the markers. (480 sl st)
- Join the third panel the same way. The bedspread is now 351 sts wide and 480 rows long.
- Grid: lay the bedspread RS up with the foot toward you. Number the columns 1-351 from left to right, counting every sc and every ch-1 sp, and the rows 1-480 from the foot.
Feathers (make 70)
- Make 24 rust, 25 mustard and 21 teal. This covers 64 feathers for the bedspread (21 rust, 22 mustard, 21 teal) and 3 for each sham (1 of each color, plus one extra each of rust and mustard to fill the set).
- Spine: ch 41.
- Side 1: sl st in 2nd ch from hook, sc in next ch, hdc in next 2 ch, dc in next 3 ch, tr in next 4 ch, ch 1, sk next ch, dtr in next 6 ch, ch 1, sk next ch, dtr in next 5 ch, tr in next 4 ch, ch 1, sk next ch, tr in next 3 ch, dc in next 3 ch, hdc in next 2 ch, sc in next 2 ch, sl st in last ch. (37 sts, 3 ch-1 sps)
- Stem: ch 9, sl st in 2nd ch from hook and in next 7 ch, sl st in the same ch as the last sl st of Side 1. (8 sl st)
- Side 2: working in the free loops on the other side of the spine, sc in next 2 ch, hdc in next 2 ch, dc in next 3 ch, tr in next 4 ch, ch 1, sk next ch, dtr in next 7 ch, ch 1, sk next ch, dtr in next 4 ch, tr in next 5 ch, ch 1, sk next ch, dc in next 3 ch, hdc in next 3 ch, sc in next 2 ch, sl st in next ch. (36 sts, 3 ch-1 sps)
- Tip: ch 3, sl st in the first sl st of Side 1. Fasten off, leaving a 50 cm tail for sewing.
- The gaps fall in different places on each side, which gives the feather its natural, slightly ragged look.
Feather Layout
- There are 8 columns and 8 rows of feathers. (64 feathers) Each position below is the center of a feather, given as (column, row).
- Columns: 22, 66, 110, 154, 198, 242, 286 and 330.
- Rows: 30, 90, 150, 210, 270, 330, 390 and 450.
- Number the feather columns 0-7 from left to right and the feather rows 0-7 from the foot. Add the two numbers together and divide by 3: a remainder of 0 is rust, 1 is mustard and 2 is teal. This makes the colors run in diagonal stripes across the bed.
- Feathers in even-numbered columns (0, 2, 4, 6) lean with the tip about 20 degrees to the right. Feathers in odd-numbered columns lean 20 degrees to the left. All stems point toward the foot.
- Mark every center with a locking marker, then lay all the feathers in place before sewing any of them, and check the pattern from a distance.
Attaching the Feathers
- Pin each feather in place with its center over the marker.
- With the feather’s own tail, sew around the outer edge with small stitches, catching the top of each tall stitch. Then sew along the spine and the stem.
- Quill: with cream, RS facing, work surf sl st through the feather and the base along the spine, starting at the tip and continuing to the end of the stem. Fasten off and pull the tail to the WS.
- The quill holds the center of the feather firmly in place and gives it the pale shaft you see in real feathers.
Rust Border
- Rnd 1: with rust, RS facing, join in a foot corner. 3 sc in corner st, sc in next 349 sts, 3 sc in corner st; 382 sc evenly along the side (about 4 sc for every 5 rows); 3 sc in corner st, sc in next 349 sts, 3 sc in corner st; 382 sc evenly along the other side. Join with sl st. (1,474 sts)
- Rnd 2: ch 1, sc in each st around, working 3 sc in the center st of each corner. Join. (1,482 sts)
- Rnds 3-8: rep Rnd 2, adding 8 sts each rnd. (Rnd 3: 1,490 sts, Rnd 4: 1,498, Rnd 5: 1,506, Rnd 6: 1,514, Rnd 7: 1,522, Rnd 8: 1,530)
- Fasten off. The border is about 4.5 cm wide.
Fringe
- Wind cream yarn around the 16 cm card and cut along one edge to make 32 cm strands.
- For each fringe bundle, fold 4 strands in half. Insert the hook from back to front through a st of Rnd 8, pull the folded loop through, then pull the ends through the loop and tighten.
- Attach a bundle in every 3rd st along the foot and both sides, starting and ending at the foot corners. (About 125 bundles along the foot and 133 along each side) Leave the head edge without fringe.
- Lay the bedspread flat and trim the fringe to an even 15 cm.
Pillow Sham Fronts (make 2)
- With cream, ch 122.
- Rows 1-100: work in linen stitch as for the panels, ending with a Row 2. Fasten off. (121 sts, about 76 x 50 cm)
- Place three feathers side by side, centered at columns 31, 61 and 91 on row 50: rust on the left, mustard in the middle and teal on the right.
- Lean all three tips about 15 degrees to the right, with the stems toward the bottom edge.
- Sew on and add the quills as for the bedspread.
Pillow Sham Backs (make 2 sets)
- Upper back: with cream, ch 122. Work Rows 1-60 in linen stitch, ending with a Row 2. (121 sts)
- Edge row: ch 1, turn, sc in each sc and ch-1 sp across. Fasten off. (121 sc)
- Lower back: with cream, ch 122. Work Rows 1-54 in linen stitch, ending with a Row 2. (121 sts)
- Edge row: ch 1, turn, sc in each sc and ch-1 sp across. Fasten off. (121 sc)
- The sc rows are the open edges of the envelope. Together the pieces give about 7 cm of overlap.
Sham Assembly
- Lay a sham front WS up. Place the lower back on top, RS up, with its foundation edge along the bottom. Place the upper back on top, RS up, with its foundation edge along the top, overlapping the lower back. Pin all edges.
- Rnd 1: turn so the front faces you. With rust, join in a corner through all layers. 3 sc in corner st, sc in next 119 sts, 3 sc in corner st; 78 sc evenly along the side; 3 sc in corner st, sc in next 119 sts, 3 sc in corner st; 78 sc evenly along the other side. Join. (406 sts)
- Rnd 2: ch 1, rev sc in each st around. Join and fasten off. (406 sts)
- Rep with the second sham.
Finishing
Weave in all ends on the WS. Run feather tails under the backs of the sewing stitches so the colors don’t show through the cream, and hide the base yarn ends inside the panel seams.
Lay the bedspread flat and steam it lightly, holding the iron above the surface. Smooth each feather into shape with your fingers so the barbs fan out evenly. Comb the fringe straight and give it a final trim if needed. Steam the shams the same way, then put the pillows in through the back opening.
Tips for Success
- Make the feathers while you work on the base panels, a few at a time. It breaks up the long rows and you’ll have them ready when the base is done.
- Keep the dtr stitches the same height in every feather. If some feathers come out wider, they’ll look uneven when laid out in rows.
- Pin all 64 feathers before sewing any. It’s the only way to see whether the diagonal color stripes and tilts read well.
- Work the quill through both the feather and the base. It anchors the feather down the middle and stops it lifting when the bedspread is used.
- Cut all the fringe strands before you start attaching them. Uneven strands are much harder to trim neatly afterward.
Common Mistakes to Avoid
- Losing count along the spine. If Side 1 doesn’t end in the last ch, the feather becomes lopsided. Count your chains before starting, and recount if a side ends early or late.
- Working into the skipped chain on Side 2. The gaps must stay open on both sides. Always ch 1 and skip, even if it feels like a mistake.
- Feathers that pucker the base. Sewing too tightly pulls the linen stitch in around each feather. Keep the stitches small but relaxed.
- Mixed-up colors. One feather in the wrong color breaks the diagonal stripes. Use the column and row numbers to check each color before sewing.
- A wavy border. If the rust band ruffles, Rnd 1 has too many sts on the sides. Stick to about 4 sc for every 5 rows.
Ways to Customize This Pattern
- Change the palette: terracotta, sage and blush, or navy, gold and cream, all suit the boho look.
- Use only one feather color, such as all rust, for a quieter, more modern version.
- Make a matching throw from one panel with 2 columns and 4 rows of feathers, and fringe on both short ends.
- Add a few small beads at the base of each quill for a bohemian touch, if the bedspread won’t be used by small children.
- Make larger feathers for the shams by starting with ch 61 and adding 5 more dtr and 5 more tr on each side.
Frequently asked questions
Each gap is a ch 1 worked over a skipped chain of the spine. With no tall stitch there, the barbs on each side of it separate slightly, which looks like the natural splits in a real feather.
Yes. Scatter them by eye, varying the tilt, and keep the colors well mixed. Pin them all first and step back to check that no area looks too crowded or too empty.
Wash the bedspread inside a large laundry bag on a gentle cold cycle, then comb the fringe while it’s damp. Lay it flat to dry and trim any strands that have shifted.
Linen stitch is dense, which is what gives the bedspread its woven texture and weight. To save yarn, you can work the base in simple hdc rows instead, but the feathers will then sit on a smoother, less textured background.
The finished Boho Feather Bedspread and Pillow Shams Crochet Pattern

