Boho Mandala Shoulder Bag Crochet Pattern
Beginner Friendly
Perfect for those just starting their crochet journey, with clear instructions and simple techniques
Single-Day Project
A satisfying project you can complete in a single afternoon or evening.
Handmade Gift
A beautiful keepsake — free forever. Read online or print at home.
About This Boho Mandala Shoulder Bag Crochet Pattern
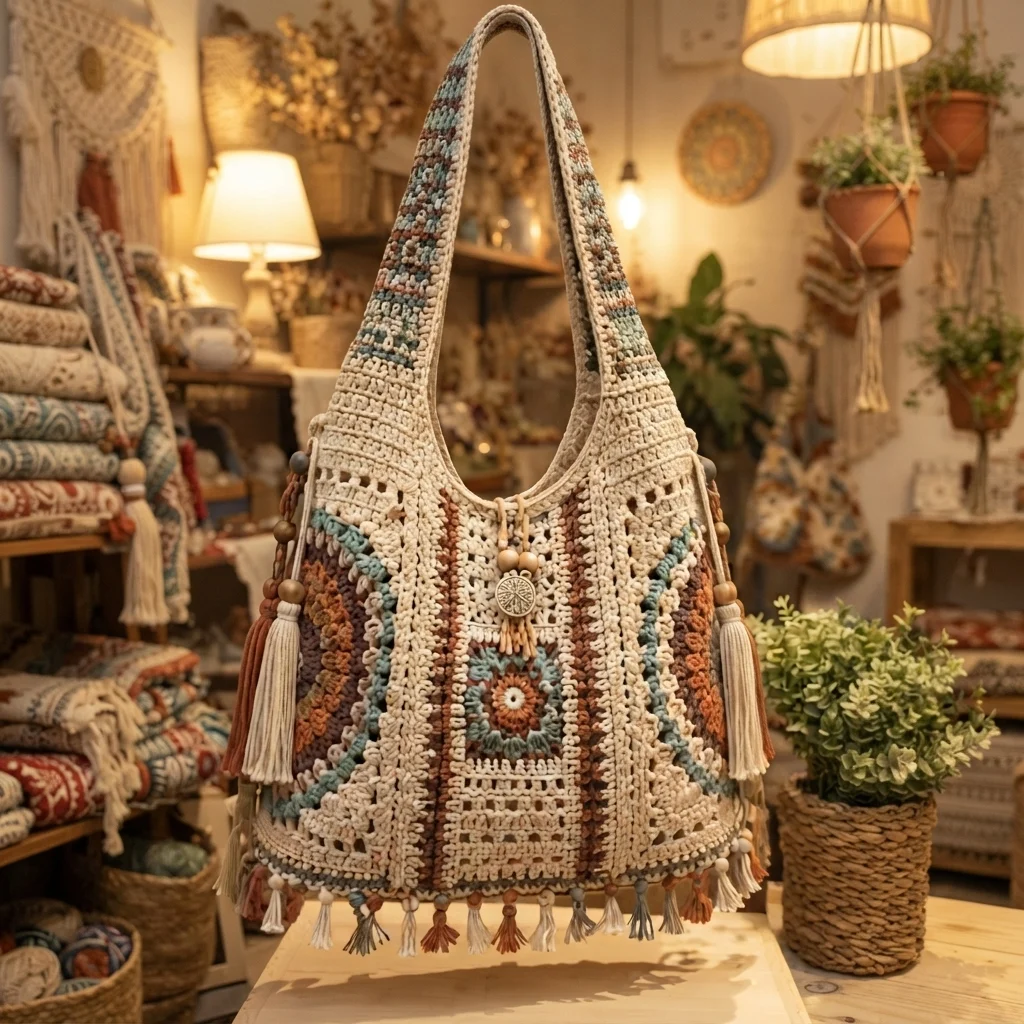
This crochet boho shoulder bag pattern builds an oversized, softly rounded bag from a striped granny-style body worked in cream, rust, teal, and brown, with a round mandala medallion appliquéd on each side front panel. A wide, padded double-layer strap, a wooden medallion accent at the top center, and clusters of beaded fringe tassels along both sides and the bottom finish the piece with real boho detail.
What makes this design distinctive is the layered construction: the main body is worked in wide horizontal color bands using a mix of granny cluster stitches and solid rows for texture, while each side panel gets its own separately worked round mandala, appliquéd on top rather than integrated into the body stitch pattern. That combination, plus the heavy use of tassels and wooden beads threaded directly into the fringe, is what gives the bag its rich, layered boho character rather than a plain striped tote look. Expect to spend 22-28 hours total across the body, both mandala panels, the strap, and all the tassel fringe.
This is an advanced pattern, best suited to someone comfortable with bag shaping, appliquéing a separately worked round motif onto a striped body, and confident assembling multi-strand beaded tassels, rather than someone making their first crochet bag.
Materials
- Worsted weight cotton-blend yarn, cream ~250g, body and strap
- Worsted weight yarn, rust orange ~100g, stripes and mandala
- Worsted weight yarn, teal/dusty blue ~100g, stripes and mandala
- Worsted weight yarn, brown ~80g, stripes and mandala
- Crochet hook 4.5 mm (US 7)
- Wooden beads, assorted sizes ~40-50, for tassels and medallion accent
- 1 large decorative button or wooden medallion for the top center accent
- Fabric for lining ~60 x 90 cm, optional but recommended
- Sewing needle and matching thread, for lining
- Tapestry/yarn needle
- Steam iron and pressing cloth, or blocking mat and pins
- Sharp scissors
Abbreviations
chchainsl stslip stitchscsingle crochethdchalf double crochetdcdouble crochetcluster3 dc worked together and closed as one, granny-styleMRmagic ringch-spchain spaceincincrease (2 sts in one st)decdecrease (2 sts worked together)st(s)stitch(es)reprepeatFOfasten offMandala Side Panel (make 2, one per side)
- With rust, ch 4, sl st to form a ring. Round 1: 12 dc into ring. Sl st to join. (12 sts)
- Round 2, with teal: *ch 2, skip 1 st, sl st in next st; rep from * around to form 6 ch-2 loops.
- Round 3, with teal: in each ch-2 loop, work (sc, hdc, 2 dc, hdc, sc). Sl st to join, FO.
- Round 4, with cream: join behind Round 3, working a round of solid sc to smooth the transition. (approx. 36 sts)
- Round 5, with brown: work a round of evenly spaced dc clusters, spaced with ch-1 gaps between, to form a decorative outer ring.
- Round 6, with rust: work a final round of sc evenly around to close the mandala with a clean, solid edge. Sl st to join, FO leaving a long tail for attaching. Repeat for 2 mandalas total.
Bag Body, Front and Back Panels (make 2, mirrored or identical)
- With cream, ch 61 to establish the bag’s base width. Row 1: sc in 2nd ch from hook and in each ch across. 60 sts.
- Rows 2-6, cream: ch 1, turn, sc in each st across, working straight to build the base section.
- Rows 7-10, rust: switch color, work in a mix of cluster sts and sc to build a textured striped band.
- Rows 11-14, cream: continue straight in sc.
- Rows 15-18, teal: repeat the cluster-and-sc textured band in teal.
- Rows 19-22, cream: continue straight in sc.
- Rows 23-26, brown: repeat the textured band in brown.
- Rows 27-32, cream: work the final rows straight, shaping the top edge with a gentle rounded decrease at each side to begin the bag’s softly curved silhouette.
- FO leaving a long tail for seaming. Repeat for the second panel.
Bag Assembly, Body
- Whipstitch the front and back panels together along the bottom and both side seams, leaving the top open for the bag’s mouth.
- Turn the assembled body right-side out and lightly steam the seams flat.
- Center and sew one mandala panel onto the front, and the second onto the back, positioning each in the lower-middle portion of its panel as shown in the photo.
Wide Strap
- With cream, ch a foundation chain approximately 8 sts wide. Row 1: sc across.
- Work back and forth in sc for approximately 70 cm, or your preferred length, keeping width consistent throughout.
- Work a second identical strip in cream, then whipstitch the two strips together along both long edges for a doubled, sturdy strap with some body.
- FO leaving tails at both ends for attaching to the bag’s top corners.
Top Edge and Strap Attachment
- With cream, work a round of sc evenly around the bag’s top opening to neaten the edge.
- Attach the strap’s two ends securely to the inside top edge of the bag, at the front and back center points, reinforcing with extra stitches since the strap bears the bag’s full weight.
- Sew the decorative medallion or button to the top center front, just below where the strap attaches, as a focal accent.
Beaded Tassel Fringe (make approximately 8-10 tassel clusters)
- Cut several strands of yarn, mixing cream, rust, teal, and brown, each approximately 25-30 cm long.
- Thread 2-3 wooden beads onto some of the strands within each cluster, knotting below each bead to hold it in place.
- Gather 6-8 strands per cluster, fold in half, and attach through a stitch along the bag’s side seams and bottom edge using a lark’s head knot.
- Trim tassel ends to varied lengths within each cluster for a naturally layered look. Repeat for 8-10 clusters total, spaced along both side seams and the bottom edge.
Finishing
If lining the bag, cut fabric to match the interior dimensions of the assembled body plus a seam allowance, and hand-sew it in place inside the bag before final tassel attachment. Weave in all remaining yarn tails. Steam the mandala panels lightly from the back to help them sit flat against the striped body, then comb and trim the beaded tassels for a clean, even finish.
Tips for Success
- Block both mandala panels to the same exact size before attaching them; mismatched panels are very noticeable on a symmetrical bag design.
- Work both body panels with identical row counts and color band placement, checking against each other periodically, so front and back match when seamed together.
- Reinforce the strap attachment points heavily, since this bag’s finished size and yarn weight add up to real weight once loaded.
- Vary tassel strand length and bead placement between clusters rather than making every cluster identical, for a more natural, boho look.
- Line the bag if using a looser stitch pattern in the body; a lining helps items from catching on the textured cluster rows inside.
Common Mistakes to Avoid
- Attaching the mandala panels before blocking them causes the panels to distort once steamed later. Fix: block each mandala flat and to size first, then appliqué.
- Making the front and back body panels with different row counts creates an uneven, twisted seam. Fix: count rows carefully and check both panels against each other before seaming.
- Attaching the strap with only a few stitches risks it tearing loose under the bag’s weight. Fix: reinforce both attachment points generously with extra stitches.
- Making every tassel cluster identical in length and bead placement looks mechanical rather than boho-organic. Fix: vary strand length and bead count between clusters.
- Skipping a lining lets loose items catch on the textured interior cluster rows. Fix: add a simple fabric lining sewn in before final tassel attachment.
Ways to Customize This Pattern
- Reduce the bag’s overall size for a smaller crossbody version instead of an oversized shoulder bag.
- Swap the rust, teal, and brown palette for a different color combination to match your own wardrobe.
- Skip the mandala side panels for a simpler striped body without appliqué.
- Add an interior zippered pocket to the lining for securing small valuables.
- Use a single tassel color throughout instead of mixing all four for a more subdued fringe.
Frequently asked questions
With a reinforced strap attachment and a sturdy worsted weight cotton-blend, this bag handles everyday carry well, but avoid loading it with very heavy items regularly, since crochet fabric stretches more than woven fabric over time with sustained weight.
A lining is recommended given the open, textured cluster rows in the body; without one, small items can snag on the stitch texture, and a lining also helps the bag hold its shape better over time.
Yes. Work additional rounds before the closing sc round to make the mandala larger, or stop a round earlier for a smaller version, adjusting its placement on the body panel to stay centered.
This is common with cotton-blend crochet bags under regular use. A fabric lining significantly helps maintain shape, and avoiding consistently heavy loads will keep the bag’s structure holding up longer over time.
The finished Boho Mandala Shoulder Bag Crochet Pattern

