Botanical Leaf Crochet Curtain Pattern
Advanced
For experienced crocheters who enjoy complex shaping, fine detail, and ambitious construction
Single-Day Project
A satisfying project you can complete in a single afternoon or evening.
Handmade Gift
A beautiful keepsake — free forever. Read online or print at home.
About This Botanical Leaf Crochet Curtain Pattern
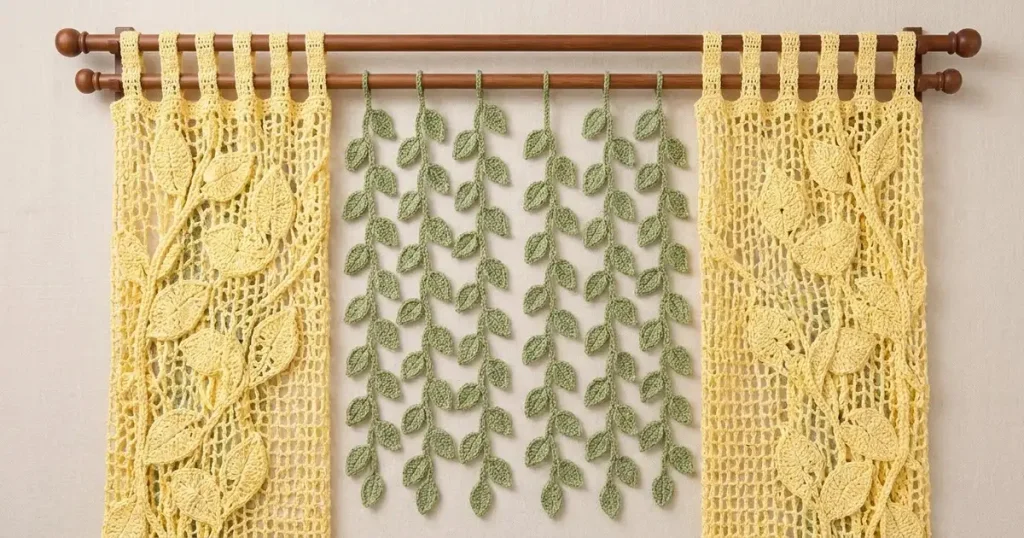
This botanical crochet curtain pattern pairs two butter-yellow mesh panels with raised yellow leaves and six hanging sage-green vines. Long folded tabs fit over an upper wooden rod, while a second rod carries the green strands across the open center. The layered leaves and winding stems echo the soft botanical shapes in the reference photograph.
This is an advanced decorative crochet project with separate shaped leaves, surface-crocheted veins, carefully placed appliqués, and reinforced hanging tabs. Allow approximately 35–50 hours, including blocking and assembly. It suits a maker who enjoys detailed finishing and wants an airy window treatment or a botanical wall hanging with plenty of visible texture.
Materials
- DK cotton yarn in butter yellow Approximately 1,200–1,400 m; buy the same dye lot for both panels
- DK cotton yarn in muted sage green Approximately 350–450 m
- 3.0 mm crochet hook Adjust to obtain both the mesh and solid-fabric gauges
- Tapestry needle and fine sewing needle For appliqués, veins, and reinforced tab seams
- Matching yellow and green sewing thread Optional for discreet secondary securing stitches
- Locking stitch markers, tape measure, rustproof pins, and blocking mats Use a full-size placement surface if possible
- Two securely mounted wooden rods Approximately 110–120 cm long and 2–2.5 cm in diameter, with removable ends
Abbreviations
chchainsl stslip stitchscsingle crochethdchalf double crochetdcdouble crochettrtreble crochetst / stsstitch / stitchesRSright sideWSwrong sideGauge, Size, and Construction
- Use US crochet terminology. Work panels and tabs in turned rows; work leaves around both sides of a foundation chain. Turning chains do not count as stitches unless specifically stated.
- Blocked mesh gauge: 20 foundation-stitch intervals and 8 mesh rows = 10 × 10 cm. Each mesh cell spans three stitch intervals. A panel has 20 cells across and 64 mesh rows, giving a nominal mesh area of 30 × 80 cm.
- Blocked solid-fabric gauge: 20 sc and 20 rows = 10 × 10 cm. Four header rows add approximately 2 cm. Each 32-row tab measures approximately 16 cm before folding and adds approximately 8 cm of hanging height.
- Blocked cord gauge: 23 completed slip stitches = 10 cm measured along the relaxed cord. A 150-stitch green cord is approximately 65 cm long. Do not stretch cords when measuring.
- For a mesh swatch, ch 28. Row 1: dc in the fourth ch from hook, then repeat ch 2, skip 2 ch, dc in next ch eight times. The initial three skipped chains count as the first dc; there are 9 cells and 10 dc. Rows 2–10: ch 3, turn, then work ch 2 and dc in each following dc across, ending in the top of the turning ch. Block and measure the central portion.
- Finished size is approximately 31 cm wide × 91 cm long per panel, including edging and folded tabs. Arrange the panels with approximately 38 cm between their inner edges for an overall display about 100 cm wide. These are blocking targets rather than guaranteed measurements.
- The curtain uses two panels, twelve tabs, twenty-four yellow leaves, six green cords, seventy-two green leaves, two long yellow stems, and eight yellow branch cords. There is no stuffing, face, or safety-eye placement because this is a curtain.
Butter-Yellow Mesh Panels — Make 2
- Foundation: with butter yellow, ch 61 loosely. Work into the back bumps if comfortable doing so.
- Row 1: ch 3 more; these three chains count as the first dc. Dc in the seventh ch from hook, then repeat ch 2, skip 2 foundation ch, dc in next foundation ch nineteen times. The first dc and turning chain enclose the first cell. Count 20 ch-2 cells and 21 dc, including the turning chain.
- Row 2: ch 3, turn; this counts as the first dc. Repeat ch 2, dc in next dc twenty times, working the final dc in the top of the previous turning chain. Count 20 cells and 21 dc.
- Rows 3–64: repeat Row 2. Every row has 20 cells and 21 dc. Mark every eighth completed row to help compare the two panels.
- Header Row 1: ch 1, turn. Sc in first dc; repeat 2 sc in next ch-2 space, sc in next dc twenty times. Count 61 sc.
- Header Rows 2–4: ch 1, turn, sc in all 61 sts. Count 61 sc per row. Fasten off after Header Row 4.
- Block both panels to matching rectangles before adding the border. Keep the 20 cells evenly spaced across the width and the 64 rows evenly spaced along the length.
Panel Borders — Work on Both Panels
- With RS facing, join butter yellow at the lower-left corner. Work across the bottom foundation: 1 sc into each of the 61 foundation positions. Count 61 sc. Ch 2 for the corner.
- Work up the first side: repeat 2 sc around the next mesh-row end and 3 sc around the following mesh-row end thirty-two times. This gives 160 sc across 64 mesh-row ends. Work 1 sc into each of the four header-row ends. Side total: 164 sc. Ch 2 for the corner.
- Work 1 sc in each of the 61 top header sts. Count 61 sc. Ch 2 for the corner.
- Work down the second side: 1 sc in each of the four header-row ends, then repeat 3 sc around the next mesh-row end and 2 sc around the following mesh-row end thirty-two times. Side total: 164 sc. Ch 2 and join with sl st to the first sc. Border total: 450 sc and four ch-2 corner spaces.
- Fasten off. If the border ripples or pulls inward, first check the blocked mesh gauge and the distribution of the side stitches. Reblock with the edge lying flat; do not force a strongly distorted edge into shape.
Folded Hanging Tabs — Make 6 on Each Panel
- With RS facing, number the 61 top-border sc from left to right, excluding corner chains. Mark these six groups: sts 1–7, 12–18, 23–29, 33–39, 44–50, and 55–61.
- Tab Row 1: join butter yellow in the first st of a marked group, ch 1, and sc in each of its seven sts. Count 7 sc.
- Tab Rows 2–32: ch 1, turn, sc in all 7 sts. Count 7 sc each row. Fasten off with a 35 cm sewing tail.
- Repeat Rows 1–32 for every marked group. Each panel has six strips approximately 3.5 × 16 cm.
- Fold each strip toward the WS, bringing Row 32 back to its own starting group. Sew all seven end stitches to the WS of the header directly below the corresponding top-border stitches. Make a second securing pass through the dense header fabric. Each folded loop has an approximate 8 cm drop.
- Keep the folds untwisted. Check that every loop accepts the rod and that all six loops on each panel hang at the same height.
Large Yellow Leaves — Make 8
- Foundation: with butter yellow, ch 17. Leave a 20 cm starting tail for securing the leaf base.
- Round 1, first side: sc in second ch from hook, hdc in next 2 ch, dc in next 4 ch, tr in next 4 ch, dc in next 2 ch, hdc in next ch, sc in next ch. These use 15 foundation chains and make 15 sts.
- Tip: in the final foundation chain, work sc, ch 2, sc. Rotate to work along the unused side of the foundation.
- Round 1, second side: sc in next ch, hdc in next ch, dc in next 2 ch, tr in next 4 ch, dc in next 4 ch, hdc in next 2 ch, sc in next ch. Join with sl st to the first sc. Count 32 sts plus the tip ch-2 space; the joining sl st does not count.
- Fasten off with a 60 cm sewing tail. The starting end is the leaf base; the ch-2 space is the tip. Gently block to approximately 8 × 4 cm, keeping the tip pointed.
Medium Yellow Leaves — Make 16
- Foundation: with butter yellow, ch 13, leaving a 20 cm starting tail.
- Round 1, first side: sc in second ch from hook, hdc in next ch, dc in next 3 ch, tr in next 3 ch, dc in next 2 ch, hdc in next ch. These use 11 foundation chains and make 11 sts.
- Tip: in the last foundation chain, work sc, ch 2, sc. Rotate to the unused side of the foundation.
- Round 1, second side: hdc in next ch, dc in next 2 ch, tr in next 3 ch, dc in next 3 ch, hdc in next ch, sc in next ch. Join with sl st to the first sc. Count 24 sts plus the tip ch-2 space.
- Fasten off with a 50 cm sewing tail. Block to approximately 6 × 3 cm. Keep the foundation line slightly raised rather than pressing the leaf completely flat.
Sage-Green Leaves — Make 72
- Foundation: with sage green, ch 9, leaving a 25 cm starting tail for attachment.
- Round 1, first side: sc in second ch from hook, hdc in next ch, dc in next ch, tr in next ch, dc in next ch, hdc in next ch, sc in next ch. These use seven foundation chains and make 7 sts.
- Tip: in the last foundation chain, work sc, ch 2, sc. Rotate to the unused side of the foundation.
- Round 1, second side: sc in next ch, hdc in next ch, dc in next ch, tr in next ch, dc in next ch, hdc in next ch, sc in next ch. Join with sl st to the first sc. Count 16 sts plus the tip ch-2 space.
- Fasten off and weave in the finishing tail. Keep the starting tail available. Block to approximately 4 × 2 cm, with a gentle central fold.
Raised Leaf Veins
- Work a matching-color surface-slip-stitch vein along the foundation line of each leaf. Hold yarn behind the leaf, insert the hook from the RS at its base, and draw up a loop.
- For each subsequent surface stitch, insert the hook through the next foundation-chain junction, draw the yarn through the fabric and through the loop on the hook. Work 15 surface sl sts on each large leaf, 11 on each medium leaf, and 7 on each green leaf. Stop before the tip space.
- Keep the vein loose enough that the leaf retains its blocked length. Fasten off on the WS and weave in both vein ends.
- On each yellow leaf, embroider three pairs of short diagonal side veins. Place them approximately one-quarter, halfway, and three-quarters along the central vein. Each diagonal runs from the central vein toward the edge and stops one stitch short of it.
- Leave the small green leaves with a central vein only. Their natural fold and alternating placement supply the texture visible in the hanging vines.
Yellow Stems and Branches
- Main stems, make 2: with butter yellow, ch 181. Working into the back bumps, sl st in second ch from hook and in each remaining ch. Count 180 sl sts. Fasten off with a 50 cm tail. At cord gauge, each stem measures approximately 78 cm.
- Branch cords, make 8: ch 31, then sl st in second ch from hook and each remaining ch. Count 30 sl sts. Fasten off with a 35 cm tail. Each branch measures approximately 13 cm.
- Block the cords without stretching. Roll them lightly between your fingers so the slip-stitch ridge faces forward consistently.
- Lay the first panel RS up, with its header at the top. For placement measurements, use the lower-left corner of the mesh as the origin: x measures across the 30 cm mesh width, and y measures upward along the 80 cm mesh height.
- Pin one main stem through these approximate coordinates in centimeters: (7, 2), (12, 20), (16, 38), (11, 56), and (20, 75). Let the cord curve smoothly between the points. Its two ends remain inside the mesh area.
- Add one branch from each of these four main-stem positions to the listed endpoint: (12, 20) to (4, 29); (16, 38) to (25, 45); (11, 56) to (4, 65); and (20, 75) to (26, 67). Ease any remaining branch length into a soft curve.
- Couch the stems and branches to the mesh with matching yarn. At every mesh intersection they cross, take a small stitch over the cord and around the mesh strand beneath it. Secure cord ends into solid stitches with several passes; do not rely on a single mesh chain for support.
- Mirror this layout on the second panel by replacing each x coordinate with 30 minus x. This makes the two botanical arrangements face inward when hung.
Yellow Leaf Placement and Attachment
- Allocate four large and eight medium leaves to each panel. Use the same coordinate system as for the stems. Coordinates below locate each leaf base; the stated direction tells you where its tip points.
- Pin the four large leaves on the first panel at (11, 16), pointing upper-left; (15, 34), pointing upper-right; (12, 53), pointing upper-left; and (18, 69), pointing upper-right.
- Pin the eight medium leaves at (8, 5), pointing lower-right; (12, 24), pointing upper-right; (5, 28), pointing upper-left; (16, 40), pointing upper-left; (24, 44), pointing upper-right; (11, 58), pointing upper-right; (5, 64), pointing upper-left; and (25, 67), pointing upper-left.
- Adjust each base by up to 2 cm so it sits directly on its stem or branch. Keep every leaf inside the panel border. Rotate the leaves slightly so their edges overlap the stems naturally without covering an entire neighboring leaf.
- Using the long sewing tail, secure the base first. Sew the central vein to the panel at three spaced points, catching a mesh strand beneath each point. Add three small attachment stitches down each side of the leaf, placing them at available mesh intersections.
- Leave the tip and short sections of the perimeter free so the leaf remains raised. Where a leaf edge falls over an open cell, run the sewing yarn along the leaf underside to the next supported point instead of drawing a visible thread across the hole.
- Mirror all base coordinates and tip directions for the second panel. Check both panels together before weaving in the final tails.
Green Hanging Vines — Make 6
- With sage green, ch 151. Sl st in the second ch from hook and in each remaining ch. Count 150 sl sts. Fasten off, leaving a 35 cm tail at the starting end. Make six cords and block each to approximately 65 cm.
- Number completed cord stitches from the starting end. Fold the first 12 stitches back toward the cord and sew the starting end securely to the cord at stitch 25. This forms a closed hanging loop containing the first 24 stitches, approximately 10 cm in circumference.
- On the remaining hanging length, mark cord stitches 30, 40, 50, 60, 70, 80, 90, 100, 110, 120, 130, and 140. These twelve positions receive one green leaf each.
- At stitch 30, use a leaf’s starting tail to sew its base around two adjacent cord stitches. Add a second stitch through the lower 1 cm of its central vein and around the cord, so the leaf cannot spin freely. Let its tip point down and left.
- Attach leaves at the remaining eleven markers, alternating right and left. Angle each tip downward about 30–45 degrees from the horizontal. Keep the surface veins facing the front.
- For every other vine, reverse the first leaf direction. Each vine has twelve leaves; six vines use all seventy-two leaves.
- Weave all attachment tails through the cord and leaf bases. The finished vertical drop from the supporting rod is approximately 60 cm, depending on rod diameter and final blocking.
Finishing
Lay the finished panels side by side and check their widths, hem levels, and tab folds. Weave remaining ends through dense stitches or the backs of appliqués. Give the work a final gentle wet block, supporting the leaves in their intended shapes. Let everything dry completely before hanging.
Mount the upper and lower rods approximately 5 cm apart, measured between their centers. Slide six yellow tabs from each panel onto the upper rod. Position the panels with roughly 38 cm of open space between their inner borders. Slide the six green loops onto the lower rod and space their centers approximately 6 cm apart within that opening. Replace the rod ends and adjust the strands so the leaves face forward.
The finished curtain should hang softly, with raised yellow leaves against the mesh and green vines suspended freely in the center. Recheck the tab seams after its first day hanging and reinforce any seam that stretches unevenly.
Tips for Success
- Block both mesh panels before placing any stems. A small difference in mesh length becomes obvious when the two hems hang beside one another.
- Mark the first and last dc of each mesh row. Always work the final dc into the top of the turning chain to preserve all twenty cells.
- Make surface veins with relaxed loops. A tight vein shortens the foundation line and makes a leaf curl into a tube.
- Attach yellow leaves at the base, center, and selected edge points. This keeps their raised shape while distributing their weight across several mesh strands.
- Hang one completed green vine before assembling the other five. Confirm the loop fit, leaf direction, and cord gauge while changes are still easy.
Common Mistakes to Avoid
- Losing the outer mesh cell: count twenty cells after each row. If there are nineteen, undo that row and restore the final dc in the turning chain.
- Working both sides of a leaf in the same chain loops: reserve the unused side of the foundation for the return pass. This creates the central line and keeps the oval balanced.
- Tightening slip-stitch cords until they become stiff: enlarge the working loop slightly and check the completed cord gauge. Remake a short or rigid cord before adding leaves.
- Pulling appliqué stitches across open mesh: carry the sewing yarn behind the leaf and attach at mesh intersections. Visible tight bridges distort the lace.
- Sewing tab ends only to the border: reinforce each seam through the dense header beneath it so the panel’s weight is shared across all seven tab stitches.
Ways to Customize This Pattern
- Use ivory panels and olive-green vines for a quieter botanical palette while keeping the yellow leaf placement and construction unchanged.
- Shorten both panels by eight mesh rows to remove approximately 10 cm. Shorten the main stems by 23 cord stitches and remove the lowest medium leaf from each panel.
- Widen each panel by two mesh cells: add six foundation chains, work twenty-two cells per mesh row, and make a 67-stitch header. Re-space the six seven-stitch tabs evenly across the new header.
- Create a denser center by adding two complete twelve-leaf vines. Allow approximately 100–130 m of additional green yarn and space all eight vines evenly.
- For a wall display, use the same two-rod arrangement and pin the green leaf tips into a consistent downward rhythm before their final light blocking.
Frequently asked questions
The upper rod carries the long yellow tabs, while the lower rod supports the separate green vines across the center opening. This reproduces the layered arrangement in the reference and lets you remove or reposition the vines independently.
The taller stitches widen each leaf, and the surface vein strengthens its center. Attach the base, three central points, and selected side points while leaving the tip free. This creates shallow relief without adding filling or making the curtain heavy.
Check a completed tab around the actual rod first. For additional room, add the same even number of rows to every tab. At the stated solid-fabric gauge, four additional rows add approximately 1 cm to the folded tab drop. Enlarge each green hanging loop separately before adding its leaves.
Yes, provided your yarn permits washing. Remove both rods, hand wash gently, and support the wet fabric as you lift it. Press out water in towels, then dry flat with the panels square and the vines separated. Avoid hanging it while wet because cotton can lengthen under its own weight.
The finished Botanical Leaf Crochet Curtain Pattern

