Botanical Leaf Crochet Lampshade Pattern
Advanced
For experienced crocheters who enjoy complex shaping, fine detail, and ambitious construction
Weekend Project
A satisfying weekend make — start Friday, finish Sunday, enjoy forever.
Handmade Gift
A beautiful keepsake — free forever. Read online or print at home.
About This Botanical Leaf Crochet Lampshade Pattern
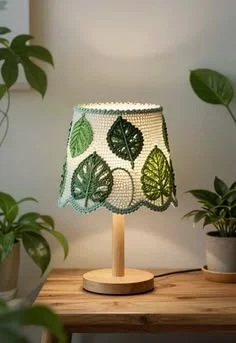
This crochet lampshade pattern recreates the botanical character of the reference with an ivory mesh shade, open green leaves, and a sage scalloped hem. A gently tapered frame gives the fabric its shape, while embroidered veins and curling stems bring the leaf arrangement together. The wooden lamp base is a separate purchased component.
Allow approximately 14–18 hours, plus blocking time, for the mesh cover, separate leaf motifs, embroidery, and frame attachment. This advanced project suits crocheters comfortable with joined lace rounds, measured blocking, and precise appliqué. The finished cover fits a small table-lamp shade approximately 20 cm high, with a 19 cm top diameter and a 24 cm bottom diameter.
Materials
- Smooth sport-weight cotton, approximately 250 m per 100 g Ivory: 80 g; sage: 25 g; medium green: 20 g; forest green: 20 g; yellow-green: 20 g
- 3.0 mm crochet hook Adjust to obtain the blocked mesh gauge
- Commercial tapered lampshade frame Approximately 19 cm top diameter, 24 cm bottom diameter, and 20 cm sloping side length; fitting must match your lamp
- Compatible table-lamp base and LED bulb Use only a setup whose manufacturer permits a textile shade and specifies suitable clearance
- Blunt tapestry needle and fine sewing needle For veins, appliqué, and frame lacing
- Matching cotton sewing thread Ivory and green
- Stitch markers, tape measure, rustproof pins, and blocking surface For shaping the cover and individual leaves
Abbreviations
chchainsl stslip stitchscsingle crochethdchalf double crochetdcdouble crochetststitchspspaceGauge, Size, and Construction
- Use US crochet terminology. Work the cover from its narrower top edge toward its wider lower edge, in joined rounds with the outside facing you. Do not turn.
- Mesh gauge after washing and blocking: 8 mesh units across and 10 mesh rows high measure 10 × 10 cm. One mesh unit is one dc plus its following ch-1 sp, equivalent to two stitch positions across.
- For a swatch, ch 26. Row 1: dc in sixth ch from hook, then repeat (ch 1, skip 1 ch, dc in next ch) 10 times. The five skipped starting chains represent the first dc and ch-1 sp. You have 12 dc and 11 spaces.
- Swatch Rows 2–12: ch 4, turn; skip the first dc, dc in next dc, then repeat (ch 1, dc in next dc) 10 times. Each row has 12 dc and 11 spaces; the beginning ch 4 counts as one dc and one space. Measure an interior area after blocking.
- The cover has 48 mesh units at the top and 60 at the bottom: approximately 60 cm and 75 cm in circumference. These correspond to diameters of approximately 19.1 cm and 23.9 cm. The 19 mesh rounds plus the narrow solid borders give approximately 20 cm of sloping height.
- A large blocked leaf should measure approximately 10 × 6 cm; a small leaf approximately 8 × 5 cm. Leaf dimensions are secondary to a correct cover gauge. Do not stuff any part; eyes and toy components are not used.
Ivory Tapered Mesh Cover
- Foundation: with ivory, ch 96 loosely. Join with sl st in first ch, taking care not to twist. The foundation must stretch comfortably around the frame’s top ring.
- Round 1: ch 1, sc in each foundation ch; join with sl st in first sc. The beginning ch 1 does not count as a stitch. (96 sc)
- Round 2: ch 4, counting as first dc and ch-1 sp; skip the next sc, then repeat (dc in next sc, ch 1, skip next sc) 47 times. Join in third ch of beginning ch 4. (48 dc, 48 ch-1 spaces)
- Round 3: sl st into first ch-1 sp, ch 4; work (dc, ch 1) in each remaining ch-1 sp. Join in third ch of beginning ch 4. (48 mesh units)
- Round 4: sl st into first space, ch 4; work (dc, ch 1) in each of the next 22 spaces, then (dc, ch 1, dc, ch 1) in next space; repeat [(dc, ch 1) in each of next 23 spaces, (dc, ch 1, dc, ch 1) in next space] once. Join as before. (50 mesh units)
- Rounds 5–6: repeat Round 3 using all 50 spaces. (50 mesh units each round)
- Round 7: sl st into first space, ch 4; work (dc, ch 1) in each of next 23 spaces, then (dc, ch 1, dc, ch 1) in next space; repeat [(dc, ch 1) in each of next 24 spaces, (dc, ch 1, dc, ch 1) in next space] once. Join. (52 mesh units)
- Rounds 8–9: repeat Round 3 using all 52 spaces. (52 mesh units each round)
- Round 10: sl st into first space, ch 4; work (dc, ch 1) in each of next 24 spaces, then (dc, ch 1, dc, ch 1) in next space; repeat [(dc, ch 1) in each of next 25 spaces, (dc, ch 1, dc, ch 1) in next space] once. Join. (54 mesh units)
- Rounds 11–12: repeat Round 3 using all 54 spaces. (54 mesh units each round)
- Round 13: sl st into first space, ch 4; work (dc, ch 1) in each of next 25 spaces, then (dc, ch 1, dc, ch 1) in next space; repeat [(dc, ch 1) in each of next 26 spaces, (dc, ch 1, dc, ch 1) in next space] once. Join. (56 mesh units)
- Rounds 14–15: repeat Round 3 using all 56 spaces. (56 mesh units each round)
- Round 16: sl st into first space, ch 4; work (dc, ch 1) in each of next 26 spaces, then (dc, ch 1, dc, ch 1) in next space; repeat [(dc, ch 1) in each of next 27 spaces, (dc, ch 1, dc, ch 1) in next space] once. Join. (58 mesh units)
- Rounds 17–18: repeat Round 3 using all 58 spaces. (58 mesh units each round)
- Round 19: sl st into first space, ch 4; work (dc, ch 1) in each of next 27 spaces, then (dc, ch 1, dc, ch 1) in next space; repeat [(dc, ch 1) in each of next 28 spaces, (dc, ch 1, dc, ch 1) in next space] once. Join. (60 mesh units)
- Round 20: repeat Round 3 using all 60 spaces. (60 mesh units)
- Round 21: ch 1; sc in each dc and each ch-1 sp around, starting in the dc represented by the previous round’s beginning chain. Join in first sc. Fasten off ivory. (120 sc)
Sage Scalloped Hem and Top Trim
- Round 22, lower hem: join sage in any Round 21 sc. Ch 1, sc in same st; repeat [skip 2 sc, 5 dc in next sc, skip 2 sc, sc in next sc] 19 times; skip 2 sc, 5 dc in next sc, skip final 2 sc, and join in first sc. Fasten off. (20 scallops; 100 dc and 20 sc)
- Top trim: with the outside facing you, join sage to an unused underside loop of any foundation chain. Ch 1, sc in the underside of each of the 96 foundation chains. Join in first sc and fasten off. (96 sc)
- Weave in the trim ends along their matching colors. Leave the scallops free below the frame’s lower ring when fitting the cover.
Large Openwork Leaves — Make Four
- Make two leaves in medium green, one in forest green, and one in yellow-green. Each leaf is worked around a central foundation chain. Keep that chain relaxed so the center stays straight.
- Foundation: ch 17. Round 1, first side: sc in second ch from hook; repeat (ch 5, skip 2 foundation chains, sc in next foundation chain) 5 times. You have reached the last chain. (6 sc and 5 ch-5 arches)
- Round 1, tip and second side: ch 3, sc again in the last foundation chain. Working back along the unused side of the chain, repeat (ch 5, skip 2 foundation chains, sc in next foundation chain) 5 times. Ch 3 and join with sl st in the first sc. (12 sc, 10 ch-5 arches, and 2 ch-3 end spaces)
- Round 2: sl st into first ch-5 arch. In each of the next 5 ch-5 arches work (sc, hdc, 3 dc, hdc, sc). In the tip ch-3 sp work (sc, hdc, dc, hdc, sc). Work the same 7-stitch group in each of the 5 arches on the second side; work the same 5-stitch group in the final ch-3 sp. Join in first sc. Do not work into Round 1 sc. (80 stitches)
- Fasten off, leaving a 60 cm sewing tail. Mark the end where the foundation began as the leaf base. Block to approximately 10 × 6 cm, gently stretching the arches open and keeping the opposite tip pointed.
Small Openwork Leaves — Make Three
- Make two in medium green and one in forest green. Foundation: ch 14.
- Round 1, first side: sc in second ch from hook; repeat (ch 5, skip 2 foundation chains, sc in next foundation chain) 4 times. (5 sc and 4 ch-5 arches)
- Round 1, tip and second side: ch 3, sc again in last foundation chain. Along the unused side, repeat (ch 5, skip 2 foundation chains, sc in next foundation chain) 4 times. Ch 3 and join in first sc. (10 sc, 8 ch-5 arches, and 2 ch-3 end spaces)
- Round 2: sl st into first arch. Work (sc, hdc, 3 dc, hdc, sc) in each of the first 4 ch-5 arches; work (sc, hdc, dc, hdc, sc) in tip ch-3 sp. Repeat the 7-stitch group in the remaining 4 arches; work the 5-stitch group in final ch-3 sp. Join in first sc. (66 stitches)
- Fasten off with a 50 cm sewing tail. Mark the foundation-start end as the base. Block each leaf to approximately 8 × 5 cm.
Leaf Veins and Separate Stems
- After blocking the leaves, embroider a central vein along each foundation chain using small backstitches. Use sage on the forest and medium-green leaves, and forest green on the yellow-green leaf. Catch the chain itself rather than pulling stitches across an open arch.
- For each large leaf, add five diagonal veins on each side. Join the central chain to the sc anchor at the outer end of each corresponding Round 1 ch-5 arch. For each small leaf, add four veins on each side. Couch each diagonal yarn strand to its arch once near the midpoint so it cannot sag freely.
- Make three separate sage stems. Stem A: ch 35, sl st in second ch from hook and each remaining chain. (34 sl st)
- Stem B: ch 45, sl st in second ch from hook and each remaining chain. (44 sl st)
- Stem C: ch 55, sl st in second ch from hook and each remaining chain. (54 sl st)
- Leave 30 cm tails at both ends of each stem. Shape the stems into loose curves during placement; they are surface details and must not draw the mesh inward.
Blocking, Layout, and Frame Attachment
- Wash the cover gently according to the cotton label. Blot in a towel without twisting. Block over a clean, non-electrical form matching the frame, with a top circumference of 60 cm, bottom circumference of 75 cm, and approximately 20 cm sloping height. Let dry completely.
- Place the dry cover temporarily on the frame. Put its round joins at the back. Mark the front center and both side quarters with removable markers. Measure leaf positions down the sloping fabric from the top edge.
- Front layout: position the large medium-green leaf at the lower left, its base 17 cm below the top and its tip pointing upward and slightly right. Put the large yellow-green leaf at the lower right, with its base 17 cm below the top and its tip pointing upward and slightly left.
- Position the small forest-green leaf above the center, its base approximately 10 cm below the top and its tip pointing upward. Place one small medium-green leaf near the upper-left side, with its base 8 cm below the top and its tip angled toward the top rim. Keep all leaf tips below the top border.
- Back layout: place the remaining large medium-green leaf low on one side, the large forest-green leaf low on the other, and the remaining small medium-green leaf between them near the top. Leave at least 1 cm between the upper leaf and the trim.
- Remove the cover from the frame. Sew each leaf’s central chain to the mesh with small stitches at approximately 1 cm intervals. Then secure its outer edge to nearby mesh intersections every 1–1.5 cm. Catch the mesh yarn without bridging empty openings with long exposed sewing threads. Keep the mesh relaxed.
- Couch Stem A from the upper-left leaf toward the front lower-left leaf. Curve Stem B between the two lower front leaves, making an open loop in the center. Curve Stem C between the rear leaves. Secure each stem approximately every 1 cm with matching sewing thread.
- Slide the completed cover onto the frame. With doubled ivory cotton and a blunt needle, lace the top foundation edge to the top ring with one wrap at every second foundation chain. (48 attachment wraps)
- Lace Round 21 to the lower ring with one wrap at every second sc. (60 attachment wraps) Keep Round 22 below the ring. Secure the cover to each vertical frame support at the top, middle, and bottom with a few small ivory stitches, avoiding the lamp fitting.
Finishing
Set the shade upright and smooth the mesh between the rings. The leaves should lie against the cover with their openings clearly visible, and the sage scallops should hang evenly below the lower ring. Secure and trim every remaining end, checking the inside for loose threads.
Fit the shade to its compatible lamp only when the crochet is completely dry. Check that the fitting is secure and that the fabric, leaves, and lacing maintain the manufacturer’s required clearance from the bulb and electrical parts. Use a suitable LED bulb within the lamp’s rating; do not use incandescent or halogen bulbs with this cotton cover.
Tips for Success
- Mark both increase spaces before each shaping round. Each increase round adds exactly two dc and two spaces, keeping the taper balanced.
- Measure the washed mesh swatch without pulling it tight. A shade that fits only under heavy tension will distort the leaves and scallops.
- Block the leaf motifs separately before embroidering their veins. This lets the vein lengths match the final openwork shape.
- Photograph the pinned leaf arrangement while the cover is on the frame. Use that image to preserve the layout when sewing the cover flat.
- Keep the yellow-green leaf toward the front and the darkest leaf above it to reproduce the reference’s contrast.
Common Mistakes to Avoid
- Counting the beginning ch 4 as two mesh units: it represents one dc and its following space, so count it as one unit.
- Working into the old dc during later mesh rounds: from Round 3 onward, place each new dc in a chain space. Working into both stitches and spaces would increase the circumference unintentionally.
- Adding stitches into the leaf’s Round 1 sc during the edging: work only into the arches and end spaces to keep the large leaf at 80 stitches and the small leaf at 66.
- Pulling appliqué thread tight: loosen the affected stitches and resew while the mesh lies at its blocked dimensions. Tight stitching causes dimples around the leaves.
- Lacing the scallop tips to the frame: move the attachment stitches to Round 21 so the decorative hem can hang freely.
Ways to Customize This Pattern
- Use soft olive in place of yellow-green for a quieter botanical palette while retaining ivory mesh and sage borders.
- Embroider the veins in ivory for stronger contrast on the forest-green leaves.
- Make a pair of shades with mirrored front layouts by swapping the lower yellow-green and medium-green leaves.
- For a fuller botanical arrangement, add one extra small leaf at the back; keep the top fitting and inner bulb clearance unobstructed.
Frequently asked questions
No. The mesh and leaf motifs need the top ring, bottom ring, and vertical supports to hold their shape. Starch is not a substitute for a suitable frame.
The written counts target approximately 60 cm at the top and 75 cm at the bottom. A substantially different frame needs a recalculated mesh count and increase schedule. Compare your blocked swatch and both ring circumferences before making the cover; stretching cannot reliably correct a large mismatch.
Unplug the lamp and remove the shade. Dust gently with a soft brush. For washing, undo the frame lacing and support tacks, hand-wash the textile cover according to its yarn label, and block it back to size. Dry completely before relacing and reinstalling.
The mesh expands during blocking. Attaching leaves beforehand can prevent that expansion and create puckers. Blocking first also lets you position each leaf accurately around the tapered frame.
The finished Botanical Leaf Crochet Lampshade Pattern

