Braided Branch Maple Leaf Table Runner Crochet Pattern
Beginner Friendly
Perfect for those just starting their crochet journey, with clear instructions and simple techniques
Single-Day Project
A satisfying project you can complete in a single afternoon or evening.
Handmade Gift
A beautiful keepsake — free forever. Read online or print at home.
About This Braided Branch Maple Leaf Table Runner Crochet Pattern
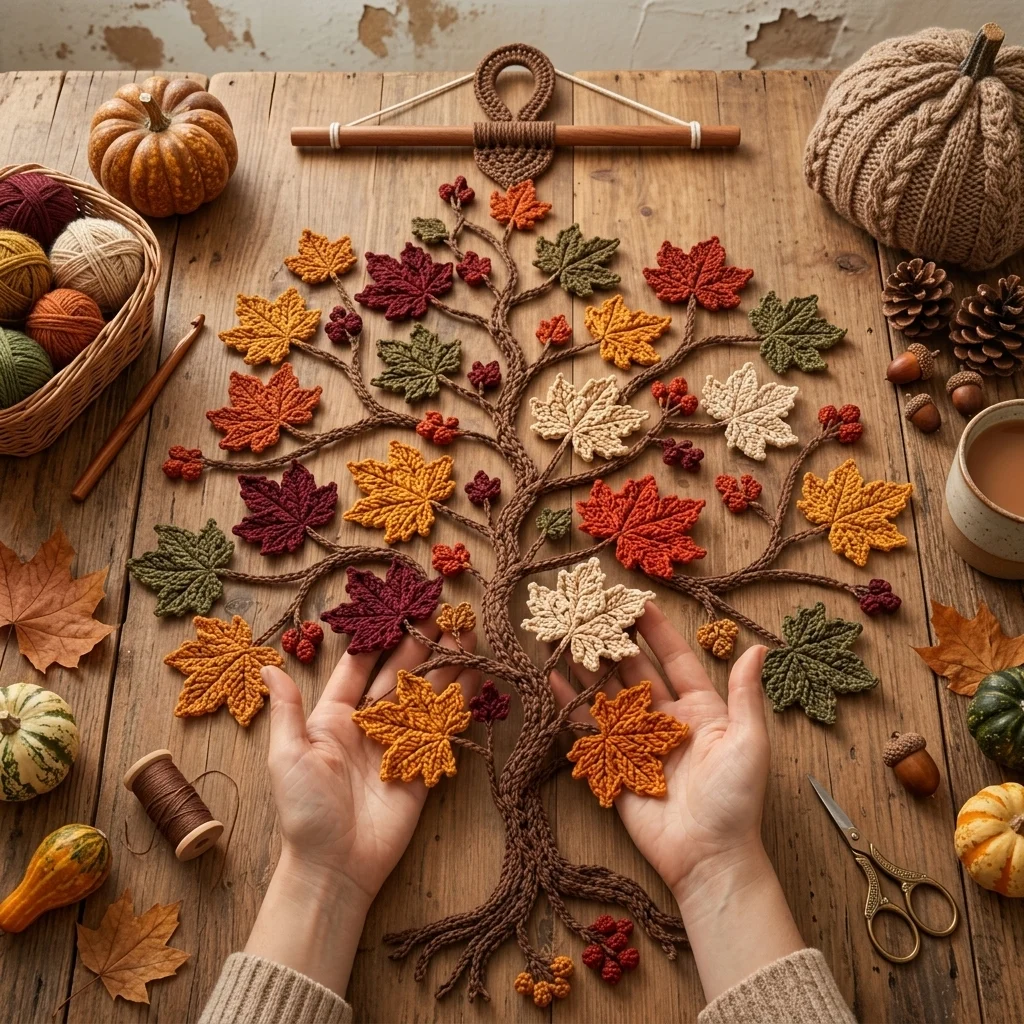
This crochet maple leaf branch table runner pattern builds a single thick, braided trunk that forks into 6-8 shorter limbs, each holding one or two large maple leaves in rust, gold, burgundy, cream, or olive, with small berry clusters tucked along the branch junctions. Rather than a flat panel or joined-motif strip, the whole piece is built around this dense, rope-like branch structure, so it reads as an actual fallen limb laid down the table rather than a woven textile.
What makes this design distinctive is the branch itself: a firm, twisted cord worked thick enough to hold its shape and support the weight of a dozen leaves, forking into narrower limbs at deliberate points rather than staying a single straight line. Combined with genuinely large, sharply lobed maple leaves in five different colors, and small bobble berry clusters scattered at the fork points, the finished piece has real sculptural presence rather than lying flat. Expect to spend 16-20 hours total, split fairly evenly between the branch structure and the 12 leaves.
This is an advanced pattern, best suited to someone comfortable building a dimensional forked branch from crochet cord and confident attaching large motifs at varying angles along it, rather than someone wanting a flat panel or joined-motif design.
Materials
- Worsted weight yarn, dark brown ~120g, branch and limbs
- Worsted weight yarn, rust orange ~40g, leaves
- Worsted weight yarn, mustard gold ~40g, leaves
- Worsted weight yarn, burgundy wine ~30g, leaves
- Worsted weight yarn, cream ~30g, leaves
- Worsted weight yarn, olive green ~30g, leaves
- Worsted weight yarn, brick red ~15g, berry clusters
- Crochet hook 4 mm (US G/6)
- Tapestry/yarn needle
- Steam iron and pressing cloth, or blocking mat and pins
- Sharp scissors
Abbreviations
chchainsl stslip stitchscsingle crochethdchalf double crochetdcdouble crochettrtreble/triple crochetMRmagic ringst(s)stitch(es)reprepeatFOfasten offMain Trunk
- With dark brown, holding 2 strands together throughout, ch approximately 100 cm for the main trunk length.
- Row 2: sc back down the entire chain, working into every ch, to thicken the trunk.
- Row 3: sc back down the trunk once more, still holding 2 strands, for a firm, rope-like thickness.
- FO leaving generous tails at both ends. This trunk forms the central spine that the forked limbs will branch from.
Forked Limbs (make 8)
- With dark brown, holding 2 strands together, ch a length of 15-25 cm per limb, varying the lengths so limbs are shorter near the top and bottom of the trunk and longer at the widest middle section, matching the branching silhouette in the photo.
- Sc back down each limb chain once to give it body, matching the trunk’s thickness as closely as possible at a smaller scale.
- FO leaving a tail at the base of each limb for attaching to the trunk. Repeat for 8 limbs total.
Attaching Limbs to the Trunk
- Lay the trunk flat and mark 8 points along its length where limbs will branch off, alternating sides and spacing them to create a natural, staggered forking pattern rather than a symmetrical ladder.
- Using the tail at the base of each limb, whipstitch it securely to the trunk at its marked point, angling each limb outward and slightly upward at a different angle from its neighbors.
- Weave in all tails at the junctions once every limb is attached.
Maple Leaf Motif (make approximately 12: mix of rust, gold, burgundy, cream, and olive)
- Ch 4, sl st in first ch to form a small foundation ring.
- Lobe 1, top center: ch 12. Starting in 2nd ch from hook: sl st, sc 2, hdc 3, dc 3, tr 2 (10 sts). Sl st into ring.
- Lobe 2, upper right: ch 9. Starting in 2nd ch from hook: sl st, sc 2, hdc 3, dc 2 (8 sts). Sl st into ring.
- Lobe 3, lower right: ch 6. Starting in 2nd ch from hook: sl st, sc 3, hdc 1 (5 sts). Sl st into ring.
- Lobe 4, lower left: repeat Lobe 3 exactly. Sl st into ring.
- Lobe 5, upper left: repeat Lobe 2 exactly. Sl st into ring.
- Sl st into base of Lobe 1 to close. FO leaving a 15-20 cm tail for attaching and veining. Repeat for approximately 12 leaves total.
Embroidering the Veins
- Thread each leaf’s tail onto a tapestry needle.
- Work a straight or backstitch line from the center ring up the middle of the top lobe to its tip.
- Work a shorter straight stitch out toward the tip of each of the remaining 4 lobes.
- Weave in the tail on the wrong side, or leave a short length free if that leaf will be tied onto a limb at that point.
Berry Clusters (make approximately 10, in brick red)
- 4 sc in MR. Do not join.
- Pull the MR tail tight to close, then sl st into the first sc to close into a small tight bobble.
- FO leaving a short tail for attaching. Repeat for approximately 10 total, grouped in small clusters of 2-3 near several limb junctions.
Blocking the Leaves
- Lightly steam or mist each finished leaf, right-side up, and pin it flat with all 5 lobes spread evenly.
- Let dry completely before attaching to the branch structure.
Attaching Leaves and Berries
- Tie or whipstitch 1-2 leaves near the tip of each of the 8 limbs, using the leaf’s own tail, mixing colors so no two adjacent leaves match.
- Position the remaining leaves directly along the main trunk between limb junctions, filling any gaps so the overall silhouette looks full rather than sparse.
- Tuck berry clusters at several limb junctions and along the trunk, mixing placement so they don’t repeat identically at each fork.
- Once all pieces are placed, trim any exposed tails close to the last knot and secure loose ends with a small stitch.
Finishing
Lay the finished branch flat down the center of the table and gently curve the trunk and limbs into a natural, slightly irregular shape rather than a straight line. Fluff and adjust the leaves so they angle in different directions and overlap slightly at the fork points, similar to how a real fallen branch would look. Check the underside for any stray tails or loose knots and secure them before setting the table.
Tips for Success
- Work the trunk and limbs with 2 strands held together throughout; a single strand won’t give the thick, substantial branch look this design needs.
- Vary limb lengths and angles deliberately rather than making them uniform, so the branching looks organic rather than symmetrical.
- Mix all 5 leaf colors across both the limbs and the trunk sections, rather than grouping by color, for a natural, blended look.
- Curve the finished trunk gently by hand once everything is attached; a perfectly straight branch looks less convincing than one with a slight natural bend.
- Block every leaf before attaching; unblocked leaves curl and won’t display well once tied onto the branch.
Common Mistakes to Avoid
- Spacing limbs at even, symmetrical intervals along the trunk looks stiff and artificial. Fix: stagger limb positions and vary spacing as instructed.
- Using a single strand for the trunk leaves it too thin to look like a real branch or to support the leaves’ weight. Fix: hold 2 strands together throughout the trunk and limb rows.
- Making all limbs the same length flattens the branching silhouette. Fix: vary limb chain lengths between 15-25 cm as instructed.
- Grouping same-colored leaves together on one limb or section breaks the blended, natural color look. Fix: mix all 5 colors throughout the whole piece.
- Leaving the branch perfectly straight instead of curving it looks less like an actual fallen limb. Fix: gently bend the trunk by hand once assembly is complete.
Ways to Customize This Pattern
- Shorten the trunk and use fewer limbs and leaves for a smaller centerpiece version instead of a full table runner.
- Swap the five-color autumn palette for greens and yellows for a spring or everyday version.
- Add small crocheted acorns tucked among a few of the leaf clusters for extra texture.
- Work the trunk and limbs in a lighter grey-brown for a birch-like look instead of a darker wood tone.
- Use only 3 leaf colors instead of 5 for a more restrained, cohesive palette.
Frequently asked questions
It should feel firm and substantial in your hands, similar to a thick cord or thin rope, once both sc passes are worked with 2 strands held together. If it still feels floppy, add a third pass before attaching any limbs.
Yes, though a longer trunk will look sparser with the same 12 leaves. Add 3-4 extra leaves and 1-2 extra limbs for every 20-30 cm of additional trunk length to keep the density consistent.
A few bare limb tips look natural and match real branch structures; you don’t need to cover every single limb. Use your leaf count to decide which limbs get 1, 2, or none.
This is a shaping issue rather than a stitch issue. Once fully assembled, gently curve the trunk and limbs by hand into a soft, irregular shape; the twisted cord construction holds a bent shape well once set.
The finished Braided Branch Maple Leaf Table Runner Crochet Pattern

