Braided Cord Maple Leaf Table Runner Crochet Pattern
Beginner Friendly
Perfect for those just starting their crochet journey, with clear instructions and simple techniques
Single-Day Project
A satisfying project you can complete in a single afternoon or evening.
Handmade Gift
A beautiful keepsake — free forever. Read online or print at home.
About This Braided Cord Maple Leaf Table Runner Crochet Pattern
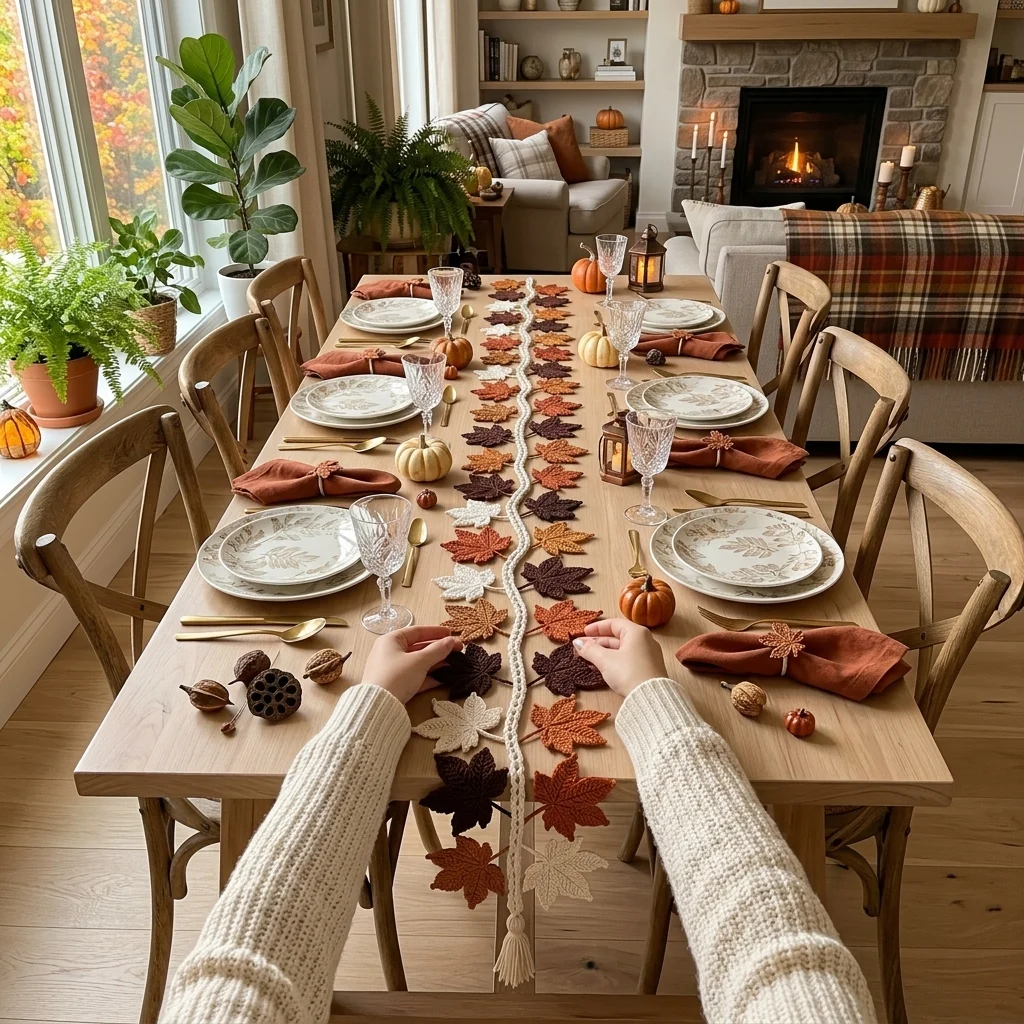
This crochet maple leaf table runner pattern builds its structure around a thick, twisted cream cord rather than a woven or joined panel. Roughly 30 maple leaves in rust, chocolate brown, and cream are tied along both sides of the cord in a loose zigzag, so the leaves fan outward from a clean center spine, finished at both ends with substantial tassels that pool onto the table.
What makes this design distinctive is the braided cord itself, worked as a long, dense twisted chain rather than a flat crocheted strip, giving the runner a rope-like center line that contrasts with the flat, pointed leaves along its length. Because leaves attach individually along the cord rather than joining edge to edge, the finished piece stays flexible and drapes naturally rather than lying rigid, and the tasseled ends give it a finished, tailored look at both table edges. Expect to spend 14-18 hours total, split between the braided cord, roughly 30 leaves, and the two tassels.
This is an advanced pattern, best suited to someone comfortable working a dense twisted-chain cord and confident balancing leaf placement and color along its length, rather than someone wanting a flat joined-motif runner.
Materials
- Worsted weight yarn, cream ~100g, cord and tassels
- Worsted weight yarn, rust orange ~40g, leaves
- Worsted weight yarn, chocolate brown ~40g, leaves
- Worsted weight yarn, cream (leaf color) ~20g, leaves
- Crochet hook 4 mm (US G/6)
- Tapestry/yarn needle
- Piece of cardboard or a book for wrapping tassels
- Sharp scissors
Abbreviations
chchainsl stslip stitchscsingle crochethdchalf double crochetdcdouble crochetst(s)stitch(es)reprepeatFOfasten offBraided Cord Spine
- With cream, holding 2 strands together throughout for extra thickness, ch a foundation chain of approximately 150 cm in length.
- Row 2: sl st back down the entire chain, working into every ch, to thicken and firm up the cord.
- Row 3: work a second pass of sl st back down the cord once more, still holding 2 strands, to build up the dense, twisted rope look shown in the photo.
- FO leaving generous tails, at least 25 cm, at both ends for the tassels.
Maple Leaf Motif (make approximately 30: mix of rust, brown, and cream)
- Ch 4, sl st in first ch to form a small foundation ring.
- Lobe 1, top center: ch 11. Starting in 2nd ch from hook: sl st, sc 2, hdc 3, dc 3 (9 sts). Sl st into ring.
- Lobe 2, upper right: ch 9. Starting in 2nd ch from hook: sl st, sc 2, hdc 3, dc 2 (8 sts). Sl st into ring.
- Lobe 3, lower right: ch 6. Starting in 2nd ch from hook: sl st, sc 3, hdc 1 (5 sts). Sl st into ring.
- Lobe 4, lower left: repeat Lobe 3 exactly. Sl st into ring.
- Lobe 5, upper left: repeat Lobe 2 exactly. Sl st into ring.
- Sl st into base of Lobe 1 to close. FO leaving a 15-20 cm tail for attaching. Repeat for approximately 30 leaves total.
Blocking the Leaves
- Lightly steam or mist each finished leaf, right-side up, and pin it flat with all 5 lobes spread evenly.
- Let dry completely before attaching to the cord. Repeat for all 30 leaves before assembly.
Attaching Leaves to the Cord
- Lay the finished cord flat and mark the center point, leaving equal lengths of plain cord at both ends for the tassels.
- Starting near the center and working outward toward both ends, tie or whipstitch each leaf’s base tail to the cord at alternating points along its length, one leaf slightly left of the cord, the next slightly right, to build the zigzag arrangement shown in the photo.
- Mix rust, brown, and cream leaves as you go rather than grouping by color, checking every few leaves that no long run of one color forms.
- Continue until all 30 leaves are attached, leaving the marked tassel sections at both ends completely bare.
Tassels (make 2, one per end)
- Wrap cream yarn around a piece of cardboard or a book approximately 15 cm wide, 40-50 times, for a full, dense tassel.
- Slide the wrapped loops off carefully and tie tightly at the top with a separate strand of yarn, leaving long ends for attaching to the cord.
- Cut through the loops at the bottom to release the tassel strands, then wrap and tie a separate strand around the tassel a short distance below the top tie to form the tassel’s neck.
- Trim the tassel ends evenly. Repeat for a second tassel, then attach one to each end of the braided cord using the top tie’s long ends, securing firmly.
Finishing
Lay the finished runner flat down the center of the table and let it settle for a few minutes; the cord relaxes slightly once weighted by the leaves. Comb through both tassels lightly with your fingers to separate the strands evenly, and trim again if needed for a clean, even edge. Adjust leaf placement by hand if any section along the cord looks too dense or too sparse compared to the rest.
Tips for Success
- Work the braided cord with 2 strands held together throughout; a single strand won’t give the thick, rope-like look this design needs.
- Block every leaf before attaching it to the cord; unblocked leaves curl and won’t lie flat once weighted onto the finished runner.
- Attach leaves in a genuine alternating zigzag, not a straight line down one side, to match the fanned-out look in the photo.
- Mix all 3 leaf colors as you attach them rather than grouping by color, checking every few leaves for accidental color runs.
- Wrap tassels generously; a thin, sparse tassel looks noticeably different from the full, dense ones shown in the photo.
Common Mistakes to Avoid
- Working the cord with a single strand instead of 2 held together leaves it too thin and floppy to hold the leaves’ weight well. Fix: hold 2 strands together throughout the cord rows.
- Attaching all leaves to one side of the cord instead of alternating sides loses the fanned zigzag look. Fix: alternate left and right consistently as you attach each leaf.
- Leaving uneven lengths of bare cord at the two ends throws off the runner’s final symmetry. Fix: measure and mark both tassel sections before attaching any leaves.
- Cutting tassel strands to inconsistent lengths gives a ragged tassel edge. Fix: wrap around a fixed-width cardboard guide and trim evenly after tying.
- Grouping same-colored leaves together in one section instead of mixing them throughout breaks the blended, natural color look. Fix: check color distribution every few leaves as you attach them.
Ways to Customize This Pattern
- Shorten the cord and use fewer leaves for a smaller version suited to a dresser scarf or narrow console table.
- Swap the rust, brown, and cream leaf palette for greens and yellows for a spring or everyday version.
- Use a single leaf color instead of three for a more monochrome, subtle look.
- Add small crocheted acorns tied in among the leaves for extra seasonal detail.
- Skip the tassels and finish both ends with a simple knot instead, for a cleaner, more minimal look.
Frequently asked questions
It should read as a substantial rope, roughly pencil-width or slightly thicker once both sl st passes are worked. If your cord looks thin after the first pass, add a third sl st pass before moving on to attaching leaves.
Yes. Extend the cord’s length and add leaves proportionally along the new length, keeping the same alternating zigzag spacing and color mix throughout.
No, though matching keeps the look cohesive as shown in the photo. A contrasting tassel color, picking up one of the leaf shades, would also work well and add a bit more visual interest at the ends.
This usually means the leaf’s attaching tail was tied too loosely or at an angle. Tie each leaf’s base securely and flat against the cord, checking that the leaf sits face-up before trimming and weaving in the tail.
The finished Braided Cord Maple Leaf Table Runner Crochet Pattern

