Bumblebee Bedspread and Cushions Crochet Pattern
Beginner Friendly
Perfect for those just starting their crochet journey, with clear instructions and simple techniques
Single-Day Project
A satisfying project you can complete in a single afternoon or evening.
Handmade Gift
A beautiful keepsake — free forever. Read online or print at home.
About This Bumblebee Bedspread and Cushions Crochet Pattern
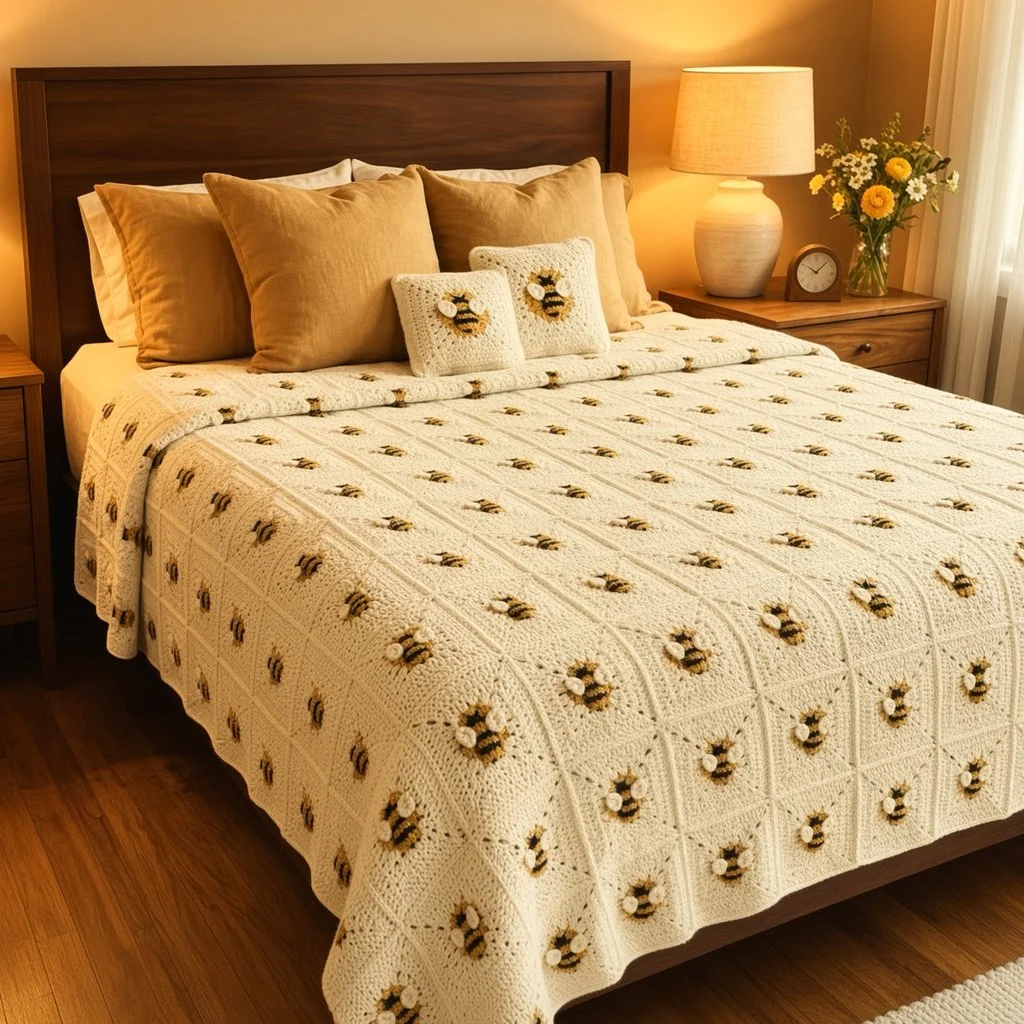
This crochet bee bedspread pattern is made from 120 cream squares, each with a little 3D bumblebee buzzing over a soft mustard glow. The bees have striped bodies, puffy white wings and embroidered antennae, and each one is tilted at an angle so the whole bed looks alive with movement. Dotted flight trails stitched between the bees add a playful touch, and two small square cushions each carry a larger bee.
Each square starts with a small mustard circle that becomes the glow behind the bee, then turns into a square with rounds of cream double crochet. A round worked in the back loops leaves a fine ridge that frames the center. The bees are made separately as tiny stuffed bodies with sewn-on wings, so they stand up from the fabric instead of lying flat. The squares are joined flat with slip stitch, which leaves a neat, thin line between them.
The full set takes around 170 to 200 hours. Each square takes under an hour and each bee about 25 minutes, so it’s an easy project to pick up in short sessions. It suits a crocheter who is comfortable with granny squares and small amigurumi pieces worked with color changes.
Materials
- Worsted weight yarn, cream about 3,600 m (18 skeins of 100 g / 200 m)
- Worsted weight yarn, mustard about 700 m (4 skeins)
- Worsted weight yarn, black about 400 m (2 skeins)
- Worsted weight yarn, white about 300 m (2 skeins)
- 5 mm crochet hook for the squares, joining and border
- 3.5 mm crochet hook for the bees and wings, so they come out firm
- Polyester fiberfill a small bag, for the bee bodies
- Two 35 cm square cushion forms
- Tapestry needle, stitch markers and scissors
Abbreviations
MRmagic ringchchainscsingle crochetsc2togsingle crochet 2 together (decrease)dcdouble crochettrtreble crochetsl stslip stitchrev screverse single crochet (crab stitch), worked left to rightBLOback loop onlyskskipspspacest(s)stitch(es)rndroundreprepeatRS / WSright side / wrong sideBee Square (make 120)
- Rnd 1: with mustard and 5 mm hook, MR, ch 3 (counts as dc here and throughout), 11 dc in ring, join with sl st to top of ch 3. Pull the ring tight. (12 sts)
- Rnd 2: ch 3, dc in same st, 2 dc in each st around, join. Fasten off mustard. (24 sts)
- Rnd 3: join cream in any st. Ch 3, dc in next 4 sts, (2 tr, ch 2, 2 tr) in next st, *dc in next 5 sts, (2 tr, ch 2, 2 tr) in next st; rep from * 2 more times, join. (36 sts: 9 per side, and 4 corner ch-2 sps)
- Rnd 4: ch 3, dc in each st to the next corner, (2 dc, ch 2, 2 dc) in corner sp, *dc in each st to next corner, (2 dc, ch 2, 2 dc) in corner sp; rep from * 2 more times, dc in each remaining st, join. (52 sts: 13 per side)
- Rnd 5: work as Rnd 4, but work every dc in the BLO. Work the corner groups into the ch-2 sps as usual. (68 sts: 17 per side)
- Rnd 6: work as Rnd 4. (84 sts: 21 per side)
- Rnd 7: work as Rnd 4. (100 sts: 25 per side)
- Rnd 8: ch 1, sc in each st around, working (sc, ch 2, sc) in each corner sp, join. Fasten off. (108 sc: 27 per side, and 4 corner ch-2 sps)
- Block each square to 22 cm.
Bee Bodies (make 120 small)
- Use the 3.5 mm hook. Work in continuous rnds without joining, and carry the color not in use loosely inside the body.
- Rnd 1: with black, MR, 6 sc in ring. (6 sts)
- Rnd 2: 2 sc in each st around. (12 sts)
- Rnd 3: change to mustard, sc in each st around. (12 sts)
- Rnd 4: *sc in next st, 2 sc in next st; rep from * 5 more times. (18 sts)
- Rnd 5: change to black, sc in each st around. (18 sts)
- Rnd 6: change to mustard, sc in each st around. (18 sts)
- Rnd 7: change to black, *sc in next st, sc2tog; rep from * 5 more times. (12 sts) Stuff the body lightly.
- Rnd 8: change to mustard, sc in each st around. (12 sts)
- Rnd 9: change to black, sc2tog 6 times. (6 sts) Add a little more stuffing, fasten off and close the hole. Leave a 30 cm tail for sewing.
- The black end with Rnds 1-2 is the head. The body is about 5 cm long.
Wings (make 240 small)
- With white and 3.5 mm hook, MR, ch 3, 9 dc in ring, ch 3, sl st in ring.
- Pull the ring tight so the wing curls into a puffy fan shape.
- Fasten off leaving a 20 cm tail for sewing. The wing is about 2.5 cm across.
Assembling Each Bee
- Place the body over the mustard center of a square, tilted at 45 degrees. Lay the squares out first and alternate the tilt in a checkerboard: one square with the head to the upper left, the next with the head to the upper right.
- Sew the body down along its underside with its tail, using small hidden stitches so it stays raised.
- Sew two wings on the top of the body, just behind the head, with the curved edges facing up and slightly apart.
- Antennae: with black, make two straight stitches from the top of the head, about 1.5 cm long and in a slight V, and finish each with a small French knot.
- Stinger: with black, make one short straight stitch at the tail end.
Flight Trails
- With black, work a dotted line of running stitch from the tail of each bee curving toward the nearest corner of the square, as if it had just flown in.
- Make each stitch about 6 mm long with 6 mm gaps, going over and under the cream stitches.
- Keep the stitches loose so they don’t pucker the square, and stop about 2 cm before the edge of the square.
- This step is optional. Leave it out if you prefer a cleaner look.
Joining the Squares
- Lay out all 120 squares, 10 across and 12 long, checking that the bee tilts alternate in a checkerboard.
- Join method: place two squares side by side, RS up. With cream and 5 mm hook, sl st through the BLO of the matching sts of both squares, starting in the corner ch-2 sps. (29 sl st per side, including both corners)
- Join all the squares into rows of 10 first, then join the rows together along the long edges.
- Where four corners meet, work through all four corner sps so there is no gap.
- The joined bedspread measures about 220 x 264 cm.
Border
- Rnd 1: with cream, RS facing, join in a corner sp. Work 3 sc in each bedspread corner sp, sc in each st along the edge of every square, and 1 sc in each point where two squares meet. Join. (335 sc along each long side, 279 sc along each short side and 12 at the corners: 1,240 sts)
- Rnd 2: ch 1, sc in each st around, working 3 sc in the center st of each corner. Join. (1,248 sts)
- Rnd 3: ch 1, rev sc in each st around. Join and fasten off. (1,248 sts)
Large Bee (make 2, for the cushions)
- With the 3.5 mm hook, work in continuous rnds as for the small bee.
- Rnd 1: with black, MR, 6 sc in ring. (6 sts)
- Rnd 2: 2 sc in each st around. (12 sts)
- Rnd 3: change to mustard, *sc in next st, 2 sc in next st; rep from * 5 more times. (18 sts)
- Rnd 4: *sc in next 2 sts, 2 sc in next st; rep from * 5 more times. (24 sts)
- Rnd 5: change to black, sc in each st around. (24 sts)
- Rnd 6: change to mustard, sc in each st around. (24 sts)
- Rnd 7: change to black, *sc in next 2 sts, sc2tog; rep from * 5 more times. (18 sts)
- Rnd 8: change to mustard, sc in each st around. (18 sts) Stuff lightly.
- Rnd 9: change to black, *sc in next st, sc2tog; rep from * 5 more times. (12 sts)
- Rnd 10: change to mustard, sc in each st around. (12 sts)
- Rnd 11: change to black, sc2tog 6 times. (6 sts) Finish stuffing, fasten off and close. The body is about 7 cm long.
- Large wings (make 4): with white, MR, ch 3, 13 dc in ring, ch 3, sl st in ring. Pull tight and fasten off.
Cushion Fronts and Backs (make 2 of each)
- Front: work Rnds 1-7 of the Bee Square. (100 sts)
- Rnds 8-12: work as Rnd 4, adding 4 sts per side each rnd. Don’t work Rnd 8 of the Bee Square. (Rnd 8: 116 sts, Rnd 9: 132, Rnd 10: 148, Rnd 11: 164, Rnd 12: 180 sts, 45 per side)
- Fasten off. The front measures about 33 cm square.
- Sew a large bee to the center as for the bedspread squares, with wings, antennae and a stinger.
- Back: work as the front, but use cream for Rnds 1 and 2, and leave off the bee. (180 sts, 45 per side)
Cushion Assembly
- Hold a front and a back WS together, with the front facing you and the corners matched.
- Rnd 1: with cream, join in a corner sp through both layers. Working through both layers, 3 sc in each corner sp and sc in each st along the sides. Before closing the last side, insert the cushion form. Join. (192 sts: 48 per side including corners)
- Rnd 2: ch 1, *sc in next 2 sts, ch 3, sl st in 3rd ch from hook; rep from * around. Join and fasten off. (96 picots)
- Rep with the second cushion.
Finishing
Weave in all ends on the WS. Run the black and mustard bee tails under the backs of the sewing stitches inside the mustard center, so nothing dark shows through the cream rounds.
Lay the bedspread flat and steam it lightly, holding the iron well above the bees so you don’t flatten them. Straighten the joining lines and plump each bee and its wings with your fingers. The cushions need only a light steam around the edges.
Tips for Success
- Make the bees with a smaller hook than the squares. A tight fabric keeps the stuffing from showing and helps the stripes stay crisp.
- Make the mustard centers in batches of 30 or 40. Working one color at a time is faster and keeps the centers a consistent size.
- Change colors on the last yarn over of the previous stitch, and keep the color jogs on the underside of each bee, where they’ll be hidden.
- Lay out all the squares before sewing any bees. It is much easier to see the checkerboard of tilts and fix mistakes at that stage.
- Stuff the bees only lightly. Overstuffed bodies are round and stiff, and they won’t sit flat against the square.
Common Mistakes to Avoid
- A wavy square. If Rnd 3 ruffles, the tr corners are too loose or you worked into the wrong st. Each side of Rnd 3 must use exactly 6 sts of Rnd 2.
- Forgetting the BLO in Rnd 5. Without it, the frame ridge around the center disappears and the squares look flat. Work every dc of that rnd in the back loops only.
- Bees that tip over. Sewing only through the head and tail lets the body roll. Sew along the whole underside of the body.
- Dotted trails that pucker. Tight running stitches pull the square in. Leave each stitch slightly loose.
- Gaps at the four-corner points. Work the join through all four corner sps where they meet, or the bedspread will have small holes.
Ways to Customize This Pattern
- Change the size: each square adds 22 cm. A king bed needs about 12 by 12 squares, and a baby blanket 4 by 5.
- Make the bedspread in honey yellow with cream bees, reversing the colors.
- Add a few daisies or clover flowers on some squares for the bees to visit.
- Leave out the 3D bees on half the squares, so the bees are scattered more sparsely across the bed.
- For a baby’s bed, embroider the bees flat instead of making 3D bodies, so there are no small parts that could come loose.
Frequently asked questions
Yes. Work Rnd 8 of each new square and join it to its neighbors with a sl st in each matching st. Sew the bees on before joining, though, because it’s much harder to reach the back of a square once it’s part of the bedspread.
The bees are sewn on securely, but they are still small 3D parts. For a baby or toddler, embroider the bees flat on the squares instead, and skip the stuffing and wings.
They are lightly stuffed and spring back after being pressed. If they flatten over time, a little steam and a gentle squeeze will bring them back to shape.
Wash it on a gentle cold cycle inside a large laundry bag, or by hand. Dry it flat, and reshape the bees and wings while they are still damp.
The finished Bumblebee Bedspread and Cushions Crochet Pattern

