Burgundy Daisy Three-Pocket Crochet Organizer
Advanced
For experienced crocheters who enjoy complex shaping, fine detail, and ambitious construction
Single-Day Project
A satisfying project you can complete in a single afternoon or evening.
Handmade Gift
A beautiful keepsake — free forever. Read online or print at home.
About This Burgundy Daisy Three-Pocket Crochet Organizer
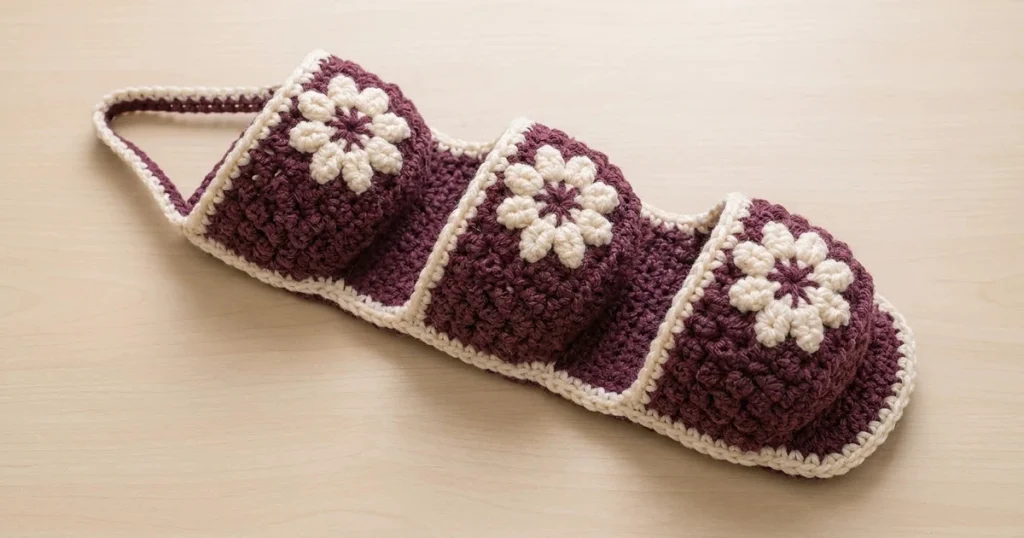
This daisy crochet organizer pattern pairs deep burgundy pockets with raised cream flowers and a continuous cream outline. Inspired by the reference photograph, the long backing carries three open pockets, each with a textured front and a softly rounded lower edge. A narrow loop at the top lets you hang the finished organizer vertically.
Allow approximately 10–14 hours for the crochet, flower appliqués, and careful assembly. This advanced project suits crocheters who enjoy fitted construction: separate side and bottom panels give each pocket depth, alternating tall and short stitches create the textured fronts, and reinforced seams help the backing hold its shape. Use it for lightweight sewing notions, hair accessories, or small craft supplies.
Materials
- Burgundy DK cotton yarn Approximately 230 g / 575 m
- Cream DK cotton yarn Approximately 45 g / 113 m; use the same yarn range as the burgundy
- 3.5 mm crochet hook Or size needed for the blocked gauge
- Tapestry needle and scissors For appliqués, seams, and woven ends
- Locking stitch markers At least 12 for aligning pocket corners
- Blocking mat, rustproof pins, and ruler For matching the separate panels
- Cotton twill tape, 12–15 mm wide Approximately 45 cm, plus matching sewing thread and needle for reinforcing the loop and upper backing
Abbreviations
chchainscsingle crochetsl stslip stitchtrtreble crochet, US terminologyMRmagic ringst / stsstitch / stitchesRS / WSright side / wrong sidepuffYarn over, insert hook in the indicated stitch, yarn over and draw up a loop to approximately 1 cm; repeat this sequence three more times in the same stitch, yarn over and draw through all nine loops, then ch 1 to secure. The securing chain is part of the puff.Construction, Gauge, and Placement
- Use US crochet terms. Work all rectangular pieces in turned rows. Beginning ch 1 never counts as a stitch. Work through both loops unless instructed otherwise.
- Blocked gauge: 20 sc and 24 rows = 10 × 10 cm. For the texture swatch, alternate one plain sc row with one row of repeated sc, tr pairs; measure over at least 12 rows.
- The unedged backing measures 12 × 37.5 cm. Each pocket front measures 12 × 8.3 cm. Side panels measure 2 × 8.3 cm; bottom panels measure 12 × 2.1 cm. Ease the approximately 1 mm depth difference into the corner seams.
- Number backing rows from the lower end upward. Pocket backs occupy rows 3–22, 35–54, and 67–86. Each pocket opening faces toward backing Row 90.
- This is an unstuffed household organizer. No stuffing, safety eyes, or facial embroidery are used.
Long Backing — Make One
- Row 1: With burgundy, ch 25. Sc in the second ch from the hook and each remaining ch. Turn. (24 sts)
- Rows 2–90: Ch 1, sc in each st across; turn after every row except Row 90. (24 sts each row)
- Fasten off. Mark the face that will carry the pockets as the RS. Block to 12 × 37.5 cm without stretching the width.
Textured Pocket Fronts — Make Three
- Row 1, RS: With burgundy, ch 25. Sc in the second ch from the hook and across. Turn. (24 sts)
- Row 2, WS: Ch 1, sc in each st across. Turn. (24 sts)
- Row 3, RS: Ch 1, repeat (sc in next st, tr in next st) 12 times. Turn. Push each treble bump toward the RS. (24 sts)
- Row 4, WS: Ch 1, sc in each st across. Turn. (24 sts)
- Rows 5–18: Repeat Rows 3–4 seven times. Turn after each row. (24 sts each row)
- Row 19, RS: Ch 1, repeat (sc in next st, tr in next st) 12 times. Turn. (24 sts)
- Row 20, WS: Ch 1, sc in each st across. Fasten off burgundy. (24 sts)
- Top edging: With RS facing, join cream in the first stitch of Row 20. Sl st loosely in each of the 24 stitches. Fasten off. This edging does not add another construction row.
- Block each front to 12 × 8.3 cm, keeping the raised stitches rounded.
Pocket Side Panels — Make Six
- Row 1: With burgundy, ch 5. Sc in the second ch from the hook and each remaining ch. Turn. (4 sts)
- Rows 2–20: Ch 1, sc in each st across; turn after every row except Row 20. (4 sts each row)
- Fasten off, leaving a 35 cm sewing tail. Block each panel to 2 × 8.3 cm. Mark Row 1 as the lower end and Row 20 as the upper end.
Pocket Bottom Panels — Make Three
- Row 1: With burgundy, ch 25. Sc in the second ch from the hook and across. Turn. (24 sts)
- Rows 2–5: Ch 1, sc in each st across; turn after every row except Row 5. (24 sts each row)
- Fasten off, leaving a 60 cm sewing tail. Block to 12 × approximately 2.1 cm. The foundation edge will join the backing; Row 5 will join the pocket front.
Eight-Petal Daisy Appliqués — Make Three
- Round 1: With burgundy, work 8 sc in an MR. Tighten the ring and sl st in the first sc. Fasten off, leaving a 25 cm tail. (8 sts)
- Round 2: Join cream in any sc. In that same sc work (sl st, ch 2, puff, ch 2, sl st). Repeat this complete petal sequence in each of the remaining seven sc. Fasten off, leaving a 60 cm sewing tail. (8 petals; each uses one center stitch)
- Shape each petal with your fingers and lightly steam or damp-block according to the yarn label. Aim for a flower approximately 5–5.5 cm across; keep the center opening closed.
- Using the burgundy tail, embroider eight short radial straight stitches from the center to the bases of the petals. Keep these stitches inside the burgundy center.
Assemble the Three Pocket Shells
- Place one front RS outward. With burgundy, whipstitch its lower foundation edge to Row 5 of one bottom panel, matching all 24 stitch positions. Use small stitches through the edge loops without flattening the front texture.
- Join one long edge of a side panel to each side of the front, matching its 20 row ends to the front’s 20 row ends. Keep the side-panel Row 20 edges at the opening.
- Close each lower side corner by sewing the side panel’s four foundation stitches to the five row ends of the bottom panel’s short edge. Match the first and last positions, and distribute the extra row end evenly through the middle. The seam should lie flat without a hole.
- With cream, edge the opening from the rear corner of one side panel: sc in its four Row 20 stitches, sl st across the 24 cream stitches on the front, then sc in the other side panel’s four Row 20 stitches. Fasten off. (32 edging sts)
- Center a daisy across front stitches 7–18, with its center approximately between Rows 13 and 14. Sew the center securely, then tack the outer base of every petal to the front. Keep the petals raised and keep all sewing inside the pocket.
- Repeat for the other two pocket shells. Leave their rear side edges and rear bottom edges open for attaching to the backing.
Attach the Pockets to the Backing
- Lay the backing RS upward with Row 1 nearest you. Pin the lowest shell so its rear bottom edge follows backing Row 3 and its rear side edges run along backing rows 3–22.
- With burgundy, sew the rear foundation edge of the bottom panel across all 24 stitches of backing Row 3. Catch the backing fabric securely without drawing the seam tight.
- Sew each free rear side-panel edge to its corresponding backing edge, matching one side-panel row end to each backing row end from 3 through 22. Leave the upper edge open. Reinforce both upper rear corners with three small stitches.
- Attach the middle shell in the same way, with its rear bottom seam across Row 35 and its side seams along rows 35–54.
- Attach the upper shell with its rear bottom seam across Row 67 and its side seams along rows 67–86. Check that all three openings face Row 90 and that no sewing passes through a pocket opening.
Cream Outer Border
- With the organizer RS facing, join cream at the lower left corner. Work 24 sc across the lower foundation edge, 3 sc in the corner, then 75 sc evenly along the first long edge, 3 sc in the upper corner, 24 sc across Row 90, 3 sc in the next corner, 75 sc down the other long edge, and 3 sc in the starting corner. Join with a sl st to the first sc. (210 sts)
- For each group of 75 long-edge stitches, divide the 90 backing rows into 15 groups of six rows and work five sc across each group. At attached pocket sections, catch the backing edge and the existing rear side seam together; keep the hook clear of the front pocket rim.
- The 24 end-edge stitches exclude the four corner spaces. Work each 3-sc corner into its own corner space to avoid counting a corner twice. Fasten off and weave in the ends.
Hanging Loop and Reinforcement
- Row 1: With burgundy, ch 51. Sc in the second ch from the hook and across. Turn. (50 sts)
- Row 2: Ch 1, sc in each st across. Fasten off, leaving a 40 cm tail. (50 sts)
- Cream edging: Join cream at one short end and sl st loosely along the 50 stitches of Row 2. Fasten off. Join cream at the opposite end and sl st along the 50 unused foundation loops. Fasten off. The short attachment ends remain burgundy.
- Block the strap to approximately 25 cm long. Fold it into a U without twisting. Overlap each short end approximately 1.5 cm onto the WS of the backing’s upper corners, behind rows 87–90. Sew each end firmly through the backing, leaving approximately 22 cm of free loop length.
- Cut twill tape to fit the free loop and continue approximately 2 cm beyond each attachment point onto the backing. Turn under its cut ends and hand-sew it along both edges to the strap’s WS and the upper backing. Use the remaining tape across the upper backing between attachment points, turning its ends under and sewing them securely.
Finishing
Weave every end through several stitches on the wrong side, changing direction once before trimming. Smooth the backing flat and shape the pockets over folded cloth while they dry, so the side panels retain their depth. Avoid pressing the flowers or treble bumps flat.
Hang the organizer from a secure hook and add a few lightweight items gradually. Check that the reinforced loop lies evenly and that the backing remains flat. If one upper corner sits lower, adjust that strap attachment before adding more contents. This narrow crocheted organizer is intended for lightweight storage rather than heavy bottles or tools.
Tips for Success
- Mark the RS of every pocket front immediately after Row 3. Push the treble bumps outward as you work the following plain row.
- Pin all three assembled shells to the backing before sewing any of them. The marked row ranges keep the spaces between pockets consistent.
- Use a hook one size larger for the cream slip-stitch rims if they pull the openings inward; retain exactly 24 stitches across each front.
- Sew each flower on while its pocket is still separate. You can secure the petals without accidentally stitching through the backing.
- Support the pocket depth with folded cloth during drying, removing it only when the seams are fully dry.
Common Mistakes to Avoid
- Counting the turning chain as a stitch widens the panels. Every front and backing row must contain exactly 24 actual stitches.
- Working a separate center stitch for each part of a petal uses up the flower center too quickly. Each entire petal sequence belongs in one of the eight center stitches.
- Pulling side seams tight makes the pocket fronts curl. Match row ends one for one and sew with the pieces resting flat.
- Forcing the five bottom-panel row ends into four tight stitches puckers the lower corners. Pin the endpoints first and ease the small difference through the center of each seam.
- Skipping the strap reinforcement allows the narrow hanging loop to lengthen under use. Stitch the tape through both attachment areas before hanging the organizer.
Ways to Customize This Pattern
- Keep the burgundy construction and use pale blush petals with cream borders for a softer floral finish.
- Use cream for each center and golden yellow for the petals to create a different eight-petal flower without changing the stitch counts.
- Add a washable cotton lining to each completed pocket, cutting it to the assembled interior dimensions with seam allowances. Hand-sew it just below the cream rim.
- Make matching shallow pockets by reducing side-panel widths to two stitches and bottom panels to three rows. Ease the small depth difference at the corners as in the original construction.
Frequently asked questions
The separate panels create approximately 2 cm of usable depth. Sewing a flat rectangle directly to the backing would produce a much tighter pocket and would not give the raised shape shown in the reference.
Use firmly worked cotton, match the blocked gauge, and reinforce the loop and upper backing with the specified twill tape. Store lightweight items and remove the contents before washing.
The puff loops may be too short or the surrounding chains too tight. Draw the puff loops to approximately 1 cm, loosen the ch-2 arches, and shape the finished petals with gentle damp blocking.
Yes. Lay it with the backing down and the openings facing the loop end. The separate gussets let the pocket fronts rise above the backing, though the pockets will settle flatter when empty.
The finished Burgundy Daisy Three-Pocket Crochet Organizer

