Burgundy Puff Flower Bedspread and Cushions Crochet Pattern
Beginner Friendly
Perfect for those just starting their crochet journey, with clear instructions and simple techniques
Single-Day Project
A satisfying project you can complete in a single afternoon or evening.
Handmade Gift
A beautiful keepsake — free forever. Read online or print at home.
About This Burgundy Puff Flower Bedspread and Cushions Crochet Pattern
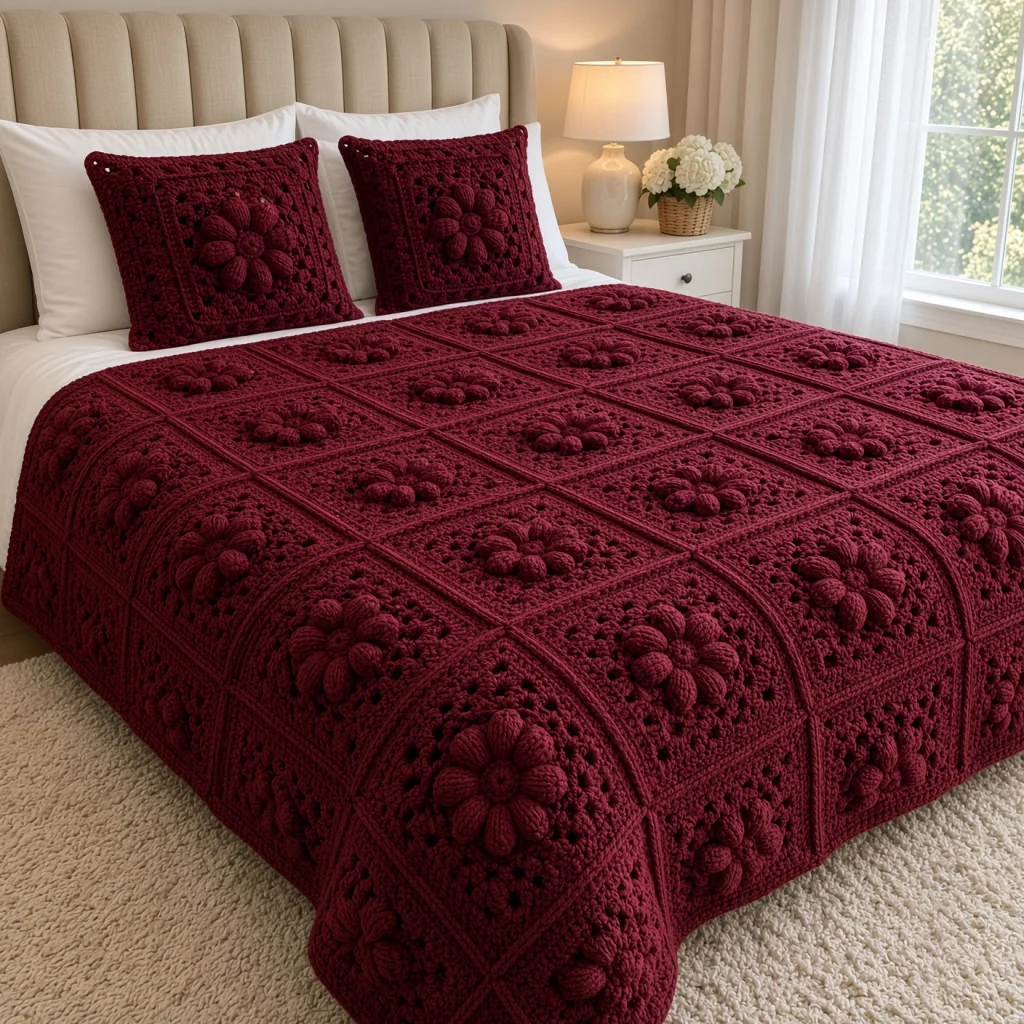
This puff flower granny square bedspread is worked entirely in one rich burgundy, so all the interest comes from texture. Each of the 72 squares has a raised flower in the center made of eight fat puff-stitch petals around a small ring, framed by granny rounds with a band of small puffs. The squares are joined with raised seams that stand up like piping, and two large cushions repeat the same flower.
The petals are elongated puff stitches with the loops pulled up tall, which makes them plump and rounded like real petals. Working in a single color lets the shadows between the puffs, granny clusters and ridged seams do the work, so the bedspread looks deeply sculpted rather than busy.
The bedspread takes about 75 to 90 hours. Each square takes under an hour, and with only one color there are very few ends to weave in. It suits a crocheter who is comfortable with granny squares and wants to master big, even puff stitches.
Materials
- Worsted weight acrylic or chenille, burgundy about 3,200 m (16 skeins of 100 g / 200 m)
- 5 mm crochet hook
- Stitch markers a few, for marking corners
- Tapestry needle and scissors
- Two 45 cm square cushion forms
Abbreviations
MRmagic ringchchainscsingle crochethdchalf double crochetdcdouble crochetsl stslip stitchbig puff(yarn over, insert hook in st, pull up a loop to about 2 cm) 6 times, yarn over, pull through all 13 loops, ch 1 to closesmall puff(yarn over, insert hook in sp, pull up a loop to about 1.5 cm) 4 times, yarn over, pull through all 9 loops, ch 1 to closerev screverse single crochet (crab stitch), worked left to rightskskipspspacest(s)stitch(es)rndroundreprepeatRS / WSright side / wrong sideFlower Center (Rnds 1-3)
- Rnd 1: MR, ch 3 (counts as dc), 15 dc in ring, join with sl st to top of ch 3. Pull the ring tight. (16 sts)
- Rnd 2 (petals): ch 2 (does not count as a st), big puff in same st, ch 3, sk next st, *big puff in next st, ch 3, sk next st; rep from * 6 more times, join with sl st to top of first puff. (8 puffs, 8 ch-3 sps)
- Rnd 3: sl st in first ch-3 sp, ch 3 (counts as dc here and throughout), (2 dc, ch 2, 3 dc) in same sp, ch 1, 3 dc in next sp, ch 1, *(3 dc, ch 2, 3 dc) in next sp, ch 1, 3 dc in next sp, ch 1; rep from * 2 more times, join. (3 groups of 3 dc per side, 36 dc, 4 corner ch-2 sps)
- Push each puff petal forward to the RS with your fingers so it stands up from the ring.
Granny Rounds (Rnds 4-9)
- Rnd 4: sl st in next 2 dc and in corner sp, ch 3, (2 dc, ch 2, 3 dc) in same sp, ch 1, *3 dc in each ch-1 sp to next corner with ch 1 between groups, (3 dc, ch 2, 3 dc) in corner sp, ch 1; rep from * 2 more times, 3 dc in each remaining ch-1 sp with ch 1 between groups, join. (4 groups per side, 48 dc)
- Rnd 5 (small puffs): sl st in next 2 dc and in corner sp, ch 2, (small puff, ch 2, small puff) in same sp, ch 1, *small puff in each ch-1 sp to next corner with ch 1 between puffs, (small puff, ch 2, small puff) in corner sp, ch 1; rep from * 2 more times, small puff in each remaining ch-1 sp with ch 1 between, join to top of first puff. (5 puffs per side, 20 puffs)
- Rnd 6: sl st in corner sp, ch 3, (2 dc, ch 2, 3 dc) in same sp, ch 1, *3 dc in each ch-1 sp to next corner with ch 1 between groups, (3 dc, ch 2, 3 dc) in corner sp, ch 1; rep from * 2 more times, 3 dc in each remaining ch-1 sp with ch 1 between, join. (6 groups per side, 72 dc)
- Rnd 7: work as Rnd 4. (7 groups per side, 84 dc)
- Rnd 8: work as Rnd 4. (8 groups per side, 96 dc)
- Rnd 9: sl st in next 2 dc and in corner sp, ch 1, (sc, ch 2, sc) in same sp, *sc in each dc and each ch-1 sp to next corner, (sc, ch 2, sc) in corner sp; rep from * 2 more times, sc in each remaining dc and ch-1 sp, join. Fasten off. (33 sc per side, 132 sc)
- The square measures about 26 cm. Make 72 for the bedspread.
Joining the Squares
- Lay out 72 squares, 8 across and 9 long.
- Join method: hold two squares WS together with the edges matched. Sl st through both loops of both squares in each matching st, starting and ending in the corner ch-2 sps. (35 sl st per side, including both corners) This leaves a raised ridge on the RS.
- Join the squares into rows of 8, then join the rows along their long edges, crossing the ridges at the corners.
- Where four corners meet, work through all four corner sps so no gap is left.
- The joined bedspread measures about 208 x 234 cm.
Border
- Rnd 1: RS facing, join in a corner sp. Work 3 sc in each bedspread corner sp, sc in each st along the edge of every square, and 1 sc in each point where two squares meet. Join. (305 sc along each long side, 271 along each short side and 12 at the corners: 1,164 sts)
- Rnd 2: ch 2 (does not count as a st), hdc in each st around, working 3 hdc in the center st of each corner. Join. (1,172 sts)
- Rnd 3: ch 1, rev sc in each st around. Join and fasten off. (1,172 sts)
Large Cushion Squares (make 4)
- Work Rnds 1-8 of the square. (8 groups per side, 96 dc)
- Rnds 9-13: work as Rnd 4, adding 1 group per side each rnd. (Rnd 9: 108 dc, Rnd 10: 120, Rnd 11: 132, Rnd 12: 144, Rnd 13: 13 groups per side, 156 dc)
- Rnd 14: work as Rnd 9 of the square. Fasten off. (53 sc per side, 212 sc)
- Each large square measures about 43 cm. Make 2 fronts and 2 backs.
Cushion Assembly
- Hold a front and a back WS together, with the front facing you and the corners matched.
- Rnd 1: join in a corner sp through both layers. Working through both layers, 3 sc in each corner sp and sc in each st along the sides. Insert the cushion form before closing the last side. Join. (224 sts: 56 per side including corners)
- Rnd 2: ch 1, rev sc in each st around. Join and fasten off. (224 sts)
- Rep with the second cushion.
Finishing
Weave in all ends on the WS, hiding them inside the granny clusters where the stitches are thickest. With only one color, the ends disappear easily.
Lay the bedspread flat and steam it lightly from above, without pressing, so the puffs keep their height. Straighten the ridged seams with your fingers so the grid of squares runs true. Steam the cushions the same way and plump the puff petals once they are dry.
Tips for Success
- Keep every puff loop the same height. Pulling them up with a slight lift of the hook each time is the trick to round, even petals.
- Don’t forget the ch 1 that closes each puff. It locks the loops in place and keeps the puff from leaning.
- Use a yarn with good stitch definition or a soft chenille. Fuzzy yarns hide the puffs and the texture loses its depth.
- Buy all the yarn from one dye lot. In a single-color bedspread, even a slight color change shows up clearly.
- Block every square to the same size before joining. It’s the easiest way to keep the ridged seams straight.
Common Mistakes to Avoid
- Petals that fall flat. If the big puffs lie down instead of standing up, the loops were pulled too low. Pull them to about 2 cm and push each petal forward after Rnd 2.
- Corners in the wrong spaces in Rnd 3. Corners go in every second ch-3 sp. If the square comes out lopsided, recount: there should be one plain group between each pair of corners.
- Squares that cup. Too tight a Rnd 3 pulls the corners up around the flower. Loosen the ch 1 between groups, or go up a hook size for that round only.
- Joins on the wrong side. Holding the squares RS together hides the ridge on the back. Always hold them WS together so the ridge shows on the front.
- A wavy border. If the edge ruffles, Rnd 1 has too many sts. Work exactly 1 sc at each point where squares meet.
Ways to Customize This Pattern
- Work the flower and puff round in a contrasting color, such as cream on burgundy, for a two-tone version.
- Change the size: each square adds 26 cm. A throw of 5 by 6 squares is about 136 x 162 cm with the border.
- Use a cream or sage yarn for a lighter, cottage-style bedspread.
- Make a matching table runner of 2 by 6 squares, or a single square as a cushion for a chair.
- Add a second band of small puffs in Rnd 8 instead of dc groups for an even more textured square.
Frequently asked questions
Pull each loop up to the same height before the next one, and keep your hook level so the loops don’t slide off. Practice 8 or 10 puffs on a scrap chain before starting your first square.
Yes, but you’ll lose the raised ridge between squares. If you join as you go on Rnd 9, the seams lie flat. For the look in the photo, finish all the squares first and join them WS together.
Chenille gives a plush, velvety look like the photo but can be slippery to work and harder to rip out. A smooth acrylic is easier to handle and shows the puffs clearly, so it’s a good choice if you’re new to puff stitches.
Wash it on a gentle cold cycle inside a large laundry bag and dry it flat. Chenille in particular should never be tumble dried, because the pile can shed and the stitches can stretch.
The finished Burgundy Puff Flower Bedspread and Cushions Crochet Pattern

