Butterfly Granny Square Pattern and Blanket Layout
Beginner Friendly
Perfect for those just starting their crochet journey, with clear instructions and simple techniques
Single-Day Project
A satisfying project you can complete in a single afternoon or evening.
Handmade Gift
A beautiful keepsake — free forever. Read online or print at home.
About This Butterfly Granny Square Pattern and Blanket Layout
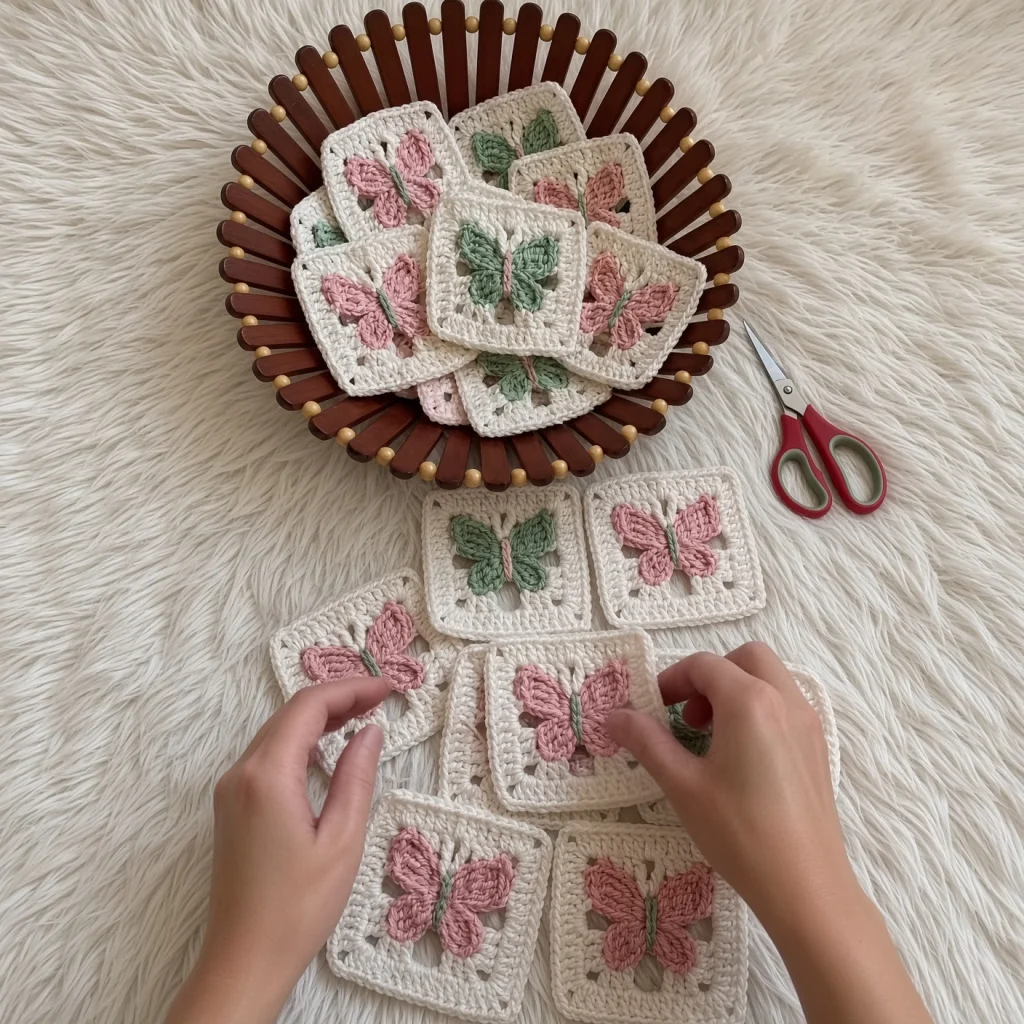
This butterfly granny square pattern is a 10 cm cream square with a raised butterfly sitting on top of it, worked separately in pink or sage and sewn on so the wings lift clear of the background. The butterfly is not colourwork and not a bobble. It is four wing loops built from a shared centre, two large upper and two smaller lower, joined by a slim embroidered body that runs down the middle and holds the whole thing in shape.
The square underneath is a modified granny worked in three rounds with a solid fourth round, which gives the classic open corners and clusters but leaves a flat enough surface at the centre for the butterfly to sit properly. A standard granny square has a hole in the middle and a butterfly sewn over it sags. That single change is what makes the motif work.
One square takes about twenty-five minutes including the butterfly. The pattern below gives the square, the butterfly, three ways to join them and a full layout for a 63 square blanket at 74 by 98 cm, which comes to 28 to 34 hours. It works equally well as six squares for a cushion cover or twelve for a baby blanket. Written in US terms throughout.
Materials
- DK / light worsted cotton in cream approx. 45 g per 10 squares, 290 g for the 63 square blanket
- DK / light worsted cotton in dusty pink approx. 60 g for the blanket, 42 butterflies
- DK / light worsted cotton in sage green approx. 40 g for the blanket, 21 butterflies and all the bodies
- 3.5 mm crochet hook granny squares
- 3.0 mm crochet hook butterflies, for firmer wings
- Tapestry needle blunt, large eye
- Stitch markers at least 4
- Rust-proof pins and a blocking mat squares block best in batches of 12
- Spray bottle and a steam iron with a pressing cloth
- Sharp scissors and a tape measure
Abbreviations
MRmagic ringchchainscsingle crochethdchalf double crochetdcdouble crochettrtreble crochetsl stslip stitchclcluster (3 dc worked together in one space)sp / spsspace / spacesst / stsstitch / stitchesreprepeatRSright sideFOfasten offGauge and Working Notes
- Gauge: one finished square measures 10 cm along each side, blocked. A butterfly measures about 5.5 cm across the upper wings and 4 cm from top to bottom.
- Work the square on the 3.5 mm hook and the butterfly on the 3.0 mm. The smaller hook keeps the wings firm enough to hold their curve when they are only stitched down along the body.
- All rounds of the square are worked with the RS facing. Do not turn, or the clusters will alternate front and back and the texture will look uneven across the blanket.
- Round 4 is worked solid rather than as clusters. This is what gives a straight edge for joining and a firm border, and it is the round that makes join-as-you-go possible.
- The butterfly is made separately and sewn on after the square is finished. Do not try to work it into the square as you go.
- Leave a 25 cm tail on every butterfly. You will use it to sew the butterfly to its square, so one tail does both jobs.
- Weave in the square’s ends before attaching the butterfly. Once the wings are on, the back of the square is harder to work on and the tails are harder to place out of sight.
The Granny Square (make 63 for the blanket)
- Round 1: with cream and the 3.5 mm hook, ch 4 and sl st into the first ch to form a ring. Ch 3 (counts as first dc), 2 dc into the ring, ch 2, *3 dc into the ring, ch 2*; rep from * twice more, sl st into the top of the ch-3 (4 groups of 3 dc and 4 ch-2 corner sps).
- Round 2: sl st into the next 2 sts and into the first ch-2 corner sp. Ch 3, 2 dc into the same corner sp, ch 2, 3 dc into the same corner sp, *ch 1, work (3 dc, ch 2, 3 dc) into the next corner sp*; rep from * twice more, ch 1, sl st into the top of the ch-3 (8 groups of 3 dc, 4 corner sps and 4 side ch-1 sps).
- Round 3: sl st into the next 2 sts and into the first corner sp. Ch 3, 2 dc into the same corner sp, ch 2, 3 dc into the same corner sp, *ch 1, 3 dc into the next ch-1 sp, ch 1, work (3 dc, ch 2, 3 dc) into the next corner sp*; rep from * twice more, ch 1, 3 dc into the last ch-1 sp, ch 1, sl st into the top of the ch-3 (12 groups of 3 dc).
- Round 4 (solid border round): ch 1, sc in each dc and 1 sc in each ch-1 sp around, working 3 sc into each ch-2 corner sp; sl st into the first sc (13 sc along each side plus 3 sc at each corner, 64 sc in total).
- FO and weave in the ends. Finished square 10 cm along each side.
- The count of 13 sc per side matters for joining. Every square must match, so check the first three squares against each other before making sixty more.
- Make 63 for the blanket, or as many as your project needs.
Butterfly, Upper Wings (make 63)
- With dusty pink or sage and the 3.0 mm hook, ch 4 and sl st into the first ch to form a small ring. This ring is the butterfly’s centre and everything is worked from it.
- Upper wing 1: ch 3, work (3 dc, ch 2, 3 dc, ch 2, 3 dc) into the ring, ch 3, sl st into the ring. The wing curls into a rounded fan on its own.
- Upper wing 2: rep the same sequence into the ring, so the second upper wing sits alongside the first.
- Check the two upper wings are the same size before continuing. They sit side by side and any difference is immediately visible.
- Keep the ch-3 at the start and end of each wing loose. Those two chains are what let the wing angle away from the centre rather than standing straight up.
Butterfly, Lower Wings and Body (make 63)
- Lower wing 1: continuing into the same ring, ch 2, work (3 dc, ch 2, 3 dc) into the ring, ch 2, sl st into the ring.
- Lower wing 2: rep the same sequence into the ring.
- Sl st to close and FO, leaving a 25 cm tail. The butterfly now has 4 wings radiating from one centre, two larger above and two smaller below, about 5.5 cm across.
- Body: with sage green, work a line of 5 or 6 straight stitches down the centre of the butterfly with the tapestry needle, from between the upper wings to between the lower ones, each stitch laid alongside the last so they form a slim raised bar about 2 cm long.
- Antennae, optional: with the same green, work two short straight stitches angling up and outward from the top of the body, each about 8 mm, finishing each with a tiny knot at the tip.
- The body is structural as well as decorative. It is what pulls the four wings into a butterfly shape rather than a four-petal flower, so do not skip it or work it too loosely.
- For the blanket make 42 pink and 21 sage, so pink butterflies outnumber sage two to one.
Attaching the Butterfly
- Centre the butterfly on the square by eye, with the upper wings toward the top and about a centimetre of cream showing between the wing tips and the clusters on either side.
- Thread the tail and stitch through the embroidered body only, taking 4 or 5 stitches down its length and through the square, so the body is anchored flat.
- Take 2 further stitches at the very centre of the butterfly where the four wings meet, to stop it pivoting.
- Leave every wing completely free. Nothing is stitched down beyond the body and the centre, and that is what gives the motif its lift.
- Weave the tail into the back of the square, along the line of Round 3, and trim.
- Check the butterfly sits square to the block before the final stitch. A butterfly a few degrees off looks like a mistake in a grid of 63, in a way that a single square never shows.
Blanket Layout, 63 Squares
- Arrange 7 squares across by 9 squares down, which gives 70 by 90 cm before the border and 74 by 98 cm with it.
- Distribute the sage butterflies as a scatter, not as a pattern. Aim for roughly one sage in every three squares, with no two sage squares touching along an edge or a corner.
- Lay the whole grid out on the floor before joining and photograph it from above. A colour clump that is invisible while you hold two squares is obvious across a full blanket.
- Orient every butterfly the same way up, with the upper wings toward the top edge of the blanket. Randomly rotated motifs read as careless rather than as playful.
- Number the rows with pins or sticky notes as you lift the squares to join them, because seven columns of nine is very easy to reassemble wrongly.
Three Ways to Join
- Whip stitch through back loops: hold two squares with RS together, thread cream, and stitch through the back loop of each corresponding sc along the edge, 13 stitches per seam. Gives a flat, almost invisible join and is the best choice for a blanket.
- Single crochet seam: hold two squares with wrong sides together and work sc through both edges, 13 sc per seam. Produces a raised ridge on the front, which suits a cushion or a bag where you want the grid to read strongly.
- Join as you go: work Rounds 1 to 3 of the new square, then on Round 4 replace the middle sc of each corner group and every alternate sc along the shared edge with a join into the matching stitch of the finished square. Adds nothing to the time and means no seaming at the end, but requires you to commit to the layout before you start.
- Whichever method you choose, join all the rows in one direction first, then join the long seams between rows. Joining square by square in a spiral leaves the grid slightly out of true.
- Keep the joining tension the same as the square’s. A tight seam puckers and a loose one leaves a gap, and with 110 seams in a 63 square blanket both add up visibly.
Blanket Border
- Round 1: with cream, join at any corner and work sc evenly around the whole blanket, 13 sc along each square edge and 3 sc in each outer corner. Across 7 squares that is 91 sc along each short edge and 117 sc along each long edge. Sl st to join.
- Round 2: ch 3 (counts as first dc), dc in each st around with 3 dc in each corner st; sl st to join.
- Round 3: ch 1, sc in each st around with 3 sc in each corner st; sl st to join.
- Round 4 (picot round): ch 1, sc in each st around, working (ch 3, sl st into the 3rd ch from hook) after every 4th sc, and 3 sc in each corner. Sl st to join and FO.
- The border adds about 2 cm on each side. Keep it firm, since a loose border on a blanket this size lets the outer edge stretch and wave within a few washes.
Finishing
Weave in every end on the back of a square, following the line of the stitches for at least 3 cm and splitting the yarn once along the way. With 63 squares and 63 butterflies there are roughly 250 ends in this blanket, which is genuinely several hours if you leave them all to the end. Weave each square’s ends as you finish it and the job disappears into the making.
Block the squares in batches of twelve before joining. Damp them, pin each one to a true 10 cm square with a pin at every corner and one at the midpoint of each side, and let them dry. Unblocked granny squares are never quite square, and 63 slightly irregular squares joined together produce a blanket with wavy seams that cannot be rescued afterwards. Keep the butterflies clear of the pins.
Once joined and bordered, give the whole blanket a final light steam from 15 cm away with the iron never touching the work, then lift each butterfly’s wings with your fingers so they stand away from the background. If a wing has flattened, pinch it back into its curve while the cotton is warm. Do not press the butterflies at any point, since the whole appeal is that they are raised.
Tips for Success
- Make the squares and butterflies in separate batches rather than alternating. Switching between a 3.5 mm and a 3.0 mm hook every twenty-five minutes is how tension drifts, and a blanket shows that drift across 63 pieces.
- Count 13 sc along each side of every square on Round 4. It is the number every join depends on, and a square with 12 or 14 will fight the grid at every seam.
- Stitch the butterfly through its body only. It is tempting to tack a wing tip down for neatness, and it kills the lift that makes the motif worth the extra step.
- Lay the full grid out on the floor and photograph it before joining. Colour distribution is the one decision here that cannot be judged a square at a time.
- Block in batches of twelve as you go, rather than blocking 63 squares in one session at the end. It keeps the job manageable and it catches a sizing problem at square twelve instead of square sixty.
Common Mistakes to Avoid
- Using a standard granny square with an open centre. The butterfly sits over a hole, sags into it, and the motif never looks crisp. The solid Round 4 and the tight Round 1 ring in this pattern exist for that reason.
- Butterfly wings worked at square tension. On the 3.5 mm hook the wings are floppy and lie flat against the square. The 3.0 mm hook is what lets them hold a curve.
- Skipping the embroidered body. Without it the four wings splay and the motif reads as a four-petal flower. The body is what makes it a butterfly, and it takes about ninety seconds.
- Butterflies attached at slightly different angles. Across a grid this is the most visible inconsistency in the whole blanket. Line each one up square to the block before stitching.
- Joining before blocking. Granny squares come off the hook a few millimetres out of true, and joined unblocked they lock each other into that shape permanently.
- Sage butterflies placed in a regular pattern. One in three as a scatter looks natural, while every third square in a row looks like a chart you got bored with.
Ways to Customize This Pattern
- Change the project rather than the square. Six squares plus a plain back makes a 30 cm cushion cover, twelve makes a 30 by 40 cm baby blanket, and two make a phone pouch.
- Work a whole rainbow of butterflies from oddments. Each one uses about 1.5 g, so a single 50 g ball gives more than thirty butterflies in one colour.
- Reverse the colours: a coloured square with a cream butterfly turns the same motif into something much bolder, and it costs no extra time.
- Use it as a single motif. One square makes a coaster, a pocket patch on a plain cardigan, or a small appliqué on a tote bag.
- Work the butterfly alone as an appliqué without the square, for hair clips, gift toppers, or scattered across a finished plain blanket.
- Add a bead or a French knot at the centre of each butterfly where the four wings meet, which catches the light and suits a cushion better than a blanket a child will use.
Frequently asked questions
Not in this form. The wings rely on being worked from a single tight ring with all four fanning off it, and there is no way to build that into a granny round without distorting the square. You could work a butterfly in tapestry crochet or in surface slip stitch as an alternative, but both give a flat motif. The appeal here is that the wings lift, and that requires a separate piece.
The wings are free by design, so yes, fingers and buttons will get under them. For a blanket a baby will actually use, add two small stitches at the outer edge of each upper wing, which reduces the lift a little but makes it far more robust. Keep the lower wings free, since they are shorter and much less likely to catch.
Divide your target measurements by 10 cm and subtract 4 cm for the border in each direction. A 100 by 130 cm lap blanket needs 10 squares by 13, which is 130 squares and around 60 hours. A 74 by 98 cm blanket as written needs 63. Always work in whole squares and adjust the border width rather than trying to fit a half square anywhere.
Whip stitch through back loops for anything that needs to drape, which means blankets. It gives a flat seam and the squares stay soft. Single crochet seams add a visible ridge and stiffen the fabric, so they suit a cushion or a bag where you want structure. Join as you go is the fastest overall, but it requires you to fix the layout before you begin, and with a scattered colour placement that is a real constraint.
Machine wash cool on a gentle cycle is fine for the blanket itself, but never tumble dry, since the heat and tumbling press the wings flat permanently. Lay it out to dry, and while it is still damp run your fingers under each butterfly to lift the wings back into shape. It takes about five minutes for 63 squares and the blanket comes back looking new.
The finished Butterfly Granny Square Pattern and Blanket Layout

