Advanced
For experienced crocheters who enjoy complex shaping, fine detail, and ambitious construction
Weekend Project
A satisfying weekend make — start Friday, finish Sunday, enjoy forever.
Handmade Gift
A beautiful keepsake — free forever. Read online or print at home.
About This Caramel Bobble Granny Square Blanket
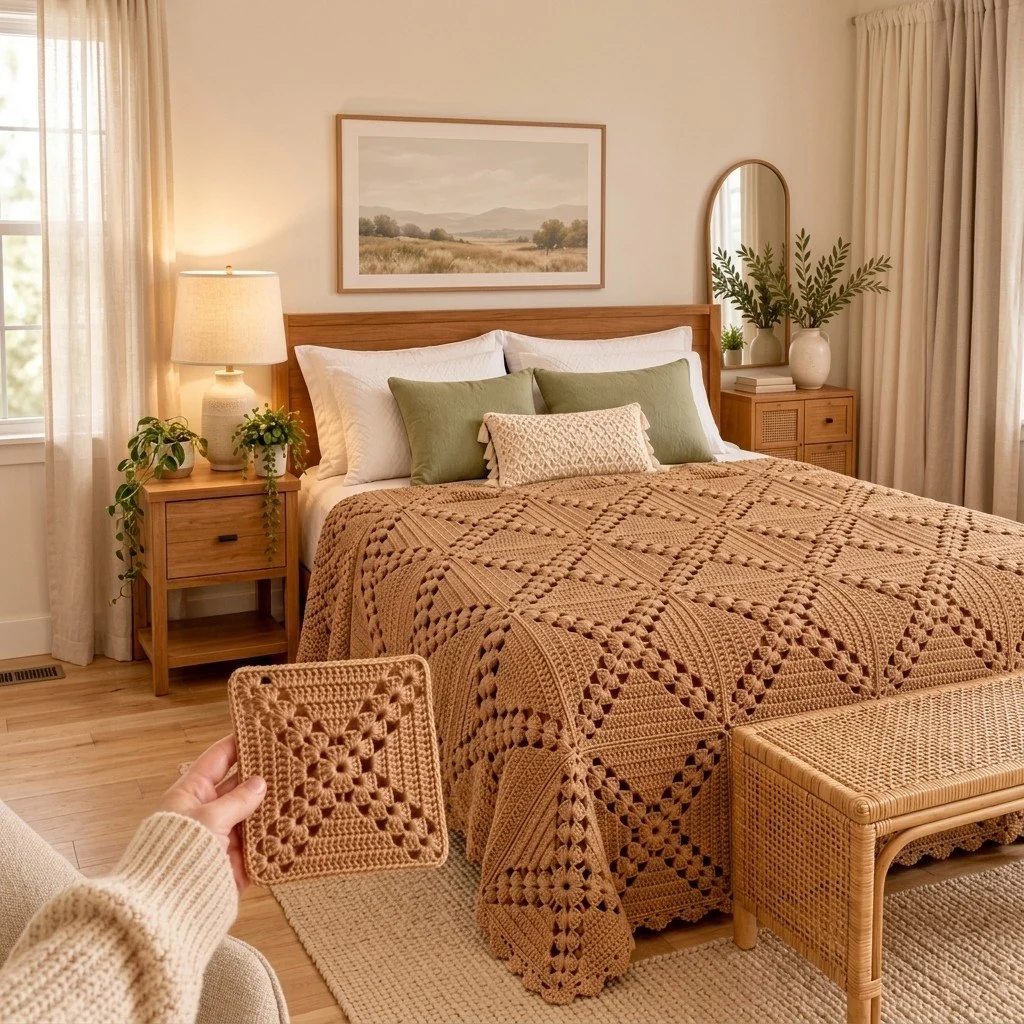
This caramel granny square blanket pattern turns one richly textured motif into a full bedspread, worked 63 times and joined into a 7 x 9 grid. Each square starts with a popcorn flower in the middle, grows outward in classic granny rows, and carries two diagonal lines of bobbles that run from the center straight out to the corners. When the squares are joined, those diagonals meet across the seams and read as one continuous lattice across the whole bed, which is what gives the finished blanket its quilted look.
It is an honest commitment: roughly 60 to 80 hours in total, or about 45 to 60 minutes per square once you have the rhythm. That structure is also what makes it a good long-haul project. A single motif fits in a bag, finishes in one sitting, and blocks flat on a towel, so you can build the blanket a few squares at a time over several weeks instead of wrestling a growing bedspread in your lap. The border and joining are the only parts that need table space.
This one suits a confident crocheter who is comfortable with popcorns, bobbles, blocking and a flat slip-stitch seam. If you have made granny squares before but never a full bed-sized piece, this is a reasonable step up, because the hard skills are all contained in one small repeatable unit. The whole blanket is worked in a single warm caramel shade, so there are no yarn changes to manage and the texture does all the work.
Materials
- Worsted / aran weight cotton-blend yarn in caramel approx. 2,800-3,200 g (about 5,600-6,400 m) for the queen-size layout
- 5 mm crochet hook or the size that gives you a 20 cm motif
- Blunt tapestry needle for ends and seams
- Stitch markers at least 8, to mark corner spaces while joining
- Blocking mats and rustproof pins enough for 4-6 motifs at a time
- Spray bottle or steam iron for wet or steam blocking
- Measuring tape to check every motif against 20 cm
- Small scissors
Abbreviations
MRmagic ringchchainsl stslip stitchscsingle crochetdcdouble crochetPCpopcorn stitchBObobble stitchst(s)stitch(es)sp(s)space(s)skskipreprepeatBLOback loops onlyrndroundbegbeginningGauge, Size and Layout
- Gauge: one complete motif (Rnds 1-10) measures 20 cm / 8 in square after blocking, using 5 mm hook and worsted/aran yarn.
- Secondary gauge check: Rnds 1-4 of the motif should measure 9 cm across before blocking. If it is bigger, drop to a 4.5 mm hook; if smaller, go up to 5.5 mm.
- Layout used here: 7 motifs across x 9 motifs down = 63 motifs, giving a joined panel of 140 x 180 cm.
- The three-round border adds about 4 cm all around, for a finished blanket of approximately 148 x 188 cm.
- For a double bed, work 6 x 8 = 48 motifs (approx. 128 x 168 cm). For a throw, work 4 x 5 = 20 motifs (approx. 88 x 108 cm). Border counts in that section are written for the 7 x 9 layout; recount your own edges if you change the grid.
- Work every motif in the same direction with the right side always facing. The bobbles and popcorns push to the right side, so a flipped square is immediately visible in the finished blanket.
Special Stitches
- Popcorn (PC): work 5 dc in the indicated st, drop the working loop from the hook, insert the hook front to back under both loops of the first dc of the group, pick up the dropped loop and pull it through to close the popcorn.
- Beginning popcorn (beg-PC): ch 3, work 4 dc in the same st, drop the loop, insert the hook in the top of the beginning ch-3, pick up the loop and pull through.
- Bobble (BO): work 4 incomplete dc in the indicated space (yarn over, insert hook, pull up a loop, yarn over and draw through 2 loops, leaving the last loop on the hook each time), then yarn over and draw through all 5 loops on the hook. Push the bobble to the right side with your thumb as you close it.
- Flat slip-stitch seam: hold two blocked motifs with wrong sides together, right sides facing out, and sl st through the back loops of both squares at the same time. This leaves a raised ridge on the right side, which is the visible line between squares in this blanket.
- Standing dc (optional, for joining new yarn at a border round): make a slip knot on the hook, yarn over, insert hook in the indicated st and complete a normal dc. This avoids a bulky join at the start of a long round.
The Motif (make 63)
- Rnd 1: MR, ch 3 (counts as first dc), 15 dc in ring, sl st to top of beg ch-3. Pull the ring closed firmly. (16 dc)
- Rnd 2: Beg-PC in same st, ch 2, sk next st; *PC in next st, ch 2, sk next st; rep from * 6 more times; sl st to top of beg-PC. (8 PC, 8 ch-2 sps)
- Rnd 3: Sl st into next ch-2 sp, ch 3, 2 dc in same sp, ch 1, (3 dc, ch 2, 3 dc) in next ch-2 sp, ch 1; *3 dc in next ch-2 sp, ch 1, (3 dc, ch 2, 3 dc) in next ch-2 sp, ch 1; rep from * twice more; sl st to top of beg ch-3. The four (3 dc, ch 2, 3 dc) groups are the corners from now on. (36 dc; 4 corner ch-2 sps; 4 side groups)
- Rnd 4: Sl st across to the next corner ch-2 sp, ch 3, 2 dc in same sp, ch 2, 3 dc in same sp, ch 1; *3 dc in next ch-1 sp, ch 1, 3 dc in next ch-1 sp, ch 1, (3 dc, ch 2, 3 dc) in next corner sp, ch 1; rep from * 3 times, omitting the final corner group on the last repeat; sl st to top of beg ch-3. (48 dc; 2 side groups per side)
- Rnd 5 (first bobble round): Sl st to next corner ch-2 sp, ch 3, 2 dc in same sp, ch 2, 3 dc in same sp, ch 1; *BO in next ch-1 sp, ch 1, 3 dc in next ch-1 sp, ch 1, BO in next ch-1 sp, ch 1, (3 dc, ch 2, 3 dc) in next corner sp, ch 1; rep from * 3 times, omitting the final corner group on the last repeat; sl st to top of beg ch-3. (36 dc, 8 BO; each side reads bobble – group – bobble) (3 side spaces worked per side)
- Rnd 6: Sl st to next corner ch-2 sp, ch 3, 2 dc in same sp, ch 2, 3 dc in same sp, ch 1; *BO in next ch-1 sp, ch 1, [3 dc in next ch-1 sp, ch 1] twice, BO in next ch-1 sp, ch 1, (3 dc, ch 2, 3 dc) in next corner sp, ch 1; rep from * 3 times, omitting the final corner group on the last repeat; sl st to top of beg ch-3. (48 dc, 8 BO; 4 side spaces worked per side)
- Rnd 7: Sl st to next corner ch-2 sp, ch 3, 2 dc in same sp, ch 2, 3 dc in same sp, ch 1; *BO in next ch-1 sp, ch 1, [3 dc in next ch-1 sp, ch 1] 3 times, BO in next ch-1 sp, ch 1, (3 dc, ch 2, 3 dc) in next corner sp, ch 1; rep from * 3 times, omitting the final corner group on the last repeat; sl st to top of beg ch-3. (60 dc, 8 BO; 5 side spaces worked per side)
- Rnd 8 (last bobble round): Sl st to next corner ch-2 sp, ch 3, 2 dc in same sp, ch 2, 3 dc in same sp, ch 1; *BO in next ch-1 sp, ch 1, [3 dc in next ch-1 sp, ch 1] 4 times, BO in next ch-1 sp, ch 1, (3 dc, ch 2, 3 dc) in next corner sp, ch 1; rep from * 3 times, omitting the final corner group on the last repeat; sl st to top of beg ch-3. (72 dc, 8 BO; 6 side spaces worked per side) The eight bobbles of Rnds 5-8 now form two clean diagonals running into each corner.
- Rnd 9 (plain granny round): Sl st to next corner ch-2 sp, ch 3, 2 dc in same sp, ch 2, 3 dc in same sp, ch 1; *[3 dc in next ch-1 sp, ch 1] 7 times, (3 dc, ch 2, 3 dc) in next corner sp, ch 1; rep from * 3 times, omitting the final corner group on the last repeat; sl st to top of beg ch-3. (108 dc; 7 side groups and 8 ch-1 sps per side)
- Rnd 10 (solid edge round): Sl st to next corner ch-2 sp, ch 3 (counts as dc), (dc, ch 2, 2 dc) in same sp. Working along the side: dc in each of the next 3 dc, then [1 dc in next ch-1 sp, dc in each of next 3 dc] 8 times, but work 2 dc (not 1) in the 4th ch-1 sp of the side, which is the center one. That gives 36 sts between the corner groups. *(2 dc, ch 2, 2 dc) in next corner sp, work the side as before; rep from * around; sl st to top of beg ch-3. (160 dc total; 40 sts along each side counting from one corner ch-2 sp to the next)
- Fasten off, leaving a 15 cm tail. Weave the tail into the back of the solid Rnd 10 so it never shows through the open granny rows.
Blocking the Motifs
- Weave in all ends on every motif first. Ends are far harder to reach once the squares are seamed.
- Soak the motifs in cool water for 15 minutes, press the water out between towels, and do not wring them.
- Pin each damp motif to 20 x 20 cm, placing a pin at each corner ch-2 space and one at the center of each side, so the edges stay straight rather than bowed.
- Check that the four corners sit at true right angles before you leave them to dry. A square pinned slightly diamond-shaped will fight you at the seam.
- Let them dry fully, usually 12-24 hours. If you prefer steam blocking, hover the iron 2 cm above the surface and never press the bobbles flat.
- Stack the dry motifs in piles of 7, one pile per blanket row, so the joining stage goes quickly.
Joining the Motifs
- Lay out all 63 motifs in a 7 across x 9 down grid on the floor, right sides up, all oriented the same way.
- Join into rows first. Hold the first two motifs of row 1 with wrong sides together, right sides out, matching corner ch-2 spaces.
- Insert the hook through the corner ch-2 sp of both motifs, pull up a loop, and ch 1. Then sl st in BLO through both squares across all 40 sts of the side, finishing with a sl st through both corner ch-2 spaces at the far end. Fasten off.
- Repeat until each row has 7 motifs joined side by side. You will have 9 rows.
- Now join the rows to each other the same way, working across all 7 motifs of a row in one continuous line: sl st in BLO through both layers, and at every motif-to-motif junction work 1 sl st through the two adjacent corner ch-2 spaces of the upper row together with the two of the lower row before continuing.
- Keep your slip stitches loose. If the seam draws in, the joined panel will pucker; switch to a 5.5 mm hook for seaming only.
- Weave in all seam ends, then lay the panel flat and press the seam ridges all in one direction with your hands so they sit as clean lines.
Border
- Rnd 1 (foundation round): Join yarn with a standing dc in any blanket corner ch-2 sp, then work (dc, ch 2, 2 dc) in that same corner sp. Work dc in each st along the edge of every motif, and 2 dc in each corner ch-2 sp where two motifs meet at a seam, which is 4 dc per seam junction. Work (2 dc, ch 2, 2 dc) in each of the four blanket corner sps. Sl st to the first dc. (304 sts along each short edge and 392 sts along each long edge, counted between the corner ch-2 spaces, plus 4 corner sps)
- Rnd 2 (bobble round): Sl st into the corner ch-2 sp, ch 1, (2 sc, ch 2, 2 sc) in same sp; *[sc in next 3 sts, BO in next st] to the next corner, then (2 sc, ch 2, 2 sc) in corner sp; rep from * around; sl st to first sc. Each short edge works 77 repeats of [3 sc, BO] across 308 sts; each long edge works 99 repeats across 396 sts. (308 sts per short edge, 396 sts per long edge, counting the 2 corner sts at each end of the side)
- Rnd 3 (scallop round): Sl st into corner ch-2 sp, ch 1, (sc, ch 3, sc) in same sp; *[sk next st, 5 dc in next st, sk next st, sc in next st] to the next corner, then (sc, ch 3, sc) in corner sp; rep from * around; sl st to first sc. Each short edge takes 78 repeats across 312 sts; each long edge takes 100 repeats across 400 sts. (78 scallops per short edge, 100 scallops per long edge)
- Fasten off and weave in the ends along the back of Rnd 1, where the solid double crochets hide them.
Finishing
Give the finished blanket one last block. Soak it in cool water, press out the excess between towels, then lay it flat on a clean sheet with the scalloped edge pulled gently into shape, pinning each corner and a few points along each side. The seams will relax and the grid will square up as it dries, which takes a full day or more for a piece this size. Do not hang it wet, because the weight of the water will stretch the squares out of shape.
Once dry, check the back for any missed ends and trim them close. Run your hand across the surface and push each bobble and popcorn through to the right side if any have sunk inward during washing. Stored folded with the scallops tucked in, it keeps its shape well; washed, it should go in cool water on a gentle cycle and be dried flat.
Tips for Success
- Close every bobble with your thumb pressing it toward the right side. Bobbles that are closed loosely sink to the back and your diagonals will look patchy from square to square.
- Work the ch-2 corner spaces snugly. In a blanket this size, loose corners create gaps where the four squares meet, and those gaps are very visible against a solid caramel.
- Count the side spaces at the end of Rnds 5 through 9 rather than counting total stitches. Each side should have one more space than the round before it, and catching a missing one early saves frogging a whole round of bobbles.
- Make all 63 motifs before you join any of them. Your tension drifts slightly over weeks of work, and blocking a complete set together evens that out far better than joining as you go.
- Keep the yarn from one dye lot for the border if you can. The border is the one continuous element running around the whole blanket, and a lot change shows there more than it does among the squares.
Common Mistakes to Avoid
- Skipping the extra dc in the center ch-1 space of Rnd 10. That single stitch is what brings each side to 40 and keeps the solid round from pulling the square’s edge in. Without it, your motifs measure short and the joined rows will not line up.
- Working the popcorns in Rnd 2 into the wrong stitches. The round must use all 16 stitches of Rnd 1, one popcorn and one skipped stitch per pair. If you end up with 7 or 9 popcorns, the corners in Rnd 3 will not fall symmetrically.
- Seaming with slip stitches that are too tight. A tight BLO seam shortens the edge relative to the squares and makes the blanket ripple. Go up a hook size for joining and check that the seamed pair still lies flat.
- Joining motifs with the wrong side facing. The bobbles and popcorns are one-sided, and a reversed square in the middle of the grid means unpicking an entire seam line. Lay the whole grid out and look at it from a distance before you join anything.
- Miscounting at the seam junctions in border Rnd 1. Each junction needs 4 dc, which is 2 in each of the two adjacent corner spaces. Fewer and the edge puckers at every seam; more and it flutes.
Ways to Customize This Pattern
- Work the motifs in a gradient. Use five shades from pale sand to deep caramel, one shade per horizontal band of rows, for a blanket that fades from light at the pillow end to dark at the foot.
- Stop each motif at Rnd 8 for a smaller 16 cm square, then work 9 x 11 motifs for a similar blanket size with twice as many bobble diagonals across the surface.
- Swap the popcorn center for a solid one: work Rnd 2 as 2 dc in each st (32 dc) and add the ch-2 spaces in Rnd 3 instead. This gives a firmer, flatter middle that suits a blanket meant for heavy daily use.
- Make a matching pillow cover from four motifs joined into a 40 cm square, backed with a second set of four and edged with border Rnds 1 and 2 only, leaving off the scallops.
- Replace the scalloped border Rnd 3 with a simple sc round plus a round of crab stitch for a tailored, straight-edged bedspread that reads more modern than cottage.
Frequently asked questions
No, as long as every motif is 21 cm. Consistency matters more than hitting the exact number. A 7 x 9 grid at 21 cm gives 147 x 189 cm before the border, which is still a good queen size. Just recount your border Rnd 1 edge stitches, because your side count per motif will be 40 only if your Rnd 10 math stayed the same. If some squares are 20 cm and others 21 cm, block them all to the same measurement instead of reworking them.
Yes, but you have to change Rnd 10. Work Rnd 10 of each new motif as written until you reach a side that meets a finished motif, then join with sl st into the corresponding stitches of the neighbor at every 5th stitch along that side. You lose the raised seam ridge that gives this blanket its quilted grid, so the surface looks flatter. If you want the ridge, seam afterward.
About 40-45 g in worsted or aran weight, because the bobble and popcorn rounds eat more yarn than a plain granny square does. Weigh your first finished motif, multiply by 63, then add roughly 10 percent for the three border rounds and the seams. That gives a reliable total before you buy the full amount.
They compress during a wash and come back as the blanket dries, provided you dry it flat and do not press the surface with an iron. Cotton-blend yarns hold the texture best. Pure acrylic bobbles can stay flattened if the blanket is steamed too closely, so keep the iron well above the fabric and let moisture, not heat, do the work.
Yes. Work 20 motifs in a 4 x 5 grid for a finished throw of about 88 x 108 cm, which takes roughly 20 hours and about 950 g of yarn. Border Rnd 1 then gives 172 stitches along each short edge and 212 along each long edge, so recount your own edges before starting Rnd 2 rather than using the numbers written for the queen size.
The finished Caramel Bobble Granny Square Blanket

