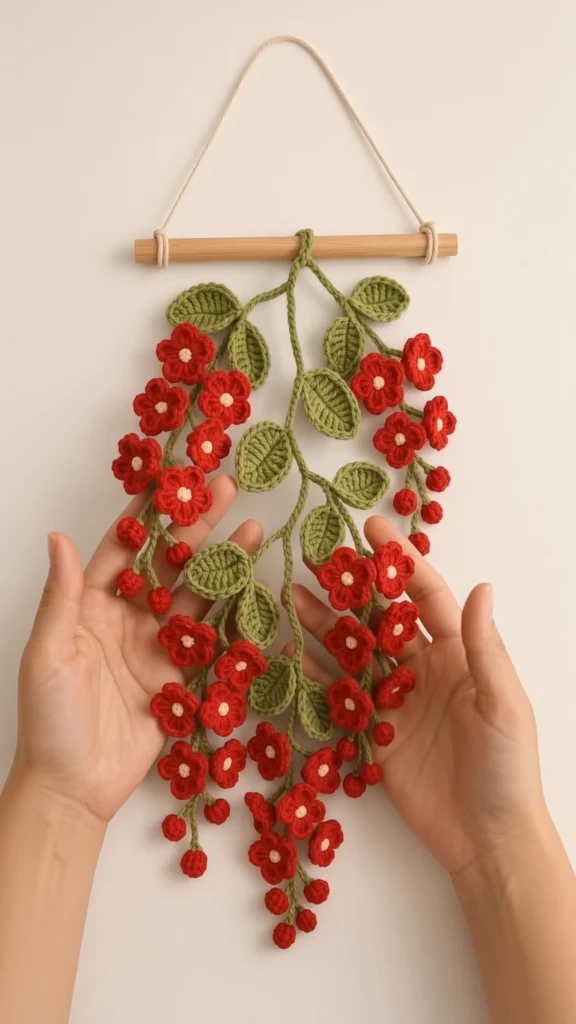
Cascading Red Blossom Crochet Wall Hanging
Beginner Friendly
Perfect for those just starting their crochet journey, with clear instructions and simple techniques
Single-Day Project
A satisfying project you can complete in a single afternoon or evening.
Handmade Gift
A beautiful keepsake — free forever. Read online or print at home.
About This Cascading Red Blossom Crochet Wall Hanging
This crochet flower wall hanging pattern builds a trailing spray of red blossoms out of more than sixty small pieces: twenty-eight five-petal flowers with pale centres, fourteen ribbed leaves, twelve stuffed berries and a set of green chain-and-slip-stitch vines that fan out from a wooden dowel and cascade down the wall. There is no backing panel and no fabric behind it. The vines are the structure, and everything else is sewn onto them, so the finished piece reads as loose and airy against a plain wall rather than as a flat motif.
Expect 10 to 13 hours. Each flower takes about three minutes once you have the rhythm, so the blossoms and berries are ideal small-batch work you can do anywhere, and the real skill is in the last hour. The assembly is done vertically, with the dowel already hung, because gravity changes where every cord falls. That is what separates a piece that looks like a growing branch from one that looks like motifs glued in rows. Good project for someone who can already work a magic ring cleanly and wants practice in composition and appliqué placement.
DK cotton is the right weight here. It keeps the blossoms small and crisp, and the chain cords stay slim enough to look like real stems instead of rope. Mercerised cotton gives the petals a slight sheen that suits the deep red. Written in US terms throughout.
Materials
- DK / light worsted cotton in true red approx. 100 g
- DK / light worsted cotton in sage or moss green approx. 60 g
- DK / light worsted cotton in blush cream small amount, approx. 15 g
- 3.0 mm crochet hook one size down from the ball band for firm petals
- Wooden dowel 25 cm long, 12 mm diameter
- Cream cotton cord for hanging 60 cm, about 4 mm thick
- Tapestry needle blunt, large eye
- Stitch markers at least 4
- Rust-proof pins and a foam board or thick towel for layout
- Sharp scissors and a tape measure
- Small scraps of the red yarn for stuffing the berries do not use polyfill, see the notes
Abbreviations
MRmagic ringchchainscsingle crochethdchalf double crochetdcdouble crochetsl stslip stitchsc2togsingle crochet 2 stitches togetherst / stsstitch / stitchesreprepeatRSright sideFOfasten offGauge and Working Notes
- Gauge: one finished blossom measures about 3 cm across, and a leaf about 5 cm long. If yours run larger, drop to a 2.5 mm hook.
- All cords are worked by chaining, then slip stitching back along the chain. Work each slip stitch into the back bump of the chain, not the top loops. This is the single thing that keeps a cord flat instead of corkscrewing.
- Keep the slip stitches loose. A tight return pass shortens the cord by several centimetres and twists it.
- Flowers and berries are worked in the round with the RS facing. Do not turn.
- Leave a 20 cm tail on every single piece. With more than sixty motifs, cutting new sewing lengths later costs an hour you do not need to spend.
- Make all the small motifs first and sort them into three piles: flowers, leaves, berries. Do not start assembly until every piece exists, because the layout is a judgement call across the whole spray.
Main Vine Cords (make 5)
- Cord 1 (centre, longest): with green, ch 90. Sl st into the back bump of the 2nd ch from hook and into the back bump of each remaining ch. FO, leaving a 25 cm tail. Finished length about 34 cm.
- Cord 2: ch 75, sl st back as above. FO, leaving a 25 cm tail. About 28 cm.
- Cord 3: ch 75, sl st back as above. FO, leaving a 25 cm tail. About 28 cm.
- Cord 4: ch 62, sl st back as above. FO, leaving a 25 cm tail. About 24 cm.
- Cord 5: ch 62, sl st back as above. FO, leaving a 25 cm tail. About 24 cm.
- Do not block these flat. A slight natural curve is what gives the finished spray its drape. Lay them aside without folding.
Side Branch Cords (make 8)
- Branches 1 to 4 (long): with green, ch 40. Sl st into the back bump of the 2nd ch from hook and each remaining ch. FO, leaving a 20 cm tail. About 15 cm each.
- Branches 5 to 8 (short): ch 28, sl st back as above. FO, leaving a 20 cm tail. About 10 cm each.
- These attach partway down the main cords and carry the outer flower clusters. Making them separately rather than chaining off the main cord means you can reposition them during layout instead of committing early.
Berry Spur Stems (make 12)
- With green, ch 14. Sl st into the back bump of the 2nd ch from hook and into each remaining ch. FO, leaving a 20 cm tail. About 5 cm each.
- Repeat until you have 12. Vary four of them to ch 10 and four to ch 18 if you want the berries to hang at staggered depths, which reads more naturally than a level row.
Leaf (make 14)
- With green, ch 9.
- Round 1, first side: sc in the 2nd ch from hook, hdc in next ch, dc in next 3 ch, hdc in next ch, sc in next ch (7 sts worked, one chain left at the far end).
- Round 1, tip: work 3 sc into that last chain to turn the point (10).
- Round 1, second side: working along the free loops on the underside of the foundation chain, sc in next ch, hdc in next ch, dc in next 3 ch, hdc in next ch, sc in next ch (17).
- Round 1, base: 2 sc into the remaining unworked chain at the base, sl st into the first sc of the round (19).
- Round 2: ch 1, sc in the next 7 sts; at the tip work sc in next st, 3 sc in the centre st, sc in next st; sc in the next 7 sts; at the base work 2 sc in each of the last 2 sts; sl st into the first sc (23).
- FO, leaving a 20 cm tail. The foundation chain forms the central spine, so keep it visible on the front. Finished leaf about 5 cm long.
Five-Petal Blossom (make 28)
- Round 1: with blush cream, 10 sc in MR. Pull the ring closed firmly, sl st into the first sc (10). FO blush cream and weave in the end now, while the flower is still open and easy to handle.
- Round 2 (petal round): join red with a sl st in any st of Round 1. *Ch 2, 3 dc in the next st, ch 2, sl st in the following st*; rep from * 4 more times, working the final sl st into the stitch where you joined.
- Each repeat uses 2 sts of Round 1, so 5 repeats consume all 10 sts and give you 5 petals.
- FO, leaving a 20 cm tail. Finished blossom about 3 cm across, with a small pale centre showing between the petals.
- Make 28. Check your first three against each other before committing to the batch, since the ch-2 tension at either side of each petal decides how flat the flower sits.
Berry (make 12)
- Round 1: with red, 6 sc in MR (6)
- Round 2: 2 sc in each st around (12)
- Round 3: sc in each st around (12)
- Round 4: sc in each st around (12)
- Round 5: (sc in next st, sc2tog) rep 4 times (8)
- Stuff firmly with a small scrap of the red yarn itself, wound into a tight ball. It needs to be dense, since a soft berry loses its shape as soon as it hangs.
- Round 6: sc2tog 4 times (4)
- FO leaving a 20 cm tail, thread the tail through the front loops of the remaining 4 sts and pull closed. Finished berry about 1.5 cm.
Dowel Tab (make 1)
- With green, ch 7.
- Row 1: sc in the 2nd ch from hook and in each ch across, turn (6)
- Rows 2 to 9: ch 1, sc in each st across, turn (6)
- FO, leaving a 30 cm tail. This is the small green strap that folds over the dowel and hides the point where all five vines converge.
Finishing
Gather the top ends of the five main cords into a tight bundle and whip stitch them together over the last 2 cm, longest cord in the centre and the shorter pairs to either side. Fold the dowel tab in half around the dowel at its midpoint, trap the bundled cord ends inside the fold, and sew the tab closed through all layers. Tie the cream cord to each end of the dowel with a double knot and hang the piece on the wall before you sew anything else. Everything that follows is placement work, and placement only makes sense with the piece hanging the way it will finally live.
Let the cords settle, then pin the two shortest main cords out to the left and right so the spray widens as it falls, with the longest cord dropping straight down the centre and the middle pair curving out and back in. Tack each cord to the wall with a pin at two or three points to hold the curve. Now attach the eight side branches, sewing the top end of each one to a main cord about a third and two thirds of the way down, angled outward. Sew the twelve berry spurs to the lower ends of the cords, mostly at the outer edges and the bottom of the spray where they act as small weights and pull the cords straight.
Sew the leaves on next, working from the top down. The upper third of the piece takes most of them, six or seven leaves clustered near the dowel where there are few flowers, with the rest scattered singly further down. Stitch each leaf to a cord at its base only, three or four stitches through the spine, so the tip stays free and lifts off the wall. Then place the blossoms: cluster four to six per strand, leaving the very top bare and letting the density increase toward the bottom. Stand back and look at the balance before you commit, then tack each flower down through its blush centre and again at two opposite petals so it cannot spin. Weave in every remaining tail on the back, and give the leaves and petals a light steam from 15 cm away with the iron never touching the work.
Tips for Success
- Work the return slip stitches on every cord into the back bump of the chain. Working into the top loops instead is the reason most vine cords come out as corkscrews, and no amount of blocking will fix it afterwards.
- Make all 28 blossoms in one sitting if you can. Petal tension drifts noticeably between sessions, and mismatched flowers stand out badly once they sit side by side on the same strand.
- Assemble vertically with the piece already hanging. Laid flat on a table, the cords sit where you put them, but on the wall they drop and the whole composition shifts.
- Put the heaviest elements low. The berries weigh more than the flowers, so concentrating them at the lower ends of the cords keeps the vines hanging straight instead of kinking.
- Count your flowers per side as you go, 14 left and 14 right, or the dowel will hang visibly off level once the piece is on the wall.
Common Mistakes to Avoid
- Cords that spiral into springs. Almost always tight slip stitches worked into the wrong loop. Undo the return pass, keep the working loop as loose as the chain itself, and go through the back bump.
- Blossoms that cup instead of lying flat. The ch-2 at each side of the petal is too tight, which pulls the 3 dc into a curve. Chain those two stitches deliberately loosely, or go up a hook size for Round 2 only.
- Berries stuffed with polyfill. White fibre shadows straight through red cotton and shows as a pale patch. Wind a scrap of the red yarn into a tight ball and use that instead.
- Flowers tacked down with one stitch through the centre. They rotate as soon as anyone brushes past, and a spun blossom looks broken. Anchor each one at the centre and at two opposite petals.
- Sewing the leaves down along their whole edge. Flat leaves kill the depth of the piece. Stitch only the base of each leaf so the tip lifts away from the wall and casts a small shadow.
Ways to Customize This Pattern
- Change the season with the palette: white blossoms with a yellow centre for cherry blossom, soft lilac for wisteria, or golden yellow with grey-green leaves for mimosa.
- Make it longer. Add 30 chains to each main cord and 10 more blossoms for a 70 cm cascade suited to a narrow hallway or the side of a bookcase.
- Work it as a horizontal garland instead. Use two 45 cm cords side by side, spread all the motifs evenly along them, and hang it across a mantelpiece or a window frame.
- Swap the berries for small wooden beads, or for tiny gold bells at Christmas, threading them onto the spur stems before sewing the ends closed.
- Scale it right down to a mini version with 8 blossoms, 4 leaves and a 10 cm twig instead of a dowel, which makes a good car mirror hanger or a gift topper.
- Skip the dowel entirely and sew the cord bundle to a small brass ring or a bent length of copper wire for a more modern hanging point.
Frequently asked questions
Not reliably. A spiralled cord is a structural problem, not a blocking problem, and steaming it straight only holds until the piece hangs for a week. Rework the cord with the slip stitches into the back bump of the chain and a much looser working loop. It takes ten minutes per cord and it is the difference between stems and rope.
Twenty-eight gives the density in the photo, but the number is a style choice rather than a structural one. Twenty reads as sparse and botanical, and thirty-five is close to solid coverage. Make twenty-eight, lay them out, and add more only if the lower half looks thin once the piece is hanging.
Yes, with a 4.0 mm hook and every stitch count exactly as written. The blossoms come out closer to 4 cm and the whole piece grows by roughly a third, so reduce the flowers to about 20 or the spray becomes crowded. Cut the chain counts on all the cords by around a fifth, since worsted chains are longer.
It hangs evenly on its own if the berries are dense and placed low. If one side still drifts, do not add weights. Move two blossoms across instead, or lengthen the cream hanging cord on the high side by a centimetre, which corrects the tilt at the dowel where it is least visible.
Take it off the wall and shake it, then go over the petals with a soft brush or a hairdryer on cool. Do not wash it as a whole piece, because wet cords stretch under the weight of the motifs and the drape never fully recovers. If something is stained, spot clean that motif with a damp cloth and let it dry hanging.
The finished Cascading Red Blossom Crochet Wall Hanging

