Charcoal Waffle Stitch Crochet Blanket Pattern
Beginner Friendly
Perfect for those just starting their crochet journey, with clear instructions and simple techniques
Single-Day Project
A satisfying project you can complete in a single afternoon or evening.
Handmade Gift
A beautiful keepsake — free forever. Read online or print at home.
About This Charcoal Waffle Stitch Crochet Blanket Pattern
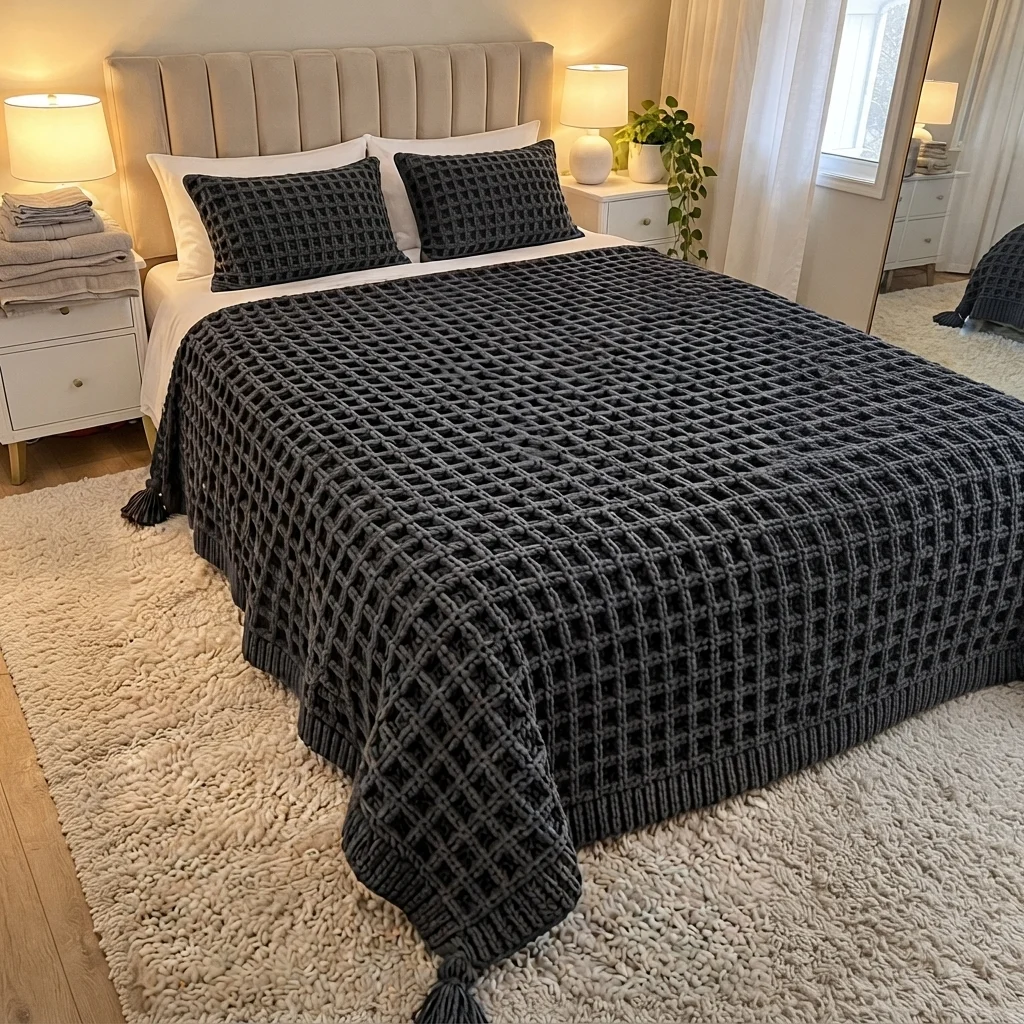
This waffle stitch crochet blanket pattern makes a heavy, textured throw in deep charcoal, with rows of square windows that catch the light like a woven grid. The blanket is worked in one piece from the bottom up, with a ribbed band at each end and a tassel at every corner, just like the throw in the photo.
It is an advanced project because of the front post and back post stitches, which you work in every row of the grid, the ribbed bands, and the sheer size of the blanket. Plan on 30 to 40 hours in total, and keep your tension even from the first row to the last, since any change will show across a surface this large.
It suits crocheters who are comfortable with post stitches and long projects, and who want a modern throw that looks good on a white bed with natural wood and a cream rug. The finished blanket is about 150 x 200 cm, and it is easy to resize in steps of 3 stitches and 4 rows.
Materials
- Chunky cotton-blend yarn, charcoal about 2.5 kg, estimated
- Crochet hook 8.0 mm
- Stiff card about 15 cm wide, for the tassels
- Yarn needle
- Stitch markers
- Scissors
- Flat surface and pins for blocking
Abbreviations
chchaindcdouble crochetFPdcfront post double crochetBPdcback post double crochetst(s)stitch(es)RSright sideWSwrong sideFOfasten off( )xrepeat the stitches in brackets the number of times givenFoundation and Base Row
- Ch 96. This is a multiple of 3, plus 3.
- Row 1: dc in the 4th ch from the hook (the skipped chains count as the first dc) and in each ch across (94). Ch 2 and turn.
Ribbed Bottom Band
- Row 2 (RS): ch 2 (does not count as a stitch), (FPdc around the next st, BPdc around the next st)x47 (94). Turn.
- Rows 3-7: ch 2 and turn at the end of each row. Work a FPdc around each post that is bumping toward you, and a BPdc around each post that is sinking away from you, so the ribs stack in straight columns (94).
- After row 7 you have 6 rows of ribbing. On the last row, ch 3 and turn so you are ready to start the body.
Waffle Body (4-row repeat)
- All rows have 94 stitches. The ch 3 at the start of each row counts as a stitch, and each row is turned with ch 3. A 94-stitch row is 1 turning chain plus 31 repeats of (post, dc, dc).
- Row 1 (RS, post row): ch 3, (FPdc around the next st, dc in each of the next 2 sts)x31 (94)
- Row 2 (WS, post row): ch 3, (BPdc around the next post st, dc in each of the next 2 sts)x31 (94). Each BPdc goes around the post that sits directly below it, so the columns stack.
- Row 3 (RS, plain row): ch 3, dc in each st across (94)
- Row 4 (WS, plain row): ch 3, dc in each st across (94)
- Repeat rows 1-4 a total of 22 times (88 rows). The columns of posts and the gaps between them form the windows, and the two plain rows form the horizontal bars.
- Measure after 10 repeats. The body should be about 80 cm tall. Add or remove repeats to change the length.
- After the last repeat, ch 2 and turn to start the top band.
Ribbed Top Band
- Row 1 (RS): ch 2, (FPdc around the next st, BPdc around the next st)x47 (94). Turn.
- Rows 2-6: ch 2 and turn at the end of each row. Work a FPdc around each post that bumps toward you and a BPdc around each post that sinks away, as in the bottom band (94).
- FO and weave in the end.
Tassels (make 4)
- Wrap yarn 30 times around the card.
- Cut a 40 cm piece of yarn, slip it under the wraps at one edge, and tie it tightly at the top. Cut the wraps at the other edge.
- Wrap a second piece of yarn around the bundle about 3 cm below the top and tie it off to form the head. Trim the ends evenly.
- Sew one tassel to each corner of the blanket, through the corner stitch and the edge of the ribbing.
Finishing
Block the finished blanket by laying it flat on towels, pinning the corners and edges to the size you want, and misting it with water. Let it dry fully before moving it. This opens the windows evenly and flattens the ribbing so it lies neatly at the foot of the bed.
Check each end for loose ends and weave them in along the ribs. Drape the blanket with the ribbed band hanging over the foot of the bed, with a tassel at each corner, and it will look like the photo.
Tips for Success
- Place a stitch marker in the turning chain of every fourth row so you can count repeats without counting rows.
- Count your stitches after every post row. There should always be 94, or the columns will drift.
- Work the post stitches around the full post, from front to back, not around the top loops only.
- Wind the yarn into center-pull balls before you start, since chunky yarn tangles easily on a project this big.
- Block the blanket flat. Post stitches curl at the edges, and blocking is what makes the windows look square.
Common Mistakes to Avoid
- Working the posts around the wrong stitch shifts the columns. Check that every post sits directly above the post in the row below.
- Skipping the first or last stitch of a row makes the sides wavy. Always work into the turning chain and the last stitch.
- Pulling the post stitches tight narrows the blanket. Keep your tension relaxed and your stitches loose.
- Mixing up the front and back posts in the ribbing flattens the ribs. Follow the bumps instead of the stitch names.
- Winding the tassels too loosely makes them look thin. Use at least 30 wraps and tie them firmly.
Ways to Customize This Pattern
- Swap charcoal for cream, sage or navy, and use the same pattern for a lighter, softer look.
- Make a lap throw by chaining 60 (19 repeats plus 3) and working 12 repeats of rows 1-4.
- Make matching pillow covers by chaining 39, working rows 1-4 seven times, adding ribbed bands and sewing the ends together.
- Skip the ribbed bands and finish with two rounds of sc around the blanket for a simpler edge.
- Use a thinner yarn and a 6 mm hook, and add more stitches in multiples of 3 for a lighter, drapier version.
Frequently asked questions
The amount above is an estimate of about 2.5 kg, based on a chunky yarn. Post stitches use more yarn than plain double crochet, so weigh your swatch, scale it up by area, and add about 10 percent.
For width, add or remove 3 stitches at a time, which means 3 more chains in the foundation. For length, add or remove 4 rows at a time, which is one full repeat of rows 1-4.
Yes. A worsted yarn with a 5 mm hook gives a more delicate fabric, but you will need many more stitches and rows for the same size, so chain more and add more repeats.
Check the yarn label first. For most cotton blends, wash on a gentle cycle in cool water, press out the water without wringing, and lay it flat to dry so the windows keep their shape.
The finished Charcoal Waffle Stitch Crochet Blanket Pattern

