Chenille Gnome Wall Hanging
Beginner Friendly
Perfect for those just starting their crochet journey, with clear instructions and simple techniques
Single-Day Project
A satisfying project you can complete in a single afternoon or evening.
Handmade Gift
A beautiful keepsake — free forever. Read online or print at home.
About This Chenille Gnome Wall Hanging
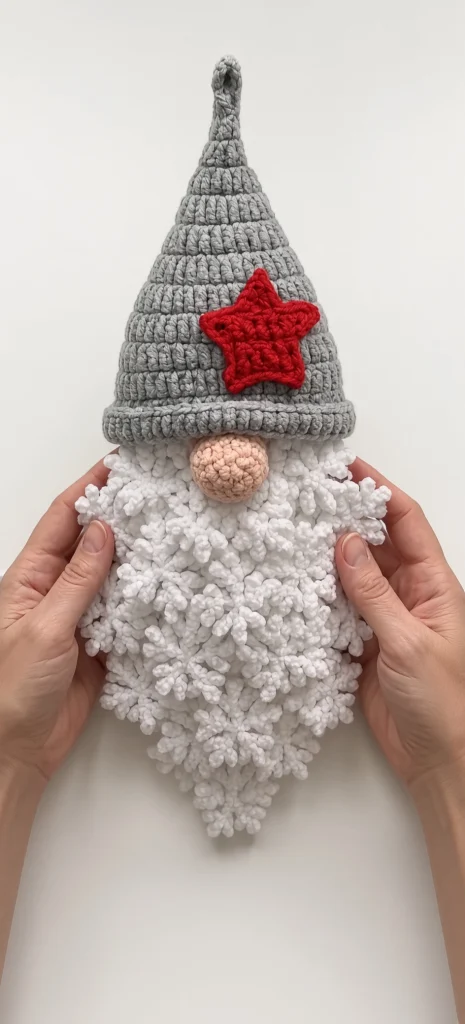
This crochet gnome pattern makes a soft chenille wall hanging with a tall ribbed grey hat, a red star patch on the brim, a rounded peach nose and a deep loop-stitch beard that tapers to a point. It is worked flat rather than in the round as a stuffed figure, so it hangs against a door or wall and sits almost completely level — the only parts with any depth are the stuffed nose and the hat’s folded brim.
The beard is the piece that takes the time and the technique. It is a triangle of loop stitch, worked with a long loop on every stitch so the surface builds into dense, overlapping curls rather than a flat fabric. In chenille that produces something that genuinely reads as a thick white beard rather than a decorative texture. It uses about half the yarn in the whole project and takes roughly three hours on its own.
Chenille is a difficult yarn to work with — it worms, it splits, and you cannot see your stitches easily — which is most of why this is an advanced pattern rather than a beginner one. The hat’s ribbing and the hanging loop are simple. Plan on 8 to 11 hours total. The finished piece is light enough to hang from a single command hook and soft enough to be a safe decoration in a room with small children.
Materials
- Chenille or velvet super bulky yarn in white approx. 90 m (about 150 g) — the beard eats yarn
- Chenille or velvet super bulky yarn in heather grey approx. 55 m (about 90 g) — hat
- Worsted weight cotton in bright red approx. 15 m — star patch
- Worsted weight cotton in warm peach approx. 12 m — nose
- 5 mm crochet hook US H-8, for the chenille
- 3.5 mm crochet hook US E-4, for the red star and the nose
- Polyester fiberfill a small handful, for the nose only
- Tapestry needle blunt tip, large eye — chenille needs a wide eye
- Stitch markers 4-6, essential in chenille where stitches are hard to see
- Small piece of stiff card 3 cm wide, for keeping the beard loops even
- Small sharp scissors and a measuring tape
Abbreviations
begbeginningBLOback loop onlychchaindcdouble crochethdchalf double crochetlp stloop stitch (see technique note)MRmagic ringreprepeatrnd(s)round(s)RSright sidescsingle crochetsc2togsingle crochet 2 stitches togetherskskipsl stslip stitchst(s)stitch(es)WSwrong sideGauge and sizing
- Gauge in chenille sc: 10 sc and 11 rows = 10 cm x 10 cm.
- Hat: approximately 18 cm from brim to tip, 20 cm wide at the brim.
- Beard: approximately 22 cm long by 20 cm at its widest.
- Nose: approximately 5 cm across. Star: approximately 8 cm point to point.
- Finished hanging: approximately 36 cm long by 20 cm wide, plus a 6 cm hanging loop.
- All instructions use US crochet terminology.
- Chenille gauge varies considerably between brands. If your hat comes out more than 2 cm off, change hook size before making the beard, since the two must match in width at the join.
Loop stitch technique
- The beard is worked entirely in loop stitch, which forms a loop on the wrong side as you work, so the loops appear on the right side when the work is turned.
- To make a loop stitch: insert the hook into the next stitch. Wrap the working yarn around your index finger to form a 3 cm loop, holding the card behind your finger to keep every loop the same size.
- With both strands of the loop on your finger, yarn over by catching the strand behind your finger, pull it through the stitch, then yarn over normally and pull through both loops on the hook.
- Slide the loop off your finger. It sits on the far side of the fabric from you.
- Work every stitch of every beard row as a loop stitch, on every row, not alternate rows — the density is what makes it read as a beard.
- Use the 3 cm card for the first twenty stitches until the size is automatic. Uneven loops are the most visible flaw in a finished loop-stitch piece.
Hat
- The hat is worked from the tip downward in joined rounds.
- Rnd 1: With grey and the 5 mm hook, MR, ch 1, 4 sc in ring, pull ring closed, sl st to first sc. (4 sc)
- Rnds 2-5: Ch 1, sc in each sc around, sl st to first sc. (4 sc each round) This narrow tube is the floppy tip of the hat.
- Rnd 6: Ch 1, 2 sc in each sc around, sl st to first sc. (8 sc)
- Rnds 7-8: Ch 1, sc in each sc around, sl st to first sc. (8 sc)
- Rnd 9: Ch 1, *sc in next sc, 2 sc in next sc; rep from * around, sl st to first sc. (12 sc)
- Rnds 10-11: Ch 1, sc in each sc around, sl st to first sc. (12 sc)
- Rnd 12: Ch 1, *sc in next 2 sc, 2 sc in next sc; rep from * around, sl st to first sc. (16 sc)
- Rnds 13-14: Ch 1, sc in each sc around, sl st to first sc. (16 sc)
- Rnd 15: Ch 1, *sc in next 3 sc, 2 sc in next sc; rep from * around, sl st to first sc. (20 sc)
- Rnds 16-17: Ch 1, sc in each sc around, sl st to first sc. (20 sc)
- Rnd 18: Ch 1, *sc in next 4 sc, 2 sc in next sc; rep from * around, sl st to first sc. (24 sc)
- Rnds 19-20: Ch 1, sc in each sc around, sl st to first sc. (24 sc)
- Rnd 21: Ch 1, *sc in next 5 sc, 2 sc in next sc; rep from * around, sl st to first sc. (28 sc)
- Rnds 22-23: Ch 1, sc in each sc around, sl st to first sc. (28 sc)
- Rnd 24: Ch 1, *sc in next 6 sc, 2 sc in next sc; rep from * around, sl st to first sc. (32 sc)
- Rnds 25-26: Ch 1, sc in each sc around, sl st to first sc. (32 sc)
- Rnds 27-32 (brim): Ch 1, working in BLO, sc in each sc around, sl st to first sc. (32 sc each round) The back-loop rounds create the ridged brim.
- Fasten off, leaving a 40 cm tail. Fold the last six rounds upward to form the turned-up brim and tack it in place at eight evenly spaced points with the tail.
- Hanging loop: join grey at the very tip of the hat, ch 12, sl st back into the tip to form a loop, fasten off and weave in.
Beard
- The beard is a triangle worked from the top edge downward, decreasing to a point. Every stitch is a loop stitch.
- Row 1 (WS): With white and the 5 mm hook, ch 21. Lp st in the 2nd ch from hook and in each ch across. Turn. (20 lp st)
- Row 2: Ch 1, lp st in each st across. Turn. (20 lp st)
- Rows 3-5: Rep Row 2. (20 lp st each row)
- Row 6: Ch 1, sc2tog, lp st in each st across to the last 2 sts, sc2tog. Turn. (18 sts) Work the decrease stitches as plain sc — a loop stitch decrease is impossible to control in chenille.
- Rows 7-8: Ch 1, lp st in each st across. Turn. (18 lp st)
- Row 9: Ch 1, sc2tog, lp st in each st across to the last 2 sts, sc2tog. Turn. (16 sts)
- Rows 10-11: Ch 1, lp st in each st across. Turn. (16 lp st)
- Row 12: Ch 1, sc2tog, lp st across to the last 2 sts, sc2tog. Turn. (14 sts)
- Row 13: Ch 1, lp st in each st across. Turn. (14 lp st)
- Row 14: Ch 1, sc2tog, lp st across to the last 2 sts, sc2tog. Turn. (12 sts)
- Row 15: Ch 1, lp st in each st across. Turn. (12 lp st)
- Row 16: Ch 1, sc2tog, lp st across to the last 2 sts, sc2tog. Turn. (10 sts)
- Row 17: Ch 1, sc2tog, lp st across to the last 2 sts, sc2tog. Turn. (8 sts)
- Row 18: Ch 1, sc2tog, lp st across to the last 2 sts, sc2tog. Turn. (6 sts)
- Row 19: Ch 1, sc2tog, lp st in next 2 sts, sc2tog. Turn. (4 sts)
- Row 20: Ch 1, sc2tog twice. Turn. (2 sts)
- Row 21: Ch 1, sc2tog. (1 st) Fasten off and pull the tail through.
- The beard should measure about 22 cm long and 20 cm at the top edge.
Nose
- Rnd 1: With peach cotton and the 3.5 mm hook, MR, ch 1, 6 sc in ring, pull closed. Do not join; work in a continuous spiral, marking the first st of each rnd. (6 sc)
- Rnd 2: 2 sc in each sc around. (12 sc)
- Rnd 3: *Sc in next sc, 2 sc in next sc; rep from * around. (18 sc)
- Rnd 4: *Sc in next 2 sc, 2 sc in next sc; rep from * around. (24 sc)
- Rnds 5-8: Sc in each sc around. (24 sc each round)
- Rnd 9: *Sc in next 2 sc, sc2tog; rep from * around. (18 sc)
- Rnd 10: *Sc in next sc, sc2tog; rep from * around. (12 sc)
- Rnd 11: Stuff firmly with fiberfill, then [sc2tog] 6 times. (6 sc)
- Fasten off, leaving a 40 cm tail. Thread the tail through the front loops of the remaining 6 sc and pull tight to close. The nose should measure about 5 cm across.
Star patch
- Rnd 1: With red cotton and the 3.5 mm hook, MR, ch 1, 10 sc in ring, pull closed, sl st to first sc. (10 sc)
- Rnd 2: Ch 1, 2 sc in each sc around, sl st to first sc. (20 sc)
- Rnd 3: Ch 1, *sc in next 3 sc, 2 sc in next sc; rep from * around, sl st to first sc. (25 sc)
- Rnd 4 (form the points): Ch 1, *sc in next sc, hdc in next sc, (dc, ch 2, dc) in next sc — point made, hdc in next sc, sc in next sc; rep from * 4 more times, sl st to first sc. (5 points)
- Rnd 5 (outline): Ch 1, sc in each st around, working (2 sc, ch 1, 2 sc) in each ch-2 point sp and sc2tog at each inner valley between points, sl st to first sc. (5 sharp points, 5 valleys)
- Fasten off, leaving a 40 cm tail for sewing. The star should measure about 8 cm from point to point.
Assembly
- Lay the hat flat with the brim at the bottom and the tip at the top, pressing it so it sits as a flat triangle rather than a cone.
- Position the beard so its top edge tucks about 3 cm up under the hat brim, centered. The beard’s 20 cm top edge should match the hat’s 20 cm brim width.
- Pin the beard in place and check that the whole piece hangs straight before sewing. Hold it up by the hanging loop — a beard sewn even 1 cm off center will be obvious once it hangs.
- Sew the beard to the hat with white, working small stitches along the top edge of the beard into the inside of the hat brim. Sew across the full 20 cm so the weight is distributed and the beard does not sag at the corners.
- Position the nose at the center of the beard’s top edge, just below the brim, so the brim overlaps the top of the nose slightly. That overlap is what makes it look like a face rather than a ball stuck on a beard.
- Sew the nose on with its long tail, stitching around its base through both the beard and the hat brim so it is anchored to both. Push the loop stitches aside as you sew rather than through them.
- Position the star on the hat, off-center and about 6 cm above the brim. Sew it down around its full outline with the red tail, catching only the front surface of the chenille so no red shows on the back.
- Weave all tails into the back of the piece. Chenille grips well but has little friction on cotton, so knot the red and peach tails once before weaving.
Finishing
Chenille does not block in the conventional sense and should not be wet blocked — water flattens the pile and it does not fully recover. Instead, shape the piece by hand: press the hat flat, run your fingers through the beard loops to separate any that have compressed, and hang it for a day so it settles under its own weight.
Fluff the beard with your fingers rather than a brush. A brush pulls the chenille pile and the loops start to shed fibers. If any loops have flattened in storage, a brief pass with a steamer held 20 cm away will lift them, but keep the steam moving and never let it soak the yarn.
Hang from a single small hook or a command strip. The finished piece weighs around 250 g, so it needs no special hardware, but the hanging loop is narrow chenille and will stretch if hung on a wide hook — a slim hook or a nail is better.
Spot clean only. Chenille and velvet yarns mat badly in the wash and a full submersion will turn the beard loops into a solid felted mass. Dab with a damp cloth and let it air dry, keeping the loops separated with your fingers as it dries.
Tips for Success
- Use a stitch marker in the first stitch of every hat round without exception. Chenille hides the join almost completely, and once you lose it the increase rounds drift and the hat comes out lopsided.
- Keep the 3 cm card behind your finger for the first several rows of the beard. Loop stitches that vary in length are the most visible flaw in the finished piece, and by row five the size will be automatic.
- Work the decreases in the beard as plain sc, not as loop stitches. A loop stitch decrease in chenille is nearly impossible to control and the resulting stitch usually pulls out.
- Count the hat rounds. The increases come every third round from Rnd 6 onward, and it is easy to work two plain rounds instead of one, which produces a hat that is too long and too narrow at the brim.
- Hold the piece up by its loop before sewing anything permanently. Everything about this design is judged hanging, and a nose that looks centered on a table looks off-center on a wall.
Common Mistakes to Avoid
- Working the loop stitch on alternate rows to save time. It halves the density and the beard reads as textured fabric rather than as hair. Every stitch of every row.
- A beard top edge that does not match the hat brim width. They must both be 20 cm. If your gauge has drifted, adjust the beard’s foundation chain rather than easing a mismatch in at the seam, which will pucker.
- Sewing the nose to the beard only. It needs to be anchored to the hat brim as well, or it pulls downward over time and the face slowly slides out of position.
- Splitting the chenille with the hook. Chenille has almost no twist and a sharp hook goes straight through the fiber rather than into the stitch. Use a hook with a rounded head and work more slowly than usual.
- Wet blocking or washing. Chenille loses its pile permanently when saturated, and a felted loop-stitch beard cannot be recovered. Spot clean only.
Ways to Customize This Pattern
- Work the hat in deep red or forest green with a cream star for a more traditional Christmas version, keeping the white beard.
- Make a smaller version with worsted cotton and a 3.5 mm hook throughout for a tree ornament — it comes out around 15 cm and the loop stitch still works, just at a finer scale.
- Swap the star for a small holly sprig, a tiny stuffed acorn, or an embroidered initial for a personalized gift.
- Make a set of three in graduated sizes — 30 cm, 36 cm and 42 cm — hung together at staggered heights beside a door.
- Add a pair of small stuffed mittens on chenille cords hanging from the beard’s lower edge, which gives the gnome arms without changing the flat construction.
Frequently asked questions
Use the card. Hold a 3 cm strip of stiff card behind your index finger and wrap the yarn around both, so every loop is physically the same length. It feels awkward for about twenty stitches and then becomes automatic. There is no way to even out loops after the fact, so the consistency has to come from the making.
Yes, and it is considerably easier to work with. Use a bulky acrylic or wool with a 5 mm hook and the stitch counts stay the same. The finished piece will be firmer and less plush, and the beard loops will be more defined and less cloud-like, which some people prefer. Chenille is what gives the soft look in the photo, but it is also the reason this is an advanced pattern.
Worming happens when the tension is too loose for the yarn. Go down a hook size, work more slowly, and give each stitch a small tug to settle it before moving on. It is a known property of chenille rather than a mistake, but tighter tension controls it almost completely. If a worm appears in finished work, you can usually work it back along the row with a needle.
Roughly 60 m of the 90 m of white — two thirds of it. Loop stitch consumes about three times the yarn of plain single crochet because every stitch carries a 3 cm loop. Buy more white than you think you need, since running out mid-beard and joining a new ball leaves a visible line through the loops.
The piece itself is soft and light with nothing rigid in it, which makes it a safer decoration than most. The things to check are the nose, which is a stuffed cotton ball firmly attached but worth reinforcing with extra stitches if a toddler can reach it, and the hanging loop, which should be short enough that it cannot be pulled into a strangulation hazard. Hang it well above reach and check the nose seam occasionally.
The finished Chenille Gnome Wall Hanging

