Cherry Blossom Crochet Curtain Panels
Advanced
For experienced crocheters who enjoy complex shaping, fine detail, and ambitious construction
Single-Day Project
A satisfying project you can complete in a single afternoon or evening.
Handmade Gift
A beautiful keepsake — free forever. Read online or print at home.
About This Cherry Blossom Crochet Curtain Panels
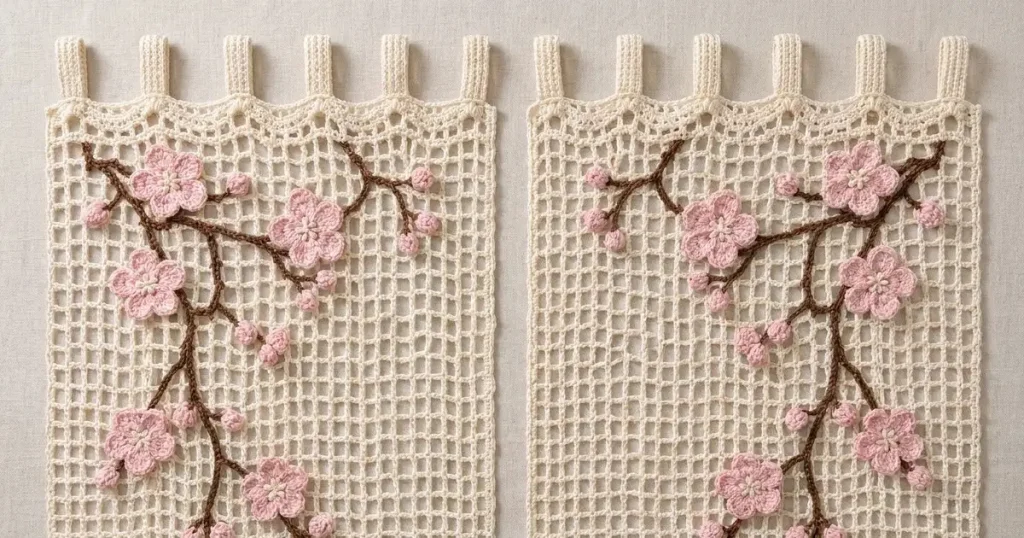
This cherry blossom crochet curtain pattern creates a pair of ivory mesh panels decorated with winding brown branches, soft pink flowers and small rounded buds. Six narrow hanging tabs finish each panel, while a shallow scalloped heading echoes the delicate openwork in the reference photograph.
The design combines counted filet mesh, separately shaped branch cords, two-layer flower appliqués and lightly stuffed buds. Allow approximately 35–45 hours for the pair, including blocking and hand sewing. It suits experienced crocheters who enjoy planning surface decoration and securing appliqués neatly to an open fabric.
Materials
- Sport-weight cotton in ivory Approximately 1,600 m for two panels; choose a yarn around 150 m per 50 g
- Sport-weight cotton in medium brown Approximately 180 m for branches
- Sport-weight cotton in dusty pink Approximately 180 m for flower fronts and buds
- Sport-weight cotton in pale blush Approximately 120 m for flower backing layers
- Ivory cotton for flower centers Use a small amount from the main supply
- Crochet hooks 3.0 mm for mesh, borders, tabs, cords and flowers; 2.5 mm for buds
- Washable fiberfill A few pinches for the buds only
- Tapestry needle, scissors and stitch markers For joining and marking attachment points
- Blocking mat, rustproof pins and tape measure For shaping the panels before assembly
- Curtain rod Approximately 15–20 mm diameter; check your tab sample before making all twelve
Abbreviations
chchainscsingle crochethdchalf double crochetdcdouble crochettrtreble crochetsl stslip stitchst / stsstitch / stitchesMRmagic ringinc2 sc in the same stitchdecsingle crochet 2 stitches togetherRS / WSright side / wrong sideGauge, Dimensions and Construction
- Use US crochet terminology. Work mesh and tabs in turned rows. Work buds in continuous rounds, marking the first stitch. Flower rounds are joined as directed.
- Blocked mesh gauge: 5 mesh cells wide and 6 mesh rows high measure 10 × 10 cm. One cell consists of a ch-2 space and its following dc. The shared boundary posts are not additional cells.
- For a swatch, ch 32. Foundation row: sc in the second ch from the hook and each remaining ch: 31 sc. First mesh row: ch 3, turn; this counts as the first dc. Skip the first sc, then repeat (ch 2, skip 2 sc, dc in next sc) 10 times: 10 cells and 11 posts. Work another 7 mesh rows using the panel repeat below. Wash, block and measure the interior.
- Additional target gauges: 22 sc × 30 rows per 10 cm for tabs; approximately 22 sc per 10 cm along a straight branch cord. A completed layered flower should measure approximately 6–7 cm across. Adjust hook size separately for these components if necessary.
- Each panel has 30 cells across and 48 mesh rows, measuring approximately 60 × 80 cm before edging. The foundation, perimeter border and heading bring the fabric to approximately 62 × 83 cm. Folded tabs extend approximately 4 cm above the heading, giving a total hanging length near 87 cm.
- Make two panels, twelve tabs, ten layered flowers and twenty-four buds. Both panels have an identical base. Reverse the decoration coordinates for the second panel to create the facing branch arrangement.
Ivory Mesh Panels — Make Two
- Foundation: with ivory and the 3.0 mm hook, ch 92. Sc in the second ch from the hook and each remaining ch: 91 sc. Turn.
- Mesh row 1: ch 3, counting as the first dc; skip the first sc. Repeat (ch 2, skip 2 sc, dc in next sc) 30 times. There are 31 dc posts and 30 ch-2 spaces. Turn.
- Mesh rows 2–48: ch 3, counting as the first dc; skip the first dc. Repeat (ch 2, dc in next dc) 30 times, placing the final dc in the top of the previous turning ch-3. Each row has 31 posts and 30 spaces. Turn after every row except row 48.
- Mark the face of the final mesh row as the RS. Do not fasten off. Count all 48 rows before adding the border.
Panel Borders and Scalloped Heading
- Border round 1: ch 1. Across the top, sc in the first dc, then repeat (2 sc in next ch-2 space, sc in next dc) 30 times: 91 sc including both corner stitches. Put a marker in the first and last sc of this edge.
- Ch 2 for the upper-right corner. Down the side, work 2 sc around the end of each of the 48 mesh rows, then 1 sc into the side of the foundation row: 97 sc. Ch 2 for the lower-right corner.
- Across the bottom, sc in each of the 91 unused foundation-chain loops: 91 sc. Ch 2 for the lower-left corner.
- Up the remaining side, work 1 sc into the side of the foundation row and 2 sc around each of the 48 mesh-row ends: 97 sc. Ch 2 and sl st to the first sc. Total: 376 sc and four ch-2 corner spaces.
- Border round 2: ch 1. Sc in each sc around, working (sc, ch 2, sc) in each corner space. Join with a sl st to the first sc. Total: 384 sc and four ch-2 corner spaces. Fasten off. Between corner spaces there are 93 stitches on each horizontal edge and 99 on each vertical edge.
- Heading row 1: with RS facing, join ivory to the first stitch after the upper-left corner space. Ch 1 and sc in each of the 93 top-edge stitches. Turn: 93 sc.
- Heading row 2: ch 1, sc in the first 2 sts. Repeat (skip 2 sts, 5 dc in next st, skip 2 sts, sc in next st) 15 times; sc in the final st. Fasten off. This consumes all 93 stitches and makes 15 shells, with 93 stitches worked in total.
- Wet-block each panel to approximately 62 × 83 cm, arranging the heading shells evenly. Let dry completely before adding decorations.
Hanging Tabs — Make Twelve
- Row 1: with ivory, ch 7. Sc in the second ch from the hook and each remaining ch: 6 sc. Turn.
- Rows 2–30: ch 1, sc in all 6 sts; turn. The turning ch never counts as a stitch. Each tab should measure approximately 2.7 × 10 cm. Fasten off, leaving a 35 cm sewing tail.
- Fold one tab in half without twisting. Overlap its two short ends by 1 cm on the WS of the heading. The resulting loop extends approximately 4 cm above the heading. Test this loop on your rod before attaching the others.
- On each panel, center tabs over top-edge stitch positions 4, 21, 38, 55, 72 and 89, counting within the 93-stitch heading foundation row.
- Sew each end separately through the dense heading foundation and upper border, using two rows of backstitch. Keep the scalloped edge visible on the front. Do not support a tab using only a mesh chain.
Brown Branch Cords
- Make one main cord per panel: with brown, ch 199. Sc in the second ch from the hook and each remaining ch: 198 sc, approximately 90 cm long. Fasten off with a long sewing tail.
- Make three long branches per panel: for each, ch 67 and sc in the second ch from the hook and across: 66 sc, approximately 30 cm.
- Make four short branches per panel: for each, ch 34 and sc in the second ch from the hook and across: 33 sc, approximately 15 cm.
- Make six twig cords per panel: for each, ch 17 and sl st in the second ch from the hook and across: 16 sl sts. These finer twigs should measure approximately 6–7 cm; keep the slip stitches relaxed.
- Leave the cords flat. Their narrow sc strips can curve and twist slightly during placement to create the irregular, woody outlines seen in the photograph. Do not stuff or insert wire.
Branch Placement and Joining
- Lay the first blocked panel RS up. Coordinates below refer to mesh intersections: x = 0 is the leftmost post and x = 30 the rightmost post; y = 0 is the bottom of the mesh and y = 48 its top. Each horizontal unit is approximately 2 cm and each vertical unit approximately 1.67 cm. Count within the mesh, excluding borders.
- Pin the main cord along this route, moving upward: (17,0), (14,8), (13,17), (10,26), (8,35), (3,44). Ease its extra length into gentle bends rather than pulling the mesh inward.
- Pin long branch 1 from (10,26), through (11,34), to (5,39). Pin long branch 2 from (8,35), through (18,34), to (22,40). Pin long branch 3 from (13,17), through (18,11), to (18,1).
- Pin short branch 1 from (22,40), through (23,43), to (20,46). Pin short branch 2 from (22,40) to (27,40). Pin short branch 3 from (10,26), through (14,25), to (15,21). Pin short branch 4 from (14,8) to (10,12). Allow small bends where a cord is longer than the direct route.
- Add the six fine twigs from (5,39) toward (3,36); from (27,40) toward (26,36); from (15,21) toward (17,18); from (10,12) toward (7,10); from (18,11) toward (21,8); and from (18,34) toward (19,30). Curve each twig to use its full length.
- Sew each cord to mesh posts and chain junctions with matching brown yarn. Catch both long edges wherever they cross a mesh strand, approximately every 1–2 cm. At junctions, overlap branch ends beneath the main cord and stitch the layers together.
- For the second panel, replace every x coordinate with 30 minus x; leave y unchanged. For example, (17,0) becomes (13,0). Pin and sew the mirrored branch arrangement in the same way.
Blossom Backing Layers — Make Ten
- Round 1: with pale blush and the 3.0 mm hook, work 5 sc in MR. Pull closed and sl st to the first sc: 5 sc.
- Round 2: ch 1, inc in each st around; sl st to the first sc: 10 sc. The joining sl st and starting ch do not count.
- Round 3: repeat the following petal sequence 5 times: sl st in the next unworked sc; in that same sc work (ch 3, 5 tr, ch 3, sl st); sl st in the following sc. Each petal uses two base stitches. All 10 base stitches are used, producing 5 petals.
- Fasten off and weave in the starting tail. Leave a 40 cm finishing tail for attaching the flower. Block the petals gently into rounded lobes without stretching their centers.
Blossom Front Layers — Make Ten
- Round 1: with dusty pink, work 5 sc in MR. Close the ring and sl st to the first sc: 5 sc.
- Round 2: ch 1, inc in every st around; join to the first sc: 10 sc.
- Round 3: repeat this petal sequence 5 times: sl st in the next unworked sc; in that same sc work (ch 2, 4 dc, ch 2, sl st); sl st in the following sc. All 10 base stitches are used, producing 5 smaller petals. Fasten off with a 30 cm tail.
- Lay one front layer over each backing layer. Rotate it slightly so narrow portions of the blush petals show between the pink petals. Sew the centers together and add one small securing stitch near the base of each front petal. Leave the outer petal edges free.
- Using ivory yarn, embroider five short straight stitches radiating from the center, each approximately 4 mm long. Add a small two-wrap French knot at the outer end of each stitch and one knot in the center. Secure the yarn between the layers.
Rounded Blossom Buds — Make Twenty-Four
- Round 1: with dusty pink and the 2.5 mm hook, work 6 sc in MR: 6 sc. Do not join.
- Round 2: inc in each st around: 12 sc.
- Round 3: sc in each st around: 12 sc.
- Round 4: dec 6 times: 6 sc. Add a tiny pinch of fiberfill, just enough to round the bud without making it firm.
- Cut yarn with a 30 cm tail. Pass the tail through the front loops of all 6 remaining stitches and pull closed. Run the needle through the bud to its starting ring.
- For a subtle petal division, pass the tail once over the outside from the starting ring to the closed end, then back through the bud. Repeat on the opposite side, pulling only enough to form shallow grooves. Retain the tail for sewing. Each bud should measure approximately 1–1.5 cm across.
Flower and Bud Placement
- On panel one, center the five layered flowers at mesh coordinates (8,40), (18,35), (6,30), (6,12) and (16,5). Rotate individual flowers so their petals sit naturally across the branches.
- Sew through the flower center and backing layer into at least three separate nearby mesh strands. Add three small stitches around the backing layer, approximately halfway from its center to its edge. Keep the outer petals free, but ensure the flower cannot swing from one attachment point.
- Place twelve buds near these coordinates: (3,36), (13,40), (25,40), (26,36), (19,30), (17,28), (14,24), (15,21), (10,14), (12,12), (4,9) and (21,2). A shift of up to one mesh cell is acceptable to land on a branch or mesh junction.
- Where a bud sits beyond a branch, embroider a short brown stem between the bud and the nearest cord, using two or three small backstitches around existing mesh strands. Do not span a large open cell with a loose length of yarn.
- Sew each bud through its closed underside to both its branch or embroidered stem and an adjacent mesh junction. Use at least three passes, then bury the tail inside the bud.
- Mirror all flower and bud x coordinates for panel two using 30 minus x, as with the branches. Each completed panel has five layered blossoms and twelve buds.
Finishing
Weave ivory ends along the dense borders and mesh posts, and hide pink and brown ends inside their matching appliqués. Check the reverse of each panel for loose loops. Lift the curtain by its tabs and gently shake it to confirm that every flower, bud and branch junction stays in place.
Give the assembled panels a gentle final damp block with the flowers facing upward. Shape the mesh around the branches without flattening the petals or buds. Once completely dry, thread the rod through the tabs and arrange the two panels so the branches face inward. Hand wash in cool water and dry flat whenever the curtains need refreshing.
Tips for Success
- Mark every fifth mesh cell and every sixth row while working. These intervals correspond to 10 cm at the target gauge and make counting the placement coordinates easier.
- Pin the entire branch arrangement before sewing any cord. Check that the main stem bends smoothly and that the top flowers have room beneath the heading.
- Sew branches with the panel lying flat. A thread pulled tight across several mesh cells can shorten a large section of the curtain.
- Place flower attachment stitches beneath the front petals so the stitches remain hidden while the backing layer stays secure.
- Use the same cotton yarn family for the mesh and appliqués to reduce differences in shrinkage during washing.
Common Mistakes to Avoid
- Losing the final mesh post: always work the last dc into the top of the turning ch-3. Count 30 spaces after each row.
- Making a wavy side border: work exactly 2 sc per mesh-row end and 1 beside the foundation row. Adjust hook tension if the counted border still flares after blocking.
- Attaching tabs only to the scallops: sew the tab ends through the dense heading foundation and upper border so the weight is distributed.
- Overstuffing buds: use only a small pinch of fiberfill. Firm buds become heavy and can pull the mesh out of shape.
- Forgetting to mirror the second panel: reverse the x coordinates before pinning so the finished branches form the intended facing pair.
Ways to Customize This Pattern
- Make a shorter café curtain by working 36 mesh rows. Multiply every decoration y coordinate by 0.75, round to the nearest row, and shorten cords to fit the revised layout before sewing.
- For a wider panel, add mesh cells in groups of five. Each additional cell requires three extra foundation chains and adds approximately 2 cm at the stated gauge. Recalculate border and heading repeats for the new width.
- Use two close pink shades for the front flowers, alternating three darker blossoms with two lighter blossoms on each panel.
- Replace the ivory center embroidery with pale yellow for a slightly warmer blossom center while retaining the same stitch placement.
- For a longer tab loop, add six rows to every tab. At the stated gauge this adds approximately 1 cm to the folded hanging extension.
Frequently asked questions
The open mesh filters the view but provides limited privacy, especially when a room is lit at night. Hang the pair over a plain sheer or use them as decorative café curtains if you need more coverage.
Keep the buds lightly filled, use cotton in the specified weight, and attach each flower to several mesh strands. Sew the backing layer in multiple places so its weight is spread across the grid.
Yes. Omit the tiny pinch of filling in each bud and gently flatten it before sewing. The buds will have a softer, flatter profile, while the layered flowers and branches remain unchanged.
Make one tab and test it on the actual rod. Add rows in pairs until it slides freely. Every six extra rows add approximately 1 cm to the folded loop height at the stated tab gauge; make all twelve tabs to the same revised row count.
The finished Cherry Blossom Crochet Curtain Panels

