Chevron Rib Table Runner Crochet Pattern with Fringe
Beginner Friendly
Perfect for those just starting their crochet journey, with clear instructions and simple techniques
Single-Day Project
A satisfying project you can complete in a single afternoon or evening.
Handmade Gift
A beautiful keepsake — free forever. Read online or print at home.
About This Chevron Rib Table Runner Crochet Pattern with Fringe
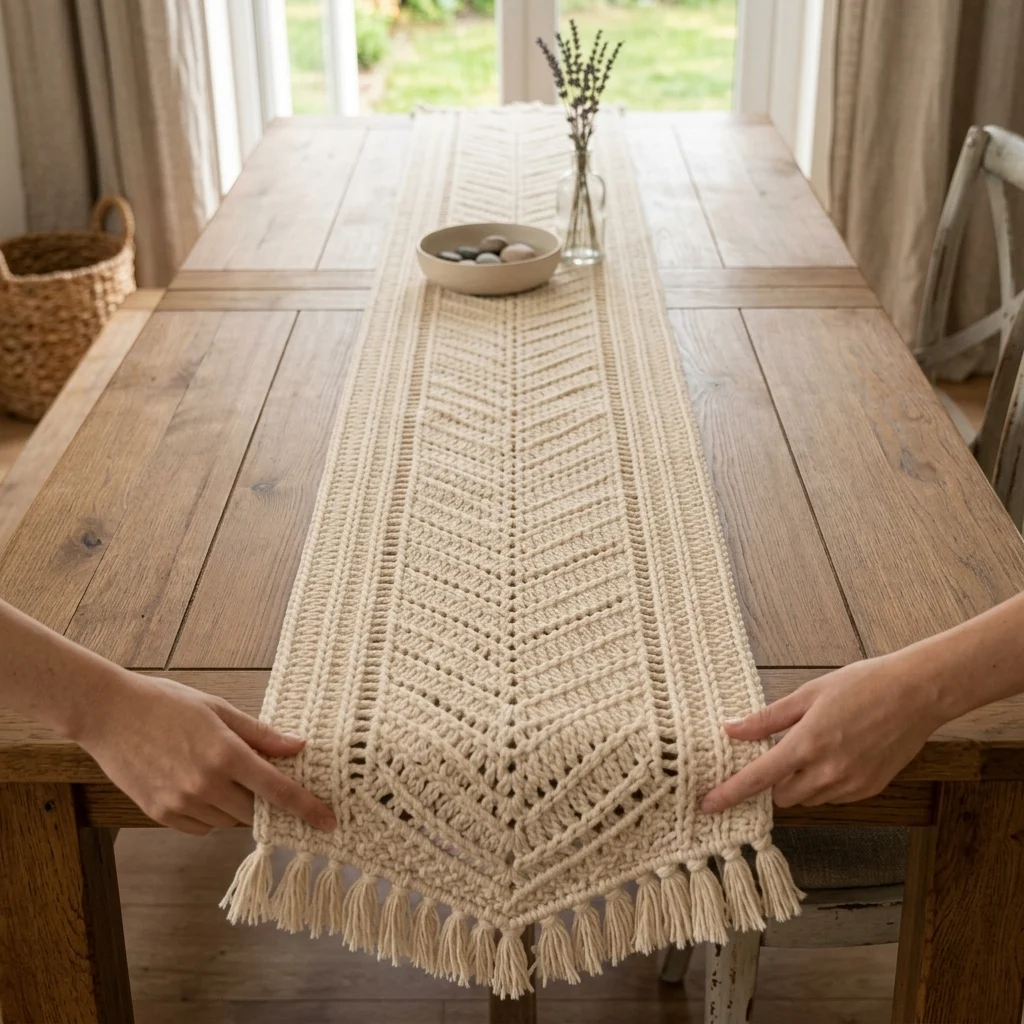
This crochet chevron table runner pattern builds a long, textured panel in a single cream colorway, combining a raised V-shaped chevron pattern down the center with narrow eyelet rib columns running the full length on either side. No separate motifs or color changes are involved; the entire visual interest comes from stitch texture and careful shaping, finished with a substantial knotted fringe at both short ends.
What makes this design distinctive is the chevron construction itself: post stitches worked at an angle build the raised diagonal lines that meet in a point down the center of the panel, creating a continuous herringbone-like texture rather than a flat surface. The narrow eyelet rib columns flanking it add small, evenly spaced holes that read as a subtle vertical stripe, giving the eye a place to rest between the busier chevron center and the plain hem edges. Expect to spend 14-18 hours total, most of it in maintaining the chevron repeat evenly across a long panel.
This is an advanced pattern, best suited to someone comfortable with front-post and back-post stitches worked at an angle to build a chevron, and confident maintaining 3 distinct stitch columns consistently across a long panel, rather than someone wanting a flat single-stitch project.
Materials
- Worsted weight cotton yarn, cream ~320g
- Crochet hook 4.5 mm (US 7)
- Tapestry/yarn needle
- Steam iron and pressing cloth, or blocking mat and pins
- Sharp scissors
Abbreviations
chchainsl stslip stitchscsingle crochethdchalf double crochetdcdouble crochetFPdcfront post double crochetBPdcback post double crochetch-spchain spacest(s)stitch(es)reprepeatFOfasten offFoundation and Three-Column Setup
- With cream, ch 71. Row 1: dc in 4th ch from hook and in each ch across. 69 sts.
- Row 2: ch 3, turn, work the outer 8 sts on each side in an eyelet rib pattern (dc 2, ch 1, skip 1, dc 1, rep across each 8-st section), and the center 53 sts in dc across plainly to set up the base for chevron shaping.
Chevron Center Pattern
- Row 3: work both eyelet rib columns as established, then across the center 53 sts, begin the chevron: work FPdc around each st for the first half of the center section, decreasing gradually toward the center point (dc2tog every few sts) to build the left half of the V, then increase back outward through the second half (2 dc in one st every few sts) using BPdc, so the two slopes of the V mirror each other around a true center point.
- Row 4: continue both eyelet rib columns, then repeat the chevron center’s decrease-then-increase structure, keeping the V’s center point directly above the point from the row below so a continuous diagonal line builds up the fabric’s length.
- Rep Row 4’s structure for the entire panel length, maintaining exactly the same decrease and increase placement every row so the chevron point stays centered and the diagonal lines stay straight, until the panel measures approximately 130 cm long.
Border and Hem Setup
- Work 3 rows of plain dc across all sts (both eyelet columns and center) at both the start and end of the main panel, to create a smooth transition zone before the fringe begins.
- FO after the final hem row, leaving a long tail.
Fringe
- Cut cream yarn into lengths of approximately 26 cm, 3-4 strands per fringe knot.
- Fold each group of strands in half, and using a crochet hook, pull the folded loop through a stitch along the short end of the panel, then pull the loose ends through the loop and tighten to form a knot.
- Space fringe knots evenly across both short ends of the runner, roughly every 1.5 cm, for a dense, full fringe line.
- Trim all fringe ends evenly once every knot is in place.
Finishing
Steam-block the entire panel face-down on a towel, pinning both long sides straight and checking that the chevron’s center point runs in a perfectly straight line down the middle of the runner. Pin the short ends straight before the fringe begins, then let the whole piece dry completely flat. Comb the fringe lightly with your fingers after drying to help the strands separate evenly.
Tips for Success
- Mark the chevron’s center point with a stitch marker every row until the pattern feels automatic, so the V never drifts off-center over the length of the panel.
- Keep both eyelet rib columns identical in stitch count throughout; any drift between the two sides becomes very visible once the fringe is added.
- Work FPdc and BPdc at consistent tension on every row; uneven post stitch tension flattens the chevron’s raised texture.
- Block firmly and check the chevron point runs perfectly straight before trimming fringe, since blocking is your best chance to correct any minor drift.
- Cut all fringe strands to the same length using a cardboard wrapping guide, so every knot along both ends matches.
Common Mistakes to Avoid
- Letting the chevron’s center point drift slightly left or right each row causes a visible wandering diagonal instead of a straight line. Fix: mark the center point and check its position every single row.
- Working the eyelet rib columns at a different stitch count than the row before pulls the whole panel narrower or wider unevenly. Fix: count both rib columns separately every few rows.
- Skipping the plain hem rows before the fringe leaves the transition looking abrupt. Fix: work the 3 plain rows at both ends as instructed before starting fringe.
- Cutting fringe strands to inconsistent lengths gives a ragged, uneven fringe line. Fix: use a fixed-width cardboard wrap to cut every strand the same length.
- Working FPdc and BPdc loosely flattens the chevron’s raised texture. Fix: keep post stitch tension firm and consistent throughout the center panel.
Ways to Customize This Pattern
- Shorten the starting chain and panel length for a matching set of placemats using the same 3-column construction.
- Work the panel in a soft grey or warm taupe instead of cream for a different neutral palette.
- Skip the fringe and finish with a simple sc border on all sides for a cleaner, more minimal edge.
- Widen the starting chain for a wider table topper instead of a narrow runner.
- Add a single row of contrast-color dc at the hem transition for a subtle pop of color against the all-cream panel.
Frequently asked questions
This almost always means the decrease and increase placement shifted slightly from row to row. Mark the exact center stitch with a removable stitch marker and check it lines up with the row below every single row.
Yes. Finish with a simple sc border on all four sides instead, treating the short ends the same as the long sides, for a clean edge with no fringe.
Substituting regular dc will remove the raised, textured look that defines this design. The front-post and back-post stitches are what create the chevron’s dimensional relief, so they’re worth the extra practice if you’re new to them.
This usually means one of the 3 columns, the two eyelet ribs or the chevron center, gradually gained or lost stitches over the panel’s length. Recount all 3 sections together every 10-15 rows to catch and correct any drift early.
The finished Chevron Rib Table Runner Crochet Pattern with Fringe

