Circle-in-Square Bedspread Crochet Pattern
Beginner Friendly
Perfect for those just starting their crochet journey, with clear instructions and simple techniques
Single-Day Project
A satisfying project you can complete in a single afternoon or evening.
Handmade Gift
A beautiful keepsake — free forever. Read online or print at home.
About This Circle-in-Square Bedspread Crochet Pattern
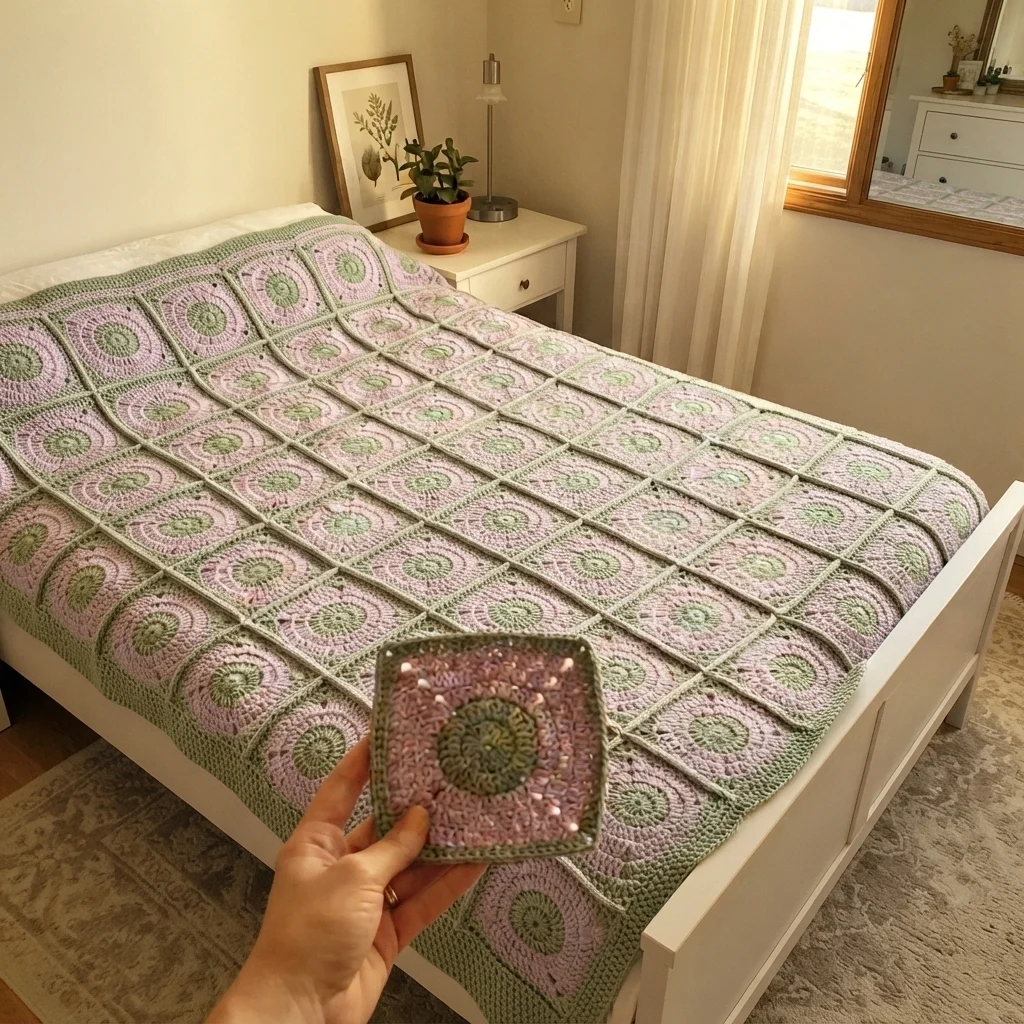
This crochet circle in square bedspread pattern builds every motif as a round worked from the center outward, then squared off at the final rounds, rather than a traditional corner-based granny square. Each piece has a textured olive green spiral center, a dusty mauve pink body, and a solid olive green outer border, and the whole grid is laid out rotated 45 degrees, so the squares read as diamonds running diagonally across the bed rather than in straight rows.
What makes this design distinctive is the circle-to-square construction itself: because each motif starts as a true circle before the final rounds flatten its sides into a square, the fabric has a subtle radiating, spiral quality at the center that a standard corner-started granny square doesn’t have. Combined with the diamond-rotated layout, where the grid’s straight lines run diagonally rather than horizontally and vertically, this bedspread reads as considerably more dynamic and complex than a typical granny square coverlet. Expect to spend 46-56 hours total for the full bedspread.
This is an advanced pattern, best suited to someone comfortable transitioning a motif from true rounds into square corners partway through, and confident planning and assembling a diamond-rotated grid layout, rather than someone wanting a standard straight-grid granny square project.
Materials
- Worsted weight cotton yarn, dusty mauve pink ~700g, motif body
- Worsted weight yarn, olive green ~600g, centers, borders, and edging
- Crochet hook 4.5 mm (US 7)
- Tapestry/yarn needle
- Steam iron and pressing cloth, or a large blocking mat and pins
- Sharp scissors
Abbreviations
chchainsl stslip stitchscsingle crochethdchalf double crochetdcdouble crochetMRmagic ringincincrease (2 sts in one st)ch-spchain spacest(s)stitch(es)reprepeatFOfasten offCircle-to-Square Motif (make approximately 180 for a full/queen bedspread)
- With olive green, 8 dc in MR. Sl st to join. (8 sts)
- Round 2: inc in each st around. (16 sts)
- Round 3: *dc 1, inc; rep from * around. (24 sts)
- Round 4: *dc 2, inc; rep from * around. (32 sts) FO olive, leaving a short tail.
- Round 5, with mauve pink: join in any st. *dc 3, inc; rep from * around. (40 sts)
- Round 6: *dc 4, inc; rep from * around. (48 sts)
- Round 7 (begin squaring): work dc evenly around, but at 4 points spaced evenly around the circle, work 3 dc into a single st to form the beginnings of 4 corners, flattening the circle’s edge at those 4 points while leaving the arcs between them still curved.
- Round 8: continue building out the 4 corner points with (2 dc, ch 1, 2 dc) corner groups, and work dc evenly along the 4 sides between corners, so the motif now reads clearly as a square with slightly rounded sides.
- Round 9, with olive green (solid border): join at any corner. Ch 3, (dc, ch 1, 2 dc) in same corner sp, dc evenly along each side, (2 dc, ch 1, 2 dc) in each corner; rep around. Sl st to join, FO leaving a long tail for joining.
- Repeat this entire sequence to make approximately 180 motifs total.
Diamond-Rotated Layout Planning
- Lay out several finished motifs on a flat surface, rotating the whole grid 45 degrees so the motifs’ corners point up, down, left, and right rather than sitting in standard horizontal and vertical rows.
- Plan your full grid in this rotated orientation, noting that a diamond layout needs partial half-motifs or triangular filler pieces along the straight outer edges of the bedspread to keep the final shape rectangular.
- Work a few half-square triangle motifs as needed: follow the same circle-to-square sequence through Round 8, then stop before completing all 4 sides, working only the portion needed to fill a straight edge gap, and finish that partial piece with a straight edge instead of a 4th corner.
Join-As-You-Go Assembly
- Following your planned diamond layout, join motifs as you complete each one’s final round, working a sl st into the corresponding corner or ch-1 sp of the neighboring motif already in place.
- Work outward from the center of the planned layout toward the edges, filling in half-motifs and triangular pieces along the straight borders as you reach them.
Bedspread Border
- With olive green, join at any corner of the assembled bedspread. Round 1: sc evenly around the entire perimeter, adjusting stitch placement at the zigzag edges created by the diamond layout to keep the border line smooth.
- Round 2: dc evenly around for a clean, solid finishing band that straightens out the visual edge of the diamond grid.
- Join with sl st to first st and FO. Weave in all ends.
Finishing
Weave in every motif’s starting and ending tail individually across the entire bedspread, since a project this size accumulates a very large number of loose ends. Steam-block the finished bedspread flat, paying particular attention to squaring off the diamond-rotated grid’s outer edges so the overall rectangle sits true, pinning firmly along the border.
Tips for Success
- Plan the diamond layout fully on paper, including where half-motifs and triangular fillers go, before making a single piece, since this layout is much harder to improvise than a standard grid.
- Keep the circle-to-square transition (Rounds 7-8) identical on every motif; this is the trickiest part of the construction and the most likely place for inconsistency to creep in.
- Work a few test half-motifs early, since figuring out exactly where to stop the sequence for a clean straight edge takes some trial and error.
- Check your growing diagonal grid against a framing square or the edge of a table periodically, since diamond layouts can drift out of true more easily than straight grids.
- Block very firmly along the border, since this is what finally squares off the zigzag edges created by the diamond rotation into a clean rectangle.
Common Mistakes to Avoid
- Starting assembly without a full layout plan leads to running out of space or needing awkward half-motifs improvised at the last minute. Fix: plan the complete diamond grid, including edge fillers, before joining anything.
- Working the circle-to-square transition at inconsistent points between motifs produces squares of slightly different sizes. Fix: keep Round 7’s 4 corner points evenly spaced and identical across every motif.
- Skipping test half-motifs often means discovering the right stopping point only after making several unusable partial pieces. Fix: work 1-2 test half-motifs before committing to the full batch of edge fillers.
- Underestimating how much yarn a project this size and complexity requires. Fix: calculate total yardage from several finished motifs, including a half-motif, before buying all your yarn.
- Leaving the border loosely blocked lets the diamond grid’s zigzag edges show through instead of reading as a clean rectangle. Fix: block firmly and pin the border edges straight.
Ways to Customize This Pattern
- Skip the diamond rotation and lay motifs out in a standard straight grid for a simpler assembly without half-motif fillers.
- Reduce the grid size for a throw blanket instead of a full bedspread.
- Swap the mauve and olive palette for a different two-color combination to match your own bedroom decor.
- Alternate 2 different body colors across the grid in a checkerboard pattern within the diamond layout for extra visual complexity.
- Use a fabric backing on the full bedspread for added warmth and easier care.
Frequently asked questions
The diagonal orientation is purely a styling choice that gives the bedspread a more dynamic, less predictable look than a standard straight grid of squares. It requires more planning and extra half-motif pieces along the edges, but the visual payoff is a noticeably different finished piece.
Work through Round 8 as normal, then instead of completing all 4 sides and corners, stop the row partway across what will become the straight outer edge, finishing with a few rows of plain dc to create a flat edge instead of a 4th pointed corner. Test this on 1-2 practice pieces first.
Yes. Skip the diamond layout planning section entirely and join motifs in standard horizontal and vertical rows instead, which eliminates the need for any half-motif or triangular filler pieces.
This usually means the 4 corner points in Round 7 weren’t evenly spaced, or the transition happened too abruptly over too few rounds. Spread the corner shaping evenly around the circle and allow it to build gradually across Rounds 7 and 8 rather than forcing it in a single round.
The finished Circle-in-Square Bedspread Crochet Pattern

