Classic Shell Lace Table Runner Crochet Pattern
Beginner Friendly
Perfect for those just starting their crochet journey, with clear instructions and simple techniques
Single-Day Project
A satisfying project you can complete in a single afternoon or evening.
Handmade Gift
A beautiful keepsake — free forever. Read online or print at home.
About This Classic Shell Lace Table Runner Crochet Pattern
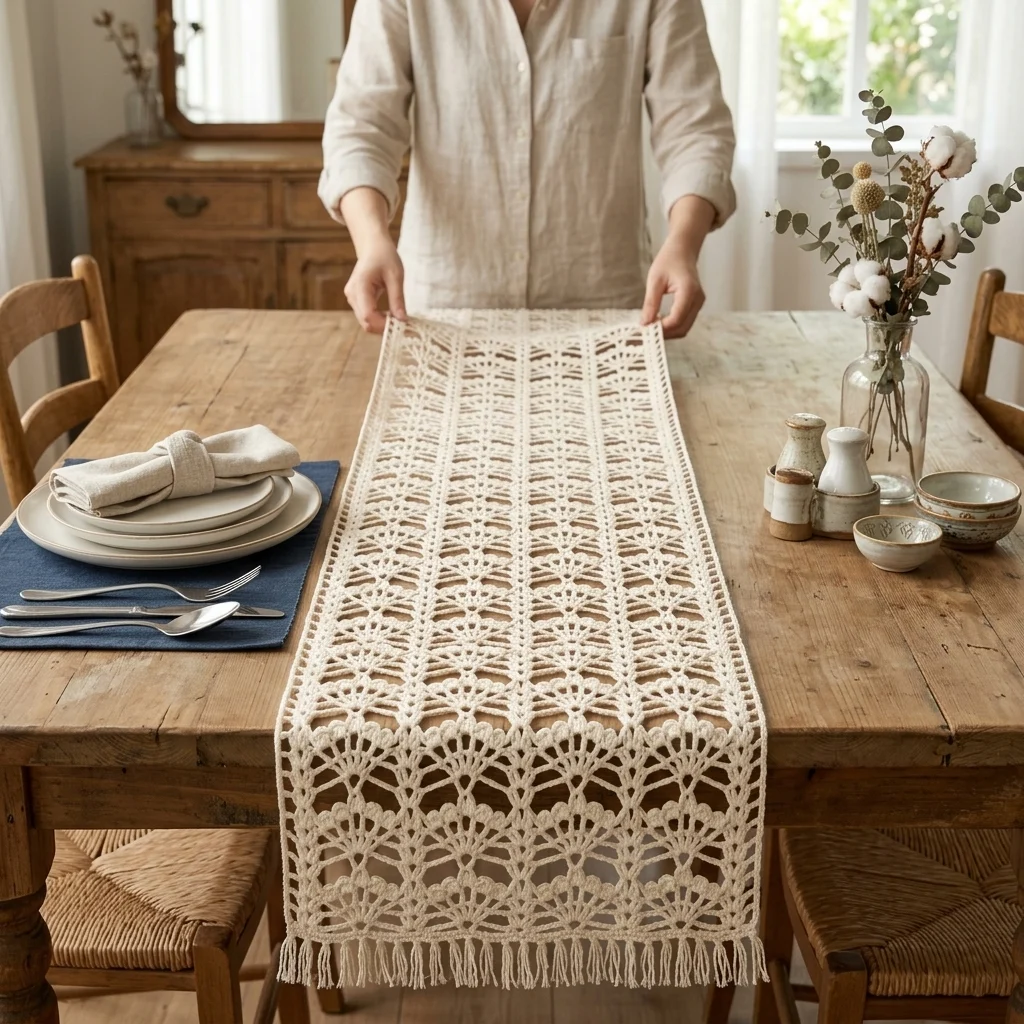
This crochet shell lace table runner pattern repeats a classic fan-and-shell stitch across the full width of a long panel, all worked in one cream cotton yarn with no separate motifs or applique. Each fan is built from a cluster of stitches worked into a single anchor point below, creating the layered, scalloped columns visible running the length of the piece, finished on both short ends with a simple knotted fringe.
What makes this design distinctive is how much texture comes from stitch pattern alone, no color changes, no sewn-on pieces, just careful, consistent shell and fan repeats stacked row after row into a dense, lacy fabric. That makes it a genuinely different kind of advanced project from a motif-based runner: the challenge here is maintaining an exact stitch count and consistent shell placement across a long piece, rather than managing multiple separate pieces. Expect to spend 10-14 hours total, mostly in the repetitive but precise main panel.
This is an advanced pattern, best suited to someone comfortable reading and maintaining a multi-row lace repeat without losing count over a long panel, rather than someone wanting motif-based or dimensional work.
Materials
- DK weight cotton yarn, cream ~300g
- Crochet hook 3.5 mm (US E/4)
- Tapestry/yarn needle
- Steam iron and pressing cloth, or blocking mat and pins
- Sharp scissors
Abbreviations
chchainsl stslip stitchscsingle crochetdcdouble crochettrtreble/triple crochetshell(dc, ch 1) worked several times in the same st, forming a fanch-spchain spacest(s)stitch(es)reprepeatFOfasten offFoundation and Fan Setup
- Ch 92 (a multiple of 14 plus 8, to allow for the shell repeat and edge stitches).
- Row 1: dc in 4th ch from hook and in next 2 ch, *skip 2 ch, 7 tr in next ch (this forms the base of the first fan), skip 2 ch, dc in next 5 ch; rep from * across, ending dc in last 3 ch.
- Row 2: ch 3 (counts as first dc), turn, dc in next 2 sts, *ch 1, skip first tr of fan, (dc, ch 1) 6 times working into the remaining 6 tr sts of the fan below, skip 2 sts, dc in next 5 sts; rep from * across, ending dc in last 3 sts.
Main Panel Repeat
- Row 3: ch 3, turn, dc in next 2 sts, *skip first dc of fan group, 7 tr worked into the ch-1 sps of the fan below to rebuild a fresh fan, skip 2 sts, dc in next 5 sts; rep from * across, ending dc in last 3 sts.
- Row 4: repeat Row 2’s pattern, working the (dc, ch 1) fan opening into the tr sts from Row 3.
- Continue alternating Row 3 and Row 4 patterns, always rebuilding a solid 7-tr fan on odd main-panel rows and opening it into a (dc, ch 1) fan on even main-panel rows, until the panel measures approximately 130 cm long.
- End on a completed fan-opening row (matching Row 2/4’s pattern) so the final row has an even, scalloped edge ready for the border.
Side and Short-End Border
- With cream, join in one corner. Round 1: sc evenly around the entire panel, working 3 sc in each corner st to keep the rectangle flat and square, and working sc evenly along both short ends where the foundation chain and final row sit.
- Round 2 (scallop trim on both long sides only): *sk 2 sts, 5 dc in next st, sk 2 sts, sl st in next st; rep from * evenly along both long edges of the panel, skipping the short ends, to add a small scalloped trim along the sides matching the fan repeat.
- Join with sl st to first st and FO. Weave in all ends.
Fringe
- Cut cream yarn into lengths of approximately 24 cm, 3 strands per fringe knot.
- Fold each group of 3 strands in half, and using a crochet hook, pull the folded loop through a stitch along the short end of the panel, then pull the loose ends through the loop and tighten to form a knot.
- Space fringe knots evenly across both short ends of the runner, roughly every 1.5-2 cm.
- Trim all fringe ends evenly once every knot is in place.
Finishing
Steam-block the entire panel face-down on a towel, gently opening each fan and the scalloped side trim so the lace pattern sits even and fully spread. Pin the short ends straight before the fringe knots, then let the whole piece dry completely flat. Comb the fringe lightly with your fingers after drying to help the strands separate evenly.
Tips for Success
- Count your foundation chain twice before starting Row 1; this stitch pattern is very sensitive to an off-by-a-few starting chain and errors compound across the whole panel.
- Use a stitch marker at the start of each row until the repeat feels automatic, so you always know where the row began if you need to recount.
- Keep tension consistent on the 7-tr fan base rows; tight fans pull the panel narrower over its length, while loose fans widen it unevenly.
- Block generously and repeatedly if needed; this lace pattern looks noticeably better and more open after a firm steam block than straight off the hook.
- Cut all fringe strands to the same length before starting, using a piece of cardboard as a wrapping guide, so every knot matches.
Common Mistakes to Avoid
- Losing count partway through a long row and improvising the last fan leaves a visibly uneven repeat. Fix: count fan groups as you go rather than checking only at the row’s end.
- Working the border’s scallop trim along the short ends as well as the sides distorts the corners. Fix: keep the scallop trim to the two long sides only, as instructed.
- Skipping blocking leaves the lace looking tight and cramped rather than open. Fix: steam firmly and pin the fans open before letting the piece dry.
- Cutting fringe strands to inconsistent lengths gives a ragged, uneven fringe line. Fix: use a fixed-width cardboard wrap to cut every strand the same length.
- Starting with a foundation chain that isn’t an exact multiple of the repeat throws off the whole pattern from Row 1. Fix: recheck the chain count against the stated multiple before working a single stitch of Row 1.
Ways to Customize This Pattern
- Shorten the starting chain and panel length for a matching set of placemats using the same fan repeat.
- Work the panel in a soft pastel or deep jewel tone instead of cream for a different seasonal or occasion look.
- Skip the fringe and finish with a simple sc border on all sides for a cleaner, more minimal edge.
- Widen the starting chain for a wider table topper instead of a narrow runner.
- Add a single row of contrast-color sc along the border for a subtle pop of color against the all-white lace.
Frequently asked questions
The fan repeat relies on a fixed number of stitches between each shell for the pattern to line up correctly across the whole row. An incorrect chain count will throw off spacing increasingly as you work across the row.
Yes. Finish with the sc and scallop border rounds on all four sides instead, treating the short ends the same as the long sides, for a clean edge with no fringe.
This usually means tension gradually tightened or loosened over the course of the panel. Recheck a few of your fan rows against the stitch count, and block firmly to help even out minor width differences.
Cotton is recommended because it blocks crisply and holds the open lace shape well after washing. Acrylic or wool blends will work but may drape more softly and hold the fan shapes less crisply.
The finished Classic Shell Lace Table Runner Crochet Pattern

