Coastal Stripe Half and Half Granny Square Blanket
Beginner Friendly
Perfect for those just starting their crochet journey, with clear instructions and simple techniques
Single-Day Project
A satisfying project you can complete in a single afternoon or evening.
Handmade Gift
A beautiful keepsake — free forever. Read online or print at home.
About This Coastal Stripe Half and Half Granny Square Blanket
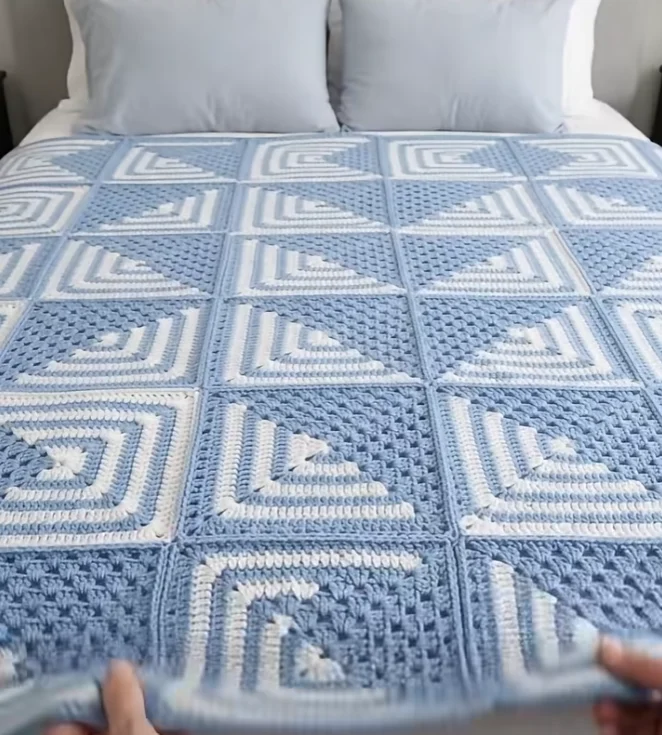
This half and half granny square blanket puts two classic textures in every square. One half is open granny clusters in cornflower blue. The other half is solid double crochet in alternating cream and blue rows, and those rows wrap around one corner in nested L shapes. The split runs diagonally from corner to corner. Once the squares are turned and grouped in fours, the blanket fills with blue cluster diamonds and striped bullseye diamonds, a pattern that looks far more complicated than any single square.
Each square is worked in the round from a magic ring, ten rounds in all, and the color changes happen at the same two corners every time. The stitch counts are set up so the granny half and the solid half grow at exactly the same rate, which keeps the square flat and true. Expect about an hour per square once you have the rhythm. The full 48-square blanket, with joining and border, takes roughly 50 to 60 hours.
This pattern suits crocheters who are comfortable with granny squares and want a project with real structure: mid-round color changes, carried yarn, a planned layout, and a seamed, bordered finish. It is not a first blanket. Every round follows the same formula, though, so after two or three squares you will rarely need to look at the page.
Materials
- Worsted weight (#4) cotton or cotton-blend yarn, main color (MC), cornflower blue approx. 3,750 m / 4,100 yd, about 21 skeins of 100 g / 183 m
- Worsted weight (#4) cotton or cotton-blend yarn, contrast color (CC), cream approx. 820 m / 900 yd, about 5 skeins of 100 g / 183 m
- 5 mm (H-8) crochet hook for the squares and border
- 5.5 mm (I-9) crochet hook for the slip stitch seams
- Locking stitch markers at least 2
- Yarn needle
- Scissors
- Blocking mats, rust-proof pins and a spray bottle strongly recommended
Abbreviations
MCmain color (blue)CCcontrast color (cream)MRmagic ringchchainsl stslip stitchscsingle crochethdchalf double crochetdcdouble crochetdc2togdouble crochet two togetherrev screverse single crochet (crab stitch)yoyarn oversp(s)space(s)st(s)stitch(es)begbeginningrndroundreprepeatRS / WSright side / wrong sideGauge and Square Anatomy
- Gauge: Rounds 1 to 4 measure about 10 cm (4 in) side to side. A finished, blocked square after Round 10 measures 24 cm (9.5 in). Change hook size if needed to match.
- Corners are named A, B, C and D in working order. Every round starts and ends at corner A. Corner B is the all-cluster corner, corner C is the color handoff, and corner D is the all-solid corner. Sides 1 and 2 (A to C through B) are the cluster half. Sides 3 and 4 (C to A through D) are the solid half.
- Color plan: Rounds 1, 3, 5 and 7 are stripe rounds, with MC on the cluster half and CC on the solid half. Rounds 2, 4, 6, 8, 9 and 10 are worked entirely in MC.
- Color changes: change color by working the final yo of the last dc in the new color. On stripe rounds, lay MC along the top of the previous round from corner C to corner A and work every CC stitch over it, so MC arrives at corner A ready to close the round. At the end of each stripe round, cut CC and leave a 15 cm tail.
- The joining hdc: Rounds 1 to 9 close with an hdc in the top of the beg ch-3. That hdc takes the place of the corner A ch-2 sp. In the next round, work the first and last stitches around the post of this hdc, not into its top.
Square (make 48)
- Rnd 1 (MC + CC): With MC, make a MR. Ch 3 (counts as dc throughout), 2 dc in ring, ch 2, 3 dc in ring, changing to CC on the last yo. With CC, holding MC against the ring and working over it: ch 2, 3 dc in ring, ch 2, 3 dc in ring, changing to MC on the last yo. Pull the ring tight. With MC, hdc in top of beg ch-3 to form corner A. Cut CC. (12 dc: 3 on each side.)
- Rnd 2 (MC): Ch 3, 2 dc in corner A sp; ch 1, (3 dc, ch 2, 3 dc) in corner B; ch 1, 3 dc in corner C, ch 2, 2 dc in same corner C; dc in each of next 3 dc; (2 dc, ch 2, 2 dc) in corner D; dc in each of next 3 dc; 2 dc in corner A sp; hdc in top of beg ch-3 to join. (26 dc: 2 clusters on each cluster side, 7 dc on each solid side.)
- Rnd 3 (stripe): Ch 3, 2 dc in corner A sp; ch 1, 3 dc in next ch-1 sp; ch 1, (3 dc, ch 2, 3 dc) in corner B; ch 1, 3 dc in next ch-1 sp; ch 1, 3 dc in corner C, changing to CC on the last yo. With CC, working over MC: ch 2, 2 dc in same corner C; dc in each of next 7 dc; (2 dc, ch 2, 2 dc) in corner D; dc in each of next 7 dc; 2 dc in corner A sp, changing to MC on the last yo. With MC, hdc in top of beg ch-3. Cut CC. (40 dc: 3 clusters on each cluster side, 11 dc on each solid side.)
- Rnd 4 (MC): Ch 3, 2 dc in corner A sp; [ch 1, 3 dc in next ch-1 sp] twice; ch 1, (3 dc, ch 2, 3 dc) in corner B; [ch 1, 3 dc in next ch-1 sp] twice; ch 1, 3 dc in corner C, ch 2, 2 dc in same corner C; dc in each of next 11 dc; (2 dc, ch 2, 2 dc) in corner D; dc in each of next 11 dc; 2 dc in corner A sp; hdc in top of beg ch-3. (54 dc: 4 clusters per cluster side, 15 dc per solid side.)
- Rnd 5 (stripe): Work as Rnd 3, but work [ch 1, 3 dc in next ch-1 sp] 3 times on each cluster side and dc in each of next 15 dc on each solid side. Remember to change to CC at corner C, carry MC under the CC stitches, change back to MC for the joining hdc, and cut CC. (68 dc: 5 clusters per cluster side, 19 dc per solid side.)
- Rnd 6 (MC): Work as Rnd 4, but work [ch 1, 3 dc in next ch-1 sp] 4 times on each cluster side and dc in each of next 19 dc on each solid side. (82 dc: 6 clusters per cluster side, 23 dc per solid side.)
- Rnd 7 (stripe): Work as Rnd 5, but work [ch 1, 3 dc in next ch-1 sp] 5 times on each cluster side and dc in each of next 23 dc on each solid side. (96 dc: 7 clusters per cluster side, 27 dc per solid side.)
- Rnd 8 (MC): Work as Rnd 4, but work [ch 1, 3 dc in next ch-1 sp] 6 times on each cluster side and dc in each of next 27 dc on each solid side. (110 dc: 8 clusters per cluster side, 31 dc per solid side.)
- Rnd 9 (MC): Work as Rnd 4, but work [ch 1, 3 dc in next ch-1 sp] 7 times on each cluster side and dc in each of next 31 dc on each solid side. (124 dc: 9 clusters per cluster side, 35 dc per solid side.)
- Rnd 10 (MC): Ch 1, sc in corner A sp; sc in each dc (including beg ch-3) and each ch-1 sp across side 1; (sc, ch 2, sc) in corner B; sc in each dc and each ch-1 sp across side 2; (sc, ch 2, sc) in corner C; sc in each dc across side 3; (sc, ch 2, sc) in corner D; sc in each dc across side 4; sc in corner A sp, ch 2, sl st in first sc to join. Fasten off. (148 sc: 37 on each side between corner ch-2 sps.)
Layout and Joining
- Block all 48 squares before joining. Pin each one to 24 cm (9.5 in) square with straight edges and sharp corners, spray it until damp, and let it dry fully.
- Lay the squares out in a grid 6 squares wide and 8 squares long, working in 2 x 2 blocks (3 blocks across, 4 blocks down). Within each block, turn every square so its corner B (the all-cluster corner) points to the center of the block: the top-left square has corner B at its bottom right, the top-right square at its bottom left, the bottom-left square at its top right, and the bottom-right square at its top left.
- Check the layout. Each block should show a blue cluster diamond in its center, and everywhere four blocks meet, the striped halves should form a cream and blue bullseye diamond. Photograph the layout and clip a marker labelled with its row number to the first square of each row.
- Horizontal seams: with the 5.5 mm hook and MC, hold the first two rows WS together so the seam ridge sits on the RS. Join MC in the corner ch-2 sps of the first pair. *Sl st through both loops of both squares in the corner sps, sl st in each of next 37 sc, sl st in the corner sps*; move to the next pair and rep from * across the row (39 sl st per pair). Fasten off. Rep for all 7 horizontal seam lines.
- Vertical seams: work the 5 vertical seam lines the same way, 8 squares each. At every intersection, sl st loosely over the horizontal seam through the corner sps, without pulling, so the crossing stays flat.
Border
- Border Rnd 1 (MC, 5 mm hook): With RS facing, join MC with a standing dc in any outer corner ch-2 sp of the blanket, dc in same sp. *Dc in each sc along the square edge; at each seam, dc2tog over the corner sp of this square and the corner sp of the next square; continue across the side; (2 dc, ch 2, 2 dc) in the next outer corner*. Rep from * around, ending with 2 dc, ch 2 in the first corner, then sl st in the standing dc. Fasten off. (231 dc on each short side and 307 dc on each long side, counted between corner ch-2 sps.)
- Border Rnd 2 (CC): Join CC with a standing dc in any corner ch-2 sp, dc in same sp. *Dc in each dc across to the next corner, (2 dc, ch 2, 2 dc) in corner sp*. Rep from * around, ending with 2 dc, ch 2 in the first corner, then sl st to join. Fasten off. (235 dc per short side, 311 dc per long side.)
- Border Rnd 3 (MC): Work as Border Rnd 2. Do not fasten off. (239 dc per short side, 315 dc per long side.)
- Border Rnd 4 (MC): Ch 1. Working from left to right, rev sc in each dc around and 3 rev sc in each corner ch-2 sp. Sl st in first rev sc to join. Fasten off.
Finishing
Weave in any remaining ends. Most of them sit at corners A and C, so weave them along the seam ridges, where they disappear. Cut nothing shorter than 3 cm after weaving, since cotton slips more than wool.
Give the whole blanket a final light block. Lay it flat on a clean floor or bed covered with towels, mist it evenly, and smooth the border straight with your hands, pinning the corners square if you have enough mats. Let it dry completely before you move it. Finished, the blanket measures about 152 x 200 cm (60 x 79 in), which covers the top of a twin bed or drapes generously over a full.
Tips for Success
- Handle the CC tails as you go. In the MC round right after each stripe, lay both CC tails along the top of the round and work over them for 10 to 12 stitches before trimming. That removes about 400 ends from the final weaving job.
- Keep the carried MC strand slightly relaxed. If you pull it snug, the solid half cups and the square no longer lies flat. If you leave it loose, a blue loop shows at the corner D ch-2. Lay the square flat after Rounds 3 and 7 and check.
- Use the stitch counts as your check every round. A cluster side in Round n has n clusters, and a solid side has 4n minus 1 dc. If the counts don’t match, the square skews toward the shorter half.
- Make all 48 squares from the same dye lot of MC if you can. The cluster halves meet across the blanket to form solid blue diamonds, and a lot change shows up there first.
- Join with the larger hook. Slip stitch seams tighten easily, and a 5.5 mm hook keeps the blanket from puckering along the seam lines.
Common Mistakes to Avoid
- Splitting at the wrong corner. If you keep working clusters past corner C, the square ends up three-quarters granny and the diagonal line bends. The corner C marker prevents this. If it happens anyway, rip back to the last round where the split was straight.
- Working into the top of the joining hdc instead of around its post. This moves corner A sideways each round and gives the square a slow twist. Always insert the hook into the space under the hdc.
- Forgetting the ch 1 after the corner A cluster. The cluster half then comes up one unit short and pulls in. Count clusters and ch-1 sps on side 1 before moving to corner B.
- Turning squares the wrong way in the layout. One wrong square breaks a diamond. Before seaming, walk around the layout and confirm that every corner B points to the center of its 2 x 2 block.
- Changing color too late. If you change color after finishing the dc instead of on its last yo, a blip of the old color shows in the first stitch of the new one. Bring in the new color on the final pull-through.
Ways to Customize This Pattern
- Throw size: make 24 squares in a 4 x 6 grid (2 x 3 blocks) for a couch throw of about 104 x 152 cm (41 x 60 in). It uses a little more than half the yarn.
- Different layout: turn every square the same way to get diagonal stripes of clusters and stripes running across the blanket, or rotate a full row at a time for a zigzag.
- Reverse the colors: work the cluster half in cream and the stripes in blue, for a lighter blanket where the diamonds read as cream.
- Larger squares: each extra round adds one cluster to each cluster side, 4 dc to each solid side, and about 2.5 cm to the square. Alternate stripe and MC rounds as written, and finish with an MC round before Round 10.
- Scrappy stripes: keep MC constant but work each square’s CC stripes in a different leftover shade, or shade the CC from cream to pale blue across the blanket for an ombre effect.
Frequently asked questions
On a stripe round, MC finishes the cluster half at corner C, but the next round has to start at corner A. Working the CC stitches over the MC strand moves it to corner A without cutting, so each stripe round adds only two ends (the CC tails) instead of four.
On paper the two halves are exactly the same width every round, so a mismatch is almost always tension. Most people crochet solid dc tighter than clusters. Relax the carried MC strand and loosen your grip slightly on the solid half. Blocking fixes small differences of a few millimeters.
Corner B is surrounded by granny clusters on both sides, with no cream at all. Corner D is the opposite corner, where the cream and blue stripes make their right-angle turn. In the layout, corner B always points to the center of its block.
Yes. Any worsted weight yarn that matches the gauge will work. Cotton gives crisp stitch definition and a heavy, cool drape, and the full blanket weighs over 2 kg. Acrylic is lighter and warmer. Block acrylic squares with steam instead of water, holding the iron above the fabric without touching it.
The finished Coastal Stripe Half and Half Granny Square Blanket

