Coral and Teal Linked Oval Crochet Curtains
Advanced
For experienced crocheters who enjoy complex shaping, fine detail, and ambitious construction
Single-Day Project
A satisfying project you can complete in a single afternoon or evening.
Handmade Gift
A beautiful keepsake — free forever. Read online or print at home.
About This Coral and Teal Linked Oval Crochet Curtains
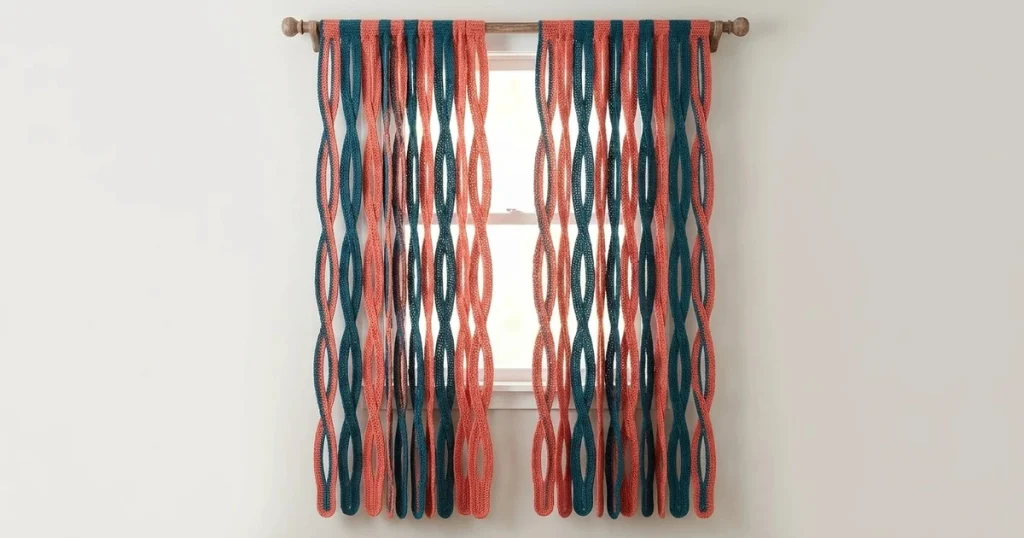
This crochet curtain pattern recreates the long, open oval shapes and alternating coral and deep teal columns shown in the reference. Two narrow panels frame the window, with repeated pinched joins creating a flowing outline beneath straight rod-pocket headers.
The construction uses separate shaped oval rings, carefully aligned joins and striped headers worked sideways. Allow approximately 35–45 hours for the pair, including blocking and assembly. This advanced project suits crocheters who enjoy precise finishing and are comfortable adjusting tension to make repeated motifs match.
Materials
- Sport-weight cotton yarn, preferably firmly plied Approximately 600 g / 1,800 m total at 300 m per 100 g: 300 g coral and 300 g deep teal; includes a working allowance
- 3.0 mm crochet hook Or size needed for gauge
- Tapestry needle and sharp scissors For woven joins and secure ends
- Locking stitch markers At least eight
- Blocking mats, rustproof pins and measuring tape A reusable 24 × 5 cm oval outline is helpful
- Curtain rod Approximately 2–3 cm diameter; use existing securely installed hardware
- Contrasting waste yarn For temporary alignment marks
Abbreviations
chchainscsingle crochet, US terminologyinc2 single crochet in the same stitchsl stslip stitchst / stsstitch / stitchesGauge, Dimensions and Construction
- Gauge after washing and drying flat: 25 sc and 28 rows = 10 × 10 cm. Make a swatch with ch 31, then sc in the second ch from the hook and each remaining ch, giving 30 sc. Work 33 further rows of 30 sc, using ch 1 and turn between rows. Measure the central 10 cm.
- Each finished oval is approximately 24 cm long × 5 cm wide, measured outside edge to outside edge after blocking. The oval dimensions are a separate gauge check: stitch gauge alone does not determine the behavior of the foundation chain.
- Make 80 ovals: 40 coral and 40 teal. Five same-color ovals form one column. Each panel contains eight columns, giving 16 columns across the pair.
- Overlap adjoining ovals by 1 cm at each join. Five 24 cm ovals with four 1 cm overlaps produce a column approximately 116 cm long.
- Each header measures approximately 40 × 8 cm before folding and 40 × 4 cm after folding. With columns attached at its lower edge, each finished panel measures approximately 40 × 120 cm.
- All stitches use US terminology. Turning chains and joining slip stitches never count as stitches. Work through both top loops unless otherwise stated. These are open textile panels: no stuffing, safety eyes or facial details are used.
Shaped Oval Rings — Make 80
- Foundation: with coral or teal, ch 120 loosely. Lay the chain flat, check that it is untwisted, then sl st into the first ch to form a ring. Leave a 20 cm starting tail. The chain loop forms the opening of the motif; do not crochet across or fill its center.
- Round 1: ch 1, sc in each foundation ch around; join with sl st to the first sc. Count 120 sc. Mark stitches 1, 60, 61 and 120 with waste yarn before proceeding.
- Round 2: ch 1, work (inc in next st, sc in next 58 sts, inc in next st) twice; join. Count 124 sc. Each repeat uses 60 stitches and produces 62. The adjacent increases around the round boundary form one end; the adjacent increases halfway around form the opposite end.
- Round 3: ch 1, work (sc in next st, inc in next st, sc in next 58 sts, inc in next st, sc in next st) twice; join. Count 128 sc. Each repeat uses 62 stitches and produces 64.
- Fasten off, leaving a 35 cm finishing tail for assembly. Weave in the foundation tail along the underside of the band, changing direction once. Keep the finishing tail free.
- Mark the tip at the round boundary and the opposite tip between stitches 64 and 65 of Round 3. These marks identify the two short ends when the ring is blocked into an elongated oval.
Block and Match the Ovals
- Soak the rings according to the yarn label, press out excess water in a towel and lay them flat. Do not wring or hang wet cotton.
- Position the two marked tips 24 cm apart. Ease the long sides outward until the overall width is approximately 5 cm. Pin the band smoothly, keeping the center open and both long sides equal.
- Check that the increases sit at the rounded ends. Move the pins gradually to distribute the fabric; do not force a tight foundation chain to the target measurement. If the inner edge pulls, remake the sample with a looser chain or a larger hook for the foundation only.
- Let the rings dry completely. Hang one ring for 24 hours and measure again. Use the settled measurement to confirm the length calculation before assembling the curtains.
- Sort the dry rings into 16 groups of five, matching length within each group. Keep eight coral groups and eight teal groups.
Assemble the Sixteen Oval Columns
- Lay five same-color ovals in a vertical line with their right sides facing up. Use the round-boundary tip as the top of every oval so the joining details remain consistent.
- Place the top tip of the second oval over the bottom tip of the first, overlapping them by exactly 1 cm. The rings are sewn together at their tips; they are not threaded through each other.
- Using the reserved yarn tail, sew through the overlapping end bands over a centered span approximately 1 cm wide. Make six small stitches through both layers, then repeat across the same span. Catch the bands securely without sewing the open centers closed.
- Secure the tail by weaving through the underside of the band in two directions. Trim only after the join has been gently tensioned and checked.
- Repeat the join between ovals two and three, three and four, and four and five. Each column has five ovals and four joins. Check its approximate 116 cm length while it lies flat.
- Complete eight coral columns and eight teal columns. Keep the unused tail at the top of each column for attachment to its header; weave in other remaining tails.
Striped Rod-Pocket Headers — Make Two
- The header is worked sideways: each row spans the unfolded pocket depth, and the 112 rows build its 40 cm width. For each color change, finish the final sc of the previous row with the incoming color. Cut the old color with a 15 cm tail rather than carrying it across another stripe.
- Foundation and Row 1: with the first stripe color, ch 21. Sc in the second ch from the hook and each remaining ch. Count 20 sc; turn.
- Rows 2–14: ch 1, sc in each of the 20 sts; turn. Count 20 sc in every row. This completes the first stripe.
- Rows 15–28: change to the second stripe color. Work ch 1, sc in each st, turn for each row. Count 20 sc per row.
- Rows 29–42: change back to the first color; work 14 rows of 20 sc.
- Rows 43–56: change to the second color; work 14 rows of 20 sc.
- Rows 57–70: change to the first color; work 14 rows of 20 sc.
- Rows 71–84: change to the second color; work 14 rows of 20 sc.
- Rows 85–98: change to the first color; work 14 rows of 20 sc.
- Rows 99–112: change to the second color; work 14 rows of 20 sc. Fasten off. The header has eight stripes, each 14 rows wide.
- For the left panel, use coral as the first color and teal as the second. For the right panel, use teal as the first color and coral as the second. When viewed from the room, the coral stripes will sit at both outside edges and the teal stripes at both center edges.
- Weave in the stripe tails on the wrong side, keeping each tail within its own color. Wet-block each rectangle to approximately 40 cm wide × 8 cm deep. Dry completely.
Form the Pockets and Attach the Columns
- Place each header wrong side up, with its 40 cm edges horizontal. Fold it lengthwise so the two long edges meet and the right side faces out. The fold becomes the top of the pocket; the matching long edges become the lower seam.
- Use matching yarn to mattress-stitch the two long edges together, matching row ends one for one. Change sewing yarn at each stripe boundary. Leave both short ends open for the rod. The flattened pocket is approximately 4 cm deep.
- Viewed from the front, arrange the left panel columns coral, teal, coral, teal, coral, teal, coral, teal. Arrange the right panel columns teal, coral, teal, coral, teal, coral, teal, coral.
- Mark the center of each header stripe at 2.5, 7.5, 12.5, 17.5, 22.5, 27.5, 32.5 and 37.5 cm from its left edge. These marks place each column under its matching stripe.
- Center the top tip of each column at its mark, immediately below the header seam. With matching yarn, sew the tip to the seam over a 1 cm span. Make two passes of six small stitches, catching both lower seam edges while keeping the needle out of the open rod channel.
- Lay the panel flat and check all eight lower tips against a straight line before securing the attachment tails. If a column sits high or low, remove its attachment stitches and reposition it. Do not shorten an individual oval by tightening its join.
Finishing
Weave all attachment tails securely into matching bands or header seams. Remove waste-yarn markers and check every connection with a gentle pull. Smooth the oval openings by hand, then slide each header onto the rod and hang the panels with an open space between them, as shown in the reference.
Allow the curtains to settle for 48 hours before making final length adjustments. If a column hangs unevenly, take it down and correct its overlap or attachment position. For cleaning, follow the yarn label, support the wet fabric and dry the panels flat before rehanging.
Tips for Success
- Use the same oval blocking outline for both colors. Different dyes can affect cotton tension, so measure coral and teal samples separately.
- Keep the foundation chain loose enough to follow the finished oval opening. A tight chain creates a bowed band even when the outer stitches are correct.
- Use a small 1 cm paper guide to set every overlap. Four inconsistent joins can visibly change a column’s length.
- Attach the columns with the headers lying flat and the stripes facing you. This makes color alignment and spacing easier to check.
- Test the completed pocket on your actual rod before attaching all eight columns. A 4 cm flattened pocket accommodates a modest rod, but bulky seams can reduce clearance.
Common Mistakes to Avoid
- Twisting the foundation loop: lay all 120 chains flat before joining. A twist cannot be removed by blocking; restart that ring.
- Counting the joining slip stitch as an extra stitch: mark the first sc and verify round totals of 120, 124 and 128.
- Placing increases along a long side: keep the round boundary at one tip and the halfway point at the other so the band rounds evenly at both ends.
- Sewing through the rod channel: keep column attachments at the lower seam. If the rod catches, remove the obstructing stitch and resew it through the seam edges.
- Hanging the panels while wet: water adds weight and can stretch the open columns unevenly. Dry flat and hang only when fully dry.
Ways to Customize This Pattern
- Make shorter café curtains with three ovals per column: 24 × 3 minus two 1 cm overlaps gives a 70 cm column, or approximately 74 cm including the header.
- Make longer panels with six ovals per column: 144 cm minus five 1 cm overlaps gives a 139 cm column, or approximately 143 cm including the header.
- Widen a panel by adding two columns and 28 header rows. At the stated gauge, this adds approximately 10 cm while preserving the alternating colors.
- Use muted terracotta and dark petrol blue for a softer version of the reference palette, retaining one solid color throughout each column.
- For a single wide panel, work 224 header rows in sixteen alternating 14-row stripes and attach all sixteen columns beneath it.
Frequently asked questions
No. Each oval is a complete open ring. Neighboring tips overlap by 1 cm and are sewn together, producing the narrow junctions and long openings seen in the reference.
The large openings make these decorative framing panels. For privacy, hang them in front of a separate sheer or blind on another rod or track.
Check the foundation chain first. Its tension controls the inner circumference. Remake the sample with a slightly larger hook for the chain, then return to the main hook for all three rounds. Confirm the blocked oval size before making a batch.
Multiply the number of ovals in one column by your settled oval length, subtract 1 cm for each join, then add the finished header depth. With the specified measurements, five ovals give 5 × 24 minus 4, plus 4 = 120 cm.
The finished Coral and Teal Linked Oval Crochet Curtains

