Coral and Teal Shell Stitch Curtain Panels
Advanced
For experienced crocheters who enjoy complex shaping, fine detail, and ambitious construction
Weekend Project
A satisfying weekend make — start Friday, finish Sunday, enjoy forever.
Handmade Gift
A beautiful keepsake — free forever. Read online or print at home.
About This Coral and Teal Shell Stitch Curtain Panels
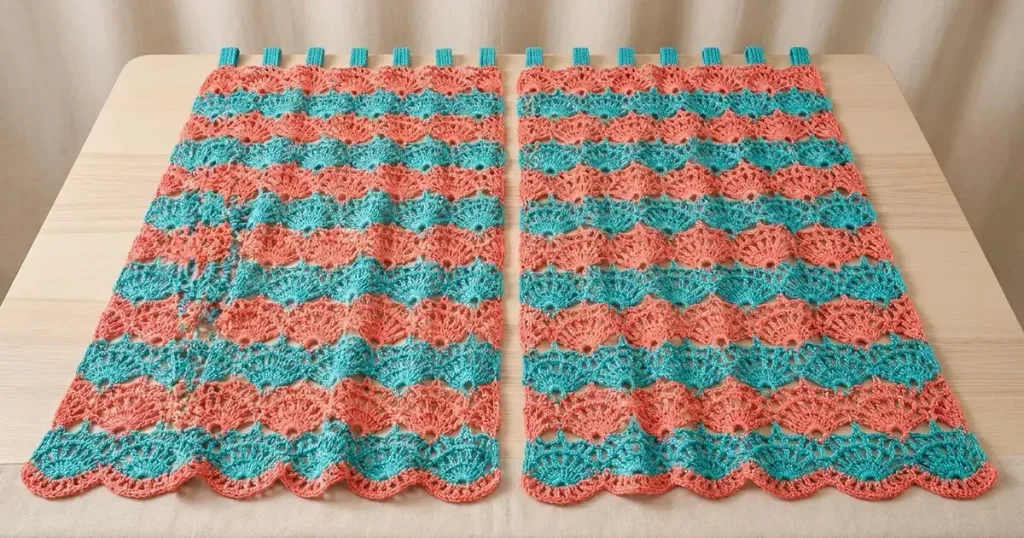
This shell stitch curtain crochet pattern creates two matching panels with alternating coral and teal fans, open lace, scalloped lower edges, and seven teal hanging tabs on each panel. The design follows the curtain pair in the reference photograph, including its straight inner edges and narrow coral hem.
The panels are worked from the header toward the hem, then finished with reinforced top bands and separately crocheted tabs. Allow approximately 18–24 hours for the pair, including sewing and blocking. This advanced project suits crocheters who enjoy reading lace structure, controlling tension across different stitch patterns, and assembling several small pieces neatly.
Materials
- DK cotton in warm coral, color A Approximately 150 g / 375 m for the pair, including a swatching allowance
- DK cotton in turquoise teal, color B Approximately 150 g / 375 m for the pair, including fourteen tabs
- Crochet hook 4.0 mm, or size needed for the blocked lace gauge
- Tapestry needle and scissors For joining tabs and securing color-change tails
- Removable stitch markers At least eight; useful for marking shell centers and tab positions
- Blocking mat, rustproof pins, and measuring tape Block both panels to the same measurements
- Curtain rod Approximately 15–20 mm diameter; verify against a completed tab before making all fourteen
Abbreviations
chchainscsingle crochetdcdouble crochetst / stsstitch / stitchesRSright sideWSwrong sideA / Bcoral / tealGauge, Dimensions, and Construction
- Use US crochet terminology. Work every piece in turned rows. A turning ch 1 never counts as a stitch. Turn after each row unless instructed to fasten off.
- Target blocked lace gauge: one horizontal shell repeat measures 5 cm across; one complete three-row stripe measures approximately 2.7 cm high. Measure several repeats together, away from the edges.
- Target blocked sc gauge: 16 sts and 20 rows = 10 × 10 cm. The 57-stitch foundation and header should block to approximately 35 cm wide. Small differences between lace and sc gauge are acceptable only if both sections lie flat at the same width.
- For a swatch, use A to ch 26, then sc in the second ch from the hook and each remaining ch: 25 sc. Work the Fan, Open Fan, and Bridge rows below across three repeats instead of seven. Work three complete stripes, changing colors after each Bridge row. Wash, dry flat, and measure the middle repeat.
- Each curtain has seven shells across and fourteen color stripes. Stripes 1–13 contain three rows each. Stripe 14 contains only its Fan and Open Fan rows, leaving a shaped edge for the coral hem.
- Make two separate panels and fourteen separate tabs. Finished measurements are approximately 35 cm wide × 40 cm high for each curtain body, plus approximately 4 cm of visible tab height. Actual length depends on the relative heights of the three lace rows.
Lace Row Instructions
- Fan row over the foundation: Ch 1, sc in the first sc. Repeat seven times: skip 3 sc, work 7 dc in the next sc, skip 3 sc, sc in the next sc. Each repeat consumes 8 foundation sts and produces 8 sts. Count: 49 dc and 8 sc = 57 sts.
- Open Fan row: Ch 1, sc in the first sc. Repeat seven times: dc in the next dc; repeat “ch 1, dc in the next dc” six times; sc in the next sc. Count: 49 dc, 8 sc, and 42 ch-1 spaces. Each fan contains 7 dc separated by 6 ch-1 spaces.
- Bridge row: Ch 1, sc in the first sc. Repeat seven times: ch 3, skip the first 3 dc and their intervening ch-1 spaces, sc in the fourth dc of the fan, ch 3, skip the remaining 3 dc and all remaining ch-1 spaces of that fan, sc in the next sc. Count: 15 sc and 14 ch-3 spaces. Do not work into any ch-1 space on this row.
- Fan row over a Bridge row: Ch 1, sc in the first sc. Repeat seven times: skip the next ch-3 space, work 7 dc in the next sc, skip the next ch-3 space, sc in the next sc. Count: 49 dc and 8 sc = 57 sts. All 15 sc from the Bridge row are used.
- Color changes: On the final sc of each Bridge row, complete its last yarn-over with the next color. Cut the old color, leaving a 15 cm tail. Turn and work the next Fan row in the new color. Keep these tails at the side edges rather than carrying yarn through the open lace.
Curtain Body — Make Two
- Row 1, A, foundation: Ch 58 loosely. Sc in the second ch from the hook and each remaining ch. Count: 57 sc. Mark this as the top edge. A slightly larger hook may be used for the chain only if needed to obtain the correct width.
- Row 2, A, stripe 1: Work the Fan row over the foundation. Count: 57 sts. Mark this side as the RS.
- Row 3, A: Work the Open Fan row. Count: 57 sts and 42 ch-1 spaces.
- Row 4, A: Work the Bridge row, changing to B on the final sc. Count: 15 sc and 14 ch-3 spaces.
- Rows 5–7, B, stripe 2: Work one Fan row over the Bridge row, one Open Fan row, and one Bridge row. Change to A on the final sc of Row 7. Counts in order: 57 sts; 57 sts and 42 ch-1 spaces; 15 sc and 14 ch-3 spaces.
- Rows 8–10, A, stripe 3: Repeat the same three-row sequence. Change to B at the end of Row 10.
- Rows 11–13, B, stripe 4: Repeat the three-row sequence. Change to A at the end of Row 13.
- Rows 14–16, A, stripe 5: Repeat the three-row sequence. Change to B at the end of Row 16.
- Rows 17–19, B, stripe 6: Repeat the three-row sequence. Change to A at the end of Row 19.
- Rows 20–22, A, stripe 7: Repeat the three-row sequence. Change to B at the end of Row 22.
- Rows 23–25, B, stripe 8: Repeat the three-row sequence. Change to A at the end of Row 25.
- Rows 26–28, A, stripe 9: Repeat the three-row sequence. Change to B at the end of Row 28.
- Rows 29–31, B, stripe 10: Repeat the three-row sequence. Change to A at the end of Row 31.
- Rows 32–34, A, stripe 11: Repeat the three-row sequence. Change to B at the end of Row 34.
- Rows 35–37, B, stripe 12: Repeat the three-row sequence. Change to A at the end of Row 37.
- Rows 38–40, A, stripe 13: Repeat the three-row sequence. Change to B at the end of Row 40.
- Row 41, B, stripe 14: Work the Fan row over the Bridge row. Count: 57 sts.
- Row 42, B: Work the Open Fan row. Count: 57 sts and 42 ch-1 spaces. Fasten off. Do not add a Bridge row; this edge must retain its seven fan-shaped scallops.
Coral Scalloped Hem — Work on Each Panel
- Row 43, A: Turn the work from its Row 42 position. Join A in the first sc with a standing sc, or join with a loop and ch 1, then sc in that same stitch. This counts as the first sc.
- Repeat seven times: sc in the next dc; repeat “sc in the next ch-1 space, sc in the next dc” six times; sc in the next sc. Count: 99 sc total, calculated as 1 starting sc plus seven repeats of 14 sc.
- Fasten off. The hem follows the existing fan outlines. Keep the stitches relaxed so the coral edge lies flat around the rounded shell tips.
Coral Header Band — Work on Each Panel
- Header Row 1, A: Turn the panel so the original starting chain is at the top and the RS faces you. Join A at one end of the unused underside of the foundation chain. Ch 1 and work 1 sc into the underside of each of the 57 foundation positions. Count: 57 sc. Do not work into the turning chain.
- Header Row 2: Ch 1, sc in each st across. Count: 57 sc.
- Header Row 3: Ch 1, sc in each st across. Count: 57 sc.
- Header Row 4: Ch 1, sc in each st across. Count: 57 sc. Fasten off. The header adds approximately 2 cm above the foundation.
- With the RS facing you, number the header stitches 1–57 from left to right. Mark the three-stitch tab positions: 4–6, 12–14, 20–22, 28–30, 36–38, 44–46, and 52–54. Each position is centered over a shell repeat.
Teal Hanging Tabs — Make Fourteen
- Row 1, B: Leave a 30 cm starting tail. Ch 4, sc in the second ch from the hook and the next 2 ch. Count: 3 sc.
- Rows 2–20: Ch 1, sc in each of the 3 sts across. Count: 3 sc per row, with 20 rows total. Fasten off, leaving a 30 cm sewing tail.
- At the stated sc gauge, each strip measures approximately 1.9 × 10 cm before assembly. Block all fourteen strips to matching dimensions without stretching their length.
- On the first panel, position one short end of a tab on the RS of the header at stitches 4–6. Overlap the upper two header rows with the first two tab rows. Align the beginning of tab Row 3 with the header’s upper edge. Sew the overlapped area securely along its lower edge and both sides.
- Bring the free end over the header without twisting the strip. Place its last two rows against the WS of the same three header stitches, aligning the end of tab Row 18 with the header’s upper edge. Sew this overlap securely. The exposed loop contains Rows 3–18, approximately 8 cm of strip, and projects approximately 4 cm above the header when flattened.
- Check the first loop on the intended rod. Make any necessary length adjustment before sewing the remaining tabs; apply the same adjustment to every tab. Sew six more tabs at the remaining marked positions, then repeat for the second panel.
Finishing
Weave each color-change tail into solid stitches of its matching stripe, reversing direction once before trimming. Keep the tails out of the open chain spaces. Leave the side edges unbordered so the alternating coral and teal stripes remain clearly defined, as in the reference.
Wash or wet-block the panels according to the yarn label. Lay them side by side with their headers aligned, then ease each body to approximately 35 × 40 cm. Pin the seven scallops individually and align corresponding color stripes. Let both panels dry completely before hanging them. Thread the rod through the seven loops on each panel and arrange the pair with a small central opening.
Tips for Success
- Mark the fourth dc of each Open Fan before working the Bridge row. These seven center stitches determine the placement of the next stripe.
- Check both the straight header width and the lace width while swatching. Changing hook size alone may not correct an unusually tight foundation chain.
- Lay the panels together after every two stripes. Matching stripe heights while working is easier than correcting a length difference during blocking.
- Sew the tabs through full stitch strands rather than splitting single cotton plies. The narrow tabs carry the entire panel weight.
- Block the bottom coral edging along the fan curves, giving each scallop the same depth without pulling the chain spaces excessively open.
Common Mistakes to Avoid
- Adding a chain after the seventh dc: Each Open Fan has six ch-1 spaces, all between its seven dc. An extra chain before the boundary sc changes the lace spacing; remove it before continuing.
- Working shells into chain spaces: After a Bridge row, the seven-dc groups belong in the center sc of each previous fan. Skip the ch-3 spaces entirely.
- Finishing the last stripe with a Bridge row: Stop after Row 42. A Bridge row would replace the shaped fan edge with arches and change the hem construction.
- Counting the hem as 57 stitches: The coral hem includes one sc in every ch-1 space as well as every stitch, giving 99 sc. Missing those spaces can cup the scallops.
- Twisting or unevenly overlapping tabs: Keep both ends centered over the same three header stitches and overlap exactly two rows at each end. Check the first loop before sewing the rest.
Ways to Customize This Pattern
- Change the width: Use a foundation of 8 × the desired number of shells + 1 sc; the starting chain is 8 × the number of shells + 2. Each additional shell adds approximately 5 cm. Place one tab over each shell center, at header stitch 5 and every eighth stitch thereafter.
- Change the length: Add or remove two complete stripes before the final teal stripe to preserve the coral-at-top, teal-at-bottom sequence. Two stripes change the length by approximately 5.4 cm.
- Swap the palette: Keep the coral and teal positions but substitute terracotta and sea green, or cream and navy, for the same alternating fan effect.
- Fit a wider rod: Add the same number of sc rows to every tab. Each extra row adds approximately 0.5 cm to the loop circumference; retain the two-row overlap at each end.
Frequently asked questions
The original foundation chain is the top. The coral header is worked into its underside after the lace body is complete. The final teal Open Fan row and coral scalloped edging form the bottom.
It has eight boundary sc and seven shell-center sc. Fourteen ch-3 spaces connect them. The following Fan row uses the seven center stitches for its seven-dc groups and the eight boundary stitches for its sc anchors.
The two panels together measure approximately 70 cm wide when laid flat. For a gently gathered appearance, they suit an opening approximately 45–55 cm wide. Measure your opening and add shell repeats if you need wider coverage.
Yes, but thinner cotton changes the dimensions. Swatch the three-row lace repeat, measure its blocked width and height, then choose the number of shells and stripes needed. Recheck header width and tab fit with the new yarn rather than relying on the DK measurements.
The finished Coral and Teal Shell Stitch Curtain Panels

