Coral Blossom Lace Table Runner Crochet Pattern
Advanced
For experienced crocheters who enjoy complex shaping, fine detail, and ambitious construction
Single-Day Project
A satisfying project you can complete in a single afternoon or evening.
Handmade Gift
A beautiful keepsake — free forever. Read online or print at home.
About This Coral Blossom Lace Table Runner Crochet Pattern
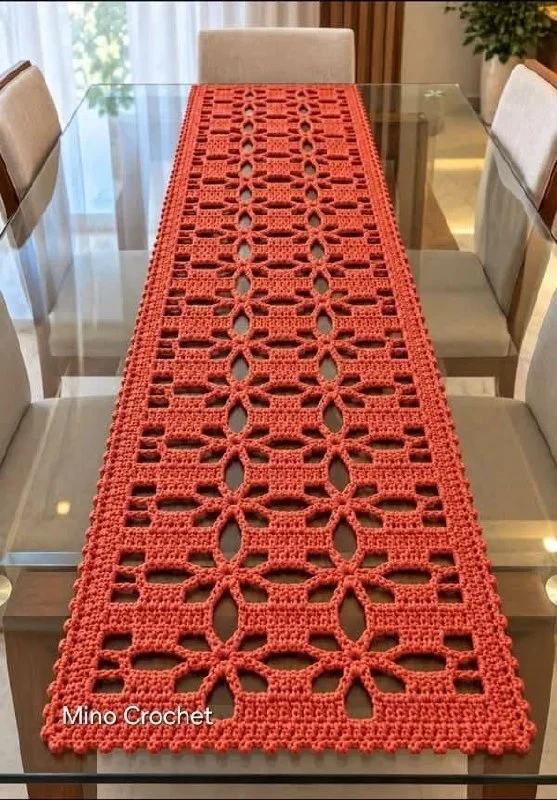
This lace table runner crochet pattern creates a long coral centerpiece with two columns of open flowers and a softly textured picot edge. The warm terracotta-coral shade and repeated petal openings take their inspiration from the photographed runner. Square floral motifs give this original version a practical, modular construction.
Allow approximately 25–35 hours for the twenty motifs, careful joining, and border. This advanced project suits crocheters comfortable with working into chain spaces, reading stitch counts, and blocking lace to consistent measurements. Its finished shape works especially well down the center of a rectangular dining table.
Materials
- Smooth sport-weight cotton in terracotta coral Approximately 1,200–1,500 m; buy the full quantity in one dye lot
- 3.0 mm crochet hook Adjust size to obtain the blocked motif measurement
- Tapestry needle For sewing seams and securing ends
- Removable stitch markers At least eight for corners and border sections
- Blocking mats, rustproof pins, and measuring tape Enough space for a 34 × 154 cm runner
Abbreviations
chchainsl stslip stitchscsingle crochetdcdouble crochetst / stsstitch / stitchessp / spsspace / spacesGauge, Layout, and Counting
- Use US crochet terminology. Work every motif in joined rounds with the right side facing throughout. Starting chains do not count as stitches unless explicitly stated.
- Gauge: one completed, blocked five-round motif measures 15 × 15 cm. Its final edge has 21 sc between adjacent corner ch-2 spaces. Motif size is the controlling gauge for this lace construction.
- Make twenty identical motifs. Arrange them two across and ten down for a body measuring approximately 30 × 150 cm before adding the border.
- The border adds approximately 2 cm to each edge. Finished dimensions are approximately 34 × 154 cm after final blocking.
- When a round gives a side count, count only stitches between corner chain spaces. Include the stitches worked into corners that lie on that side; exclude the corner chains themselves.
Open Flower Centers — Make 20
- Foundation: ch 6 and sl st into the first ch to form a ring. Leave a 15 cm tail.
- Round 1: ch 1, work 8 sc into the ring, sl st into the first sc. Count: 8 sc.
- Round 2: work the following eight times: ch 9, sl st into the next sc. For the eighth repeat, work the sl st into the first sc of Round 1, which is also the starting anchor. Count: eight ch-9 petal loops and eight sl st anchors. Do not work into the slip stitches again.
- Round 3: sl st into the first ch-9 loop, ch 1. In each of the eight ch-9 loops work 5 sc, ch 3, 5 sc. Sl st into the first sc to close. Count: 80 sc and eight ch-3 petal-tip spaces. Number the tips 1–8 clockwise with removable markers; tips 1, 3, 5, and 7 will become square corners.
Square Frames — Complete All 20 Motifs
- Round 4 setup: fasten off after Round 3. Join yarn with a sl st in petal-tip space 1. This fresh start keeps the framing round centered precisely over the petal tip.
- Round 4: ch 3, counting as the first dc; work 2 dc, ch 2, 3 dc in the same tip space. Ch 3, work 3 dc in tip 2, ch 3. In tip 3 work 3 dc, ch 2, 3 dc; ch 3, work 3 dc in tip 4, ch 3. In tip 5 work 3 dc, ch 2, 3 dc; ch 3, work 3 dc in tip 6, ch 3. In tip 7 work 3 dc, ch 2, 3 dc; ch 3, work 3 dc in tip 8, ch 3. Sl st into the top of the starting ch-3. Leave all Round 3 sc unworked. Count: 36 dc, eight ch-3 side spaces, and four ch-2 corners; each side has 9 dc and two ch-3 spaces.
- Round 5 setup: sl st across the next two dc and into the first corner ch-2 space. Ch 1.
- Round 5: in that corner work sc, ch 2, sc. Work sc in each of the next 3 dc, 3 sc in the next ch-3 space, sc in each of the next 3 dc, 3 sc in the next ch-3 space, and sc in each of the next 3 dc. Repeat this corner-and-side sequence three more times, then sl st into the first sc. Count: 68 sc and four ch-2 corners; 17 sc per side.
- Round 6: sl st into the first corner space, ch 3, counting as the first dc. Work dc, ch 2, 2 dc in that space. Work dc in each of the next 17 sc. In each remaining corner work 2 dc, ch 2, 2 dc, and work dc in each of the 17 sc along the following side. Sl st into the top of the starting ch-3. Count: 84 dc and four ch-2 corners; 21 dc per side.
- Round 7: sl st into the next dc and then into the corner space, ch 1. Work sc, ch 2, sc in the corner; sc in each of the next 21 dc. Repeat this corner-and-side sequence three more times and sl st into the first sc. Count: 92 sc and four ch-2 corners; 23 sc per side. Fasten off, leaving a 60 cm sewing tail on ten motifs.
- Block each motif to 15 × 15 cm. The completed motif has seven rounds, including the flower center. Use this finished measurement for gauge, rather than the intermediate frame measurement.
Join the Two Flower Columns
- Place the blocked motifs right side up in ten rows of two. Rotate them so the petal tips and square corners align consistently. Label the rows 1–10 from one short end.
- Join the two motifs in each row along one full side. With right sides facing up, whipstitch through the back loop of each corresponding edge sc, matching all 23 stitches. Take one small securing stitch through the two corner chain spaces at each end. Keep the seam flat and flexible.
- Join row 1 to row 2 along the full two-motif width, matching 23 sc on each motif side. At the central intersection, secure the four corner spaces together with two small crossing stitches. Repeat until all ten rows are joined. There are ten short seams within rows and nine full-width seams between rows.
- Secure sewing tails on the wrong side through several solid stitches, reversing direction once. Avoid carrying tails across open petals or chain spaces. Lay the body flat and check that its two long edges are the same length.
Continuous Mesh Border
- Round 1 setup: mark the four outside corners. Join yarn in an outside corner ch-2 space and ch 1. Work sc, ch 2, sc in this corner. Each corner throughout Rounds 1–3 uses sc, ch 2, sc.
- Round 1 distribution: work exactly 48 sc along each short side and 240 sc along each long side, counting between corner ch-2 spaces. These totals include the sc made at the adjacent corners. To achieve this precisely, work 23 sc in the existing edge stitches of every exposed motif side; add 2 sc into each seam junction between motifs; and include one corner sc at each end of the complete side. Thus a short side has 46 + 2 + 2 = 50 sc, and a long side has 230 + 18 + 2 = 250 sc. Use these calculated totals of 50 and 250, then complete the round and sl st into the first sc.
- Round 2: sl st into the first corner space, ch 1, and work sc, ch 2, sc there. On a short side, sc in the first edge sc, then repeat ch 2, skip 2 sc, sc in the next sc sixteen times; sc in the last edge sc. On a long side, sc in the first edge sc, then repeat ch 2, skip 2 sc, sc in the next sc eighty-two times; sc in each of the last 3 edge sc. Work sc, ch 2, sc in every corner, and join to the first sc. Counts between corner spaces: short side, 20 sc and sixteen ch-2 spaces; long side, 88 sc and eighty-two ch-2 spaces.
- Round 3: sl st into the first corner space, ch 1. Work sc, ch 2, sc in each corner; work sc in every side sc and 2 sc in every side ch-2 space. Join to the first sc. Count: 54 sc per short side and 254 sc per long side, plus four ch-2 corner spaces. Total: 616 sc.
Picot Edge
- Picot method: ch 3, then sl st into the first chain of those three. This picot sits above the last completed sc and does not use another stitch from the previous round.
- Round 4 setup: sl st into the first corner space and ch 1. In that corner work sc, make one picot, then sc.
- Across each short side, work sc in the first 3 sc; then repeat the following twelve times: make one picot, sc in each of the next 4 sc. Work sc in the last 3 sc. This consumes 3 + 48 + 3 = 54 side stitches and makes twelve side picots.
- Across each long side, work sc in the first 3 sc; then repeat the following sixty-two times: make one picot, sc in each of the next 4 sc. Work sc in the last 3 sc. This consumes 3 + 248 + 3 = 254 side stitches and makes sixty-two side picots.
- In each remaining corner space work sc, picot, sc. Finish the final side and sl st into the first sc. Count: 624 sc and 152 picots, including the four corner picots. Fasten off.
Finishing
Weave the remaining ends through solid stitches on the wrong side. Soak the runner according to the cotton label, gently squeeze out the water, and roll it in a towel. Lay it flat and pin the outside corners first, aiming for approximately 34 × 154 cm.
Straighten the seams and open the petals with your fingers. Pin the picots lightly so the edge keeps its small, rounded points. Let the runner dry completely before lifting it. The finished fabric should lie flat on the table without tension at the joins.
Tips for Success
- Use smooth, firmly twisted cotton so the coral flower outlines remain clear and the picots hold their shape.
- Mark alternate petal tips before framing each flower. Four evenly spaced corner tips are essential for a square motif.
- Block all twenty squares with the same template. Equal squares make the long seams much easier to keep straight.
- Count border stitches between corner spaces, including the corner sc at each end. Keep markers in those spaces until the edging is complete.
Common Mistakes to Avoid
- Working the frame into the petal-edge sc closes the flower openings. Round 4 attaches only to the eight ch-3 tip spaces.
- Counting the initial ch-3 twice adds an extra dc. It replaces the first dc only in Rounds 4 and 6.
- Pulling sewing stitches tightly creates ridges and shortens the runner. Ease the seam flat after every few stitches.
- Skipping seam junctions during the border can draw in the edges. Place the specified 2 sc at each junction and verify 50 stitches on short sides and 250 on long sides.
- Blocking with strong tension distorts the narrow petal outlines. Adjust the fabric gently and accept a small size difference if your yarn resists the target dimensions.
Ways to Customize This Pattern
- Keep the photographed warm palette with burnt coral, clay, or soft terracotta cotton.
- Use a slightly deeper coral for the outer border while keeping every flower and frame in the main shade.
- Make a matching square centerpiece from four motifs. Its sides use the same two-motif border instructions as the runner’s short ends.
- Replace the final picots with plain sc for a quieter edge; work sc, ch 2, sc in each corner space.
Frequently asked questions
No. This is an original interpretation of its coral color, elongated shape, open floral repeats, and decorative edging. The pattern uses separately made flower squares joined into two columns.
Use the completed seven-round square, blocked to 15 × 15 cm. Measure between the outside corner spaces along two adjacent sides. The flower alone is not a reliable gauge swatch.
The 250-stitch foundation does not divide evenly into three-stitch mesh repeats. The small solid section absorbs the remainder while preserving the exact side count and keeping the next round flat.
Follow the yarn label. Gentle washing and flat drying are usually suitable for cotton lace; reshape the petals and border while damp. Test your coral yarn for color bleeding before the first full wash.
The finished Coral Blossom Lace Table Runner Crochet Pattern

