Coral Flower Crochet Blanket Pattern
Beginner Friendly
Perfect for those just starting their crochet journey, with clear instructions and simple techniques
Single-Day Project
A satisfying project you can complete in a single afternoon or evening.
Handmade Gift
A beautiful keepsake — free forever. Read online or print at home.
About This Coral Flower Crochet Blanket Pattern
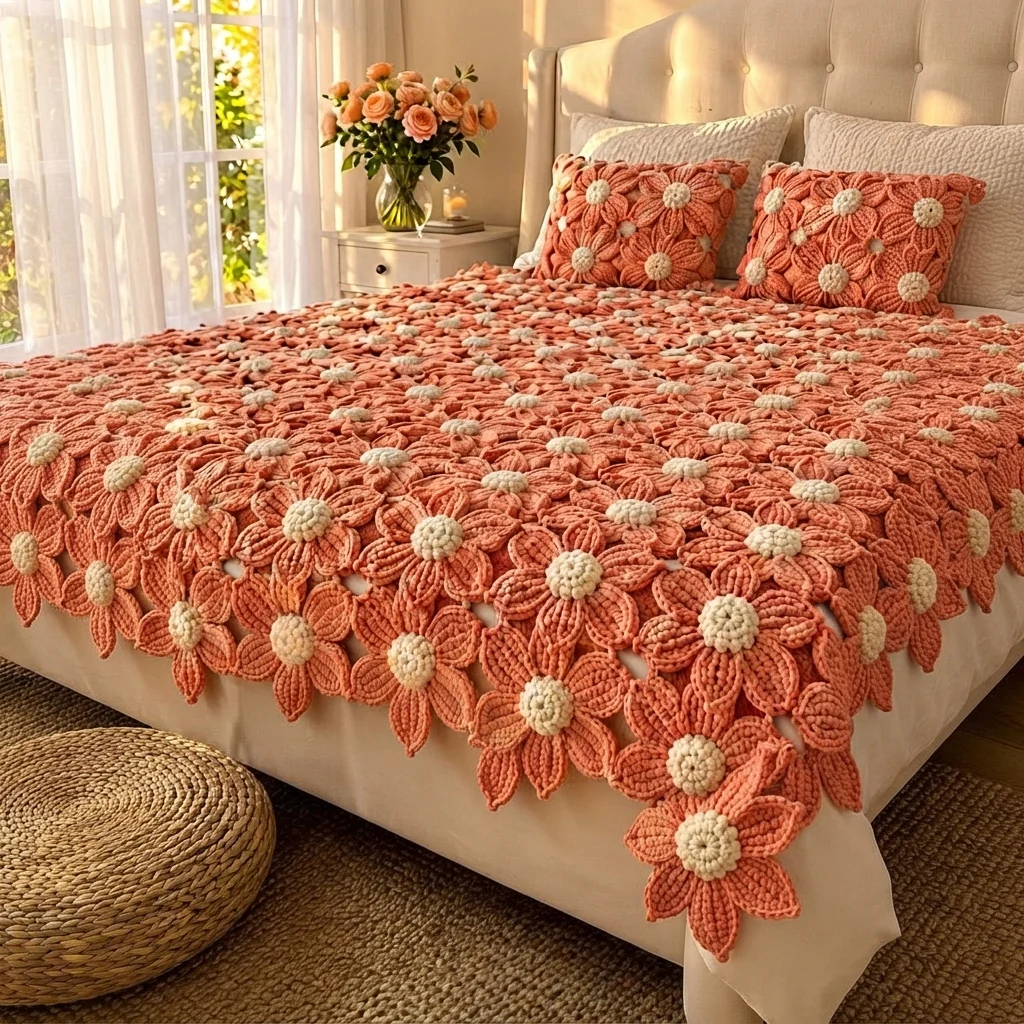
This crochet flower blanket pattern builds a soft, textured throw from 8-petal coral flowers with round cream centers. Each flower has long pointed petals, and the flowers are joined at the petal tips so small open gaps show between them, just like the blanket in the photo.
It is an advanced project because every flower is made in several parts: a coral base, eight petals worked in rows directly onto it, and a stuffed cream center sewn on top. You will make 90 flowers, then join them in offset rows. Plan on 35 to 45 hours in total, about 25 minutes per flower once you find a rhythm.
It suits crocheters who are comfortable with working flat rows on a round base, shaping with increases and decreases, and joining motifs neatly. The finished throw is about 90 x 114 cm, and you can make it larger by adding more flowers.
Materials
- Worsted or aran cotton-blend yarn, coral (A) about 800 g, estimated
- Worsted or aran cotton-blend yarn, cream (C) about 200 g, estimated
- Crochet hook 4.0 mm
- Polyester fiberfill a small amount for the centers
- Yarn needle
- Stitch markers
- Flat surface and pins for blocking and layout
Abbreviations
MRmagic ringchchainscsingle crochetinc2 sc in the same stitchdecsingle crochet 2 stitches togethersc3togsingle crochet 3 stitches togethersl stslip stitchst(s)stitch(es)FOfasten offAcoral yarnCcream yarn( )xrepeat the stitches in brackets the number of times givenFlower Base (A)
- Round 1: 6 sc in MR (6)
- Round 2: inc x6 (12)
- Round 3: (1 sc, inc)x6 (18)
- Round 4: (2 sc, inc)x6 (24). Join with a sl st to the first sc. Mark the first stitch. The 24 stitches make 8 groups of 3 stitches, one group for each petal.
Petals (A, make 8 on the base)
- Work each petal in flat rows on one group of 3 stitches from round 4. Ch 1 and turn at the end of every row (the ch 1 does not count as a stitch).
- Row 1: sc in the next 3 sts of round 4 (3)
- Row 2: inc, 1 sc, inc (5)
- Row 3: inc, 3 sc, inc (7)
- Row 4: sc in each st across (7)
- Row 5: dec, 3 sc, dec (5)
- Row 6: dec, 1 sc, dec (3)
- Row 7: sc3tog (1). Do not FO.
- Slide down the side of the petal with about 6 sl sts, back to round 4, then work row 1 of the next petal into the next 3 sts. Repeat for all 8 petals.
- After the 8th petal, sl st down the side, FO and weave in the end. For a ridged look like the photo, work rows 2-5 of each petal in the back loops only.
Flower Center (C)
- Round 1: 6 sc in MR (6)
- Round 2: inc x6 (12)
- Round 3: (1 sc, inc)x6 (18)
- Round 4: sc in each st around (18)
- Round 5: (1 sc, dec)x6 (12). Stuff lightly with a small ball of fiberfill.
- Round 6: dec x6 (6). FO leaving a long tail and close the hole.
- Sew the center onto the middle of the flower base, over rounds 1-3, with small stitches around the edge.
Blanket Layout
- Lay out 12 rows of flowers, alternating 8 flowers and 7 flowers per row (90 flowers in all). Start and end with a row of 8.
- Offset each row by half a flower, so each flower sits in the gap between two flowers in the row above, as in the photo.
- Turn all the flowers the same way, with a petal pointing straight up, before you start joining.
Joining
- Join the flowers into rows first. Hold two neighboring flowers with right sides together and whip stitch the touching petal tips together for about 4 stitches, starting at the tip.
- Join the rows to each other in the same way, joining each flower to the two flowers above or below it.
- Leave the small gaps between flowers open. They are part of the look.
- Weave in all ends.
Finishing
Block the finished blanket by laying it flat on towels, pinning the outer petals to shape, and misting it lightly with water. Let it dry fully before moving it. This flattens the petals and opens the gaps evenly.
The edge of the blanket is scalloped by the outer petals. Leave it as it is, or work one round of sc in A around the outside, working a sc in each petal tip and 2 sc in each gap, for a firmer edge.
Tips for Success
- Make one test flower before you commit to all 90, and write down your hook size and the measurements.
- Count the stitches on round 4. There must be exactly 24, or the petals will not divide evenly.
- Make the flowers in batches of ten and keep them in a bag by row, so the layout is easy later.
- Weave in the ends as you go. Doing 90 flowers at the end is slow.
- Use the same amount of fiberfill in every center so they all sit at the same height.
Common Mistakes to Avoid
- Petals that curl up mean your row 1 is too tight. Work the first row looser and spread the stitches on your hook.
- Uneven petals usually mean the wrong stitch count on a row. Check each row against the counts in brackets.
- Flowers of different sizes will not join flat. Block every flower to the same size before joining.
- Stuffing the centers too firmly makes them stick up and look like buttons. Use a small amount so they stay soft and round.
- Joining with a tight seam pulls the petals out of shape. Keep your sewing stitches loose.
Ways to Customize This Pattern
- Swap coral for sage, dusty blue or mustard and keep the cream centers for a different palette.
- Make a baby blanket with 8 rows of alternating 6 and 5 flowers (44 flowers), about 70 x 80 cm.
- Make matching pillow covers from 6 flowers joined in two rows of 3 and sewn to a plain back.
- Work the centers in a contrasting color, such as mustard, for a more daisy-like look.
- Use a chunkier yarn and a 5.0 mm hook for larger flowers and a faster blanket with fewer motifs.
Frequently asked questions
The amounts above are estimates of about 9 g of coral and 2 g of cream per flower. Weigh your test flower and multiply by 90 for each color, then add about 10 percent for the joining and any edging.
Yes. Use a larger hook for bigger flowers or a smaller hook for smaller ones, and keep the stitch counts the same so the petals stay even. You can also make them larger by adding two rows to each petal.
A little stuffing gives the rounded, puffy look from the photo. Without it the centers are flat, which still looks good and makes the blanket easier to wash and fold.
Yes. On the last petal of each flower, sl st it to the matching petal tip of a neighboring flower instead of fastening off. This saves sewing time, but you need to plan the layout first so every join lands in the right place.
The finished Coral Flower Crochet Blanket Pattern

