Coral Layered Rose Crochet Blanket
Beginner Friendly
Perfect for those just starting their crochet journey, with clear instructions and simple techniques
Single-Day Project
A satisfying project you can complete in a single afternoon or evening.
Handmade Gift
A beautiful keepsake — free forever. Read online or print at home.
About This Coral Layered Rose Crochet Blanket
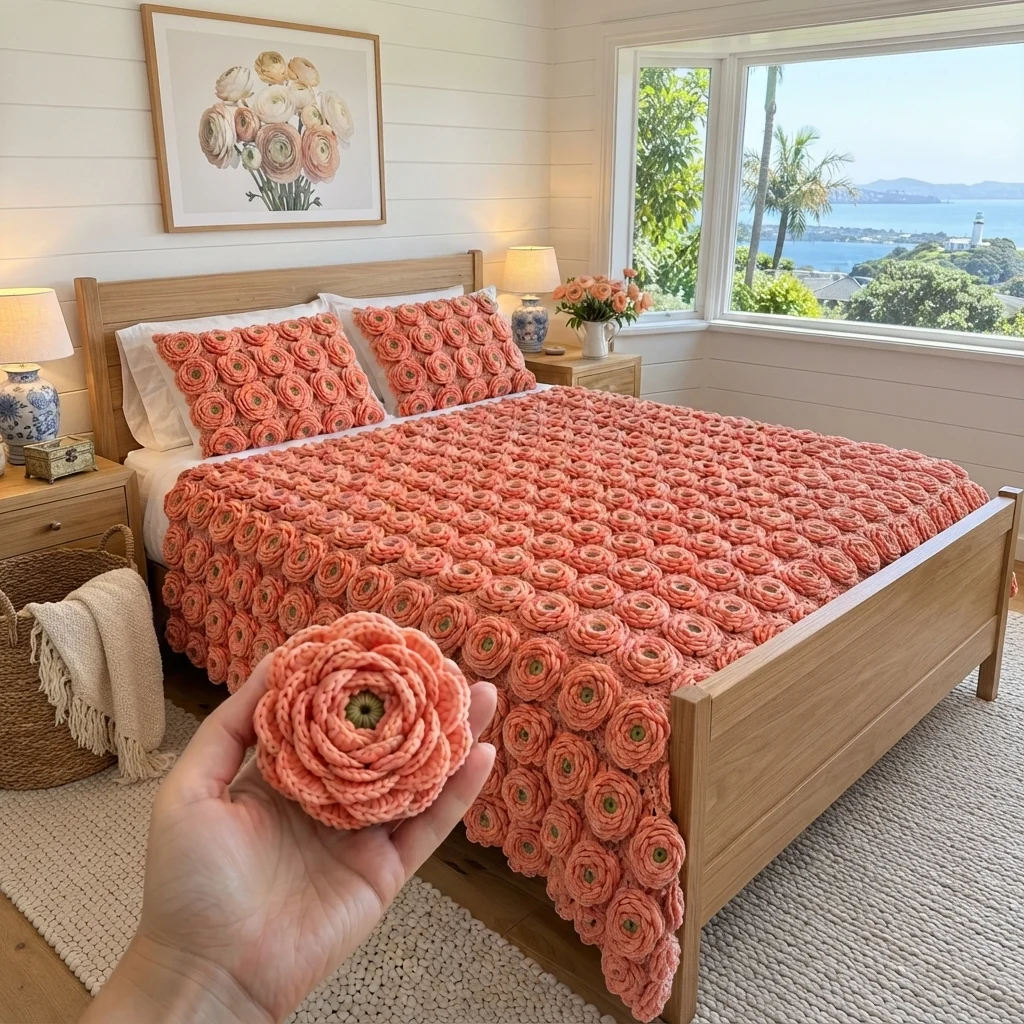
This crochet rose blanket pattern covers a bed in 391 layered coral roses, each with a small sage green center and three tiers of ruffled petals. There are no squares and no backing: the flowers are made one at a time and joined edge to edge in staggered rows, so the blanket finishes with a naturally scalloped edge. The effect is a thick, sculptural bedspread that looks like a field of ranunculus.
Every rose is the same, so the project is repetitive rather than difficult. Each flower is a small flat disc with ridged rounds, and the petals are worked into the loops left behind by those ridges. Once you have made one flower, the rest follow quickly, which makes this a good project for a long season of small sessions.
Plan on about 20 minutes per flower, plus time to join them, so roughly 150 to 180 hours for the full size, or about 50 hours for a throw. It suits crocheters who are comfortable with single crochet in the round, double crochet fans and working in the front and back loops. The pattern also includes matching pillow covers.
Materials
- Bulky (weight 5-6) yarn in coral about 4,100 m (4,480 yd) for the full-size blanket with joining
- Bulky (weight 5-6) yarn in sage green about 250 m (275 yd)
- Extra yarn for two pillow covers about 610 m (670 yd) coral and 25 m (28 yd) sage
- 6 mm (US J-10) crochet hook
- Large-eye tapestry needle for joining the flowers
- 2 stitch markers for marking rounds
- Blocking mats and rustproof pins
- Two 45 cm (18 in) pillow inserts optional, for the pillow covers
Abbreviations
MRmagic ringchchainscsingle crochetdcdouble crochetsl stslip stitchst(s)stitch(es)skskipincincrease: 2 sc in the same stBLOback loop onlyFLOfront loop onlyyoyarn overRSright sideLayered Rose (make 391 for the full size)
The rose is worked from the center out with the right side facing you throughout. Work in a spiral without joining, and use a marker to track the start of each round. The ridged rounds (3 and 4) leave a ring of unworked loops on the right side, and the petal tiers are worked into those rings. Hold the flower with the center facing you when you work the petals. Leave a 20 cm tail at the end.
- Rd 1: With sage, 6 sc in MR. Pull the tail to close the ring tightly. (6)
- Rd 2: inc in each st around, changing to coral on the last yo of the final sc. (12)
- Rd 3 (BLO): inc in each st around. The front loops of Rd 2 are left free. (24)
- Rd 4 (BLO): [2 sc, inc] 8 times. The front loops of Rd 3 are left free. (32)
- Rd 5 (outer petals): Work in both loops of Rd 4. [Sk 1 st, 9 dc in the next st, sk 1 st, sl st in the next st] 8 times. Fasten off. (8 petals)
- Rd 6 (middle petals): Join coral in any free front loop of Rd 3. [Sk 1 st, 7 dc in the next st, sk 1 st, sl st in the next st] 6 times, working into the free front loops. Fasten off. (6 petals)
- Rd 7 (inner petals): Join coral in any free front loop of Rd 2. [5 dc in the next st, sl st in the next st] 6 times, working into the free front loops. Fasten off and weave in the ends. (6 petals)
Layout and Sizing
- The roses are joined in staggered rows. Every row has the same number of flowers, and each even-numbered row is shifted half a flower to the right, so each flower touches two flowers in the row above and two in the row below. This gives the scalloped edge on both sides.
- Sizes: throw, 10 flowers across by 12 rows (120 flowers), about 105 x 106 cm. Twin, 13 flowers across by 20 rows (260 flowers), about 135 x 175 cm. Full or double, 17 flowers across by 23 rows (391 flowers), about 175 x 209 cm. The yarn amounts in this pattern are for the full size.
- Make the flowers in batches and block them together before joining.
- Lay out several rows on the floor and take a photo before you join anything.
Joining the Roses
- Block every rose to 10 cm. Pin the flower flat with the petals fanned out and let it dry completely.
- Join the flowers into rows first, then join the rows to each other.
- Place two roses side by side with the right sides up and the outer petals touching. Using coral yarn and a tapestry needle, whip stitch the touching outer petals together at the base of the petals, using 3 or 4 stitches at each contact.
- When joining a row to the row above, stitch each flower to the two flowers it touches, at the two contact points on each side.
- Weave in all ends on the wrong side.
Pillow Front (make 2)
- Make 20 roses for each pillow front.
- Join them into a staggered panel of 4 flowers across by 5 rows, with each even row shifted half a flower to the right, using the same coral whip stitch joins. The panel measures about 45 x 45 cm (18 x 18 in).
Pillow Back (make 2)
- With coral, ch 62.
- Row 1: Sc in the 2nd ch from hook and in each ch across. Ch 1, turn. (61)
- Rows 2-63: Sc in each st across. Ch 1, turn. (61)
- Fasten off and weave in the ends. The panel measures about 45 x 45 cm (18 x 18 in) after blocking.
Assembling the Pillow Cover
- Place the front and back with wrong sides together, with the back panel centered under the flower panel.
- Using coral, whip stitch the back panel to the underside of the rim of each edge flower (the ridged round, Rd 4) along three sides, keeping the stitches hidden under the petals.
- Insert the 45 cm pillow and close the fourth side the same way, or sew on snaps if you want to remove the insert for washing.
Finishing
Weave in every end before you join the flowers, as each rose has a few and they are easiest to hide while the flowers are small. After joining, steam or mist the blanket lightly and fluff the petals with your fingers. Do not press the flowers flat. The blanket is thick and heavy, so wash it gently, support its weight when wet, and dry it flat to keep the petals full.
Tips for Success
- Make the roses in batches of twenty or thirty and block each batch together, so the sizes stay consistent from the first flower to the last.
- Keep your tension the same throughout. A flower that is half a centimeter bigger shows up quickly in the joined rows, so measure one every ten or so.
- Work the petal fans loosely. Tight dc fans stand up stiffly instead of ruffling.
- Mark the first stitch of each ridged round with a stitch marker so you do not lose your place when you go back for the petals.
- Weigh your first finished rose, then multiply by your flower count to check you have enough yarn before you commit to the rest.
Common Mistakes to Avoid
- Working Rd 3 or Rd 4 in both loops buries the free loops, and the petals have nowhere to go. Always work these two rounds in BLO.
- Pulling the dc fans tight makes the petals stand straight up. Work them loosely so they ruffle.
- Joining the flowers before blocking leaves the rows uneven. Always block first.
- Mixing flower sizes produces gaps and waves in the rows. Check your size against the first flower regularly.
- Sewing the touching petals flat hides the 3D effect. Stitch only at the petal bases and let the tips stay free.
Ways to Customize This Pattern
- Change the color. A dusty rose, butter yellow or sky blue single color gives the same texture with a very different mood.
- Work an ombre by making each batch of flowers a shade lighter or darker than the one before, and arrange the batches in rows.
- Make the center in a contrasting color such as cream, gold or deep burgundy instead of sage.
- Use worsted yarn and a 4 mm hook for flowers about 7 cm across. You will need roughly twice as many flowers for the same blanket size.
- Make a throw or table runner using the smaller sizes in the Layout and Sizing section.
Frequently asked questions
The roses are joined directly to each other in staggered rows, so the flowers form the whole fabric. This gives the scalloped edge and keeps the blanket lighter than one with a solid ground, though it is still thick and heavy.
Yes. On Rd 5, replace the sl st between two petals with a sl st into the touching petal of a neighboring flower. Sewing gives you more control over the spacing, so it is the method written here.
There are small triangular gaps where three flowers meet. They are part of the look, and the thick petals mostly hide them. Place the blanket over a light sheet if you want the gaps to look filled.
About 20 minutes once you find your rhythm, a little longer for the first few. The ridged rounds take about 8 minutes and the three petal tiers take about 12 minutes.
The finished Coral Layered Rose Crochet Blanket

