Coral Swirl Bedspread Crochet Pattern
Advanced
For experienced crocheters who enjoy complex shaping, fine detail, and ambitious construction
Single-Day Project
A satisfying project you can complete in a single afternoon or evening.
Handmade Gift
A beautiful keepsake — free forever. Read online or print at home.
About This Coral Swirl Bedspread Crochet Pattern
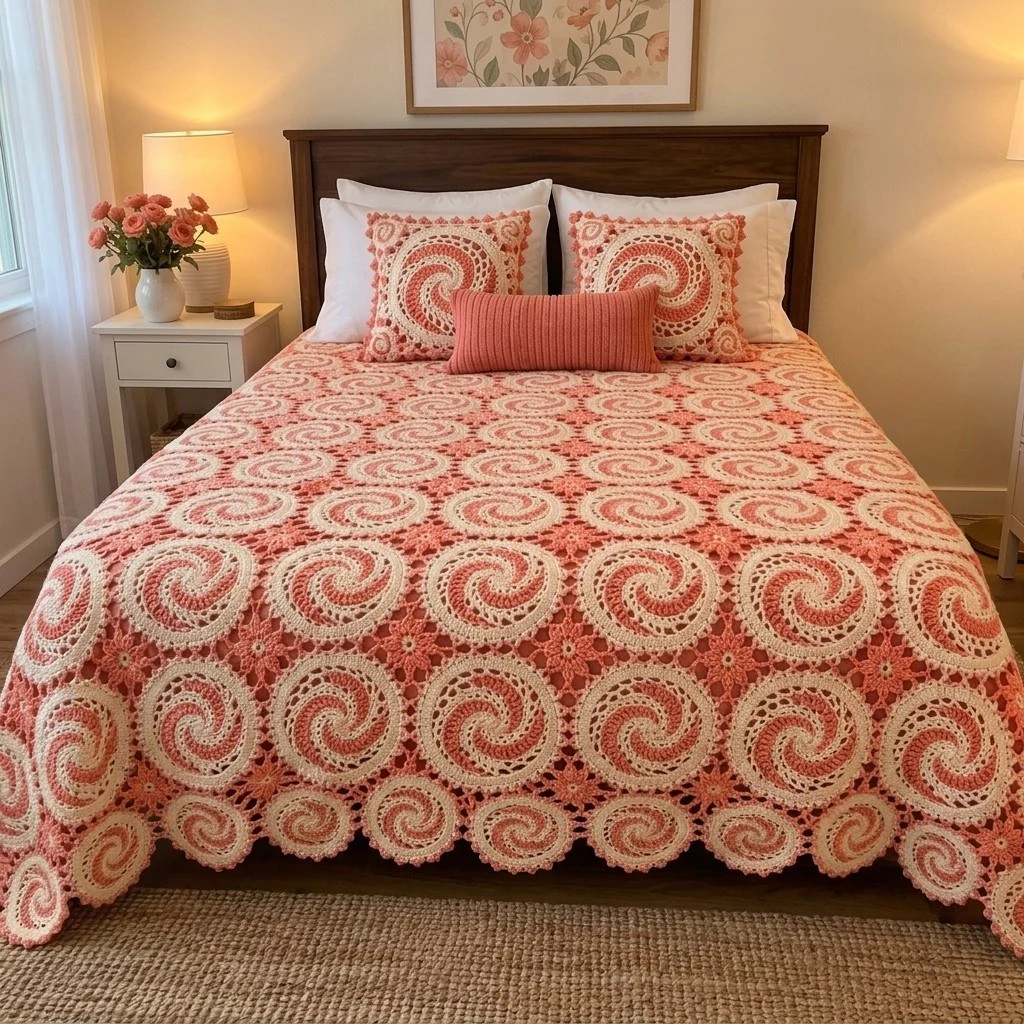
This coral swirl bedspread crochet pattern turns one simple idea — a six-armed spiral worked in two colors — into a full bed-sized cover with real depth and movement. Each motif is a square built around a raised swirl: six spiral arms grow out of a magic ring, get wrapped in a lacy chain mesh, and then are squared off with corner shells so the finished blocks sit flush against each other. Between the squares sit small cream-centered filler flowers that fill the diamond gaps and keep the surface from going flat. The scalloped edging at the bottom is worked last, directly into the outer motifs, so the drape over the sides of the bed ends in soft half-circles instead of a hard line.
This is a long project, and it is honest to say so. A single motif takes most crocheters 25 to 35 minutes once the rhythm sets in, and a queen-size spread needs 100 motifs plus 81 filler flowers plus the border — figure 40 to 55 hours of hooking spread over several weeks. The good news is that it is completely portable: you can carry a ball of coral, a ball of cream and a 3.5 mm hook anywhere and come home with four more squares. Nothing about an individual motif is hard. The difficulty is in the spiral color management, the join-as-you-go seam, and keeping tension even across a hundred pieces.
It suits a confident intermediate crocheter who wants to step up, or an advanced crocheter looking for a long, meditative make. You need to be comfortable with magic rings, working in continuous spirals, front post stitches, and reading your own stitch placement rather than counting every single stitch. If you have made granny squares and want something that looks far more complicated than it actually is, this is the project. Make it in the coral-and-cream shown here, or swap in any two-color pair with strong contrast — the swirl only reads clearly when the two yarns are clearly different in value.
Materials
- DK / light worsted cotton or cotton blend in coral approx. 2400 g / 12 x 200 g — main spiral and background
- DK / light worsted cotton in soft cream approx. 1600 g / 8 x 200 g — second spiral, flower centers, scallops
- DK / light worsted cotton in deep salmon approx. 300 g — filler flower petals and corner accents
- 3.5 mm crochet hook or the size that gives you gauge
- 4.0 mm crochet hook for the join rounds and border only, if you join tightly
- Blunt tapestry needle size 16-18, for ends and seams
- Stitch markers at least 8 — mark spiral arms and corners
- Rustproof blocking pins and a blocking mat or towel-covered bed
- Measuring tape
- Spray bottle or steam iron for wet or steam blocking
Abbreviations
MRmagic ringchchainsl stslip stitchscsingle crochethdchalf double crochetdcdouble crochettrtreble crochetfpdcfront post double crochetinc2 stitches in the same stitchdc2togdouble crochet 2 togetherspspacest / stsstitch / stitchesreprepeatBLOback loop onlyJAYGjoin as you go( )stitches worked into the same stitch or space[ ]repeat the sequence as directedGauge and Motif Count
- Gauge: one blocked swirl motif = 23 x 23 cm using a 3.5 mm hook and DK cotton.
- Unblocked, the motif will measure about 21.5 cm and will look slightly cupped. This is normal — the spiral pulls in until blocked.
- Queen size (shown): 10 motifs wide x 10 motifs long = 230 x 230 cm before the border, plus about 6 cm of scalloped edging on the two sides and the foot.
- Double size: 9 x 9 motifs = 207 x 207 cm. King size: 11 x 11 motifs = 253 x 253 cm.
- Filler flowers are needed at every internal corner junction: for a 10 x 10 layout that is 9 x 9 = 81 flowers.
- Work all motifs before joining, or join as you go in rows — both methods are given below.
Swirl Motif — Spiral Center (make 100)
- The spiral is worked with two strands of color carried at once: coral (A) and cream (B). Start both in the same magic ring and alternate — work 3 sts with A, drop A to the front, pick up B, work 3 sts with B. Keep the dropped strand always on the same side so the arms stay clean.
- Rnd 1 (A and B): In a MR, with A work 3 sc; with B work 3 sc. Pull ring closed. (6 sc — 3 A, 3 B)
- Rnd 2: With A, 2 sc in each of the next 3 A sts; with B, 2 sc in each of the next 3 B sts. (12 sts — 6 A, 6 B)
- Rnd 3: With A, [sc, inc] 3 times over the A section; with B, [sc, inc] 3 times over the B section. (18 sts — 9 A, 9 B)
- Rnd 4: With A, [2 sc, inc] 3 times; with B, [2 sc, inc] 3 times. (24 sts — 12 A, 12 B)
- Rnd 5: With A, [3 sc, inc] 3 times; with B, [3 sc, inc] 3 times. (30 sts — 15 A, 15 B)
- Rnd 6: With A, [4 sc, inc] 3 times; with B, [4 sc, inc] 3 times. (36 sts — 18 A, 18 B)
- Rnd 7: With A, [5 sc, inc] 3 times; with B, [5 sc, inc] 3 times. (42 sts — 21 A, 21 B)
- Rnd 8: With A, [6 sc, inc] 3 times; with B, [6 sc, inc] 3 times. (48 sts — 24 A, 24 B)
- Rnd 9: With A, [7 sc, inc] 3 times; with B, [7 sc, inc] 3 times. (54 sts — 27 A, 27 B)
- Rnd 10: With A, [8 sc, inc] 3 times; with B, [8 sc, inc] 3 times. (60 sts — 30 A, 30 B)
- Rnd 11: With A, [9 sc, inc] 3 times; with B, [9 sc, inc] 3 times. (66 sts — 33 A, 33 B)
- Rnd 12: With A, [10 sc, inc] 3 times; with B, [10 sc, inc] 3 times. (72 sts — 36 A, 36 B)
- To end the spiral evenly: with A work 6 sc, then 4 hdc, then 3 dc, then sl st to taper the A arm down into the fabric. Fasten off A. Repeat the same taper with B over its next 13 sts. Fasten off B.
- The disc now measures about 15 cm across and should lie flat with two clean spiral arms. Weave in the two tapered ends on the back now — they are much harder to reach after the mesh round.
Swirl Motif — Lace Mesh Ring
- Rnd 13 (cream B): Join B with sl st in any st of the final spiral round. Ch 1, sc in same st, [ch 3, skip 2 sts, sc in next st] around, ending ch 3, sl st to first sc. (24 ch-3 sps)
- Rnd 14 (B): Sl st into first ch-3 sp. Ch 3 (counts as dc), 2 dc in same sp, [ch 1, 3 dc in next ch-3 sp] around, ending ch 1, sl st to top of ch-3. (24 three-dc groups, 24 ch-1 sps)
- Rnd 15 (B): Ch 1, sc in same st, [ch 4, skip 2 dc and the ch-1 sp, sc in first dc of next group] around, ending ch 4, sl st to first sc. (24 ch-4 sps)
- Rnd 16 (coral A): Join A in any ch-4 sp. Ch 1, [2 sc, ch 2, 2 sc] in that sp, then [4 sc in next ch-4 sp] 5 times, and repeat this 6-space sequence around — that is, every 6th space gets the ch-2 picot cluster. You will place 4 picot clusters, evenly spaced at what will become the four corners. (96 sc, 4 corner ch-2 sps)
- Rnd 17 (A): Ch 1, sc in each sc around, working (2 sc, ch 2, 2 sc) in each corner ch-2 sp. (112 sc, 4 corner ch-2 sps)
- The piece is now a rounded square. Do not fasten off — continue straight into the squaring round.
Swirl Motif — Squaring Rounds
- Rnd 18 (A): Ch 3 (counts as dc). Working along the first side: dc in each of the next 7 sc, hdc in next 5, sc in next 6, hdc in next 5, dc in next 5, then (3 dc, ch 2, 3 dc) in the corner ch-2 sp. Repeat this side sequence three more times, ending sl st to top of ch-3. (28 sts per side plus 4 corner groups)
- Rnd 19 (A): Ch 1, sc in each st around, working (sc, ch 2, sc) in each corner ch-2 sp. Each side now has 34 sc between corners. (136 sc, 4 corner ch-2 sps)
- Rnd 20 (cream B): Join B in any corner ch-2 sp. Ch 1, (sc, ch 2, sc) in that corner, then sc in each of the next 34 sc, and repeat around. Sl st to first sc. (136 sc, 4 corners)
- Rnd 21 (B): Ch 2 (counts as hdc), hdc in each st around, working (2 hdc, ch 2, 2 hdc) in each corner ch-2 sp. Each side now has 36 hdc between corners. (144 hdc, 4 corners)
- Rnd 22 (coral A), texture round: Join A in any corner ch-2 sp. Ch 1, (sc, ch 2, sc) in corner, then [3 sc, fpdc around the next hdc] 9 times along the side — 36 sts — and repeat around. Sl st to first sc. (144 sts, 4 corners)
- Rnd 23 (A), final round: Ch 1, sc in each st around, working (sc, ch 2, sc) in each corner. (144 sc, 4 corner ch-2 sps — 36 sc per side.) Fasten off, leaving a 15 cm tail if you plan to seam later.
- Block each motif to a true 23 cm square. The corners must be square, not rounded, or the joins will pucker.
Filler Flowers (make 81)
- Rnd 1 (cream B): 6 sc in MR, sl st to first sc. (6 sc)
- Rnd 2 (B): Ch 1, 2 sc in each st around, sl st to first sc. (12 sc) Fasten off B.
- Rnd 3 (deep salmon C): Join C in any sc. Ch 1, [sc in next st, skip nothing, ch 2] — worked as: *sc in next st, ch 3, skip next st*, rep from * around. (6 sc, 6 ch-3 sps)
- Rnd 4 (C), petals: In each ch-3 sp work (sc, hdc, 3 dc, hdc, sc). Sl st to first sc. (6 petals)
- Rnd 5 (C), anchor points: Ch 1, working behind the petals, sl st to the sc at the base of the first petal, [ch 5, sl st to the sc at the base of the next petal] 6 times. (6 ch-5 anchor loops) Fasten off, leaving a 30 cm tail.
- The flower should measure about 7 cm across. These sit in the diamond-shaped gap where four motif corners meet, and the six ch-5 loops are what get sewn down.
Joining the Motifs
- Lay out all 100 motifs in a 10 x 10 grid on the floor or a bed. Rotate them so every spiral turns the same direction — the swirl pattern only reads correctly if they all match. Photograph the layout before you move anything.
- Join method (flat slip-stitch seam): hold two motifs right sides together. With coral and a 4.0 mm hook, insert the hook through the corner ch-2 sp of both motifs and sl st, then sl st through each matching pair of back loops along the side — 36 sl sts — and finish with a sl st through both corner ch-2 sps. Fasten off.
- Join all 10 motifs in each horizontal row first, then join the 10 completed rows to each other. At every four-corner junction, work the sl st through all four corner ch-2 spaces at once so the junction stays tight and flat.
- Alternative JAYG method: on Rnd 23 of each new motif, when you reach a side that touches a finished motif, replace each sc with a sl st into the corresponding sc of the neighbor, then continue in sc. This skips all seaming but requires you to keep the grid in order as you work.
- Once the grid is joined, the four-corner junctions will each show a small open diamond about 5 cm across. These are intentional — they hold the filler flowers.
- Press the joined seams flat with a steam iron held just above the fabric. Do not let the iron touch cotton directly.
Attaching the Filler Flowers
- Center a flower over one four-corner junction on the right side of the spread. The six ch-5 loops should reach outward toward the surrounding motif edges.
- Thread the 30 cm tail on a tapestry needle. Tack each ch-5 loop down with 2 small whip stitches into the motif fabric beneath it, catching only the top loops so nothing shows on the back.
- Keep the petals free and unstitched — they should lift slightly off the surface. Only the loops behind them get sewn.
- Bring the needle through to the back, knot, and weave the tail into the seam allowance for at least 5 cm.
- Repeat for all 81 junctions. Work in rows and check every ten flowers that they are all sitting at the same angle.
Scalloped Border
- Rnd 1 (coral A): Join A in any corner of the joined spread. Ch 1, sc evenly all the way around the outer edge: 36 sc along each motif edge, 1 sc in each seam junction, and (sc, ch 2, sc) in each of the four outer corners. Sl st to first sc.
- Rnd 2 (A): Ch 2 (counts as hdc), hdc in each st around, working (2 hdc, ch 2, 2 hdc) in each corner. Sl st to top of ch-2.
- Rnd 3 (cream B): Join B in any st. Ch 1, sc in each st around, working (sc, ch 2, sc) in each corner. Sl st to first sc. Count your total and adjust with 1 or 2 extra sc at the corners so the final count is a multiple of 6.
- Rnd 4 (B), scallop base: Ch 1, [sc in next st, ch 3, skip 2 sts] around, working (sc, ch 3, sc) at each corner. Sl st to first sc.
- Rnd 5 (coral A), scallops: Join A in any ch-3 sp. Ch 3 (counts as dc), then work 6 dc in that same sp, sl st into the next ch-3 sp, [7 dc in next ch-3 sp, sl st into next ch-3 sp] around. Sl st to top of ch-3. Each scallop is a 7-dc fan separated by a slip stitch.
- Rnd 6 (cream B), scallop trim: Join B in the sl st between any two fans. Ch 1, sc in that sl st, then [sc in each of the 7 dc of the fan, sc in the next sl st] around. Sl st to first sc. Fasten off.
- Rnd 7 (B), picot finish: Ch 1, sc in first st, [sc in next 3 sts, ch 3, sl st in the last sc made] around. Fasten off and weave in.
- On the head end of the bed (the edge that sits under the pillows), work only Rnds 1-3 and stop. A flat edge there keeps the spread from bunching under the pillows, exactly as shown in the photo.
Finishing
Weave in every end before you block. On a spread this size that can mean two or three hundred ends, so do it in batches as you go rather than saving it all for the last day. Run each tail at least 5 cm through the back of the stitches, split the yarn once near the end so it cannot work loose in the wash, and trim close.
Block the whole spread at once if you can. Soak it in cool water with a little wool wash, press the water out between towels without wringing, then lay it flat on a bed covered with dry towels. Pin the four outer corners square, measure the diagonals to make sure they match, and pin out each scallop on the three finished edges. Let it dry fully — a cotton spread this size takes 24 to 48 hours. Do not hang it wet; the weight will stretch the motifs out of square permanently.
Once dry, check the four-corner junctions one last time and add a stitch anywhere a flower has shifted. The finished spread measures about 230 x 230 cm plus the border, which gives a proper overhang on a queen bed with the flat edge tucked under the pillows. Launder on a cold gentle cycle in a mesh bag and dry flat.
Tips for Success
- Carry both spiral colors rather than cutting them. When you drop coral to pick up cream, always drop it toward the front of the work. Dropping inconsistently is what makes one spiral arm look chunky and the other look thin.
- Mark the start of each spiral arm with a stitch marker on Rnd 1 and move it up every round. The spiral has no join, so without a marker you will lose your place on round seven and the increase spacing will drift.
- Block in batches of ten on a single mat with a 23 cm square template drawn underneath. Consistent motif size matters far more here than perfect individual stitches — a grid of slightly imperfect but identical squares joins beautifully, a grid of perfect but uneven squares does not.
- Join rows in the same direction every time. If you seam row one left to right and row two right to left, the tiny directional pull of a slip-stitch seam will show as a subtle diagonal bias across the whole spread.
- Keep one finished motif pinned to the wall as a reference. After thirty squares your tension will have changed without you noticing, and comparing against the original catches it early.
Common Mistakes to Avoid
- Spiral arms that merge into one blob — this happens when you work 3 sts of one color before the increase instead of after. Follow the bracket placement exactly: the increase is always the last stitch of each repeat, which pushes the color change outward and keeps the arms separate.
- Cupped, dome-shaped motifs. The spiral center naturally cups as it grows. If it still cups after Rnd 16, your mesh rounds are too tight — go up to a 4.0 mm hook for Rnds 13-15 only. If it ruffles instead, your mesh is too loose; drop to 3.25 mm for those rounds.
- Rounded corners after the squaring rounds. The corner ch-2 spaces need a full (3 dc, ch 2, 3 dc) on Rnd 18 — skipping to a smaller corner group leaves the motif octagonal, and octagons do not tile. Rip back and redo the corners rather than trying to block it square.
- Motifs joined with spirals facing different directions. Check the layout photo before every seam. Once twenty squares are joined, fixing a backwards motif means unpicking two full sides.
- Stitching the flower petals down flat. Only the six ch-5 loops behind the petals get tacked. Sewing through the petals themselves flattens the raised texture that gives the spread its dimension.
Ways to Customize This Pattern
- Make matching pillow covers: work four motifs, join them 2 x 2, add Rnds 1-3 of the border, then sc the panel to a plain cream back panel worked in rows to the same size, leaving one side open for the cushion insert.
- Shift the palette while keeping the structure: deep teal with ivory, mustard with warm grey, or dusty plum with oatmeal all read well, as long as the two spiral yarns differ strongly in lightness.
- Make a throw instead of a bedspread: 5 x 7 motifs gives a 115 x 161 cm throw that takes roughly a third of the time and uses about 1200 g of yarn total.
- Go ombre: work the coral in four shades, lightest at the center of the spread and deepest at the outer rows, keeping cream constant throughout. Sort your motifs by shade before joining.
- Skip the filler flowers for a cleaner, more modern look, and instead work the four-corner junctions closed with a small cream 12-sc circle sewn flat over each one.
Frequently asked questions
The two arms stay equal because each color gets exactly the same number of stitches and exactly three increases per round. If one arm is drifting wider, you have almost certainly worked an extra increase in that color. Count the stitches in each color at the end of every round through Rnd 6 — they must be identical. After Rnd 6 the pattern is established enough that you can count only every third round.
Yes, but it changes the result. Acrylic is lighter and warmer, which makes a cozier spread, but it will not hold a blocked shape the way cotton does — the motifs will relax back toward their unblocked size within a few weeks. If you use acrylic, go down to a 3.25 mm hook so the fabric is firmer, and expect the finished spread to end up roughly 5 percent smaller than the measurements given.
Join as you go if you want to avoid a hundred-square seaming marathon and you can keep your grid organized. Seam at the end if you want to block every motif individually first, which gives a noticeably more even finished surface. For a project this size I recommend making and blocking all the motifs first, then seaming — the blocking consistency is worth the extra hours, and you can seam while doing something else.
The top edge sits under the pillows. A scalloped border there creates a ridge that shows through the pillows and makes the spread sit unevenly against the headboard. Working only the first three border rounds on that edge gives a clean flat finish that tucks neatly. If your spread will be used as a throw rather than on a bed, scallop all four sides.
A queen spread needs roughly 2400 g coral, 1600 g cream and 300 g deep salmon. You can buy in stages, but buy all of the coral and cream in one dye lot up front if you possibly can — cotton dye lots vary enough that a later batch will show as a visible band across the finished spread. The deep salmon is used only in small amounts for the flowers and is safe to buy later.
The finished Coral Swirl Bedspread Crochet Pattern

