Crimson Fan Lace Crochet Panel Pattern
Advanced
For experienced crocheters who enjoy complex shaping, fine detail, and ambitious construction
Weekend Project
A satisfying weekend make — start Friday, finish Sunday, enjoy forever.
Handmade Gift
A beautiful keepsake — free forever. Read online or print at home.
About This Crimson Fan Lace Crochet Panel Pattern
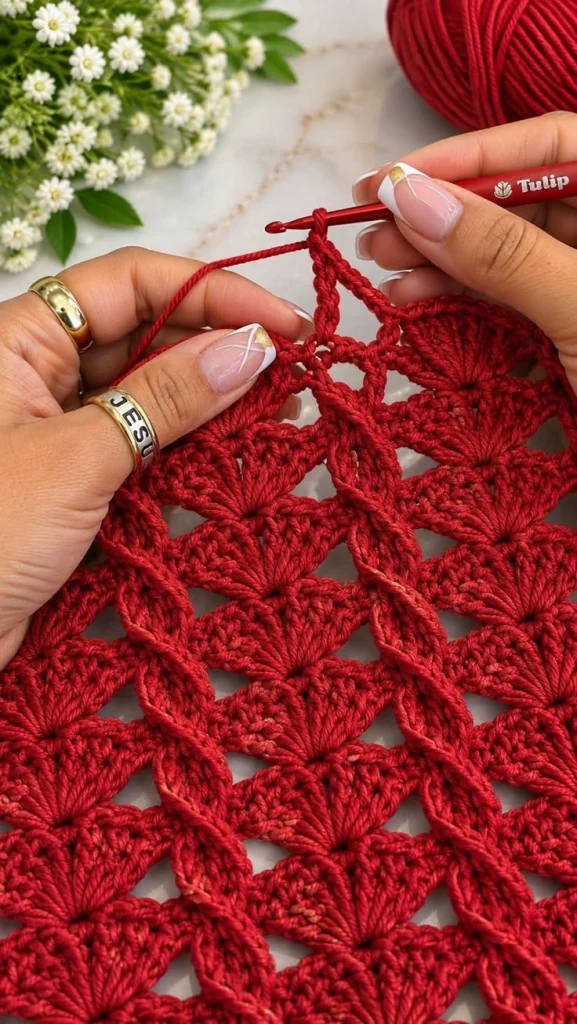
This fan lace crochet pattern creates a crimson fabric panel with broad, radiating fans, open spaces, and raised leaf columns inspired by the photograph. The single rich red shade lets the tall stitches and sculpted connecting details stand out. Its small rectangular format works as a decorative table panel or a sample for a larger lace project.
The construction uses separate fan motifs, carefully placed sewn joins, chain bridges, and two applied leaf cords. Allow approximately 14–18 hours for crocheting, assembly, and finishing, plus drying time. This advanced project suits crocheters comfortable with tall stitches, working into chain backs, and blocking individual pieces to consistent measurements. The instructions are an original interpretation of the visible fabric, rather than a reconstruction of an unseen source pattern.
Materials
- Crimson sport-weight mercerized cotton Approximately 450–550 m; choose a smooth yarn around 125 m per 50 g
- Crochet hook 3.0 mm, or size needed for the motif gauge
- Tapestry needle For structural joins and securing the applied cords
- Locking stitch markers At least 12
- Scissors, ruler, rustproof pins, and blocking mat Use a mat large enough for a 26 × 36 cm panel
Abbreviations
chchainsl stslip stitchscsingle crochethdchalf double crochetdcdouble crochettrtreble crochet: yarn over twice, insert hook and draw up a loop, then yarn over and draw through two loops three timesst(s)stitch(es)RSright sideWSwrong sideGauge, Layout, and Construction
- Use US crochet terminology throughout. Turning chains do not count as stitches. Work fan motifs in turned rows; the foundation ring is their pointed base.
- Blocked motif gauge: one completed fan measures 8 cm wide × 4.5 cm high. For a supporting stitch check, aim for approximately 24 sc and 28 rows per 10 cm in a separate sc swatch. Prioritize the finished fan measurements if the two gauges differ.
- Make 24 fans and two leaf cords. Arrange the fans in three columns of eight, all opening toward the same end of the panel. Number columns 1–3 from left to right and tiers 1–8 from bottom to top, viewed from the RS.
- Each column measures approximately 8 cm wide × 36 cm long. Leave a 1 cm channel between neighboring columns, giving a total width of 8 + 1 + 8 + 1 + 8 = 26 cm.
- The finished outline has naturally curved fan edges. The stated size describes the maximum blocked width and length, rather than a straight-edged rectangle.
Fan Motifs — Make 24
- Foundation: ch 4, sl st in the first ch to form a ring. Leave a 15 cm tail for closing and reinforcing the base.
- Row 1: ch 4, work 9 tr into the ring. Turn. The ch 4 does not count. Count: 9 tr.
- Row 2: ch 1, sc in the first tr; repeat [ch 1, sc in the next tr] eight times. Turn. Count: 9 sc and 8 ch-1 spaces.
- Row 3: ch 1, sc in the first sc; repeat [sc in the next ch-1 space, sc in the next sc] eight times. Count: 17 sc. Fasten off, leaving a 25 cm tail for assembly.
- Mark stitches 1, 9, and 17 of Row 3. Stitch 9 is the crown center; stitches 1 and 17 are the side tips. Close the foundation ring neatly with its tail, secure it through several stitch bases, and weave in that tail.
- Wet-block each motif to 8 cm across the side tips and 4.5 cm from the foundation ring to stitch 9. Spread the nine tr evenly without stretching the ring open. Let dry completely.
Join the Fans into Three Columns
- Lay eight fans RS upward in a vertical column. Place the foundation ring of tier 2 against crown stitch 9 of tier 1. Continue in the same way through tier 8. Keep all fans opening upward.
- Using the lower fan’s Row 3 tail, sew its crown stitch 9 to the upper fan’s foundation ring with three small passes. Catch both loops of the crown stitch and two neighboring strands of the ring. Keep the join flat and do not pull the ring over the crown.
- Secure each joining tail through the backs of several nearby stitches. Weave the unused Row 3 tail of the top fan into its WS. There are seven structural joins per column.
- Repeat for the other two columns. Total: three columns, 24 fans, and 21 vertical joins. Pin each column to approximately 36 cm long, keeping the crown centers aligned.
Chain Bridges Between Columns
- Place the three columns RS upward with a 1 cm channel between each neighboring pair. Align matching tiers horizontally. Keep the columns pinned while adding the bridges.
- At tier 1, attach crimson yarn with a sl st to the inward-facing side-tip stitch of column 1. Ch 5, then sl st into the facing side-tip stitch of column 2. Fasten off, leaving 10 cm tails. Each bridge has 5 chains between its attachment stitches.
- Repeat at tiers 2–8 between columns 1 and 2. Make the same eight bridges between columns 2 and 3. Total: 16 bridges, containing 80 chain stitches.
- Secure bridge tails through the WS of the fan edging. Maintain the pinned 1 cm spacing while adjusting the chains; they should form shallow relaxed arches, not pull the fans together.
Raised Leaf Cords — Make Two
- Foundation: ch 73 loosely, leaving a 30 cm tail. Work into the back bumps of the chain for a defined cord edge.
- Row 1: starting in the second ch from the hook, repeat [sc in the next ch, hdc in the next ch, dc in the next ch, tr in each of the next 2 ch, dc in the next ch, hdc in the next ch, sc in the next ch, sl st in the next ch] eight times. Each repeat consumes 9 chains and creates 8 shaped stitches plus 1 sl st. Total: 72 stitches worked into 72 foundation chains, forming eight leaves.
- Fasten off, leaving a 30 cm tail. Mark each of the eight slip stitches; these are the narrow junctions between successive leaf sections.
- Wet-block each cord to 36 cm long, allocating 4.5 cm to each nine-stitch repeat. Pin the narrow junctions in a straight line and allow the tall stitches to bow sideways. Let dry completely. The two cords must match in length before assembly.
Apply the Leaf Columns
- With the panel RS upward, position one leaf cord over each channel. Align the cord’s starting end with the foundation-ring level of tier 1. Align the end of each leaf repeat with the corresponding tier’s chain bridge; the final repeat ends at the tier-8 bridge.
- Rotate the second cord 180 degrees around its long axis before placing it so that the two cords’ broader leaf edges face toward the central fan column. Keep the chain spines visible and untwisted.
- Using a separate 70 cm length of crimson yarn for each cord, sew each marked junction to the middle chain of its bridge with two small passes. Catch the underside of the cord and both loops of the bridge chain. Each cord has eight bridge attachments.
- Secure the lower end of each cord with two small tacks: one to the nearest foundation-ring edge on each neighboring bottom fan. These tacks support the cord below the first bridge without closing the open space.
- At each tier, lightly tack the broad edge of the leaf to the nearest fan side edge where they naturally touch. Catch one strand from the underside of each piece. Use one tack per leaf, eight per cord, and leave the remaining leaf edge free to stand above the fabric.
Finishing
Check all 21 fan-to-fan joins, 16 bridges, and both applied cords before trimming any remaining tails. Weave each end through several stitches on the WS, change direction, and pass through a second group of stitches. Keep the ends within the dense fan areas so they do not show across the openings.
Soak the completed panel according to the yarn label, press out water in a towel, and pin it RS upward to approximately 26 × 36 cm. Align the three fan columns and keep the two channels evenly spaced. Shape the leaf edges with your fingers and leave them slightly raised as the cotton dries. Keep the natural scalloped outline; no additional border is required.
Tips for Success
- Mark crown stitch 9 immediately after finishing each fan. Joining into stitch 8 or 10 makes the column lean.
- Draw up the first loop of every tr to the same height. Uneven tall stitches create a lopsided crown that blocking cannot fully correct.
- Block all fans before sewing. Matching their width first makes the 1 cm channels much easier to maintain.
- Use small sewing passes beneath the raised leaf cords. Tight stitches flatten the relief and can shorten the panel.
Common Mistakes to Avoid
- Counting the Row 1 turning chain as a treble produces an extra fan ray. Work exactly nine actual tr into the ring and ignore the turning chain in Row 2.
- Missing a chain space in Row 3 reduces the crown below 17 stitches. Check for nine sc worked into stitches and eight sc worked into spaces.
- Working only one tr in the center of a leaf shifts every following repeat. Each leaf uses two consecutive tr in two separate foundation chains.
- Pulling the bridges straight and tight collapses the channels. Re-pin the columns 1 cm apart and remake any bridge that cannot span the gap with a little ease.
- Sewing down the entire leaf perimeter removes its raised appearance. Remove excess tacking and retain the junction attachments plus one light side tack per leaf.
Ways to Customize This Pattern
- Make a longer runner with 12 tiers: use 36 fans, 24 bridges, and two cords starting with ch 109, each worked for 12 leaf repeats. Target length is approximately 54 cm at the stated gauge.
- Make a wider four-column panel with 32 fans, 24 bridges, and three eight-leaf cords. Target width is approximately 35 cm, with the same 36 cm length.
- Use a deeper burgundy or a brighter scarlet cotton while keeping the entire panel one color to preserve the strong relief of the reference.
- For subtle contrast, make only the two leaf cords in a neighboring red shade. Keep all fan joins and bridges in the main crimson.
Frequently asked questions
No. It is an original modular interpretation of the visible crimson fans, open spaces, and raised leaf columns. The photograph does not reveal the complete outline or every stitch connection.
Separate motifs let each nine-ray fan open fully while keeping its foundation compact. Sewing the pointed bases to the crown centers also gives precise control over the vertical alignment.
Block the cord and column separately first. If the cord still cannot reach 36 cm without distorting its stitches, remake it with a larger hook and looser foundation chain. Do not stretch the sewn panel to force a mismatch.
Yes, as a decorative lace accent. The 12-tier variation makes a longer runner. The raised leaf cords create an uneven surface, so place glasses and other items requiring a level base directly on the table beside it.
The finished Crimson Fan Lace Crochet Panel Pattern

