Crimson Garden Crochet Flower Table Runner
Beginner Friendly
Perfect for those just starting their crochet journey, with clear instructions and simple techniques
Single-Day Project
A satisfying project you can complete in a single afternoon or evening.
Handmade Gift
A beautiful keepsake — free forever. Read online or print at home.
About This Crimson Garden Crochet Flower Table Runner
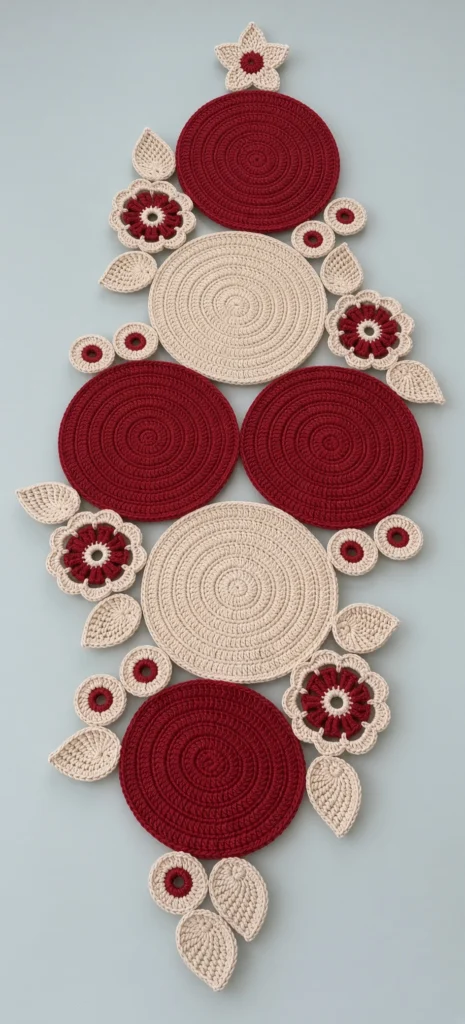
This crochet flower table runner pattern builds one long centrepiece out of thirty-five separate motifs: six flat spiral discs in deep crimson and cream, four layered flowers with raised crimson spokes, fourteen pointed leaves, ten small open rings and a five-point star that sits at the top like a finial. Nothing is worked as a single large panel. Every piece is made on its own, blocked flat, laid out on the table, and only then sewn to its neighbours, which is what gives the finished runner its scattered, grown-into-place look instead of a rigid grid.
Plan on 16 to 20 hours. The discs are the slow part, since the two large cream ones run to twenty-two rounds each, but they are also the easy part and they work well in front of the television. The flowers, rings and star are quick and fiddly, and the assembly stage takes a solid evening on its own because the placement is a judgement call rather than a diagram. This is a good project for someone who is comfortable with flat circles and wants to move on to multi-piece construction, colour joining and appliqué placement.
Worsted weight cotton is the right choice here. It holds a crisp edge, it presses flat under a damp cloth, and it will survive being washed after a dinner. Crimson and cream give the strongest contrast, but the whole design is built on a two-colour rule, so any high-contrast pair works. Written in US terms throughout.
Materials
- Worsted / Aran cotton in deep crimson approx. 250 g / 500 m
- Worsted / Aran cotton in cream or ecru approx. 350 g / 700 m
- 4.0 mm crochet hook one size down from the ball band, for a dense fabric
- Tapestry needle blunt, large eye
- Stitch markers at least 6, one per disc in progress
- Rust-proof pins and a blocking mat or towel you will pin pieces up to 20 cm across
- Spray bottle or a steam iron with a pressing cloth
- Sharp scissors
- Optional: cotton backing fabric or non-slip mat, about 110 x 45 cm
- Optional: light fabric stiffener or spray starch only if you want the leaves to stand crisp
Abbreviations
MRmagic ringchchainscsingle crochethdchalf double crochetdcdouble crochetsl stslip stitchincincrease (2 sc in the same stitch)sc2togsingle crochet 2 stitches togetherBLOback loop onlyst / stsstitch / stitchesreprepeatRSright sideFOfasten offGauge and Working Notes
- Gauge: the first 6 rounds of a disc should measure about 6.5 cm across. If yours is larger, drop to a 3.5 mm hook.
- The fabric should be firm with no daylight through it. A loose disc will ripple at the edge and refuse to lie flat.
- All discs are worked in a continuous spiral with the RS facing. Do not join or turn until the final round.
- Leave a 40 cm tail when you fasten off every piece. You will use it to sew that piece into the layout, and it saves weaving in twice.
- When changing colour, complete the last yarn over of the previous stitch with the new colour. Cut the old colour rather than carrying it, especially under the cream rounds.
- Work all six discs before you start the small motifs. It is easier to judge how many leaves and rings you need once the big shapes are on the table.
Large Cream Disc (make 2)
- Round 1: with cream, 6 sc in MR (6)
- Round 2: 2 sc in each st around (12)
- Round 3: (sc in next st, inc) rep 6 times (18)
- Round 4: (sc in next 2 sts, inc) rep 6 times (24)
- Round 5: (sc in next 3 sts, inc) rep 6 times (30)
- Round 6: (sc in next 4 sts, inc) rep 6 times (36)
- Round 7: (sc in next 5 sts, inc) rep 6 times (42)
- Round 8: (sc in next 6 sts, inc) rep 6 times (48)
- Round 9: (sc in next 7 sts, inc) rep 6 times (54)
- Round 10: (sc in next 8 sts, inc) rep 6 times (60)
- Round 11: (sc in next 9 sts, inc) rep 6 times (66)
- Round 12: (sc in next 10 sts, inc) rep 6 times (72)
- Round 13: (sc in next 11 sts, inc) rep 6 times (78)
- Round 14: (sc in next 12 sts, inc) rep 6 times (84)
- Round 15: (sc in next 13 sts, inc) rep 6 times (90)
- Round 16: (sc in next 14 sts, inc) rep 6 times (96)
- Round 17: (sc in next 15 sts, inc) rep 6 times (102)
- Round 18: (sc in next 16 sts, inc) rep 6 times (108)
- Round 19: (sc in next 17 sts, inc) rep 6 times (114)
- Round 20: (sc in next 18 sts, inc) rep 6 times (120)
- Round 21: (sc in next 19 sts, inc) rep 6 times (126)
- Round 22: (sc in next 20 sts, inc) rep 6 times (132)
- Round 23 (edge round): sc in each st around with no increases, sl st into the first sc to level the spiral (132). FO, leaving a long tail. Finished diameter about 20 cm.
Large Crimson Disc (make 2)
- Round 1: with crimson, 6 sc in MR (6)
- Round 2: 2 sc in each st around (12)
- Round 3: (sc in next st, inc) rep 6 times (18)
- Round 4: (sc in next 2 sts, inc) rep 6 times (24)
- Round 5: (sc in next 3 sts, inc) rep 6 times (30)
- Round 6: (sc in next 4 sts, inc) rep 6 times (36)
- Round 7: (sc in next 5 sts, inc) rep 6 times (42)
- Round 8: (sc in next 6 sts, inc) rep 6 times (48)
- Round 9: (sc in next 7 sts, inc) rep 6 times (54)
- Round 10: (sc in next 8 sts, inc) rep 6 times (60)
- Round 11: (sc in next 9 sts, inc) rep 6 times (66)
- Round 12: (sc in next 10 sts, inc) rep 6 times (72)
- Round 13: (sc in next 11 sts, inc) rep 6 times (78)
- Round 14: (sc in next 12 sts, inc) rep 6 times (84)
- Round 15: (sc in next 13 sts, inc) rep 6 times (90)
- Round 16: (sc in next 14 sts, inc) rep 6 times (96)
- Round 17: (sc in next 15 sts, inc) rep 6 times (102)
- Round 18: (sc in next 16 sts, inc) rep 6 times (108)
- Round 19: (sc in next 17 sts, inc) rep 6 times (114)
- Round 20 (edge round): sc in each st around with no increases, sl st into the first sc (114). FO, leaving a long tail. Finished diameter about 17 cm. These two sit at the very top and the very bottom of the runner.
Medium Crimson Disc (make 2)
- Round 1: with crimson, 6 sc in MR (6)
- Round 2: 2 sc in each st around (12)
- Round 3: (sc in next st, inc) rep 6 times (18)
- Round 4: (sc in next 2 sts, inc) rep 6 times (24)
- Round 5: (sc in next 3 sts, inc) rep 6 times (30)
- Round 6: (sc in next 4 sts, inc) rep 6 times (36)
- Round 7: (sc in next 5 sts, inc) rep 6 times (42)
- Round 8: (sc in next 6 sts, inc) rep 6 times (48)
- Round 9: (sc in next 7 sts, inc) rep 6 times (54)
- Round 10: (sc in next 8 sts, inc) rep 6 times (60)
- Round 11: (sc in next 9 sts, inc) rep 6 times (66)
- Round 12: (sc in next 10 sts, inc) rep 6 times (72)
- Round 13: (sc in next 11 sts, inc) rep 6 times (78)
- Round 14: (sc in next 12 sts, inc) rep 6 times (84)
- Round 15: (sc in next 13 sts, inc) rep 6 times (90)
- Round 16: (sc in next 14 sts, inc) rep 6 times (96)
- Round 17 (edge round): sc in each st around with no increases, sl st into the first sc (96). FO, leaving a long tail. Finished diameter about 14.5 cm. These two sit side by side in the middle of the runner.
Flower Base, Petal Layer (make 4)
- Round 1: with cream, 6 sc in MR (6)
- Round 2: 2 sc in each st around (12)
- Round 3: (sc in next st, inc) rep 6 times (18)
- Round 4 (petal round): *ch 2, 2 dc in next st, 2 dc in next st, ch 2, sl st in next st*; rep from * 5 more times. Each repeat uses 3 sts of Round 3, so all 18 sts are consumed and you finish with 6 rounded petals.
- Sl st into the base of the first ch-2 to close the round. FO, leaving a 40 cm tail. The finished flower base measures about 8 cm across.
Flower Centre, Crimson Spokes (make 4)
- Round 1: with cream, 6 sc in MR (6)
- Round 2: 2 sc in each st around (12). Sl st into the first sc and FO cream.
- Round 3 (spoke round): join crimson in the BLO of any st of Round 2. *Ch 5, sl st in the 2nd ch from hook, sl st in each of the next 3 ch, sl st in the BLO of the next st of Round 2*; rep from * around, once into each of the 12 sts (12 spokes).
- Sl st into the base of the first spoke. FO, leaving a 30 cm tail. The spokes should stand up as short raised bars radiating out from the cream centre. Set aside for assembly, where each spoke motif is sewn onto the middle of one flower base.
Leaf (make 14)
- With cream, ch 12.
- Round 1, first side: sc in the 2nd ch from hook, sc in next ch, hdc in next 2 ch, dc in next 2 ch, hdc in next 2 ch, sc in next 2 ch (10 sts worked, one chain left at the far end).
- Round 1, tip: work 3 sc into that last chain to turn the point (13).
- Round 1, second side: working along the free loops on the underside of the foundation chain, sc in next 2, hdc in next 2, dc in next 2, hdc in next 2, sc in next 2 (23).
- Round 1, base: 2 sc into the remaining unworked chain at the base, sl st into the first sc of the round (25).
- Round 2: ch 1, sc in next 10 sts; at the tip work sc in next st, 3 sc in the centre st, sc in next st; sc in next 10 sts; at the base work 2 sc in each of the last 2 sts; sl st into the first sc (29).
- FO, leaving a 30 cm tail. Each leaf measures roughly 8 cm long. Make 14, or a few extra if you want to fill more gaps in the layout.
Small Ring (make 10)
- With crimson, ch 6 and sl st into the first ch to form a ring. Do not pull this ring closed. The open centre is part of the design.
- Round 1: ch 1, work 12 sc into the ring, sl st into the first sc (12)
- Round 2: ch 1, (sc in next st, inc) rep 6 times, sl st into the first sc (18). FO crimson.
- Round 3: join cream in any st, ch 1, (sc in next 2 sts, inc) rep 6 times, sl st into the first sc (24)
- Round 4: ch 1, (sc in next 3 sts, inc) rep 6 times, sl st into the first sc (30). FO, leaving a 25 cm tail.
- Each ring finishes at about 5 cm across with a crimson band around a small open centre. Make 10.
Star Topper (make 1)
- With crimson, ch 4 and sl st into the first ch to form a ring.
- Round 1: ch 1, work 10 sc into the ring, sl st into the first sc (10). FO crimson.
- Round 2: join cream in any st, ch 1, 2 sc in each st around, sl st into the first sc (20)
- Point row 1: ch 1, sc in the next 4 sts, turn (4)
- Point row 2: ch 1, sc2tog, sc2tog, turn (2)
- Point row 3: ch 1, sc2tog (1). Ch 1, then sl st down the side of the point back to Round 2.
- Repeat the three point rows over each following group of 4 sts of Round 2 until you have 5 points (5 points x 4 sts = all 20 sts used).
- Edging round: sc evenly around the whole outline of the star, working 3 sc into each point tip and sc2tog in each valley between points. Sl st into the first sc, FO, leaving a 30 cm tail. The star measures about 9 cm across.
Finishing
Block every piece before you sew anything. Dampen each motif, pin the discs out to their full diameter with pins every few centimetres around the edge, and pin the leaves into a proper pointed oval rather than letting them curl. Let everything dry completely. The flowers only need light steam from above with the spokes facing up so you do not flatten them. Sew each crimson spoke motif to the centre of a flower base now, stitching through the cream Round 2 so the spokes stay raised.
Lay the runner out on a large flat surface before a single stitch goes in. Working from the top down: the star, then a large crimson disc, then a large cream disc, then the two medium crimson discs side by side, then the second large cream disc, then the second large crimson disc at the bottom. The discs should just touch or overlap by a centimetre, staggered slightly left and right so the outline gently zigzags instead of running as a straight column. Place the four flowers in the wide gaps beside the discs, two on the left and two on the right, then scatter the leaves and rings around the outer edge and into the notches where two discs meet. Photograph the layout on your phone before you move anything.
Join the discs first, using matching yarn and a whip stitch through the back loops along the full contact zone where two discs meet, usually 3 to 5 cm. A join of only a couple of stitches will hinge and flop. Then sew the flowers, leaves and rings on top, tacking each one down at four or five points around its edge rather than at a single spot, with the leaf tips left free so they lift slightly. Weave in all ends on the wrong side and press the finished runner face down under a damp cloth. If you want it to stay put on a polished table, tack a piece of thin cotton or non-slip matting to the back, following the outer outline loosely rather than cutting a rectangle.
Tips for Success
- Move the increase placement two or three stitches along each round on the large discs. Twenty-two rounds of stacked increases will give you six obvious corners instead of a circle.
- Make both discs of the same size back to back, in the same session if you can. Tension drifts between days, and two 20 cm discs that differ by a centimetre are very visible once they sit side by side.
- Cut a paper circle at 20 cm, 17 cm and 14.5 cm and check each disc against its template around round 15. It is far cheaper to add or drop a round then than after the edge round.
- Leave the flower spokes until last in each flower and do not press them. They are the only raised element in the whole runner and they carry the texture.
- Keep leaves and rings in two separate bags as you make them. You will be pulling handfuls of both during layout, and hunting for one more leaf in a pile of thirty motifs wastes an evening.
Common Mistakes to Avoid
- Discs that cup into a bowl. Your tension has tightened past the increase rate. Rip back to where it started curling and either loosen your grip or add one extra increase in the offending round, then continue as written.
- Discs that ruffle at the edge. This is the opposite problem, too much fabric for the circumference, usually from working the edge round loosely. Redo the last two rounds with a firmer hand or skip the plain edge round entirely.
- Carrying crimson yarn behind the cream rounds of the small rings. The dark strand shows straight through cotton as a dirty shadow. Cut the crimson, fasten off, and join cream fresh each time.
- Sewing before blocking. A dry unblocked disc is a slightly different size and shape from a blocked one, so joins made first will pucker the moment you wet the runner. Block, dry, then sew, in that order.
- Anchoring appliqués with one stitch in the middle. Leaves and rings will spin and lift at the corners after a wash. Tack each motif at four or five points around its perimeter instead.
Ways to Customize This Pattern
- Swap the palette while keeping the high contrast: forest green with ecru for winter, navy with ochre for a modern look, or charcoal with dusty pink. The design depends on two strong tones, not on red specifically.
- Make a round mandala mat instead. Use one large cream disc as the centre, ring it with the four flowers and all the leaves, and skip the other five discs for a 45 cm centrepiece.
- Shorten it to a coffee table size by leaving out one large cream disc and one large crimson disc, which brings the finished length down to roughly 70 cm.
- Turn the individual discs into a matching set. The medium crimson disc works as a trivet on its own, and a 10 round version of the same disc makes a coaster.
- Add a picot edging around the entire assembled outline, or sew a small pearl or wooden bead into the open centre of each ring for a bit of shine at the table.
- Hang it instead. Sew a cotton loop behind the star, thread a slim dowel through the top three motifs, and use it as a seasonal wall panel.
Frequently asked questions
Yes, with a 3.0 mm hook. Every stitch count stays exactly as written, but the pieces come out smaller, so the finished runner will be closer to 85 cm long. If you want to keep the 105 cm length, add three rounds to each disc, continuing the same pattern: round 23 becomes sc in next 21 sts then inc, round 24 becomes sc in next 22 sts then inc, and so on.
Not if your gauge is firm and you block properly. Worsted cotton pinned damp and left to dry will hold flat on its own. Starch is worth it only for the leaves if you want their tips to lift off the table, and in that case apply it to the leaves alone before assembly, not to the whole runner.
Usually not. A difference of up to a centimetre disappears in blocking, since you can pin the smaller one out harder and let the larger one relax. Beyond that, take the larger disc back to its edge round and redo the last two rounds with a 3.5 mm hook rather than starting over.
Hand wash in cool water with a mild detergent, press the water out against the side of the basin rather than wringing, then lay it flat and re-pin the discs into shape while damp. Cotton will come back to size every time as long as you reshape it wet. Skip the machine, as the appliqué stitching takes a beating in a drum.
You can, but it changes the character of the piece. Part of the appeal here is the open air between motifs where the table shows through. If you do want a backing for stability, cut it to follow the outer edge of the joined motifs and hand stitch it to the discs only, leaving the leaves and rings free.
The finished Crimson Garden Crochet Flower Table Runner

