Crimson Pagoda Landscape Crochet Blanket Pattern
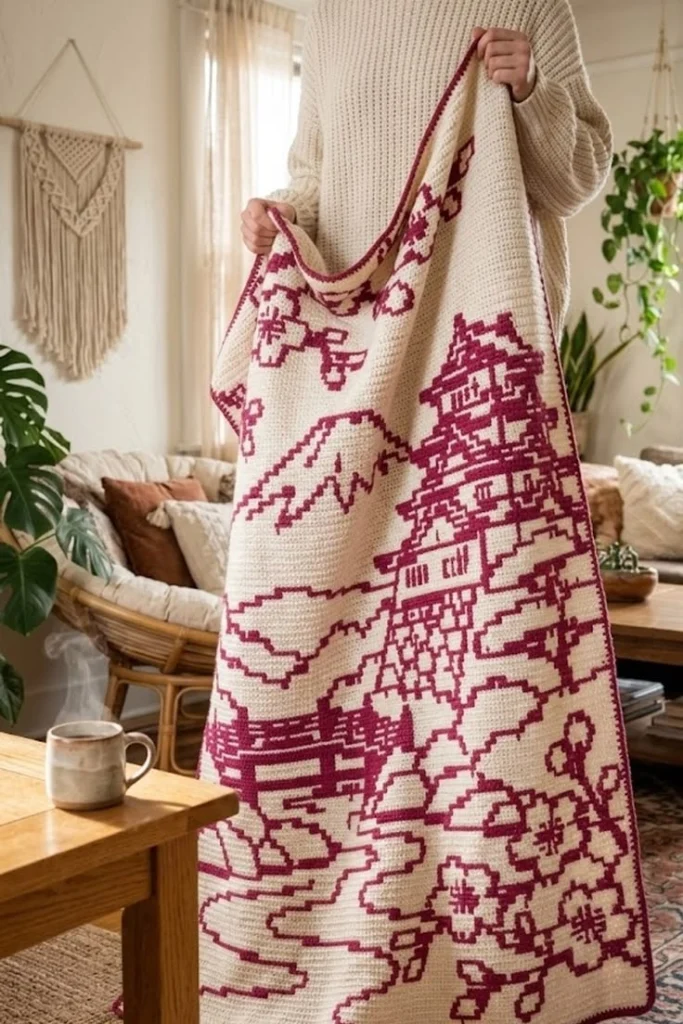
Advanced
For experienced crocheters who enjoy complex shaping, fine detail, and ambitious construction
Single-Day Project
A satisfying project you can complete in a single afternoon or evening.
Handmade Gift
A beautiful keepsake — free forever. Read online or print at home.
About This Crimson Pagoda Landscape Crochet Blanket Pattern
This pagoda crochet blanket pattern combines a warm cream background with deep burgundy landscape details inspired by the reference photograph. A tiered tower rises beside a mountain, angular riverbanks lead toward the lower edge, and outlined blossoms frame the scene. The narrow burgundy border brings the whole composition together.
Allow approximately 55–75 hours for the crochet, counted embroidery, and assembly. This advanced project suits makers who enjoy careful placement and detailed finishing. The original construction uses a crocheted ground, counted landscape embroidery, and separately shaped flower petals to interpret the photograph; it is not a recovered pattern for the pictured blanket.
Materials
- Cream DK yarn Approximately 1,900 m, including swatching and flower petals
- Deep burgundy DK yarn Approximately 650 m for embroidery, flower centers, and border
- 4 mm crochet hook Adjust to achieve the blocked gauge
- Blunt tapestry needles One large eye needle and one finer finishing needle
- Removable contrasting thread For the counted placement grid
- Locking stitch markers, scissors, measuring tape, and blocking equipment Use enough pins to keep the rectangle square
Abbreviations
chchainscsingle crochet, US terminologysl stslip stitchinc2 sc in one stitchdecsingle crochet 2 stitches togetherMRmagic ringststitchRSright sideWSwrong sideGauge, Size, and Construction
- With cream, ch 28. Row 1: sc in the second ch from the hook and each remaining ch; turn. You have 27 sc.
- Rows 2–30: ch 1, sc in every st, turn. Each row has 27 sc. Turning chains never count as stitches.
- Wash and dry the swatch as you will the blanket. Target gauge is 18 sc and 20 rows per 10 cm, measured in the center. Change hook size and repeat if necessary.
- The cream ground contains 144 sc across and 252 rows, measuring approximately 80 × 126 cm. Three border rounds bring the intended finished size to approximately 83 × 129 cm; border depth depends on your tension.
- Construction order: crochet and block the ground, mark the grid, embroider the landscape, crochet and attach six flowers, then add the border. There is no stuffing or facial detail.
Cream Blanket Ground
- With cream, ch 145 loosely.
- Row 1: sc in the second ch from the hook and each remaining ch; turn. You have 144 sc.
- Rows 2–252: ch 1, sc in all 144 st; turn. Every row has 144 sc. Fasten off after Row 252.
- Mark the side facing you after completing Row 1 as the RS. Keep this side facing upward for all placement work. Row 1 is the bottom of the landscape.
- Weave in the foundation and finishing tails. Wet block to a square-cornered rectangle approximately 80 × 126 cm. Let dry completely before marking.
Placement Grid and Embroidery Method
- Use grid intersections rather than stitch centers. The bottom-left corner of the cream ground is (0,0), the bottom-right corner is (144,0), and the top-right corner is (144,252). The first coordinate counts stitches to the right; the second counts rows upward. Border stitches are outside this grid.
- Baste removable guide lines at every 12 stitches horizontally and every 12 rows vertically. Add temporary markers at individual coordinates as needed. Keep basting loose enough to remove without distorting the crochet.
- Every coordinate sequence below is a separate continuous path. Join consecutive points in order. Horizontal and vertical segments follow grid lines. For a diagonal, work a staircase: from (a,b) to (c,d), let H be the absolute horizontal distance and V the absolute vertical distance. For each of the V row steps, first move horizontally by floor(k × H ÷ V) minus floor((k − 1) × H ÷ V) stitches, then move one row vertically, for k = 1 through V. Move in the directions indicated by the destination. A segment with V = 0 is entirely horizontal.
- Use burgundy yarn held single and backstitch one grid unit at a time along each path. Bring the needle through gaps between stitches without splitting the cream yarn. Follow the same path a second time to thicken the outline, keeping the second pass relaxed.
- Start and end each separate path independently. Weave each tail through at least 5 cm of nearby WS stitches, reversing direction once. Do not carry yarn between distant motifs.
- The embroidery will show on the WS. At each path intersection, pass through the existing meeting point without adding a bulky knot. Lay the blanket flat frequently and ease the yarn until the cream fabric lies smooth.
Mountain and Distant Shore
- Embroider the mountain silhouette through these points: (8,160), (18,168), (29,180), (39,187), (48,190), (56,188), (65,180), (72,176), (80,178).
- Embroider the inner ridge: (14,157), (25,162), (33,170), (38,166), (44,178), (48,181), (52,171), (57,174), (63,167).
- Add the short summit cleft: (48,184), (48,179), (46,176).
- Embroider the distant shore: (5,139), (15,141), (24,145), (34,145), (44,142), (55,143), (65,148), (77,149).
- Add the lower shore contour: (6,133), (15,130), (25,130), (33,134), (44,134), (54,138), (64,139).
Pagoda Roofs
- Embroider the finial: (104,218), (104,211), (101,208), (107,208), (104,211). Add its crossbar from (101,215) to (107,215).
- Top roof outer outline: (88,199), (94,203), (99,210), (109,210), (115,203), (121,199), (88,199). Add the lower lip: (88,196), (121,196). Connect (88,199) to (88,196) and (121,199) to (121,196).
- Top roof ridge: (95,202), (101,207), (107,207), (114,202). Add roof bands from (94,201) to (115,201) and from (91,198) to (118,198).
- Second roof outer outline: (83,178), (91,183), (97,187), (112,187), (119,182), (126,178), (83,178). Add its lower lip from (83,175) to (126,175), then connect each end vertically to the matching outer roof endpoint.
- Second roof bands: (90,181), (120,181); and (87,177), (123,177). Work these as two separate paths.
- Third roof outer outline: (77,155), (86,160), (94,165), (116,165), (124,160), (132,155), (77,155). Add its lower lip from (77,152) to (132,152), then connect each end vertically to the matching outer roof endpoint.
- Third roof bands: (85,159), (125,159); and (81,154), (129,154). Work these separately.
- Lowest roof outer outline: (70,130), (81,135), (91,141), (119,141), (129,135), (137,130), (70,130). Add its lower lip from (70,127) to (137,127), then connect both ends vertically.
- Lowest roof bands: (79,134), (130,134); and (75,129), (134,129). Work these separately. All four roofs remain cream inside their burgundy outlines.
Pagoda Walls, Windows, and Stone Base
- Upper chamber: (94,196), (94,187), (115,187), (115,196). Add a central upright from (104,196) to (104,187).
- Upper windows: work vertical paths from (98,193) to (98,189), from (101,193) to (101,189), from (108,193) to (108,189), and from (111,193) to (111,189).
- Middle chamber: (90,175), (90,165), (120,165), (120,175). Add a central upright from (105,175) to (105,165), and a sill from (90,168) to (120,168).
- Middle windows: work vertical paths from (95,173) to (95,170), (98,173) to (98,170), (111,173) to (111,170), and (114,173) to (114,170).
- Lower chamber: (84,152), (84,141), (126,141), (126,152). Add a central upright from (105,152) to (105,141), and a sill from (84,144) to (126,144).
- Lower windows: work vertical paths from (91,150) to (91,146), (94,150) to (94,146), (97,150) to (97,146), (113,150) to (113,146), (116,150) to (116,146), and (119,150) to (119,146).
- Ground floor: (79,127), (79,113), (130,113), (130,127). Add uprights from (88,127) to (88,113), (103,127) to (103,113), and (121,127) to (121,113).
- Door outline: (98,113), (98,123), (108,123), (108,113). Add the door division from (103,123) to (103,113). Add left window bars from (83,124) to (83,117) and (86,124) to (86,117); add right window bars from (125,124) to (125,117) and (128,124) to (128,117).
- Stone base outline: (79,113), (72,104), (66,94), (61,87), (136,87), (134,100), (130,113), (79,113).
- Stone courses: (74,105), (132,105); (69,98), (134,98); and (65,92), (135,92). Work each separately.
- Stone joints: (83,113), (83,105); (96,113), (96,105); (114,113), (114,105); (123,113), (123,105); (78,105), (78,98); (91,105), (91,98); (107,105), (107,98); (124,105), (124,98); (73,98), (73,92); (86,98), (86,92); (99,98), (99,92); (117,98), (117,92); (130,98), (130,92); (79,92), (79,87); (94,92), (94,87); (110,92), (110,87); and (126,92), (126,87). Treat each pair as a separate short path.
Bridge and Winding Water
- Bridge upper rail: (8,106), (18,109), (32,109), (45,111), (56,110). Lower rail: (8,100), (20,103), (34,103), (46,105), (56,104).
- Bridge deck: (8,96), (22,98), (36,98), (48,100), (56,99). Add a second deck line from (8,93) through (22,95), (36,95), (48,97), to (56,96).
- Bridge posts: work (12,94) to (12,109), (22,96) to (22,110), (34,96) to (34,111), (46,98) to (46,113), and (54,97) to (54,111).
- Bridge supports: (17,95), (19,84), (25,80); and (45,97), (43,86), (37,81). Work separately.
- Left riverbank: (13,91), (8,84), (15,76), (27,72), (31,65), (22,59), (9,56), (7,48), (17,43), (34,40), (40,33), (33,26), (17,23), (7,18).
- Right riverbank: (65,91), (56,84), (53,77), (63,71), (73,65), (70,58), (55,53), (50,46), (57,39), (74,34), (79,26), (70,19), (53,14), (47,8).
- Upper water line: (11,68), (21,67), (25,63), (18,60), (10,60). Middle water line: (11,46), (22,45), (30,42). Lower water line: (9,13), (21,13), (31,16), (38,16). Work these as separate paths.
- Right rocky shore: (137,83), (128,80), (121,73), (111,72), (105,66), (100,60). Stop this path before the lower flower cluster.
Blossom Branches and Leaves
- Lower main branch: (137,8), (129,16), (123,26), (113,34), (105,43), (94,51). Add twigs through (123,26), (134,35), (136,44); through (113,34), (104,25), (95,21); and through (105,43), (115,51), (116,61).
- Lower leaves: embroider the closed paths (128,17), (119,16), (115,11), (123,11), (128,17); and (105,26), (97,30), (91,29), (96,24), (105,26).
- Upper-left branch: (5,249), (13,239), (20,230), (31,222), (43,216). Add twigs through (20,230), (17,220), (12,214); and through (31,222), (35,235), (43,242).
- Upper leaves: embroider the closed paths (33,229), (39,231), (44,228), (39,225), (33,229); and (13,240), (7,239), (5,233), (11,234), (13,240).
- Remove only the basting directly beneath the flower attachment areas before sewing. Leave the remaining grid until all placement is complete.
Flower Centers — Make Six
- Use burgundy. Round 1: 6 sc in MR. Work in a continuous spiral and mark the first st. You have 6 sc.
- Round 2: inc in every st. You have 12 sc.
- Round 3: repeat sc in the next st, inc in the next st, six times. You have 18 sc.
- Sl st in the next st and fasten off, leaving a 40 cm sewing tail. The sl st does not count as a new stitch. Keep each center flat and unstuffed.
Shaped Cream Petals — Make Thirty
- With cream, ch 5. Row 1: sc in the second ch from the hook and the next 3 ch; turn. You have 4 sc. Leave a 20 cm foundation tail for assembly.
- Row 2: ch 1, inc, sc in the next 2 st, inc; turn. You have 6 sc.
- Row 3: ch 1, inc, sc in the next 4 st, inc; turn. You have 8 sc.
- Rows 4–5: ch 1, sc in each st; turn. Each row has 8 sc.
- Row 6: ch 1, dec, sc in the next 4 st, dec; turn. You have 6 sc.
- Row 7: ch 1, dec, sc in the next 2 st, dec; turn. You have 4 sc.
- Row 8: ch 1, dec twice. You have 2 sc. Fasten off and weave in the finishing tail. Do not stuff or fold.
- With burgundy held single, backstitch around the visible perimeter of each petal, approximately one crochet stitch inside the edge. Use short stitches through the crochet fabric, following the shaped outline. Leave the narrow foundation edge plain because it will sit under the center.
Flower Assembly and Placement
- For each flower, arrange five petals with their foundation edges pointing toward a shared center. Space their axes approximately 72 degrees apart. Overlap adjacent foundation corners slightly, then sew those corners together using the cream foundation tails.
- Place one burgundy center over the five foundation edges. Sew through the outer 18 center stitches and the underlying petals. Each finished flower should measure approximately 10–11 cm across after gentle blocking.
- Attach the upper flowers with their centers at (15,235), (37,242), and (30,217). Attach the lower flowers with their centers at (92,52), (121,65), and (123,38). Measure positions from the original cream ground, excluding the border.
- Orient each flower so a gap between petals faces its branch. If a petal overlaps a nearby leaf or twig, allow that overlap as part of the layered design.
- Using cream yarn, sew around every petal perimeter just inside the burgundy outline, catching the blanket beneath. Secure the centers to the ground with three small stitches each. Keep all petals flat against the blanket.
- Add five cream straight stitches on each burgundy center, radiating from its middle toward the petal bases. Keep each stitch approximately 5 mm long. Secure all tails on the WS.
Burgundy Border
- Remove the remaining basting. With the RS facing, join burgundy at the top-left corner of the cream ground. Work joined rounds in the same direction throughout. Starting ch 1 and joining sl st never count as stitches.
- Round 1: ch 1, work 144 sc across the top edge, ch 2; work 252 sc down the right edge, one in each row end, ch 2; work 144 sc across the bottom foundation edge, ch 2; work 252 sc up the left edge, ch 2. Sl st to the first sc. You have 792 sc and four ch-2 corner spaces. Count each edge independently; the corner spaces separate the edges.
- Round 2: ch 1, sc in each sc around; in every ch-2 corner space work 2 sc, ch 2, 2 sc. Sl st to the first sc. You have 808 sc and four ch-2 spaces: 148 sc along each short side and 256 sc along each long side.
- Round 3: ch 1, sc in each sc around; in every ch-2 corner space work 2 sc, ch 2, 2 sc. Sl st to the first sc. You have 824 sc and four ch-2 spaces: 152 sc along each short side and 260 sc along each long side.
- Fasten off and weave in the ends through the burgundy stitches. If a long edge draws inward, undo that edge and rework with a slightly larger hook while keeping the specified stitch count.
Finishing
Spread the blanket out and check the tower uprights, roof tips, and flower edges. Ease any tight embroidery by gently redistributing the burgundy yarn along its path. Secure loose petal edges with small cream stitches so they will not catch during use.
Wash according to the yarn label, supporting the wet blanket as you lift it. Block flat with straight sides and square corners, letting the embroidery settle without stretching it. Let the blanket dry fully before folding; the finished throw should feel relaxed, with the landscape sitting smoothly on the cream ground.
Tips for Success
- Mark all four roof tips before embroidering the tower. Their increasing widths make the tiered silhouette readable from across a room.
- Work the landscape with the blanket resting on a table. Letting its weight hang from your needle hand can tighten the outlines.
- Complete the first pass of every roof before adding the second pass. This makes misplaced tiers easier to correct.
- Block the petals before flower assembly. Matching their lengths keeps each five-petal flower balanced.
- Photograph the laid-out flowers before sewing them down so you can restore the arrangement if a piece moves.
Common Mistakes to Avoid
- Counting from the border shifts the whole scene. All coordinates start at the bottom-left corner of the original cream rectangle.
- Pulling backstitches firmly makes the tower pucker. Leave each stitch resting on the fabric and ease any tight section before continuing.
- Using long diagonal embroidery stitches loses the stepped appearance and creates snagging loops. Follow the one-unit staircase method.
- Placing the narrow petal tip under the center reverses the intended shaping. The four-stitch foundation edge belongs beneath the burgundy disk.
- Skipping row ends in the border shortens the long sides. Mark every 12 row ends and check that each long edge contains exactly 252 sc in Round 1.
Ways to Customize This Pattern
- Use dark plum instead of burgundy while retaining the warm cream background and the same outline treatment.
- For a flatter throw, embroider five-petal outlines around the six listed flower centers instead of attaching crocheted flowers.
- Make a larger version with heavier yarn and a matching hook, keeping every stitch count and coordinate unchanged. Calculate dimensions from your new blocked gauge and allow extra yarn.
- Add a cream fabric backing after final blocking to conceal embroidery carries and tails. Cut it to the measured cream-ground size plus seam allowances, prewash it, hem it, and hand sew it just inside the burgundy border without stretching either layer.
Frequently asked questions
In this original interpretation, the landscape is counted embroidery over a single-crochet ground. The flowers are separate crochet pieces. This gives you a workable construction without claiming to reproduce the unseen stitch method in the photograph.
The backstitch paths and woven ends will be visible on the WS. Keep tails local and tidy, or add the optional fabric backing after washing and blocking.
Block the cream ground before marking it. Count every upright from the same bottom-left origin and follow the gaps between columns. A small natural lean is acceptable; do not stretch individual columns to force them straight.
Yes. Add rows above Row 252 so the existing scene keeps its proportions. Keep the flower coordinates unchanged, and add one border sc per extra row to each long side in Round 1. Each added row increases the total border stitch count by two in every round.
The finished Crimson Pagoda Landscape Crochet Blanket Pattern

