Crimson Rose Crochet Dining Set Pattern
Advanced
For experienced crocheters who enjoy complex shaping, fine detail, and ambitious construction
Weekend Project
A satisfying weekend make — start Friday, finish Sunday, enjoy forever.
Handmade Gift
A beautiful keepsake — free forever. Read online or print at home.
About This Crimson Rose Crochet Dining Set Pattern
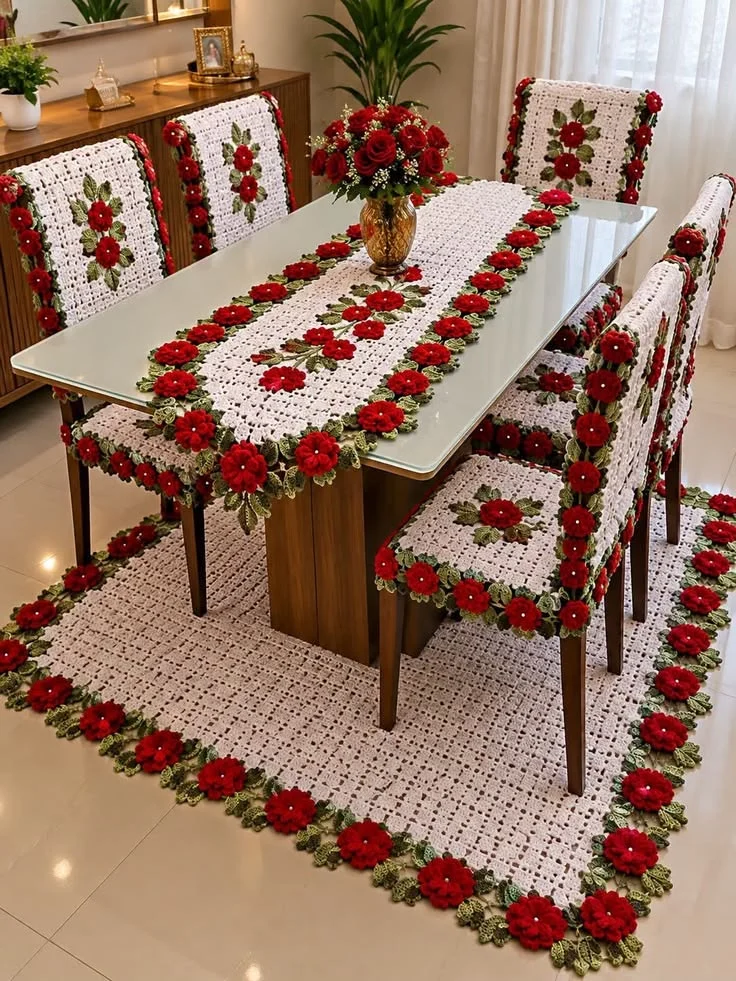
This rose crochet dining set pattern pairs ivory openwork with layered crimson roses and two shades of green foliage. Inspired by the photographed dining room, it includes a rectangular table runner, six removable chair-back sleeves, six tied seat mats and a matching decorative floor rug. Raised flowers frame the pale panels and form small floral arrangements down the runner and chair backs.
This is an advanced home-decor project with separately crocheted flower layers, shaped leaves, embroidered veins, fitted assembly and carefully spaced appliqué borders. Allow approximately 180–260 hours for the complete set. The panel stitches are repetitive, but the challenge lies in keeping large pieces square and attaching hundreds of motifs securely. The instructions create an original interpretation of the photograph rather than a reconstruction of its unseen stitch pattern.
Materials
- Ivory DK cotton Provisional allowance: 4,000 g for all panels, borders and ties
- Crimson DK cotton Provisional allowance: 1,200 g for 286 layered roses
- Dark olive DK cotton Provisional allowance: 800 g for 572 leaves and embroidered stems
- Light olive DK cotton Provisional allowance: 300 g for leaf veins and edging
- Crochet hooks 3.5 mm for panels; 3.0 mm for motifs, or sizes needed for gauge
- Matching sewing thread For discreet reinforcement of flower centers
- Tapestry needle, sewing needle, scissors and stitch markers Use removable markers to map every motif before sewing
- Blocking mats, rustproof pins and measuring tape Large panels may be blocked in overlapping sections
- Non-slip rug underlay Cut to the ivory rug footprint, approximately 92 × 142 cm
- Optional cotton lining fabric For chair sleeves and seat mats if your chairs have a finish that catches openwork
Yarn allowances are purchasing estimates, not measured consumption. Use cotton of approximately 120 m per 50 g throughout. Weigh your blocked panel swatch and one completed rose-and-leaf unit to calculate a closer allowance before buying the full quantity.
Abbreviations
chchainsl stslip stitchscsingle crochethdchalf double crochetdcdouble crochetMRmagic ringststitchinc2 sc in the same stitchRSright sideUS terminology. Numbers in parentheses give stitch counts. Turning ch-3 counts as one dc; turning ch-1 does not count as a stitch. A mesh row’s count includes both dc and chain spaces. Flowers use joined rounds; panels use turned rows.
Gauge, Dimensions and Construction
- Panel gauge after washing and blocking: 20 stitch positions and 10 rows = 10 × 10 cm in alternating solid and mesh rows with the 3.5 mm hook. One ch-1 space occupies one stitch position.
- Make a swatch: ch 33. Row 1: dc in fourth ch from hook and each remaining ch; the skipped chains count as the first dc (31). Row 2: ch 3, turn, skip the first dc, repeat [ch 1, skip next st, dc in next st] 15 times (16 dc and 15 spaces; 31 positions).
- Swatch Row 3: ch 3, turn, skip first dc; work 1 dc in every remaining dc and 1 dc in every ch-1 space (31 dc). Rows 4–20: repeat Row 2 on even-numbered rows and Row 3 on odd-numbered rows. Wash, dry flat and measure the central area without stretching the mesh.
- Motif check: one completed rose should measure approximately 5 cm across; each leaf approximately 4 cm long and 2 cm wide. Change the motif hook if necessary. Floral tips extend about 4 cm beyond the ivory perimeter.
- Ivory panels before edging: runner 30.5 × 121 cm; rug 90.5 × 141 cm; chair-back panels 30.5 × 45 cm; seat panels 40.5 × 41 cm. Edging adds approximately 1 cm to each side.
- Approximate overall sizes including projecting foliage: runner 40 × 131 cm; rug 100 × 151 cm; chair-back sleeve 32.5 × 46 cm before projecting flowers; seat mat 42.5 × 43 cm before projecting flowers. Chair sleeves remain open at the bottom.
- All panels are worked in ivory. Finish and block them before attaching crimson flowers, dark olive leaves and light olive accents. Nothing is stuffed, and no eyes or facial details are used.
Table Runner — Make One
- Foundation: with ivory and the 3.5 mm hook, ch 63.
- Row 1: dc in fourth ch from hook and each remaining ch (60 worked dc plus the turning chain; 61 dc total).
- Row 2: ch 3, turn, skip first dc; repeat [ch 1, skip next st, dc in next st] 30 times (31 dc and 30 spaces; 61 positions).
- Row 3: ch 3, turn, skip first dc; work 1 dc in each remaining dc and 1 dc in each ch-1 space (61 dc).
- Rows 4–121: repeat Row 2 on every even-numbered row and Row 3 on every odd-numbered row (61 positions per row). Fasten off after Row 121.
- Block the panel to 30.5 × 121 cm. Add the universal ivory edging below, using N = 61 stitches and R = 121 rows.
Decorative Floor Rug — Make One
- Foundation: with ivory and the 3.5 mm hook, ch 183.
- Row 1: dc in fourth ch from hook and each remaining ch (180 worked dc plus the turning chain; 181 dc total).
- Row 2: ch 3, turn, skip first dc; repeat [ch 1, skip next st, dc in next st] 90 times (91 dc and 90 spaces; 181 positions).
- Row 3: ch 3, turn, skip first dc; work 1 dc in each remaining dc and 1 dc in each ch-1 space (181 dc).
- Rows 4–141: repeat Row 2 on even-numbered rows and Row 3 on odd-numbered rows (181 positions per row). Fasten off.
- Block to 90.5 × 141 cm. Add the universal ivory edging with N = 181 and R = 141. This is a decorative mat sized to echo the reference; choose a larger size if chairs need to slide entirely within its footprint.
Chair-Back Panels — Make Twelve
- Make one front and one rear panel for each of six chairs. With ivory and the 3.5 mm hook, ch 63.
- Row 1: dc in fourth ch from hook and each remaining ch (61 dc including turning chain).
- Row 2: ch 3, turn, skip first dc; repeat [ch 1, skip next st, dc in next st] 30 times (31 dc and 30 spaces; 61 positions).
- Row 3: ch 3, turn, skip first dc; work 1 dc in each remaining dc and 1 dc in each ch-1 space (61 dc).
- Rows 4–45: repeat Row 2 on even-numbered rows and Row 3 on odd-numbered rows (61 positions per row). Fasten off.
- Block each panel to 30.5 × 45 cm. Add universal ivory edging to every panel with N = 61 and R = 45. Keep six panels undecorated for the sleeve backs.
Seat Panels — Make Six
- With ivory and the 3.5 mm hook, ch 83.
- Row 1: dc in fourth ch from hook and each remaining ch (81 dc including turning chain).
- Row 2: ch 3, turn, skip first dc; repeat [ch 1, skip next st, dc in next st] 40 times (41 dc and 40 spaces; 81 positions).
- Row 3: ch 3, turn, skip first dc; work 1 dc in each remaining dc and 1 dc in each ch-1 space (81 dc).
- Rows 4–41: repeat Row 2 on even-numbered rows and Row 3 on odd-numbered rows (81 positions per row). Fasten off.
- Block to 40.5 × 41 cm. Designate the foundation edge as the front. Add universal ivory edging with N = 81 and R = 41.
Universal Ivory Panel Edging
- With RS facing, join ivory at the first stitch of the top edge. For these counts, the four panel corner stitches belong to the top and bottom edges; side stitches are placed in row-end gaps between those corners.
- Round 1: ch 1; work 3 sc in the first top stitch, sc in the next N minus 2 stitches, 3 sc in the last top stitch; work 2 sc around each of the R row ends down the first side. Across the foundation edge, work 3 sc in its first stitch, sc in the next N minus 2 stitches and 3 sc in its last stitch. Work 2 sc around each of the R row ends up the second side. Join to first sc (2N + 4R + 8 sc).
- Round 1 totals: runner 614 sc; rug 934 sc; each chair-back panel 310 sc; each seat panel 334 sc. Mark the middle sc of each 3-sc corner.
- Round 2: ch 1; sc in each stitch around, working 3 sc in each marked corner stitch. Move the markers to the middle stitch of each new corner group. Join and fasten off (Round 1 total plus 8: runner 622; rug 942; chair back 318; seat 342).
- Check the border flat on a table. If the sides ripple, use a smaller hook for the edging while keeping the written counts. If they pull inward, use a larger hook. Reblock without stretching the corners into points.
Layered Crimson Roses — Make 286
- Each rose consists of three separate circular petal layers. Use crimson and the 3.0 mm hook throughout. Keep joining sl sts and starting chains out of the stitch counts.
- Small layer, Round 1: 6 sc in MR; join with sl st to first sc (6).
- Small layer, Round 2: ch 1; repeat [sl st in next st, work (hdc, 3 dc, hdc) in next st] 3 times. Join to the first sl st and fasten off, leaving a 25 cm tail (3 petals; 18 stitches around the edge).
- Middle layer, Round 1: 6 sc in MR; join (6).
- Middle layer, Round 2: ch 1; inc in each st; join (12).
- Middle layer, Round 3: ch 1; repeat [sl st in next st, work (hdc, 3 dc, hdc) in next st, sl st in next st] 4 times. Join to first sl st and fasten off (4 petals; 28 stitches around the edge).
- Large layer, Round 1: 6 sc in MR; join (6).
- Large layer, Round 2: ch 1; inc in each st; join (12).
- Large layer, Round 3: ch 1; repeat [sc in next st, inc in next st] 6 times; join (18).
- Large layer, Round 4: ch 1; repeat [sl st in next st, work (hdc, 3 dc, hdc) in next st, sl st in next st] 6 times. Join to first sl st and fasten off, leaving a 40 cm attachment tail (6 petals; 42 stitches around the edge).
- Stack the small layer over the middle and large layers with all RS facing outward. Rotate the layers so their petal tips are staggered. Using the small layer’s tail, sew through all three centers with six small radial stitches. Cup the three inner petals slightly inward and secure their bases to create a rose-like center. Do not pull the entire flower into a tight ball.
- Allocation: 36 roses for the runner, 64 for the rug, 19 for each chair-back front and 12 for each seat mat. Total: 36 + 64 + 114 + 72 = 286.
Shaped Leaves — Make 572
- With dark olive and the 3.0 mm hook, ch 9. Work around both sides of the chain to make a pointed oval.
- Round 1, first side: sc in second ch from hook, hdc in next ch, dc in each of next 3 ch, hdc in next ch, sc in next ch, 3 sc in last ch. This uses all 8 available foundation chains and makes 10 stitches.
- Round 1, second side: rotate the chain; work into the unused loops of the next 7 chains: sc in next ch, hdc in next ch, dc in each of next 3 ch, hdc in next ch, sc in last ch. Join to first sc (17 stitches total).
- Round 2: join light olive; ch 1, sl st loosely in each of the 17 stitches. Join and fasten off, leaving a 30 cm sewing tail. Keep this round loose enough that the leaf stays flat.
- With light olive, embroider a center vein from the narrow base to the middle of the 3-sc tip. Add two short diagonal vein stitches on each side. Carry the needle through the back of stitches so the reverse remains tidy.
- Make two leaves per rose. At assembly, overlap the leaf bases beneath the flower and angle their tips away from one another. Steam lightly only if the yarn label permits, or wet-block flat.
Runner Floral Layout and Embroidered Stems
- Lay the edged runner flat. On each long edge, mark 12 flower centers at equal intervals. Measure the usable edge length between the corner centers; divide it into 12 equal sections and mark each section midpoint. This places 24 roses without corner duplication.
- On each short edge, mark 3 centers at the midpoints of 3 equal sections. These 6 roses complete a 30-rose perimeter. Place their centers on the outer ivory edging so the outer petals and leaves project beyond it.
- Place the remaining 6 roses along the centerline, at approximately 15, 33, 51, 69, 87 and 105 cm from one short end of the unedged panel. Offset alternate flowers 2 cm to either side of the centerline.
- Attach two leaves under every rose, alternating the leaf direction along the border. For each rose, sew through the center and the large layer’s solid base at six points; leave petal tips free.
- With dark olive, embroider a gently curving stem between the six central roses using chain stitch. To make chain stitch, bring the needle up, take it down in the same hole, bring it up a short distance ahead inside the resulting loop and draw gently. Use 4–5 mm links and anchor the final loop with a small straight stitch.
- Keep flowers clear of the area where a vase will sit. If needed, shift the central roses outward before sewing while retaining the six-flower total.
Rug Floral Border
- Mark 20 equally spaced section midpoints along each long edge and 12 along each short edge. These are 64 separate positions; do not place an additional flower on any corner.
- Lay two leaves at each position, pointing diagonally outward along the border. Place the rose over their bases. Adjust the nearest motifs around each corner so the foliage visually turns the corner without stacking several thick flowers together.
- Sew leaf bases and center veins to the ivory edging. Sew each rose center and solid outer-layer base securely through the edging. Add three small concealed tacking stitches around the lower petal bases to keep the flowers from flipping upward.
- Set the rug over the non-slip underlay. Keep the raised floral border outside chair-leg paths and normal walking routes; check the actual furniture arrangement before using the set.
Chair-Back Floral Fronts and Sleeve Assembly
- Decorate one panel per chair. Along each vertical edge, mark 5 centers at the midpoints of 5 equal sections. Along the top and bottom edges, mark 3 centers at the midpoints of 3 equal sections. This gives 16 perimeter roses per front panel, with no corner roses.
- Place 3 more roses on the panel’s vertical centerline, approximately 11, 22.5 and 34 cm below the unedged top. Add two leaves under each rose. Embroider a dark olive stem connecting the three central flowers as described for the runner.
- Attach the 19 roses and 38 leaves before joining the sleeve, keeping sewing ends on the reverse. Leave the outermost edging loops accessible for the seam.
- Place one decorated front and one plain rear panel with wrong sides together. Align all four corner markers. Using ivory, whipstitch through the outer loops of matching edging stitches up one side, across the top and down the other side. Sew each shared top corner once. Leave both bottom edges unjoined.
- Slide the sleeve onto its chair. The seam should sit along the chair-back edges without pulling the floral front around to the rear. Remove it and adjust the fit before making the other five sleeves.
- For a different chair width, change each panel by an even number of stitches. At the stated gauge, adding 2 stitches adds 1 cm to each flat panel. Change height by adding or removing 2 rows for each 2 cm. Recalculate edging using the supplied formula and distribute the same motif counts by equal section midpoints.
Seat Flowers and Securing Ties
- On each seat panel, mark 5 equal-section midpoints along the front edge and 3 along each side edge. Keep the rear edge undecorated. These 11 roses form the hanging front-and-side trim.
- Attach the twelfth rose at the center of the front edge, approximately 5 cm inward from the edging. Give it two leaves and keep its petals low with concealed stitches through the petal bases. This positions the surface motif toward the seat front rather than directly beneath the sitter.
- Attach two leaves beneath each of the 11 border roses. Sew their bases securely to the edging, letting the flowers face outward and hang over the seat edge.
- Make four ties per seat, 24 ties total. With ivory, ch 71. Row 1: sl st in second ch from hook and each remaining ch (70 sl sts). Fasten off with a sewing tail. Each tie should measure approximately 30 cm; block to that length.
- Sew two ties to each rear corner, with their bases 1 cm apart. Stitch each base through at least three edging stitches, then reinforce with a second pass.
- Place the mat on the seat and tie each pair around the corresponding rear chair support. Use a flat bow positioned behind the chair. Ensure the mat stays still when sitting down and standing up; reposition the attachment points to suit your chair.
Finishing
Weave every yarn end through several solid stitches on the reverse, changing direction once before trimming. Reinforce the rose centers with matching sewing thread where repeated handling is likely. Check that no attachment thread spans an open mesh square where it could catch a finger or chair edge.
Wash according to the yarn label and dry the pieces flat. Shape the leaves with your fingers and lift the rose petals while they are slightly damp. Fit the chair sleeves and secure the seat mats only after they are completely dry. Place the rug on its underlay and arrange the furniture so its raised flowers remain clear of sliding chair legs. The finished set should feel coordinated, with the ivory panels lying flat and the crimson flowers forming a continuous visual border.
Tips for Success
- Make one complete rose with two leaves before beginning the panels. Its size determines how closely the floral borders resemble the reference.
- Place a marker in the top of each turning ch-3. Working the last dc into that marked stitch keeps the long ivory panels rectangular.
- Block corresponding chair panels together and compare their corner positions before sewing sleeves. Small differences become noticeable across six chairs.
- Pin the entire floral border before attaching any motifs. Equal-section midpoint placement spreads minor size differences without crowding the corners.
- Batch the flower layers in groups of ten, but assemble and count complete roses regularly so the small, middle and large layers remain balanced.
Common Mistakes to Avoid
- Adding an extra dc at the start of solid rows widens the panel. The ch-3 already counts as the first dc, so skip the stitch directly beneath it.
- Working 2 dc into every mesh space makes the next solid row too wide. Each ch-1 space receives exactly 1 dc.
- Pulling the light olive slip-stitch edging tight curls the leaves. Undo that round and use a looser tension or a slightly larger hook.
- Sewing only through the rose center lets the flower swivel and flip. Attach the large layer’s solid base at six points as well.
- Joining all four sleeve edges closes the opening. Sew only the two sides and top, leaving the bottom completely open.
Ways to Customize This Pattern
- Use burgundy for the large rose layers and crimson for the inner layers to deepen the flowers while keeping the photographed palette.
- Replace alternate dark olive leaves with medium moss green, keeping the light olive veins for the same variegated foliage effect.
- Lengthen the runner by 20 rows for approximately 20 cm of extra length. Keep its width at 61 positions and redistribute the border flowers, or add matching roses where larger gaps appear.
- For a larger rug, add stitches in multiples of 2 and rows in multiples of 2. Every 20 added stitches gives approximately 10 cm of width; every 10 added rows gives approximately 10 cm of length. Recalculate the edging and add flowers at roughly the original spacing.
- For smoother everyday seating, omit the single surface rose on each seat mat and retain all 11 hanging border roses. The six omitted flowers can decorate matching napkin bands made from narrow ivory strips.
Frequently asked questions
It includes an original coordinated runner, six chair-back sleeves, six seat mats and a decorative rug using the photograph’s ivory, crimson and olive palette. The photographed vase arrangement and furniture are not crochet components of this pattern.
Measure the widest part of the chair back, its thickness and the desired covered height. The standard sleeve is intended for a back about 28–29 cm wide, 43 cm high and up to 2 cm thick. Make one blocked sleeve and test it; thick, curved or flared backs may need individually shaped panels.
The supplied rug is approximately 100 × 151 cm including foliage, so it is primarily decorative. A practical dining rug needs enough additional width and length for every chair to remain on it when pulled out. Measure that footprint and enlarge the panel before beginning.
Yes. Sew the leaves and roses onto a separately crocheted ivory band, then hand-baste that band to the panel with closely spaced stitches. Remove the basting before washing separately. Avoid loose buttons or hooks on the rug and seat mats, where they can catch on clothing or furniture.
Weigh the blocked swatch and divide its weight by its area to estimate panel yarn. Multiply by the combined area of your chosen panels, then add approximately 15 percent for edging, ties and seams. Weigh one complete rose and its two leaves separately, multiply by the required motif counts and add approximately 10 percent for ends and variation.
The finished Crimson Rose Crochet Dining Set Pattern

