Advanced
For experienced crocheters who enjoy complex shaping, fine detail, and ambitious construction
Single-Day Project
A satisfying project you can complete in a single afternoon or evening.
Handmade Gift
A beautiful keepsake — free forever. Read online or print at home.
About This Crochet Flower Curtain Pattern
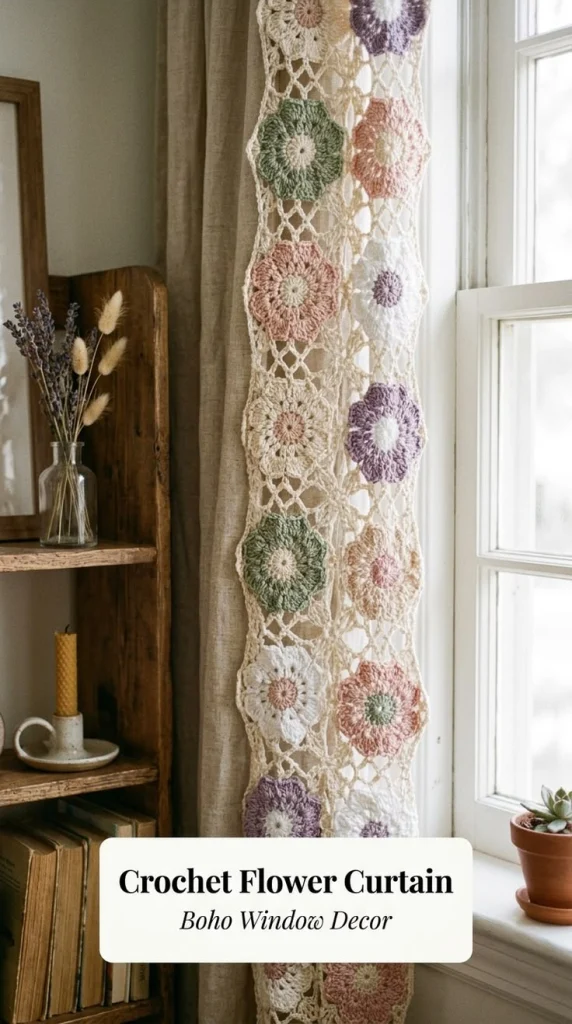
This crochet flower curtain pattern pairs large scalloped blossoms with an open cream lattice, inspired by the narrow floral panel in the reference photograph. Sage green, dusty blush, muted lavender, warm ivory, and soft white give the flowers their gentle vintage palette. The openwork lets daylight through while adding texture beside a plain linen curtain.
The panel contains sixteen separately worked flower squares, arranged in two columns and eight rows. Raised petal shells, anchored mesh, squared corners, carefully matched seams, and reinforced hanging tabs make this an advanced decorative crochet project. Allow approximately 25–35 hours, including blocking and assembly. It suits an experienced crocheter who enjoys motif construction and precise finishing.
Materials
- DK cotton yarn, cream Approximately 650 m for lattice, selected flowers, seams, edging, and tabs
- DK cotton yarn, dusty blush Approximately 120 m
- DK cotton yarn, sage green Approximately 100 m
- DK cotton yarn, muted lavender Approximately 100 m
- DK cotton yarn, soft white Approximately 120 m
- Crochet hook 4 mm, or size needed for gauge
- Tapestry needle and scissors For seams and securely woven ends
- Locking stitch markers At least 16 for corners and petal anchors
- Blocking board, rustproof pins, and measuring tape Large enough to block individual squares to 16 × 16 cm
- Curtain rod Up to approximately 15 mm diameter for the specified tabs
Abbreviations
chchaindcdouble crochetincwork 2 dc in the same stitchMRmagic ringscsingle crochetsl stslip stitchststitchtrtreble crochetUS terminology. Repeat instructions in parentheses the stated number of times. Beginning chains do not count as stitches unless explicitly stated. Join rounds to the first actual stitch. Work through both loops unless instructed otherwise.
Gauge, Size, and Construction
- Working gauge: approximately 18 dc and 9 rows over 10 × 10 cm in a separate flat dc swatch. The decisive gauge is one complete motif blocked to 16 × 16 cm.
- Each square finishes with 25 dc along each side and a ch-2 space at each corner. Measure the square from outer corner to outer corner after it has dried completely.
- Sixteen squares form a 32 × 128 cm panel before edging. The edging adds approximately 1 cm on each edge, giving a body approximately 34 × 130 cm. Folded hanging tabs extend approximately 4 cm above the body.
- The flower is worked in joined rounds, then surrounded by two rounds of cream mesh and a final stabilizing round. Flowers remain unstuffed, with no eyes or facial details.
- If your motif cannot reach 16 cm square with gentle blocking, change hook size and make another sample. Do not stretch the mesh enough to distort its stitches.
Flower Centers — Make 16
- Round 1: With the assigned center color, make an MR, ch 2, work 12 dc into the ring, and join with a sl st. Tighten the ring. Count: 12 dc.
- Round 2: Ch 2, inc in each stitch around, and join. Count: 24 dc. Fasten off the center color.
- Round 3: Join the assigned petal color in any stitch, ch 2, inc in each stitch around, and join. Count: 48 dc.
Scalloped Petals — Complete on Every Center
- Round 4: Ch 1, then repeat (sc in the next stitch, skip 1 stitch, work 5 tr in the next stitch, skip 1 stitch) 12 times. Join to the first sc. Count: 12 petals, comprising 60 tr and 12 sc; all 48 stitches of Round 3 are used.
- Fasten off. On each petal, identify the third tr of its five-tr group. These twelve middle stitches are the mesh attachment points.
- Number the petal tips 1–12 clockwise from any chosen tip, with the flower facing you. Mark tips 1, 4, 7, and 10 as future square corners. Keep all subsequent rounds on this same facing side.
Cream Lattice and Square Frame — Complete 16
- Round 5: Join cream in the middle tr of marked tip 1. Ch 1, work (sc, ch 5, sc) in that tip for the first corner. Ch 5, sc in tip 2; ch 5, sc in tip 3; ch 5. Work (sc, ch 5, sc) in tip 4, ch 5, sc in tip 5, ch 5, sc in tip 6, ch 5. Work (sc, ch 5, sc) in tip 7, ch 5, sc in tip 8, ch 5, sc in tip 9, ch 5. Work (sc, ch 5, sc) in tip 10, ch 5, sc in tip 11, ch 5, sc in tip 12, ch 5, and join to the first sc. Count: 16 sc and sixteen ch-5 spaces: four corner spaces and three side spaces between consecutive corners.
- Round 6: Sl st into the first corner space. Ch 2, work (3 dc, ch 2, 3 dc) in that space. Repeat (work 5 dc in each of the next three side spaces; work 3 dc, ch 2, 3 dc in the next corner space) three times. Work 5 dc in each of the final three side spaces and join to the first dc. Skip every sc from Round 5. Count: 84 dc and four ch-2 corners; 21 dc between corner spaces on each side.
- Round 7: Sl st to the next corner space. Ch 2, work (2 dc, ch 2, 2 dc) in that space. Repeat (dc in each of the next 21 dc; work 2 dc, ch 2, 2 dc in the next corner space) three times. Dc in each of the final 21 dc and join to the first dc. Count: 100 dc and four ch-2 corners; 25 dc per side. Fasten off.
- Weave in the center and petal ends now. Secure each magic ring tail through the center stitches in several directions so washing cannot loosen it.
Color Placement and Blocking
- Make these center/petal combinations: four cream/sage; three cream/blush; three white/lavender; two blush/cream; two lavender/white; one blush/white; and one sage/blush. All Round 5–7 frames are cream.
- Arrange the squares in two columns. Reading left then right, from top to bottom: Row 1 blush/cream and white/lavender; Row 2 cream/sage and cream/blush; Row 3 cream/blush and lavender/white; Row 4 blush/cream and white/lavender; Row 5 cream/sage and cream/sage; Row 6 blush/white and sage/blush; Row 7 white/lavender and lavender/white; Row 8 cream/sage and cream/blush.
- Soak the motifs according to the yarn label, squeeze without wringing, and roll in a towel. Pin each square to 16 × 16 cm, with straight sides and square corners. Open each petal gently with your fingers.
- Let every motif dry completely before joining. Check that all sixteen squares have matching side lengths and 25 outer dc per side.
Joining the Panel
- Lay the blocked squares in the specified arrangement, all with the same side facing upward. Use cream yarn and a tapestry needle for flat whipstitched seams.
- Join each horizontal pair first. Place the two corresponding edges together and sew through both loops of each matching dc pair, making exactly 25 paired stitch joins. At each end, secure the corresponding corner spaces together with one small stitch through the spaces. Keep the seam relaxed enough to open flat.
- Join the eight two-square rows from top to bottom. Each horizontal seam joins 50 dc pairs, 25 from each square. Secure the matching corner spaces at the central intersection and at both outer ends without gathering them.
- At four-square intersections, pass the needle once through all four meeting corner spaces to close the small central gap. Do not pull the corners into a knot. Weave seam tails along the reverse of the dc frame.
Continuous Cream Border
- Round 1: With the front facing, join cream in the upper-left outer corner space. Ch 1 and work 3 sc in that space, marking the middle sc as the corner. Continue clockwise: sc in each outer dc; at every seam along an outer edge, work 1 sc in each of the two meeting motif corner spaces. Work 3 sc in each of the remaining three panel corner spaces. Join to the first sc. Count: 500 sc over outer dc, 32 sc in seam corner spaces, and 12 sc at panel corners, totaling 544 sc.
- Check the side counts: each short edge has 52 sc between marked corner stitches; each long edge has 214 sc between marked corner stitches. These counts exclude the four marked corner stitches themselves.
- Round 2: Ch 1, sc in each stitch around, working 3 sc in each marked corner stitch. Move each marker to the middle stitch of its new corner group. Join and fasten off. Count: 552 sc, an increase of 8 stitches.
- The upper edge now contains 54 sc between its two marked corners. Use these 54 stitches to position the hanging tabs.
Reinforced Hanging Tabs — Make 4
- With cream, ch 7. Row 1: Sc in the second chain from the hook and in each remaining chain. Count: 6 sc.
- Rows 2–20: Ch 1, turn, sc in all 6 stitches. Count: 6 sc in each row. Fasten off with a 40 cm sewing tail. Aim for a strip approximately 3 cm wide × 8 cm long after blocking; if needed, adjust the tab hook size while retaining the stated counts.
- Number the 54 upper-edge stitches from left to right, excluding the marked corner stitches. Tab attachment ranges are stitches 1–6, 17–22, 33–38, and 49–54.
- Fold each strip in half crosswise, bringing its foundation edge and Row 20 edge together. Place those two ends against the back of the corresponding six-stitch attachment range. Sew both ends securely to that range, then add a second reinforcing line through the tab ends and the border round immediately below.
- Keep the folded loops approximately 4 cm high, with their openings unobstructed. Check your rod fits before securing the final sewing tails.
Finishing
Weave in all remaining tails along the solid frames and seams, changing direction at least twice. Lightly wet-block the assembled curtain into a rectangle, supporting the tabs separately so they remain even. The finished body should measure approximately 34 × 130 cm, with the tabs bringing the overall length to about 134 cm.
Let the curtain dry flat before threading it onto the rod. Hang it where the flower colors can catch the daylight, then check the lower edge after a day of hanging. Cotton may relax under its own weight; if the bottom becomes uneven, wash and block the whole panel again with particular attention to the seams.
Tips for Success
- Mark the third tr of every petal before beginning the mesh. A misplaced anchor makes the flower sit off-center inside its frame.
- Keep the ch-5 arches loose and consistent. Chains that are much tighter than your dc stitches pull the flower upward.
- Block all sixteen motifs against the same measured square. Matching stitch counts alone will not correct differences in chain tension.
- Lay joined seams flat after every row. Adjust a tight sewing thread immediately, before more motifs hide the problem.
- Use the same yarn fiber and weight for every color so the flowers and lattice respond similarly to washing.
Common Mistakes to Avoid
- Missing the final skipped stitch in a petal repeat shifts the scallops. Each repeat uses four base stitches; count twelve petals before adding the mesh.
- Confusing corner arches with side arches changes the square shape. Round 5 has sixteen arches, with every fourth arch serving as a corner.
- Working into the mesh anchor sc during Round 6 adds unwanted stitches. Work only into the ch-5 spaces to retain 84 dc.
- Omitting the two outer corner spaces at a seam shortens the border. Round 1 requires one sc in each of those spaces at every seam.
- Attaching tabs only to the final border round can stretch that edge. Add the specified second sewing line into the round below to spread the load.
Ways to Customize This Pattern
- Make a wider panel with three columns and the same eight rows. Before edging, it will measure approximately 48 × 128 cm; recalculate the border and distribute additional tabs evenly.
- Make a shorter two-column café curtain with four rows. Its motif panel will measure approximately 32 × 64 cm before edging and tabs.
- Use only cream centers and white petals for a subtle floral panel while keeping the same mesh and frame colors.
- Repeat sage and blush flowers in alternating rows for a more regular color rhythm, retaining all stitch counts.
- For a thicker rod, extend every tab by the same even number of rows. Measure the strip around the rod before sewing its ends to the curtain.
Frequently asked questions
The lattice is deliberately open, so the panel is decorative and filters light gently. Pair it with a separate linen curtain or blind when you need privacy.
Check that Round 3 has 48 dc and that all twelve petal tips are anchored. If those counts are correct, tight ch-5 arches are the likely cause. Rework the mesh with looser chains or a slightly larger hook, then block the sample again.
This pattern uses sewn seams so every flower square can be blocked and checked first. A join-as-you-go substitution needs a separately planned joining round; simply replacing dc with slip stitches will change the frame counts and tension.
Follow the yarn label, using a gentle wash and supporting the wet fabric fully. Reshape and dry flat. Avoid hanging it while wet, because the weight of the water can stretch the lattice and tabs.
The finished Crochet Flower Curtain Pattern

