Crochet Poinsettia Window Curtain Pattern
Advanced
For experienced crocheters who enjoy complex shaping, fine detail, and ambitious construction
Single-Day Project
A satisfying project you can complete in a single afternoon or evening.
Handmade Gift
A beautiful keepsake — free forever. Read online or print at home.
About This Crochet Poinsettia Window Curtain Pattern
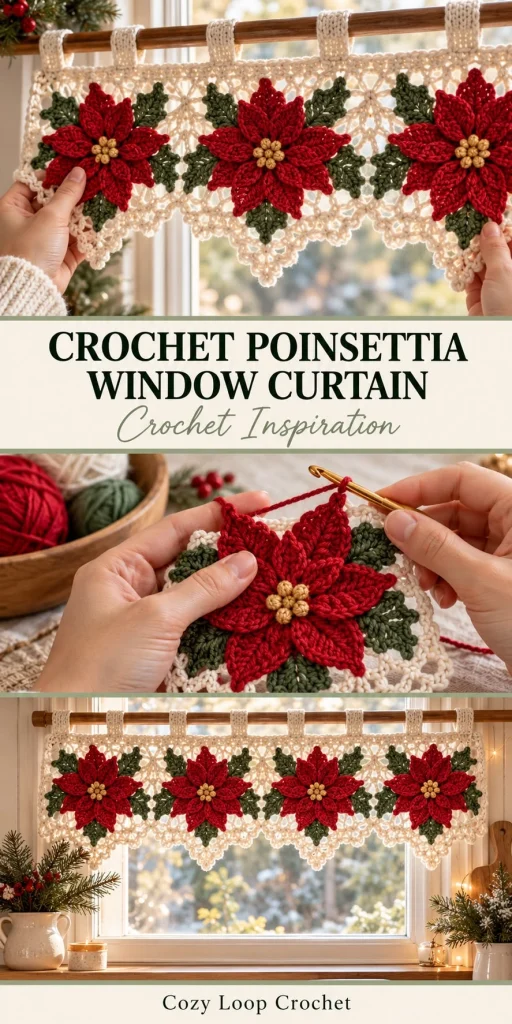
This crochet poinsettia curtain pattern creates a cream lace valance with layered crimson flowers, deep olive leaves, and small golden centers. Four joined panels form the background, and pointed lace drops give the lower edge the scalloped outline seen in the reference.
The flowers are made separately, then sewn onto the open mesh so their pointed petals sit above the lace. Allow approximately 24–32 hours for the crochet, careful placement, and finishing. This advanced project suits makers comfortable with counted mesh, working around foundation chains, raised embroidery, and assembling many small pieces.
Materials
- Sport-weight mercerized cotton, approximately 125 m per 50 g Cream: 300 g; crimson: 150 g; deep olive: 100 g; golden ochre: 25 g. These are estimated allowances.
- 3.0 mm crochet hook For lace panels, drops, edging, and tabs; adjust to gauge.
- 2.5 mm crochet hook For petals, leaves, and centers.
- Tapestry needle and fine embroidery needle For assembly and leaf veins.
- Stitch markers, ruler, blocking mat, and rustproof pins Mark every panel corner and the center of each flower.
- Curtain rod Approximately 2–2.5 cm diameter; measure its circumference before making tabs.
Abbreviations
chchainscsingle crochethdchalf double crochetdcdouble crochetsl stslip stitchst / stsstitch / stitchesRS / WSright side / wrong sideMRmagic ringsc2togsingle crochet two stitches togetherGauge, Dimensions, and Construction
- Use US crochet terminology. Work flat unless a round is specified. A turning ch 1 never counts as a stitch; ch 3 counts as a dc; ch 4 counts as a dc plus ch 1.
- Blocked mesh gauge with the larger hook: 10 mesh spaces and 10 mesh rows measure 10 × 10 cm. One mesh space consists of ch 1 between adjacent dc posts.
- For a swatch, ch 26. Sc in the second ch and each remaining ch: 25 sc. Turn. Ch 4, skip the next sc, dc in the next sc; repeat (ch 1, skip 1 sc, dc in the next sc) 11 times: 13 dc and 12 spaces. Work 11 more mesh rows using the panel instructions below. Wash and block; measure the central 10 spaces and 10 rows.
- Each blocked panel measures approximately 24 cm wide × 21 cm high, including its foundation row. Each pointed drop adds approximately 8 cm below its attachment seam; the scallops add approximately 2 cm. Blocking and joins give an overall target of approximately 98 × 33 cm, excluding tabs.
- Make four panels, four pointed drops, 24 large red petals, 24 small red petals, 20 olive leaves, 28 gold centers, and nine hanging tabs. Each flower uses six petals of each size, five leaves, and seven centers. This is an unstuffed curtain; no eyes or toy components are used.
Cream Mesh Panels — Make 4
- Foundation: with cream and the larger hook, ch 50.
- Row 1: sc in the second ch from the hook and each remaining ch. Turn. Count: 49 sc.
- Row 2: ch 4, skip the next sc, dc in the next sc; repeat (ch 1, skip 1 sc, dc in the next sc) 23 times. Turn. Count: 25 dc, including the turning chain, and 24 ch-1 spaces.
- Rows 3–21: ch 4, dc in the next dc; repeat (ch 1, dc in the next dc) 23 times, placing the final dc in the third chain of the previous turning chain. Turn after each row. Each row: 25 dc and 24 ch-1 spaces. There are 20 mesh rows in total.
- Fasten off. Mark the foundation edge as the lower edge and Row 21 as the upper edge. Block each panel to approximately 24 × 21 cm.
Pointed Cream Lace Drops — Make 4
- Foundation: with cream and the larger hook, ch 50.
- Row 1: sc in the second ch and each remaining ch. Turn. Count: 49 sc.
- Row 2: ch 6, skip 3 sc, dc in the next sc; repeat (ch 3, skip 3 sc, dc in the next sc) 11 times. Turn. Count: 13 dc and 12 ch-3 spaces. The first three chains of ch 6 count as the first dc.
- Row 3: sl st in the next three chains and in the next dc to reach the second post. Ch 6, dc in the next dc; repeat (ch 3, dc in the next dc) 9 times. Leave the final space and final dc unworked. Turn. Count: 11 dc and 10 spaces.
- Row 4: move to the second post with sl sts as in Row 3. Ch 6, dc in the next dc; repeat (ch 3, dc in the next dc) 7 times. Leave the final space and dc unworked. Turn. Count: 9 dc and 8 spaces.
- Row 5: move to the second post. Ch 6, dc in the next dc; repeat (ch 3, dc in the next dc) 5 times. Leave the final space and dc unworked. Turn. Count: 7 dc and 6 spaces.
- Row 6: move to the second post. Ch 6, dc in the next dc; repeat (ch 3, dc in the next dc) 3 times. Leave the final space and dc unworked. Turn. Count: 5 dc and 4 spaces.
- Row 7: move to the second post. Ch 6, dc in the next dc, ch 3, dc in the next dc. Leave the final space and dc unworked. Turn. Count: 3 dc and 2 spaces.
- Row 8: move to the second post. Ch 3 only; this represents the single remaining dc. Fasten off. Count: 1 dc and no spaces.
- Block each drop with a straight 24 cm top edge and its tip centered approximately 8 cm below that edge. Ease the stepped sides into even slopes without stretching the top wider.
Join the Background and Add the Lace Border
- Place the four blocked panels side by side with RS facing upward. With cream, whipstitch adjacent side edges together, matching all 21 rows. Take two small sewing passes around each pair of corresponding dc row ends and one through the foundation-row ends. Keep the seams flat.
- Center one drop under each panel. With RS facing upward, sew its 49-stitch foundation edge to the panel’s 49-stitch foundation edge, matching stitch for stitch. The seams form a continuous horizontal line across the curtain.
- Work a counted foundation border around the lower outline. Join cream at the lower-left corner of the rectangular background. For each drop, distribute 24 sc evenly down its left slope, work 3 sc around its single tip post, and distribute 24 sc up its right slope. Do not work across the attached top edge. Repeat for all four drops. Count: 204 sc. Turn.
- Scallop row: ch 1, sc in the first sc; repeat (skip 1 sc, 5 dc in the next sc, skip 1 sc, sc in the next sc) 50 times. Skip 1 sc, 5 dc in the next sc, sc in the last sc. Count: 51 shells of 5 dc and 52 separating or end sc, totaling 307 stitches. Fasten off.
- For the upper border, join cream at the upper-left corner. Ch 1, work 1 sc in each dc and 1 sc in each ch-1 space across all four panels: 196 sc. Work both adjoining corner posts at each panel seam. Turn.
- Upper border Row 2: ch 1, sc in each sc across. Count: 196 sc. Fasten off.
- Finish each outer vertical side separately. Join cream at its upper corner, work 1 sc into each of the two upper-border row ends, 2 sc around each of the 20 mesh-row ends, and 1 sc into the foundation-row end. Count: 43 sc per side. Fasten off.
Large Crimson Petals — Make 24
- Use crimson and the smaller hook. Ch 13, keeping the chain relaxed. Work around both sides of this chain.
- Round 1: sc in the second ch, hdc in the next ch, dc in the next 8 ch, hdc in the next ch, 3 sc in the final ch. Along the unused side of the chain, hdc in the next ch, dc in the next 8 ch, hdc in the next ch, sc in the final ch. Join with sl st to the first sc. Count: 25 stitches.
- Round 2: ch 1, sc in the first 12 stitches, (sc, ch 2, sc) in the next stitch, sc in the remaining 12 stitches. Join to the first sc. Count: 26 sc and one ch-2 tip space.
- Fasten off with a 30 cm sewing tail. The starting end is the petal base; the ch-2 space is the pointed tip. Pinch the base and sew its first and last border stitches together to give the petal a slight cup.
- Lightly block to approximately 7 cm long × 3 cm wide. Keep the cupped base raised.
Small Crimson Petals — Make 24
- With crimson and the smaller hook, ch 11.
- Round 1: sc in the second ch, hdc in the next ch, dc in the next 6 ch, hdc in the next ch, 3 sc in the final ch. Along the unused side, hdc in the next ch, dc in the next 6 ch, hdc in the next ch, sc in the final ch. Join to the first sc. Count: 21 stitches.
- Round 2: ch 1, sc in the first 10 stitches, (sc, ch 2, sc) in the next stitch, sc in the remaining 10 stitches. Join. Count: 22 sc and one ch-2 tip space.
- Fasten off with a 25 cm tail. Pinch and sew the base as for a large petal. Lightly block to approximately 5.5 × 2.5 cm.
Olive Leaves and Raised Veins — Make 20
- With olive and the smaller hook, work the foundation and both rounds of a large crimson petal. Round 1 has 25 stitches; Round 2 has 26 sc and one ch-2 tip space.
- Fasten off with a 35 cm tail. Leave the base flat rather than pinching it.
- Using a separate length of olive yarn, embroider a stem-stitch vein along the foundation chain from base to tip. Add three short diagonal branch veins on each side, passing the needle between stitches without pulling the leaf narrow.
- Block each leaf to approximately 7 × 3 cm. Keep all sewing tails on the WS.
Golden Flower Centers — Make 28
- Round 1: with golden ochre and the smaller hook, work 6 sc in MR. Pull the ring closed. Count: 6 sc. Work continuously.
- Round 2: sc in each stitch. Count: 6 sc.
- Round 3: sc2tog three times. Count: 3 sc. Fasten off with a 20 cm tail. Thread the tail through the front loops of the three remaining stitches and draw closed.
- Do not stuff. Roll gently between your fingers to form a small rounded seed-like center. Reserve seven for each flower.
Arrange and Attach the Four Poinsettias
- Lay the blocked background flat, RS upward. Mark a flower center halfway across each panel and approximately 11 cm below its upper mesh edge. Keep all four centers on one horizontal line.
- For each flower, arrange five olive leaves behind the planned petal ring: two pointing upward diagonally, two pointing outward and slightly down, and one pointing straight down. Place leaf bases approximately 1 cm from the flower center so the tips extend beyond the petals.
- Sew each leaf base around nearby mesh posts. Add one small anchoring stitch halfway along its central vein. Catch posts rather than pulling against a single chain.
- Arrange six large petals evenly around the center, approximately 60 degrees apart, with their bases meeting. Sew the bottom 1.5 cm of each petal to the mesh and its neighboring petal bases. Add a discreet tack near the midpoint of each large petal to support its weight.
- Place six small petals over the large petals, rotating the upper layer by approximately 30 degrees so each small tip falls between two large tips. Sew their bottom 1 cm securely through the lower petal layer and into the mesh. Leave their outer halves raised.
- Sew one golden center over the joined petal bases and six more around it. Pass each sewing tail through the petal layers and around a mesh post twice, then weave it through several stitches on the WS. Repeat for all four flowers.
Cream Hanging Tabs — Make 9
- With cream and the larger hook, ch 7.
- Row 1: sc in the second ch and each remaining ch. Turn. Count: 6 sc.
- Rows 2–32: ch 1, sc in each stitch, turn. Each row: 6 sc. Fasten off with a 40 cm sewing tail.
- At an expected sc gauge of approximately 24 stitches and 28 rows per 10 cm, each strip measures approximately 2.5 × 11.5 cm before folding. Check one strip around your rod. If necessary, add or remove rows on every tab so the finished loop clears the rod comfortably; retain the 6-stitch width.
- Place tab centers over upper-border stitches 4, 28, 52, 76, 98, 122, 146, 170, and 193, counting from the left with the RS facing you.
- Fold each strip in half with its short ends aligned. Overlap both ends approximately 1 cm onto the WS of the upper border. Sew each end independently across its full width, then sew the lower edge of the overlap. The finished loops rise approximately 5–6 cm above the curtain.
Finishing
Weave in the remaining tails on the back, keeping pale tails within the cream lace and colored tails inside matching appliqués. Check that every petal base, leaf, center, and tab has a firm attachment. The mesh should lie flat behind each flower without puckering.
Dampen the finished valance and pin the cream background to its final dimensions. Shape all four drops evenly, then lift the upper petals gently with your fingers. Let the curtain dry completely before threading the rod through the tabs. Hang it for a day and check that the top edge stays level; reinforce any tab seam that carries extra weight.
Tips for Success
- Mark the third chain of every mesh turning chain. The final dc belongs there, keeping all 24 spaces intact.
- Block the four drops together with their tips aligned. Matching their top widths matters more than stretching every lace opening identically.
- Arrange all four flowers before sewing any of them down. Compare the downward leaves and petal tips across the full curtain.
- Use several small attachment points around mesh posts to spread the weight of each flower and prevent sagging.
- Keep the upper petals lightly cupped. Pressing them flat removes the layered shape that gives the poinsettias their depth.
Common Mistakes to Avoid
- Adding a dc into a mesh space widens the panel. Work into dc posts only after Row 2 and recount 25 posts at each row end.
- Reducing only one side of a drop moves its point off center. Begin at the second post and leave the final post unworked on every decrease row.
- Placing the petal tip increase in the wrong stitch makes a crooked leaf shape. It belongs in the middle sc of the three-sc turn from Round 1.
- Pulling appliqué sewing tails tightly gathers the mesh. Relax the seam, spread the panel flat, and resew around several nearby posts.
- Using loose or unequal tabs makes the curtain hang unevenly. Measure the first completed loop on the rod, then match every remaining tab to it.
Ways to Customize This Pattern
- For a narrower window, use three complete panel-and-drop units, three flowers, and seven evenly spaced tabs. Keep the same gauge and motif construction.
- Make ivory poinsettias by replacing crimson with warm white while retaining the olive leaves and ochre centers.
- Use burgundy for the lower petal layer and crimson for the upper layer to give the flowers a subtle depth of color.
- For a shallower valance, finish each rectangular panel after Row 16. Keep its 25 dc and 24 spaces per mesh row, then attach the same pointed drop.
Frequently asked questions
Yes. Add or remove complete 24 cm panel-and-drop units, with one flower per unit. Keep the original gauge and place hanging tabs approximately 12 cm apart, including one near each outer corner.
Separate petals allow the two layers to overlap and cup naturally. They also let you support each flower at several points, which helps the open lace carry its weight evenly.
Follow the yarn label and check the red yarn for color bleeding first. Hand-wash gently, support the wet curtain when lifting it, and press out water in towels. Dry flat with the lace pinned into shape and lift the upper petals with your fingers.
Measure the rod circumference and allow approximately 2 cm extra clearance. Each unfolded tab needs that length plus approximately 2 cm for its two attachment overlaps. Adjust the tab row count before making all nine.
The finished Crochet Poinsettia Window Curtain Pattern

