Crochet Pumpkin Table Runner Pattern
Beginner Friendly
Perfect for those just starting their crochet journey, with clear instructions and simple techniques
Single-Day Project
A satisfying project you can complete in a single afternoon or evening.
Handmade Gift
A beautiful keepsake — free forever. Read online or print at home.
About This Crochet Pumpkin Table Runner Pattern
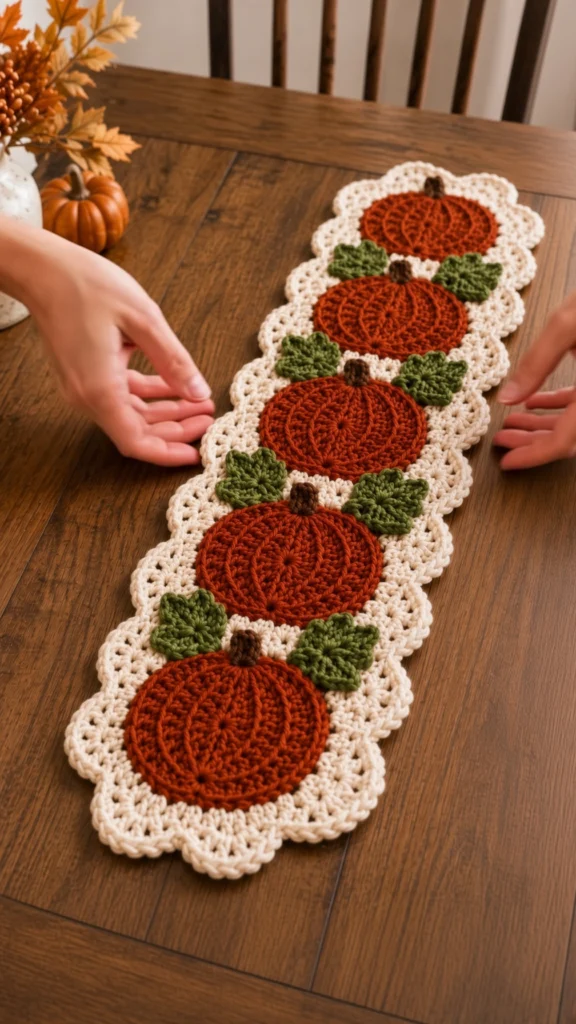
This crochet pumpkin table runner pattern builds a cream panel with a deep scalloped edge, then loads it with five ribbed pumpkin appliqués and ten maple leaves. The pumpkins are not flat circles with a stem stuck on top. Each one carries twelve front-post ridges that start on Round 3 and radiate all the way to the outer edge, so the disc reads as a real pumpkin from across the room instead of an orange coaster.
Plan on twelve to sixteen hours. The panel itself is the slow part and the least interesting, but it goes fast once you settle into the rhythm, and the appliqués are small enough to carry around. The border is where the piece earns its look: a round of chain-5 loops that opens the edge up, then a round of nine-stitch scallops worked into those loops. Neither round is difficult, but both depend on the panel having exactly the right number of stitches, so the counts matter more here than they usually do on a runner.
This suits someone who is comfortable with front-post stitches, working a flat circle without ruffling, and sewing appliqués down invisibly. If you have made a few amigurumi pieces or a textured blanket, you have the skills. Cotton is the right choice — it blocks crisply, washes well, and holds the scallops flat, which acrylic will not do as reliably on a piece this size.
Materials
- Worsted weight (#4) cotton yarn in cream approx. 300 g / 550 m
- Worsted weight (#4) cotton yarn in rust or burnt orange approx. 60 g
- Worsted weight (#4) cotton yarn in medium olive green approx. 50 g
- Worsted weight (#4) cotton yarn in dark brown approx. 10 g
- 4.0 mm (US G/6) crochet hook
- Tapestry needle for sewing appliqués and weaving ends
- Stitch markers at least 12, for marking the pumpkin ribs
- Rust-poppy sewing thread or matching yarn for invisible appliqué stitching
- Rustproof pins and a blocking mat large enough for an 83 cm panel
- Measuring tape
Abbreviations
chchainsl stslip stitchscsingle crochethdchalf double crochetdcdouble crochetFPdcfront post double crochetMRmagic ringst(s)stitch(es)sp(s)space(s)rnd(s)round(s)skskipreprepeatRSright sideGauge
14 hdc and 11 rows = 10 cm (4 in) with a 4.0 mm hook in worsted cotton. Gauge is not critical for the appliqués, but it does control the finished length of the runner and the size of the pumpkins relative to the panel width. Work a 10 cm swatch in hdc before starting the panel. If you are getting more than 14 stitches to 10 cm, your panel will come out narrow and the 11 cm pumpkins will crowd the edges; go up half a hook size.
Base Panel
- With cream, ch 27.
- Row 1: Hdc in 2nd ch from hook and in each ch across. (26 hdc)
- Rows 2-84: Ch 1 (does not count as a st), turn, hdc in each st across. (26 hdc)
- At the end of Row 84, do not fasten off and do not turn. Ch 1 and continue straight into the Scalloped Border. The panel should measure approximately 18.5 x 76 cm (7.25 x 30 in) before the border.
Scalloped Border
- Rnd 1 (foundation): Working in cream around the whole panel with RS facing, sc in each st across the short end (26 sc), working 3 sc in each of the two corner sts. Sc evenly down the long side at a rate of 1 sc per row end (84 sc). Sc across the second short end (26 sc), working 3 sc in each of the two corner sts. Sc up the second long side (84 sc). Sl st to the first sc. (228 sc)
- Stop and count Rnd 1 before going any further. The total must be exactly 228 or Rnd 2 will not close evenly.
- Rnd 2 (loop round): Ch 1, sc in same st, *ch 5, sk next 5 sts, sc in next st; rep from * around, ending with ch 5, sk last 5 sts, sl st to first sc. (38 ch-5 sps, 38 sc)
- Rnd 3 (scallop round): Sl st into the first ch-5 sp. Ch 1, (sc, hdc, 5 dc, hdc, sc) in same sp and in each ch-5 sp around. Sl st to the first sc. (38 scallops, 342 sts)
- Fasten off cream and weave in ends. Block the panel flat, pinning each scallop out into a smooth curve, and let it dry completely before attaching anything.
Pumpkin Appliqué (Make 5)
- Rnd 1: With rust, MR, ch 2 (does not count as a st), 12 dc into ring. Pull the ring closed. Sl st to first dc. (12 dc)
- Rnd 2: Ch 2, 2 dc in each st around. Sl st to first dc. (24 dc)
- Rnd 3: Ch 2, *FPdc around next st, 2 dc in next st; rep from * 11 more times (12 times total). Sl st to first st. (36 sts — 12 FPdc ribs now set)
- Place a stitch marker in each of the 12 FPdc before moving on.
- Rnd 4: Ch 2, *FPdc around next FPdc, dc in next st, 2 dc in next st; rep from * 11 more times. Sl st to first st. (48 sts)
- Rnd 5: Ch 2, *FPdc around next FPdc, dc in next 2 sts, 2 dc in next st; rep from * 11 more times. Sl st to first st. (60 sts)
- Rnd 6: Ch 2, *FPdc around next FPdc, dc in next 4 sts; rep from * 11 more times. Sl st to first st. (60 sts — no increases this round)
- Rnd 7 (edge round): Ch 1, sc in each st around, working the sc around the post of each FPdc so the ribs carry to the outer edge. Sl st to first sc. (60 sc)
- Fasten off, leaving a 60 cm tail for sewing. The disc should measure approximately 11 cm across and lie flat. Make 5 total.
Stems (Make 5)
- Row 1: With brown, ch 7. Sc in 2nd ch from hook and in each ch across. (6 sc)
- Rows 2-5: Ch 1, turn, sc in each st across. (6 sc)
- Fasten off, leaving a 30 cm tail.
- Fold the small rectangle in half lengthways with RS out and whipstitch the long edge closed with the tail, forming a short tube roughly 2 cm tall.
- Flatten one end slightly and set aside. Make 5 total.
Maple Leaves (Make 10)
- Rnd 1: With green, MR, ch 1, 12 sc into ring. Pull the ring closed. Sl st to first sc. (12 sc)
- The five points and the stem are worked out of alternating sc: points come out of sc 1, 3, 5, 7 and 9, and the stem out of sc 11. Sl st across each intervening sc to travel between them.
- Point 1 (short, from sc 1): Ch 6, sl st in 2nd ch from hook, sc in next ch, hdc in next 2 ch, sl st in last ch, sl st into the base sc. Sl st in next sc.
- Point 2 (medium, from sc 3): Ch 8, sl st in 2nd ch from hook, sc in next ch, hdc in next 2 ch, dc in next ch, hdc in next ch, sl st in last ch, sl st into the base sc. Sl st in next sc.
- Point 3 (long centre, from sc 5): Ch 10, sl st in 2nd ch from hook, sc in next ch, hdc in next 2 ch, dc in next 3 ch, hdc in next ch, sl st in last ch, sl st into the base sc. Sl st in next sc.
- Point 4 (medium, from sc 7): Work as Point 2. Sl st in next sc.
- Point 5 (short, from sc 9): Work as Point 1. Sl st in next sc.
- Stem (from sc 11): Ch 6, sl st in 2nd ch from hook and in each ch across (5 sl st), sl st into the base sc.
- Fasten off, leaving a 40 cm tail. The finished leaf measures roughly 7-8 cm from stem tip to the tip of the long centre point. Make 10 total.
Finishing
Block all twenty appliqué pieces before sewing. Pin each pumpkin disc flat without stretching the ribs out of shape, and pin each leaf with all five points pulled straight — leaf points curl badly if you skip this, and once they are sewn down you cannot fix them.
Lay the blocked panel out and find the centre point of its length. Pin the third pumpkin there, centred on the panel width. Measure 15 cm out from that centre in each direction and pin pumpkins two and four, then another 15 cm out for pumpkins one and five. That leaves about 8 cm of clear panel beyond the outer pumpkins at each end, which is what gives the runner its balanced look.
Sew a stem to each pumpkin before attaching the pumpkin to the panel. Position the stem at the top of the disc, sitting on the join between two ribs, and stitch it down around its flattened base so it stands up slightly rather than lying flat. Then sew each pumpkin to the panel with matching thread, taking small stitches through the sc edge round and catching only the top loops of the panel underneath. Keep your tension loose — pulling the thread tight will pucker the panel and the pucker will not block out.
Place two leaves per pumpkin last, one on each side, in the gap between neighbouring pumpkins. Angle each leaf so its long centre point aims outward toward the scalloped edge and tuck its stem end under the curve of the pumpkin disc. Sew down the stem and the base of each point, leaving the point tips free so they lift slightly off the fabric. Weave in all remaining ends and give the finished runner a light steam block to settle everything flat.
Tips for Success
- Count Rnd 1 of the border twice. The whole edge depends on hitting exactly 228 sc, and it is far easier to add or remove a stitch on the long sides now than to discover the problem 30 loops into Rnd 2.
- Mark all twelve FPdc on Rnd 3 of the first pumpkin and leave the markers in until the disc is finished. After the first pumpkin you will recognise the rib by sight and can drop the markers.
- Work the appliqués with slightly firmer tension than the panel. A dense disc sits crisply on the cream ground; a loose one goes floppy and shows the panel through the fabric.
- Block the panel completely before you pin a single appliqué. An unblocked hdc panel narrows and lengthens as it relaxes, and your carefully measured 15 cm spacing will drift.
- Sew with a length of matching sewing thread rather than yarn where the appliqué meets the panel. Yarn bulks up under the disc edge and creates a visible ridge.
Common Mistakes to Avoid
- Treating the ch-2 at the start of each pumpkin round as a stitch. It does not count here. If you sl st into it at the end of the round you will gain a stitch every round and the disc will ruffle by Rnd 5. Sl st into the first real stitch instead.
- Working the FPdc around the wrong post on Rnds 4-6. If the rib shifts even one stitch per round, all twelve ribs spiral and the pumpkin stops reading as ribbed. Check that each FPdc sits directly above the one below before continuing.
- Skipping the wrong number of stitches on border Rnd 2. Every repeat must skip exactly 5 sc. One miscount leaves you short at the join and forces a lopsided final loop that shows on the finished scallop.
- Pulling the sewing thread tight while attaching the pumpkins. Cotton has no give, so puckers set permanently. Lay the panel flat on the table while you sew and check for ripples every few stitches.
- Attaching the leaf points flat along their whole length. Sewing only the stem and the base of each point is what lets the tips lift and gives the leaves their dimension.
Ways to Customize This Pattern
- Work the pumpkins in three shades — rust, mustard and dusty sage — for a heirloom pumpkin patch look instead of a single orange.
- Make matching coasters by working a single pumpkin disc through Rnd 7, then adding border Rnds 2 and 3 directly around it. The 60 sc edge divides evenly by 6, so you get 10 scallops.
- Add curling vine tendrils: ch 25 in green, then work 3 sc in each ch back down the chain to force a spiral. Sew one loosely between each pair of pumpkins.
- Swap the maple leaves for oak leaves by working all five points at the short length (ch 6) and rounding the tips with 2 sc worked into the turning chain.
- Shorten the panel to 42 rows and place three pumpkins for a coffee table version, or extend to 126 rows and seven pumpkins for a long farmhouse table.
Frequently asked questions
Keep the panel 26 stitches wide and change the row count in multiples of 3. The border perimeter works out to 60 plus twice the row count, and Rnd 2 needs that total to divide evenly by 6, so any row count divisible by 3 will close correctly. Row 84 works, and so do 78, 81, 87 and 90. A row count like 85 will not.
Almost always the FPdc tension on Rnds 4 to 6. Front post stitches naturally pull shorter than the double crochets beside them, so if you work them tightly the ribs act like drawstrings and dome the disc. Try working the FPdc with a deliberately longer first yarn over. If the disc is already made, a firm wet block over a flat surface will usually settle it.
You can, but the scallops will not hold their shape as sharply and the panel will stretch under its own weight over a long table. Acrylic also will not block permanently, so any puckering from the appliqué stitching stays. If acrylic is what you have, go down to a 3.5 mm hook for a denser fabric and expect a slightly smaller finished runner.
The five points are worked as narrow chain spikes, which is correct — the leaf shape appears once the points are blocked open and fanned out evenly around the centre ring. If they still look sharp after blocking, your ring is probably too tight. Loosen the magic ring slightly so the 12 sc sit in a visible circle rather than a knot, which spreads the points apart at the base.
The finished Crochet Pumpkin Table Runner Pattern

