Cyclamen Bedspread and Shams Crochet Pattern
Beginner Friendly
Perfect for those just starting their crochet journey, with clear instructions and simple techniques
Single-Day Project
A satisfying project you can complete in a single afternoon or evening.
Handmade Gift
A beautiful keepsake — free forever. Read online or print at home.
About This Cyclamen Bedspread and Shams Crochet Pattern
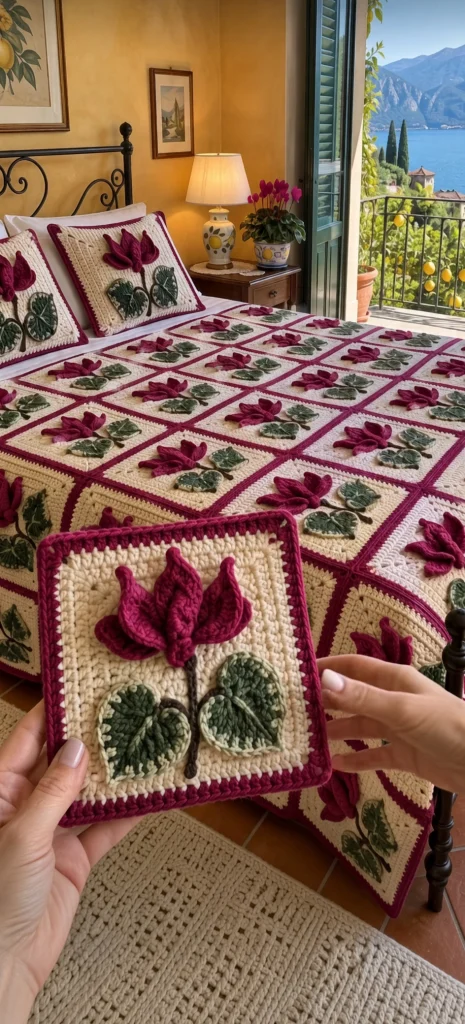
This cyclamen crochet bedspread is made from 90 cream squares, each holding a single cyclamen in bloom: five magenta petals swept upward above a small flower mouth, a dark stem, and two heart-shaped leaves in deep green with pale marbled edges. Every square is framed in magenta, and the frames meet to form a bold grid across the bed. Two square shams carry a larger version of the same flower.
What makes the design is the shape of the flower. Real cyclamen petals fold back and point up, away from the downturned center, so each petal here is made separately and sewn around a tiny cup, then folded upward and tacked to the square. The leaves are worked in a single round that pulls into a heart, then outlined in pale green with a few embroidered veins for the silvery marbling cyclamen leaves are known for.
The set takes about 170 to 200 hours. Each square is quick, solid double crochet, and the flower and leaves add about 45 minutes more. It suits a crocheter who is comfortable with working around a foundation chain, shaping small pieces and sewing them on neatly.
Materials
- Worsted weight acrylic-cotton blend, cream about 4,400 m (22 skeins of 100 g / 200 m)
- Worsted weight acrylic-cotton blend, magenta about 1,900 m (10 skeins)
- Worsted weight acrylic-cotton blend, dark green about 300 m (2 skeins)
- Worsted weight acrylic-cotton blend, pale sage green about 400 m (2 skeins)
- Worsted weight acrylic-cotton blend, dark brown about 100 m (1 skein)
- 5 mm crochet hook for the squares, joining and border
- 4 mm crochet hook for the petals and leaves
- Two 50 cm square cushion forms
- Tapestry needle, stitch markers and scissors
Abbreviations
MRmagic ringchchainscsingle crochethdchalf double crochetdcdouble crochettrtreble crochetdtrdouble treble crochetsl stslip stitchsurf sl stsurface slip stitch: yarn held behind the work, insert hook from the front, pull up a loop and draw it through the loop on hookrev screverse single crochet (crab stitch), worked left to rightBLOback loop onlyspspacest(s)stitch(es)rndroundreprepeatRS / WSright side / wrong sideCream Square (make 90)
- Rnd 1: with cream and 5 mm hook, MR, ch 3 (counts as dc here and throughout), 2 dc in ring, ch 2, *3 dc in ring, ch 2; rep from * 2 more times, join with sl st to top of ch 3. Pull the ring tight. (12 dc: 3 per side, and 4 corner ch-2 sps)
- Rnd 2: ch 3, dc in next 2 sts, (2 dc, ch 2, 2 dc) in corner sp, *dc in next 3 sts, (2 dc, ch 2, 2 dc) in corner sp; rep from * 2 more times, join. (28 dc: 7 per side)
- Rnd 3: ch 3, dc in each st to the next corner, (2 dc, ch 2, 2 dc) in corner sp, *dc in each st to next corner, (2 dc, ch 2, 2 dc) in corner sp; rep from * 2 more times, dc in each remaining st, join. (44 dc: 11 per side)
- Rnds 4-9: rep Rnd 3, adding 4 sts per side each rnd. (Rnd 4: 60 dc, Rnd 5: 76, Rnd 6: 92, Rnd 7: 108, Rnd 8: 124, Rnd 9: 140 dc, 35 per side) Fasten off cream.
- Rnd 10: join magenta in a corner sp, ch 1, (sc, ch 2, sc) in same sp, *sc in each st to next corner, (sc, ch 2, sc) in corner sp; rep from * 2 more times, sc in each remaining st, join. (148 sc: 37 per side)
- Rnd 11: sl st in corner sp, ch 1, (sc, ch 2, sc) in same sp, *sc in each st to next corner, (sc, ch 2, sc) in corner sp; rep from * 2 more times, sc in each remaining st, join. Fasten off. (156 sc: 39 per side)
- The square measures about 25 cm. Block it flat before adding the flower.
Cyclamen Petals (make 450)
- You need 5 petals for each square.
- With magenta and 4 mm hook, ch 10.
- Side 1: sl st in 2nd ch from hook, sc in next ch, hdc in next ch, dc in next 2 ch, tr in next 2 ch, dc in next ch, 3 hdc in last ch. (8 sts plus 3 hdc at the base)
- Side 2: working in the free loops on the other side of the chain, dc in next ch, tr in next 2 ch, dc in next 2 ch, hdc in next ch, sc in next ch, sl st in next ch. (8 sts)
- Tip: ch 2, sl st in the first sl st of Side 1. Fasten off leaving a 25 cm tail. The petal is about 5 cm long, widest near its base.
Flower Mouth (make 90)
- Rnd 1: with magenta and 4 mm hook, MR, ch 1, 5 sc in ring, join with sl st to first sc. Pull the ring tight. (5 sts)
- Rnd 2: ch 1, sc in each st around, join. (5 sts) Fasten off leaving a 25 cm tail.
- This makes a tiny cup about 1.5 cm across. The ring end is the bottom of the flower.
Assembling the Flower
- Sew the base of 5 petals (the 3-hdc end) around the open rim of the cup, one petal at each st of Rnd 2.
- Hold the cup with the ring end pointing down, then fold all 5 petals upward so they rise above the cup like a crown. This is the cyclamen’s swept-back shape.
- With a petal tail, stitch through the bases of all 5 petals once more to hold the fold in place.
Heart Leaves (make 180)
- Rnd 1: with dark green and 4 mm hook, MR, ch 3 (does not count as a st), 4 tr, 4 dc, ch 2, dtr, ch 2, 4 dc, 4 tr, ch 3, sl st in ring. Pull the ring tight so the top dips into a notch. Fasten off dark green. (17 sts, 2 ch-2 sps)
- Rnd 2: join pale green with sl st in the ring at the notch, ch 1, 2 sc in ch-3 sp, 2 sc in each of next 4 tr, sc in each of next 4 dc, 2 sc in ch-2 sp, (sc, ch 2, sc) in dtr, 2 sc in ch-2 sp, sc in each of next 4 dc, 2 sc in each of next 4 tr, 2 sc in ch-3 sp, sl st in ring. Fasten off leaving a 30 cm tail. (34 sc and 1 ch-2 tip)
- Marbling: with pale green, embroider a center vein from the notch to the tip with backstitch, then 2 short straight stitches on each side, angled out like the veins of a leaf.
- Each leaf is about 6 cm across.
Stem and Placement
- Decide which side of the square is the top and keep the same orientation for all 90 squares.
- Stem: with dark brown, RS facing, start 3 cm above the center of the square. Work surf sl st straight down to about 3 cm above the magenta border, about 10 cm in all.
- Leaf stalks: starting 4 cm above the bottom of the stem, work a line of surf sl st about 2 cm long going down and to the left, then another going down and to the right.
- Sew a leaf at the end of each stalk, notch toward the stalk and tip pointing out and down. Sew around the whole pale green edge with small stitches.
- Sew the flower mouth to the top of the stem, ring end down. Then fan the petals upward toward the top of the square: two in the center pointing almost straight up, and the others angled out to each side.
- Tack each petal to the square at its widest point, leaving the tip free so it lifts slightly.
Joining the Squares
- Lay out all 90 squares, 9 across and 10 long, with every flower facing the head of the bed.
- Join method: place two squares side by side, RS up. With magenta and 5 mm hook, sl st through the BLO of the matching sts of both squares, starting in the corner ch-2 sps. (41 sl st per side, including both corners)
- Join the squares into rows of 9, then join the rows along their long edges.
- Where four corners meet, work through all four corner sps so no gap is left.
- The joined bedspread measures about 225 x 250 cm.
Border
- Rnd 1: with magenta, RS facing, join in a corner sp. Work 3 sc in each bedspread corner sp, sc in each st along the edge of every square, and 1 sc in each point where two squares meet. Join. (399 sc along each long side, 359 along each short side and 12 at the corners: 1,528 sts)
- Rnd 2: ch 1, sc in each st around, working 3 sc in the center st of each corner. Join. (1,536 sts)
- Rnd 3: ch 1, rev sc in each st around. Join and fasten off. (1,536 sts)
Sham Fronts and Backs (make 4 large squares)
- Rnds 1-9: work as the Cream Square, but don’t fasten off after Rnd 9. (140 dc)
- Rnds 10-19: rep Rnd 3 of the Cream Square, adding 4 sts per side each rnd. (Rnd 10: 156 dc, and so on to Rnd 19: 300 dc, 75 per side) Fasten off cream.
- Rnd 20: with magenta, work as Rnd 10 of the Cream Square. (308 sc: 77 per side)
- Rnd 21: work as Rnd 11 of the Cream Square. Fasten off. (316 sc: 79 per side)
- Each large square measures about 48 cm. Make 2 fronts and 2 backs.
Large Cyclamen and Leaves (for the shams)
- Large petals (make 10): with magenta, ch 14. Side 1: sl st in 2nd ch from hook, sc in next ch, hdc in next ch, dc in next 3 ch, tr in next 4 ch, dc in next 2 ch, 3 hdc in last ch. Side 2: in the free loops, dc in next 2 ch, tr in next 4 ch, dc in next 3 ch, hdc in next ch, sc in next ch, sl st in next ch. Tip: ch 2, sl st in first sl st. (12 sts per side, about 7 cm long)
- Large mouth (make 2): work as the Flower Mouth, then add Rnd 3: ch 1, sc in each st around, join. (5 sts)
- Large leaves (make 4): work Rnd 1 of the Heart Leaf. Then work Rnd 2 in dark green instead of pale green. (34 sc and 1 ch-2 tip)
- Rnd 3: join pale green at the notch, ch 1, sc in each sc around, (sc, ch 2, sc) in the tip ch-2 sp, sl st at the notch. Fasten off. (36 sc and 1 ch-2 tip) Embroider the veins as for the small leaves.
- Assemble the flower and place the stem, leaves and flower on each front as for the bedspread squares, doubling all the measurements.
Sham Assembly
- Hold a front and a back WS together, with the front facing you and the corners matched.
- Rnd 1: with magenta, join in a corner sp through both layers. Working through both layers, 3 sc in each corner sp and sc in each st along the sides. Insert the cushion form before closing the last side. Join. (328 sts: 82 per side including corners)
- Rnd 2: ch 1, rev sc in each st around. Join and fasten off. (328 sts)
- Rep with the second sham.
Finishing
Weave in all ends on the WS. Hide the green and brown tails under the leaves and stem, and run the magenta tails under the flower, so nothing dark shows through the cream.
Lay the bedspread flat and steam it lightly, holding the iron well above the flowers so you don’t flatten the petals. Straighten the magenta grid, and lift each petal tip gently with your fingers so it stands slightly away from the square. Steam the shams the same way.
Tips for Success
- Make the petals in batches of 50 while you work the squares. With 450 petals in all, it helps to have them ready as you go.
- Use the smaller hook for petals and leaves. A firmer fabric holds the swept-back petal shape and keeps the hearts crisp.
- Pull the magic ring of each leaf tight before the pale green round. A loose ring leaves no notch and the leaf looks round instead of heart-shaped.
- Do all the stems before sewing any flowers. The stem lines guide where everything else goes and keep every square consistent.
- Lay out all 90 squares with the flowers facing the same way before joining. One upside-down flower is very noticeable on the finished bed.
Common Mistakes to Avoid
- Sewing the petals flat. If the petals lie open like a daisy, the flower stops looking like a cyclamen. Fold them all upward from the cup before tacking them down.
- Corners that ripple. If the square waves, a corner got 3 dc instead of 2 on one side. Check the count per side at the end of each rnd.
- Leaves without a heart shape. Starting Rnd 1 with a ch 3 that counts as a st throws off the symmetry. The ch 3 at each end doesn’t count, and both sides must have 4 tr and 4 dc.
- Puckered stems. Pulling the surf sl st tight draws the square in. Keep each stitch the same length as the dc beneath it.
- Gaps at the four-corner points. Work the join through all four corner sps where squares meet, or small holes appear in the grid.
Ways to Customize This Pattern
- Make the flowers in a mix of magenta, soft pink and white for a bed of mixed cyclamen.
- Change the size: each square adds 25 cm. A king bed needs about 11 by 11 squares, a throw 5 by 6.
- Add a second, smaller flower on a curved stem in some squares for a more natural, varied look.
- Swap the magenta frame for deep green to make the flowers stand out more against the grid.
- Make a single large square as a cushion or wall hanging, using the sham instructions.
Frequently asked questions
Separate petals let you sew them around the cup and then fold them upward, which creates the cyclamen’s swept-back shape. Petals worked directly onto a center would fan out flat like a daisy.
They are tacked at their widest point, so they hold their shape well. If they flatten, steam them lightly and lift the tips with your fingers while they are still warm.
Yes. Work Rnd 11 of each new square and join it to its neighbors with a sl st in each matching st. Add the flower, leaves and stem before joining, because the back of the square is much harder to reach afterward.
Wash it on a gentle cold cycle inside a large laundry bag, or by hand, and dry it flat. Wash a test square first, since magenta can bleed onto cream on the first wash.
The finished Cyclamen Bedspread and Shams Crochet Pattern

