Daffodil Granny Square Blanket Crochet Pattern
Beginner Friendly
Perfect for those just starting their crochet journey, with clear instructions and simple techniques
Single-Day Project
A satisfying project you can complete in a single afternoon or evening.
Handmade Gift
A beautiful keepsake — free forever. Read online or print at home.
About This Daffodil Granny Square Blanket Crochet Pattern
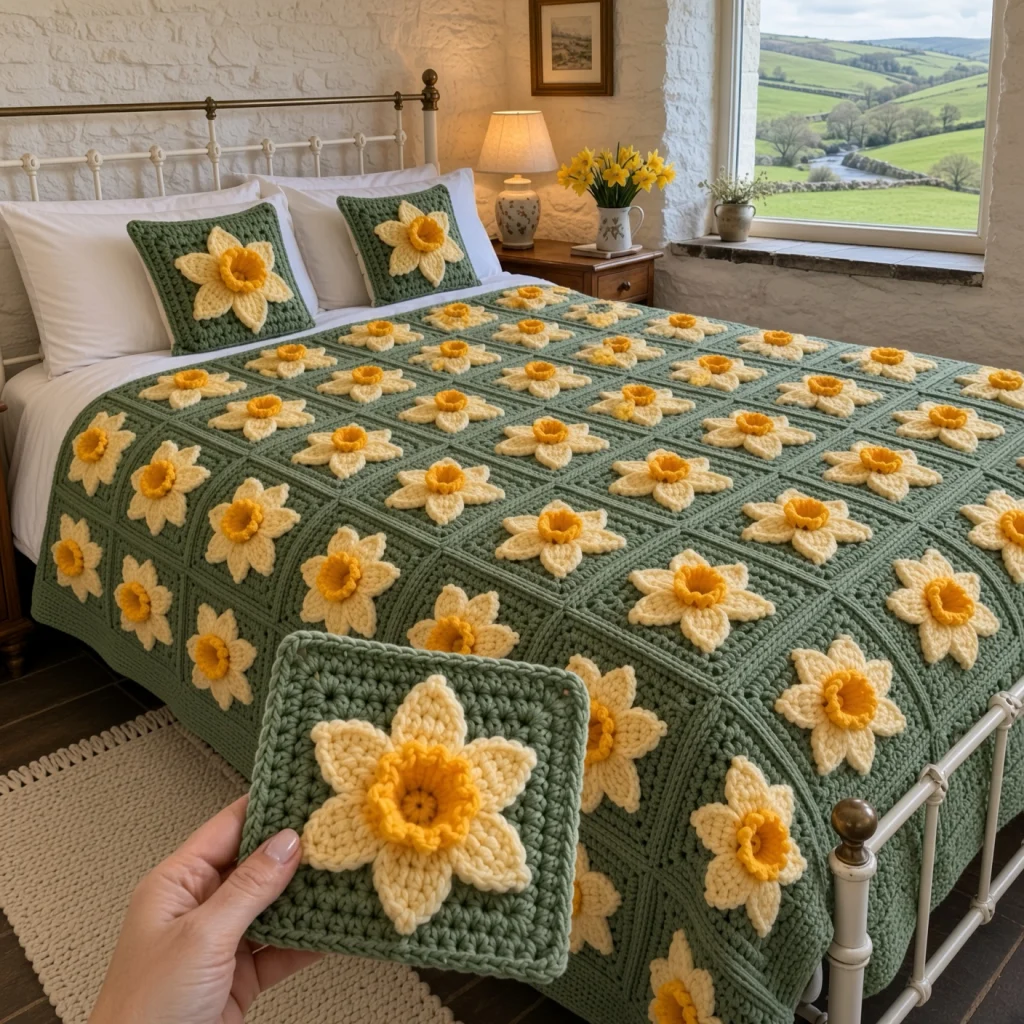
This daffodil granny square pattern gives you a raised spring flower on a sage-green square. The flower has six pointed cream petals and a real yellow trumpet. The trumpet is a small cup worked in rounds and finished with a ruffled lip, so it stands up off the square the way a daffodil does. The cup has a deep gold center. The flower is made separately and sewn on. The green square ends in two rounds of classic granny clusters, so the blanket keeps that familiar texture between the flowers.
Each square takes about 1 hour 15 minutes once you know the steps. The flower is the slower part. A throw of 30 squares is a good spring project. A queen bedspread of 132 squares is a long-term make you can pick up one square at a time. The pattern includes matching pillow covers, and they are a good way to try the design before committing to a full blanket.
This is an advanced pattern. It uses three colors, front-loop and back-loop work, petals shaped in short rows, a solid square that turns into granny clusters, a raised joining seam, and a crab-stitch border. If you are comfortable with granny squares and want to try 3D flowers, this is a good next step.
Materials
- Worsted / aran yarn in sage green approx. 4.4 kg (44 x 100 g) for a queen bedspread; 1.1 kg for a 30-square throw
- Worsted / aran yarn in cream approx. 1.1 kg for queen; 250 g for throw
- Worsted / aran yarn in bright yellow approx. 550 g for queen; 130 g for throw
- Worsted / aran yarn in deep gold approx. 150 g for queen; 40 g for throw
- 5 mm crochet hook
- 6 mm crochet hook for the larger pillow flowers only
- Tapestry needle
- Stitch markers at least 4
- Blocking mats and rust-proof pins
- Two 40 x 40 cm pillow forms optional, for matching cushions
Abbreviations
MRmagic ringchchainsl stslip stitchscsingle crochethdchalf double crochetdcdouble crochetsc2togsingle crochet 2 together (decrease)sc3togsingle crochet 3 togetherrev screverse single crochet (crab stitch)BLOback loop onlyFLOfront loop onlyspspacest(s)stitch(es)skskipRS / WSright side / wrong sideFlower Trumpet (deep gold and bright yellow)
- R1 (gold): 6 sc in MR (6). Do not join; work in a continuous spiral and mark the first st of each round.
- R2 (gold): 2 sc in each st around (12). Change to bright yellow on the last yarn-over.
- R3 (yellow): working in BLO, sc in each st around (12). This leaves the 12 front loops of R2 free for the petals, and it turns the work upward to start the cup.
- R4: sc in each st around (12).
- R5: (sc, 2 sc in next st) 6 times (18).
- R6: ch 2 (does not count), 2 hdc in each st around (36). The edge will start to ruffle.
- R7: sl st loosely in each st around (36). Fasten off and weave in the yellow tail. Weave the gold starting tail to the inside and pull it so the MR closes tightly.
Petal Base (cream)
- Hold the trumpet with the cup facing you. Join cream into any free front loop of R2, the gold round.
- R1: ch 1, (sc in next free front loop, 2 sc in next free front loop) 6 times, join with sl st to first sc (18). Do not fasten off.
Petals (cream, worked in rows directly from the base)
- Row 1: ch 1, sc in each of the first 3 base sts (3), turn.
- Row 2: ch 1, 2 sc in first st, sc in next st, 2 sc in last st (5), turn.
- Row 3: ch 1, 2 sc in first st, sc in next 3 sts, 2 sc in last st (7), turn.
- Rows 4–5: ch 1, sc in each st across (7), turn.
- Row 6: ch 1, sc2tog, sc in next 3 sts, sc2tog (5), turn.
- Row 7: ch 1, sc2tog, sc in next st, sc2tog (3), turn.
- Row 8: ch 1, sc3tog (1). For the pointed tip, ch 2 and sl st in the 2nd ch from the hook.
- Work about 8 sl sts evenly down the side of the petal to reach the base round. Your hook should now sit at the end of the 3 base sts this petal used.
- Repeat Rows 1–8 and the slip-stitch descent over the next 3 base sts, 5 more times (6 petals total, 18 base sts used).
- After the 6th petal, sl st into the first st of the base round. Fasten off and leave a 40 cm cream tail for sewing the flower to the square.
Stamen Embroidery (deep gold)
- Thread 30 cm of gold yarn onto the tapestry needle.
- Bring the needle up through the center of the gold disc inside the trumpet. Work 3 French knots close together, wrapping the yarn twice around the needle for each knot.
- Take the tail to the back of the flower and tie it securely to the cream tail.
Green Square
- R1: MR, ch 3 (counts as dc throughout), 11 dc in ring, join with sl st to top of ch-3 (12).
- R2: ch 3, dc in same st, 2 dc in each st around, join (24).
- R3: ch 3, 2 dc in next st, (dc in next st, 2 dc in next st) 11 times, join (36).
- R4 (squaring): ch 3, (dc, ch 2, 2 dc) in same st [first corner], *dc in next 2 sts, hdc in next 4 sts, dc in next 2 sts, (2 dc, ch 2, 2 dc) in next st* 3 times, dc in next 2 sts, hdc in next 4 sts, dc in next 2 sts, join (48 sts: 12 per side between ch-2 corners).
- R5: sl st in next dc and into corner ch-2 sp, ch 3, (dc, ch 2, 2 dc) in same sp, *dc in each of next 12 sts, (2 dc, ch 2, 2 dc) in next ch-2 sp* 3 times, dc in each of next 12 sts, join (64: 16 per side).
- R6: sl st in next dc and into corner sp, ch 3, (dc, ch 2, 2 dc) in same sp, *dc in each of next 16 sts, (2 dc, ch 2, 2 dc) in next ch-2 sp* 3 times, dc in each of next 16 sts, join (80: 20 per side).
- R7 (first granny round): sl st in next dc and into corner sp, ch 3, (2 dc, ch 2, 3 dc) in same sp, *[sk 2 sts, 3 dc in next st] 6 times, sk 2 sts, (3 dc, ch 2, 3 dc) in next ch-2 sp* 3 times, [sk 2 sts, 3 dc in next st] 6 times, sk 2 sts, join (8 groups of 3 dc per side, counting the corner halves).
- R8: sl st in next 2 dc and into corner sp, ch 3, (2 dc, ch 2, 3 dc) in same sp, *3 dc in each of the next 7 spaces between groups, (3 dc, ch 2, 3 dc) in next corner sp* 3 times, 3 dc in each of the next 7 spaces, join (9 groups and 27 dc per side). Fasten off and weave in the ends.
- Make 132 squares for a queen bedspread (11 wide x 12 long) or 30 for a throw (5 x 6).
Attaching the Flower
- Center the flower on the RS of the square. Turn it so one petal points straight up to the middle of a side, not into a corner.
- Use the cream tail to backstitch around the petal base round. Go through the square, but do not go through to the green RS anywhere outside the flower.
- Tack the tip of each petal with one small stitch, about 3 mm in from the point. The petals should lie flat but still sit up slightly from the square.
- Knot the tail securely on the WS, then weave it into the green stitches behind the flower so it cannot show through.
Joining the Squares
- Block every square to 20 x 20 cm before joining. Pin them damp and let them dry fully.
- Lay out the squares in rows. Keep all the flowers facing the same way, with the top petal pointing toward the head of the bed.
- Hold two squares WS together. Join green in the corner ch-2 sp, working through both layers.
- Sc in the corner sp, sc in each of the 27 dc along the side through the outer loops only, sc in the next corner sp. This gives the raised ridge you see between the squares in the finished bedspread.
- Join all the horizontal seams first, then all the vertical seams. Where four corners meet, work one sc over the existing seam so there is no hole.
Border
- R1: join green in any outer corner sp, ch 1, (sc, ch 2, sc) in the corner, sc in each dc and 1 sc in each seam and in each joined corner sp along the edge, (sc, ch 2, sc) in each outer corner, join to first sc.
- R2: sl st into corner sp, ch 3, (dc, ch 2, 2 dc) in same sp, dc in each sc to the next corner, (2 dc, ch 2, 2 dc) in each corner sp, join.
- R3: repeat R2.
- R4: ch 1, working left to right, rev sc in each st around, 3 rev sc in each corner sp, join. Fasten off and weave in the ends.
Matching Pillow Covers (optional)
- Front: work the green square through R8. Then continue: sl st into corner sp, (ch 3, 2 dc, ch 2, 3 dc) in corner, 3 dc in each space between groups to the next corner, (3 dc, ch 2, 3 dc) in each corner, join. Each round adds one group per side. Repeat until the square measures 40 cm (about 7 more rounds).
- Large flower: make the trumpet, base, and petals with a 6 mm hook and two strands of each color held together. Sew it to the center of the front.
- Back: make a second green square the same size, with no flower.
- Hold front and back WS together. Sc through both layers around three sides, insert the 40 x 40 cm form, then sc the last side closed.
Finishing
Give the finished bedspread one last light steam or wet block, laid flat on towels or a clean floor. Pin the outer border straight so the edges stay square. Never press the flowers flat. Hold the iron above the trumpets, let the steam relax the stitches, and then pinch each ruffle back into shape with your fingers.
Check each flower once more before you call it done. If a petal tip has come loose, add one more tacking stitch. If a trumpet leans to one side, add a small stitch at its base to stand it upright. Weave in any stray ends you missed along the seams.
Tips for Success
- Make the flowers in batches: all the trumpets first, then all the petal sets. Once the steps become automatic you will move much faster.
- Keep the R7 slip-stitch round on the trumpet loose. If it is tight, the ruffle pulls inward and the cup closes up.
- Use a firm stitch for the solid center rounds of the square (R1–R6). It supports the flower and stops the square from puckering when you sew the flower on.
- Count your stitches at the end of R6. If you have 20 per side, the granny rounds will come out right.
- Store finished squares stacked flat in a box, not loose in a bag. This keeps the trumpets from getting crushed before you block.
Common Mistakes to Avoid
- Working R3 of the trumpet in both loops. This leaves no front loops for the petals. Pull it back and redo the round in BLO.
- Petals that come out different sizes. Usually a turning ch 1 was counted as a stitch. The ch 1 never counts, so check each row against the stitch counts given.
- Squares that ripple at the edges after R7. This happens when you skip 1 stitch instead of 2 between clusters. Each side must have exactly 6 side clusters plus 2 corner halves.
- Flowers that face different ways across the blanket. Mark the top of each square with a stitch marker as soon as you sew the flower on.
- Pulling the sc seam too tight. The blanket will cup and will not lie flat on the bed. Work the seam at the same tension as the squares, or go up half a hook size for joining.
Ways to Customize This Pattern
- Pale narcissus: make the petals in white and the trumpet in soft peach, with an orange lip on R7.
- Checkerboard bedspread: alternate flower squares with plain green squares. This halves the flower work and still looks full.
- Two-tone background: work R1–R6 in sage and the granny rounds R7–R8 in a darker forest green to frame each flower.
- Baby blanket: use DK yarn and a 4 mm hook for 15 cm squares, and join 6 x 7 squares.
- Table runner: join a single strip of 2 x 7 squares and add the crab-stitch border.
Frequently asked questions
Not with this construction. The petals are worked in rows from the trumpet, so the flower has to be finished on its own first. Sewing it on also means a mistake on one flower never costs you a whole square.
Yes, if you use acrylic or a cotton-acrylic blend. Wash on a gentle cycle in a large laundry bag and dry flat, then pinch each ruffle back into shape while it is damp. Avoid pure wool unless you are sure it is superwash.
With 20 cm squares: a twin needs 8 x 12 (96 squares), a queen 11 x 12 (132), and a king 13 x 12 (156). Add about 10 cm to each dimension for the border.
Most likely R3 was worked in both loops, or R4 was skipped. Working R3 in the back loops and then one plain round of 12 is what lifts the cup up from the gold base before it flares out.
The finished Daffodil Granny Square Blanket Crochet Pattern

