Daisy Crochet Blanket Pattern Navy Squares White Petals
Beginner Friendly
Perfect for those just starting their crochet journey, with clear instructions and simple techniques
Single-Day Project
A satisfying project you can complete in a single afternoon or evening.
Handmade Gift
A beautiful keepsake — free forever. Read online or print at home.
About This Daisy Crochet Blanket Pattern Navy Squares White Petals
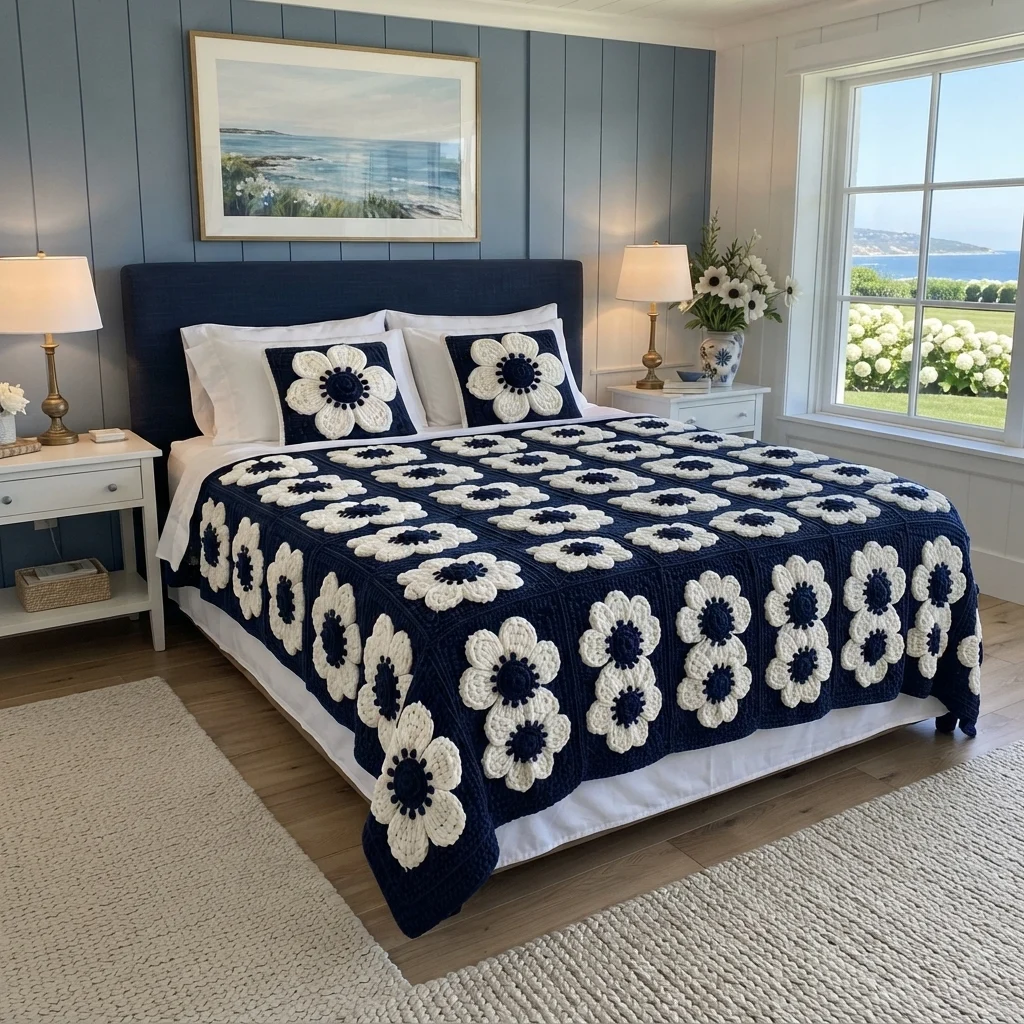
This daisy crochet blanket pattern builds a bold navy throw from 20 plain squares, each topped with a big white flower. Every flower has six wide petals, a navy center and a ring of little navy bobbles, so the blanket looks like a field of daisies on a dark sea, just like the one in the photo.
It is an advanced pattern because of the volume and the finishing. The squares are simple single crochet, but you will make 20 squares, 120 flat petals, 20 centers and 20 bobble rings, then sew every flower on by hand and join the squares with neat seams. Plan on 40 to 50 hours in total, with about 20 of them spent on the flowers.
It suits crocheters who are comfortable with small shaped pieces, bobble stitches and careful sewing, and who want a graphic, fresh throw for a bed with white linen and natural wood. The finished blanket is about 152 x 188 cm, and you can resize it by adding or removing whole squares.
Materials
- Chunky cotton-blend yarn, navy (N) about 2.4 kg, estimated
- Chunky cotton-blend yarn, cream white (C) about 900 g, estimated
- Crochet hook 6.0 mm
- Yarn needle
- Stitch markers and pins for placing the flowers and for joining
- Flat surface for blocking and layout
Abbreviations
MRmagic ringchchainscsingle crochetinc2 sc in the same stitchdecsingle crochet 2 stitches togethersl stslip stitchst(s)stitch(es)bobble(yarn over, insert hook in the stitch, pull up a loop, yarn over and pull through 2 loops) 4 times in the same stitch, then yarn over and pull through all 5 loops on the hook. It counts as one stitch.FOfasten offNnavy yarnCcream white yarn( )xrepeat the stitches in brackets the number of times givenNavy Square (make 20, flat, N)
- Foundation: with N, ch 41. Sc in the 2nd ch from the hook and in each ch across (40). Ch 1 and turn at the end of every row (the ch 1 does not count as a stitch).
- Rows 2-40: sc in each st across (40). You now have 40 rows of 40 stitches. Do not FO.
- Round 1 (border): ch 1, work 3 sc in the corner st. Sc in each of the next 38 sts along the side, then work 3 sc in the next corner. Repeat for the other three sides, working 38 sc between the corner groups on every side (164). Join with a sl st to the first sc.
- Round 2: ch 1, sc in each st around, working 3 sc in the middle st of each 3-sc corner group. Join with a sl st, FO and weave in the ends (172). Each side now has 40 stitches between the corner groups.
- Check your square: it should be about as wide as it is tall. Block each square flat with a damp cloth and pin it to the same size as your test square. Let it dry fully.
Flower Center (make 20, N)
- Round 1: 6 sc in MR (6)
- Round 2: inc x6 (12)
- Round 3: (1 sc, inc)x6 (18)
- Round 4: sc in each st around (18)
- Round 5 (bobbles): (1 sc, bobble in the next st)x9 (18 sts, 9 bobbles). Join with a sl st, FO leaving a long tail.
- Count your bobbles. There must be 9, evenly spaced around the edge. The center should measure about 7 cm across, including the bobbles.
Petal (make 120: 6 for each flower, C)
- Ch 5. Row 1: sc in the 2nd ch from the hook and in each of the next 3 chs (4). Ch 1 and turn at the end of every row.
- Row 2: inc, 2 sc, inc (6)
- Row 3: inc, 4 sc, inc (8)
- Rows 4-6: sc in each st across (8) for 3 rows
- Row 7: dec, 4 sc, dec (6)
- Row 8: dec, 2 sc, dec (4)
- Row 9: dec, dec (2)
- Row 10: dec (1). FO leaving a tail of about 20 cm for sewing.
- Check one petal: the stitch counts run 4, 6, 8, 8, 8, 8, 6, 4, 2, 1, and the petal should be about 7 cm wide and 8 cm long. Press each petal flat with a damp cloth.
Assembling the Flower
- Find the center of the blocked square: between stitches 20 and 21 of the 40, and between rows 20 and 21. Pin a marker there.
- Arrange 6 petals in a ring around the marker, with the narrow base of each petal (row 1) pointing toward the center and the tips pointing out. Overlap neighboring petals by about 1 cm at the base so they form a closed ring. Space them evenly, like the hours on a clock face with six marks.
- Pin all 6 petals, step back and check that the flower looks round before you sew anything.
- Sew each petal on with small stitches along its base and along both sides for the first 3 cm, using the tail. Leave the outer tip loose so it lifts slightly.
- Place the navy center over the ring of petal bases and sew it down with small stitches around its edge, which also hides the petal bases.
- Weave all tails along the back of the square for at least 5 cm.
Blanket Layout
- Lay out 4 squares across and 5 squares down (20 squares in all).
- The flower is the same turned in any direction, so there is no right way up. Check from a few steps back that the flowers line up in straight rows and columns before you start joining.
Joining
- Join the squares into 5 rows of 4. Hold two squares with wrong sides together and sc through the back loops of both, using N. Match the stitches one for one along each side, from the middle stitch of one corner group to the middle stitch of the next (42 stitches including both corners).
- Join the 5 rows to each other in the same way, matching the corners so the seams make a clean cross.
- Work the horizontal seams last so the vertical and horizontal seams meet flat at each corner.
- Weave in all ends.
Blanket Edging (N)
- Round 1: join N in any outer corner. Ch 1 and sc evenly around the blanket, working 3 sc in each corner, one sc in each stitch along the edges and one sc in each seam where two squares meet. Join with a sl st.
- Rounds 2-3: ch 1, sc in each st around, working 3 sc in the middle st of each corner. Join with a sl st at the end of each round. FO after round 3 and weave in the end.
- Check your edging: the corners should lie flat without cupping or ruffling, and the border should be about 4 cm wide.
Finishing
Weave in all ends along the back, following the stitches for at least 8 cm. Block the blanket by laying it flat on towels, pinning the corners and edges to about 152 x 188 cm, and misting it with water. Keep the pins away from the flowers so you do not flatten the petals. Let it dry fully before moving it.
Check each flower for loose stitches and secure any petal that lifts too far. Drape the blanket with the head under the pillows and the foot hanging over the bed, and it will look like the photo.
Tips for Success
- Make one test square and flower before you commit to all 20, and write down your hook size and measurements.
- Count the stitches at the end of every tenth row of each square. There should always be 40, or the seams will not line up.
- Make the petals in batches of 30, so every flower in a batch comes out the same size.
- Pull each bobble closed firmly, so the beads stand up from the center and stay round.
- Block the squares before you sew the flowers on, and pin the flowers in place before you stitch.
Common Mistakes to Avoid
- Counting the ch 1 turning chain as a stitch makes the square 41 or 39 stitches wide. The ch 1 never counts.
- Working the bobbles too tightly makes small, hard beads. Keep each loop loose and the same height.
- Sewing the petals without overlapping the bases leaves gaps between them. Pin them with a 1 cm overlap first.
- Placing the flower off-center shows much more in a grid of 20 squares. Mark the center of every square before you pin.
- Joining with a tight seam makes ridges across the flowers. Use a loose stitch and match the seam tension to the squares.
Ways to Customize This Pattern
- Swap navy and white for charcoal and cream, forest green and ivory, or dusty pink and cream, and keep the same pattern.
- Make the flower centers in mustard instead of navy for a warmer, daisy-like look.
- Make a baby blanket with 3 squares across and 3 down (9 squares), about 110 x 110 cm with the edging.
- Make matching pillow covers by sewing one finished square to a plain navy back, with a button closure.
- Make the blanket larger by adding one more column (about 36 cm) or one more row (about 36 cm) of squares, and edge it with the same 3 rounds.
Frequently asked questions
The amounts above are estimates of about 3.3 kg in all. Weigh your test square and its flower, multiply by 20, and add about 10 percent for the joining and the edging. Navy makes up about three quarters of the total.
Yes. Use a larger hook for bigger petals or a smaller hook for smaller ones, and keep the stitch counts the same. To change the proportions, add or remove one of the three straight rows (rows 4-6) in each petal, which makes it about 0.7 cm longer or shorter.
You can, but sewing gives you more control over the spacing. Separate petals also let you replace one that comes out too small without redoing the whole flower.
With a washable cotton blend, wash it on a gentle cycle in cool water, press out the water without wringing, and lay it flat to dry. Navy can bleed onto the white petals, so wash it with a color catcher the first time, and check that the flowers are sewn on securely before every wash.
The finished Daisy Crochet Blanket Pattern Navy Squares White Petals

