Daisy Meadow Granny Square Bedspread Pattern
Beginner Friendly
Perfect for those just starting their crochet journey, with clear instructions and simple techniques
Single-Day Project
A satisfying project you can complete in a single afternoon or evening.
Handmade Gift
A beautiful keepsake — free forever. Read online or print at home.
About This Daisy Meadow Granny Square Bedspread Pattern
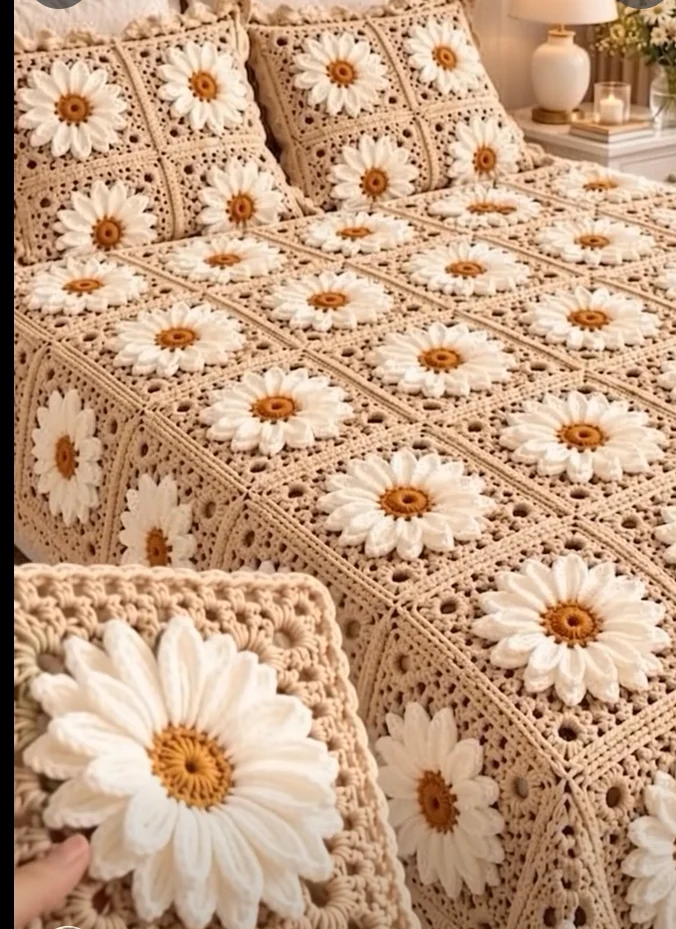
This daisy granny square pattern turns one textured flower motif into a full bedspread and a pair of matching pillow shams. Each square starts with a mustard center and two layers of white petals: a short front layer and a longer back layer set between them, so the daisy looks full and dimensional. A lacy latte granny background then squares it off and finishes with a solid edge.
Each square takes about 50 minutes once you know the petal sequence. The queen-size bedspread uses 132 squares, which works out to roughly 130 to 150 hours including joining and the border, plus about 20 hours for the shams. Because the work is all in small squares, it travels well and fits into short sessions.
This is an advanced pattern. You will work petals separately in front and back loops of the same round, anchor a background to petal tips, keep granny corners straight over several rounds, and handle a large joined piece. It is a good choice if you have made a few granny square blankets and want something with more depth.
Materials
- Worsted weight cotton, latte or beige about 2.8 kg (28 x 100 g) for the bedspread, plus 500 g for two shams
- Worsted weight cotton, white about 1.1 kg (11 x 100 g) for the bedspread, plus 200 g for two shams
- Worsted weight cotton, mustard about 200 g for the bedspread, plus 40 g for two shams
- 4 mm (US G-6) crochet hook
- Tapestry needle
- Locking stitch markers at least 4
- Two 45 x 65 cm pillow inserts for the shams
- 6 buttons, 20 mm 3 per sham
- Blocking mats and pins, or a spray bottle and towels
Abbreviations
MRmagic ringchchainsl stslip stitchscsingle crochethdchalf double crochetdcdouble crochettrtreble crochetinc2 sc in the same stitchFLO / BLOfront loop only / back loop onlysp(s)space(s)st(s)stitch(es)begbeginningreprepeatRS / WSright side / wrong sideDaisy Center and Petals
- Round 1 (mustard): 6 sc in MR. (6)
- Round 2: inc in each st around. (12)
- Round 3: [sc, inc] 6 times, changing to white on the final yarn-over. Join with sl st to first sc. Fasten off mustard. (18)
- Round 4 (white): Ch 1, [2 sc, inc] 6 times, join with sl st to first sc. (24)
- Round 5 (front petals, worked in front loops of Round 4): *Sl st in next st, ch 7, sc in 2nd ch from hook, hdc in next ch, dc in next 2 ch, hdc in next ch, sc in last ch, sl st in next st; rep from * 11 more times. (12 front petals) Fasten off.
- Round 6 (back petals, worked in back loops of Round 4): Fold the front petals toward you. Join white with sl st in the back loop of the st holding the closing sl st of any front petal. Ch 9, sc in 2nd ch from hook, hdc in next ch, dc in next ch, tr in next 2 ch, dc in next ch, hdc in next ch, sc in last ch, sl st in back loop of next st. *Sl st in back loop of next st, ch 9, sc in 2nd ch from hook, hdc in next ch, dc in next ch, tr in next 2 ch, dc in next ch, hdc in next ch, sc in last ch, sl st in back loop of next st; rep from * 10 more times, join with sl st to first sl st. (12 back petals, each sitting between two front petals) Fasten off.
Lacy Background (Latte)
- Round 7: Keep the front petals folded forward and out of the way. Join latte with sc in the tip of any back petal (the chain just beyond the first sc). Ch 5, *sc in tip of next back petal, ch 5; rep from * 10 more times, join with sl st to first sc. (12 sc, 12 ch-5 sps)
- Round 8: Sl st into first ch-5 sp, ch 3 (counts as dc), (2 dc, ch 2, 3 dc) in same sp. *Ch 1, 3 dc in next sp, ch 1, 3 dc in next sp, ch 1, (3 dc, ch 2, 3 dc) in next sp; rep from * 2 more times, ch 1, 3 dc in next sp, ch 1, 3 dc in next sp, ch 1, join with sl st to top of beg ch-3. (16 groups of 3 dc, 12 ch-1 sps, 4 corner sps)
- Round 9: Sl st in next 2 dc and into corner sp, ch 3 (counts as dc), (2 dc, ch 2, 3 dc) in same sp. *[Ch 1, 3 dc in next ch-1 sp] 3 times, ch 1, (3 dc, ch 2, 3 dc) in next corner sp; rep from * 2 more times, [ch 1, 3 dc in next ch-1 sp] 3 times, ch 1, join. (5 groups and 4 ch-1 sps per side)
- Round 10: Sl st in next 2 dc and into corner sp, ch 3 (counts as dc), (2 dc, ch 2, 3 dc) in same sp. *[Ch 1, 3 dc in next ch-1 sp] 4 times, ch 1, (3 dc, ch 2, 3 dc) in next corner sp; rep from * 2 more times, [ch 1, 3 dc in next ch-1 sp] 4 times, ch 1, join. (6 groups and 5 ch-1 sps per side, 23 sts per side between corner sps)
- Round 11: Sl st in next 2 dc and into corner sp, ch 3 (counts as dc), (dc, ch 2, 2 dc) in same sp. *Dc in each dc and in each ch-1 sp along the side (23 dc), (2 dc, ch 2, 2 dc) in next corner sp; rep from * 2 more times, dc in each dc and ch-1 sp along the last side (23 dc), join. (27 dc per side, 108 dc total)
- Round 12: Sl st in next dc and into corner sp, ch 1, (sc, ch 2, sc) in same sp. *Sc in each of next 27 dc, (sc, ch 2, sc) in next corner sp; rep from * 2 more times, sc in each of next 27 dc, join with sl st to first sc. Fasten off. (29 sc per side, 116 sc total, 4 ch-2 corner sps)
- Make 132 squares for the bedspread and 24 for two pillow shams (156 total).
Joining the Squares
- Block all squares flat to about 21 cm, pinning only the background, never the petals. Let them dry completely.
- Lay them out in 12 rows of 11 squares.
- Horizontal seams: Hold the first square of Row 1 and the first square of Row 2 with WS together, so the ridge forms on the RS. Join latte with sc through both corner ch-2 sps. Sc through both loops of both layers in each of the next 29 sts, then sc through both corner sps at the far end. Without cutting the yarn, pick up the next pair and continue across. (31 sc per square, 341 sc per seam.) Work all 11 horizontal seams this way.
- Vertical seams: Work the 10 vertical seams the same way, with 1 sc over the crossing ridge at each junction so the intersections lie flat. (31 sc per square plus 11 junction sc = 383 sc per seam.)
Bedspread Border
- Round 1 (latte): Join with sl st in any outer corner sp. Ch 1, 3 sc in the same sp. Sc in each st along the edge, 1 sc in each corner sp at the seams, and 1 sc in each seam. Work 3 sc in each outer corner sp. Join with sl st to first sc. (349 sc on each short side and 381 sc on each long side between the 3-sc corners)
- Round 2 (white): Join with sl st in the center sc of any corner. Ch 3 (counts as dc), 2 dc in the same st, *dc in each st to next corner center, 3 dc in corner center; rep from * 2 more times, dc in each st to end, join with sl st to top of beg ch-3. Fasten off. (351 / 383 dc between corner centers)
- Round 3 (latte): Join with sl st in the center dc of any corner. Ch 1, 3 sc in the same st, *sc in each st to next corner center, 3 sc in corner center; rep from * 2 more times, sc in each st to end, join with sl st to first sc. (353 / 385 sc between corner centers)
- Round 4 (latte picot edge): Ch 1, *sc in next 3 sts, ch 3, sl st in 3rd ch from hook; rep from * around. If 1 or 2 sts remain before the end, sc in them. Join with sl st to first sc and fasten off.
Pillow Shams (make 2)
- Front panel: Join 6 squares into a panel 3 squares wide and 2 squares tall, using the same WS-together sc seam so the ridges sit on the RS.
- Back panel: Join 6 more squares the same way.
- Hold the panels WS together with the front facing you. Join latte in a corner sp through both layers. Working through both layers, sc around one short side and both long sides. Work 31 sc per square edge (29 sts plus 1 sc in each corner sp), 1 sc in each seam, and 3 sc in each corner you turn. (95 sc on each long side, 63 sc on the closed short side, not counting the corner groups)
- Opening edge: Continue across the remaining short side through the front panel only. Sc in each st across (63 sts), making 3 evenly spaced button loops (ch 5, sk 2 sts). Fasten off. Join latte at the back panel’s open edge, sc across, and fasten off.
- Edging: Join latte at a corner of the closed sides and work the Round 4 picot edge along the three closed sides. Fasten off.
- Sew 3 buttons to the back panel to line up with the loops.
Finishing
Weave any remaining ends along the back of the seam ridges, where they stay hidden. Lay the bedspread flat on a clean floor or a covered bed, mist the background evenly and smooth the squares into straight lines. While the cotton is still damp, lift each daisy gently and pinch the petal tips so the front layer curls up slightly and the back layer fans out. Leave it until completely dry.
Slip the inserts into the shams, button them closed and set them against the headboard. Fluff the petals with your fingers whenever the bed is made, so the daisies keep their shape.
Tips for Success
- Make all 156 flowers first, then all the backgrounds. Petal size depends heavily on tension, and batching keeps the daisies matching across the bed.
- Hold the front petals forward with a clip or your thumb while working Rounds 6 and 7. That keeps them free of the back loops and the background chains.
- Put a stitch marker in each corner sp from Round 8 onward. Granny corners drift easily, and the markers show you where to slip-stitch over at the start of each round.
- Count 29 sc per side on Round 12 before you fasten off. Matching counts are what keep 341-stitch seams lying flat.
- Use a 3.5 mm hook just for the petals if yours look floppy. Firmer petals stand up better on a bed that gets used every day.
Common Mistakes to Avoid
- Catching a front petal in a Round 7 sc. The daisy flattens on one side. Check the front of every square before Round 8, and undo just that sc to free the petal.
- Starting Round 6 in the wrong place. The back petals line up behind the front ones and the flower looks thin. Always start at the closing sl st of a front petal, so each back petal fills a gap.
- Chain-5 loops in Round 7 that are too tight. The square cups around the flower. Loosen your chains or change them to ch 6 throughout.
- Skipping the sl st over to the corner at the start of Rounds 9 to 11. The corners twist out of line. Each round must begin in a corner sp.
- Joining with RS together. The ridge ends up on the underside of the bedspread. Hold WS together so the latte ridges frame each daisy on the front.
Ways to Customize This Pattern
- Change the background to sage, soft grey or blush and keep the white daisies with mustard centers.
- Work the petals in pale yellow or pink for a different flower, keeping the same counts.
- For quicker squares, skip Round 5 and work only the long Round 6 petals in both loops of Round 4. This makes a single-layer daisy that still anchors the same background.
- Make a throw: 35 squares joined 5 across and 7 down, with the same border, comes out at about 111 x 153 cm.
- Swap Round 2 of the border to mustard for a thin golden line that echoes the flower centers.
Frequently asked questions
For a twin, join 9 squares across and 12 down (108 squares), which finishes at about 195 x 258 cm with the border. For a king, join 13 across and 12 down (156 squares) for about 279 x 258 cm. Add or remove a row of squares to change the drop at the foot of the bed.
Cotton petals relax in water, but they come back with a little shaping. Wash cold on a gentle cycle, press out the water without wringing, then lay the bedspread flat and pinch the petal tips back into shape while damp. Avoid the tumble dryer, which crushes the petals and can shrink cotton.
The usual cause is tight chain-5 loops in Round 7, which pull the background in toward the petal tips. Chain more loosely or work ch 6 instead. If the square still cups, check that Round 8 has exactly 16 groups, with the corner groups in every third space.
Yes. A worsted acrylic works at the same counts and makes the bedspread lighter and warmer. The petals will be a little softer and less crisp, so a 3.5 mm hook for the petal rounds helps them hold their shape.
The finished Daisy Meadow Granny Square Bedspread Pattern

