Dense Daisy Field Bedspread Crochet Pattern
Beginner Friendly
Perfect for those just starting their crochet journey, with clear instructions and simple techniques
Single-Day Project
A satisfying project you can complete in a single afternoon or evening.
Handmade Gift
A beautiful keepsake — free forever. Read online or print at home.
About This Dense Daisy Field Bedspread Crochet Pattern
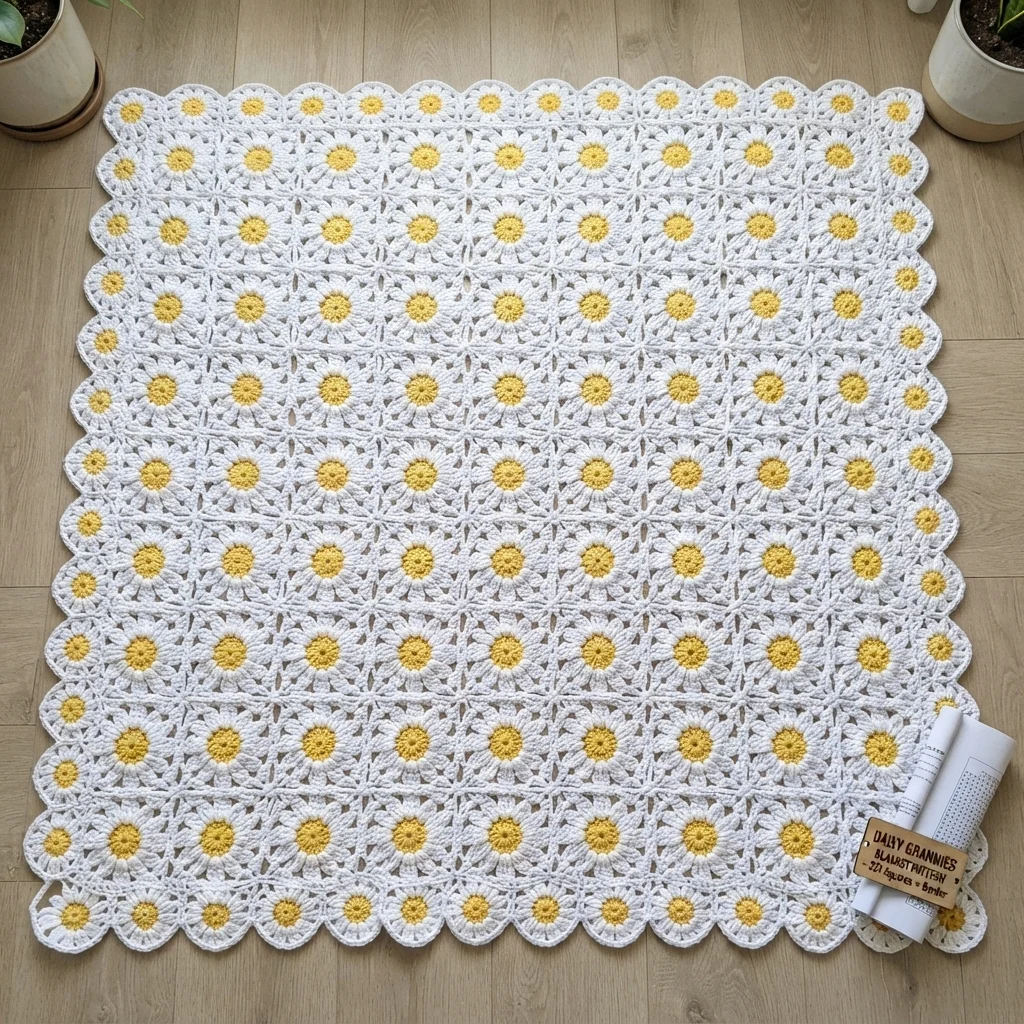
This crochet daisy bedspread pattern covers a full bed in a dense field of individually made white daisies, each with a richly textured golden center, joined directly to their neighbors at the petal tips rather than through a granny square frame. Because there’s no background fabric between daisies, the whole surface reads as a continuous carpet of flowers, finished all the way around with a deep scalloped edge rather than a plain border band.
What makes this design distinctive is the direct petal-tip joining method: instead of building a square frame around each daisy and joining those frames, every daisy’s outer petals connect straight to the petal tips of its 4 to 6 neighbors, leaving small open diamond gaps between flowers rather than solid fabric. That join-as-you-go petal construction, repeated with total consistency across hundreds of daisies, plus a continuous scalloped edge that has to account for the irregular outer line created by the daisy field itself, is what makes this such a demanding project. Expect to spend 50-60 hours total for the full bedspread.
This is an advanced pattern, best suited to someone experienced with join-as-you-go flower motifs and confident managing petal-tip connections across a very large number of daisies, rather than someone wanting a standard square-grid bedspread.
Materials
- Worsted weight cotton yarn, white ~1000g, daisy petals and scalloped edge
- Worsted weight yarn, golden yellow ~250g, daisy centers
- Crochet hook 4.5 mm (US 7)
- Tapestry/yarn needle
- Steam iron and pressing cloth, or a large blocking mat and pins
- Sharp scissors
Abbreviations
chchainsl stslip stitchscsingle crochethdchalf double crochetdcdouble crochetMRmagic ringincincrease (2 sts in one st)BLOback loop onlych-spchain spacest(s)stitch(es)reprepeatFOfasten offDaisy Center (make approximately 220 for a full/queen bedspread)
- With golden yellow, 8 sc in MR. (8 sts)
- Round 2: inc in each st around. (16 sts)
- Round 3, worked in BLO: sc around even to raise a slight textured ridge. (16 sts)
- Round 4: sc around even, both loops now. (16 sts)
- Sl st to close, FO leaving a short tail. Repeat for approximately 220 centers total.
Daisy Petals and Join-As-You-Go Assembly
- With white, join in any st along the outer edge of a finished center. Work each of 16 petals individually: ch 3, (sc, hdc, 2 dc, hdc, sc) in 2nd ch from hook, sl st into the next base st on the center to anchor the petal.
- For the very first daisy, simply repeat this individual petal 16 times, evenly spaced, with no joins yet, to establish your starting flower.
- For every subsequent daisy, work petals the same way, but wherever a petal’s position would touch an already-placed neighboring daisy, instead of completing that petal independently, work a sl st into the tip of the matching petal on the neighboring daisy partway through, then continue and complete the current petal, linking the two flowers directly at their petal tips.
- Continue working daisies outward in concentric rings or row by row, joining each new daisy to all of its already-placed neighbors (typically 2-4 join points per daisy in the interior of the field, fewer at the outer edges) as you complete its petal round.
- Continue until the daisy field covers your full planned bedspread area, approximately 200 cm x 220 cm, checking periodically that the growing field lies flat.
Scalloped Outer Edge
- With white, join at any point along the daisy field’s outer edge. Round 1: sc evenly around the entire irregular outer perimeter created by the outermost daisies’ unjoined petal tips, working extra sts into the gaps between petal tips to smooth the line into a continuous edge.
- Round 2 (scallop round): *sk 1 st, 5 dc in next st, sk 1 st, sl st in next st; rep from * evenly around the entire perimeter, adjusting repeat spacing as needed so the scallops read as even despite the irregular daisy-field edge underneath.
- Join with sl st to first st and FO. Weave in all ends.
Finishing
Weave in every daisy’s center and petal tails individually across the entire bedspread, since a project this size with no background fabric accumulates a very large number of loose ends with nowhere to hide them except within the daisy itself. Steam-block the finished bedspread flat on a large surface, pinning the scalloped edge open evenly all the way around and checking that the open diamond gaps between daisies stay consistent in size across the whole field rather than pulling tight in some areas.
Tips for Success
- Work your test cluster of 7 daisies first and really study how the join-as-you-go petal connection behaves before scaling up; this technique has no separate frame to hide inconsistencies.
- Keep the BLO textured round on every daisy center identical in tension, since this small detail is very noticeable repeated across hundreds of flowers.
- Plan your daisy field’s overall shape loosely before starting, working outward from a center point in rings, so the final outer edge comes out close to a true rectangle before scalloping.
- Check daisy spacing and the size of the open diamond gaps between flowers every few rows, since this join method can drift tighter or looser than intended without active checking.
- Work in good light and take breaks often; joining dozens of individual petals per daisy across hundreds of daisies is genuinely demanding on hand and eye fatigue.
Common Mistakes to Avoid
- Joining neighboring petals at inconsistent points along their length causes the gaps between daisies to vary noticeably in size. Fix: always join at the same relative point on each petal, such as its very tip.
- Losing track of which petals on a new daisy need joins and which don’t leads to unconnected daisies or missed joins. Fix: lay out and mark your planned daisy field shape before working each new flower, noting which direction its neighbors will be.
- Letting the field drift out of a rough rectangle shape makes the final scalloped edge very uneven. Fix: periodically lay the growing piece flat and check its overall outline against a rectangular guide.
- Underestimating how much yarn and time a daisy field this dense actually requires. Fix: calculate yardage and time from your test cluster of 7 daisies before committing to the full piece.
- Skipping the BLO round on daisy centers for speed removes the small textured detail that makes each center read as dimensional. Fix: always work Round 3 in back loop only as instructed.
Ways to Customize This Pattern
- Reduce the daisy field size for a throw blanket or large lap blanket instead of a full bedspread.
- Swap the golden yellow centers for a different accent color, such as soft pink or lavender, for a different seasonal look.
- Alternate 2 petal colors across the field for a two-tone daisy effect instead of all-white.
- Back the finished piece with lightweight fabric to fill the open diamond gaps and add warmth for everyday use.
- Scale daisies down and reduce the field size for a matching set of placemats or a table runner using the same join technique.
Frequently asked questions
Around 220 daisies covers a full/queen bedspread at this density, but exact counts depend heavily on your individual daisy gauge. Work outward from the center, checking your covered area periodically against your target dimensions.
Join-as-you-go is strongly recommended here, since sewing together hundreds of individually finished daisies afterward, matching petal tips precisely, would take considerably longer and be harder to keep even than joining during construction.
The open diamond gaps between daisies do let some air through, similar to any open lace piece. For warmer, everyday use, consider backing the finished piece with lightweight fabric, or use it as a decorative topper over a solid coverlet.
This usually means the field grew unevenly in different directions as daisies were added. Periodically lay the growing piece flat and compare its outline to a rectangular guide, adding daisies preferentially toward any shorter or uneven sides to even out the shape before scalloping.
The finished Dense Daisy Field Bedspread Crochet Pattern

