Diagonal Granny Square Blanket in Deep Burgundy
Advanced
For experienced crocheters who enjoy complex shaping, fine detail, and ambitious construction
Weekend Project
A satisfying weekend make — start Friday, finish Sunday, enjoy forever.
Handmade Gift
A beautiful keepsake — free forever. Read online or print at home.
About This Diagonal Granny Square Blanket in Deep Burgundy
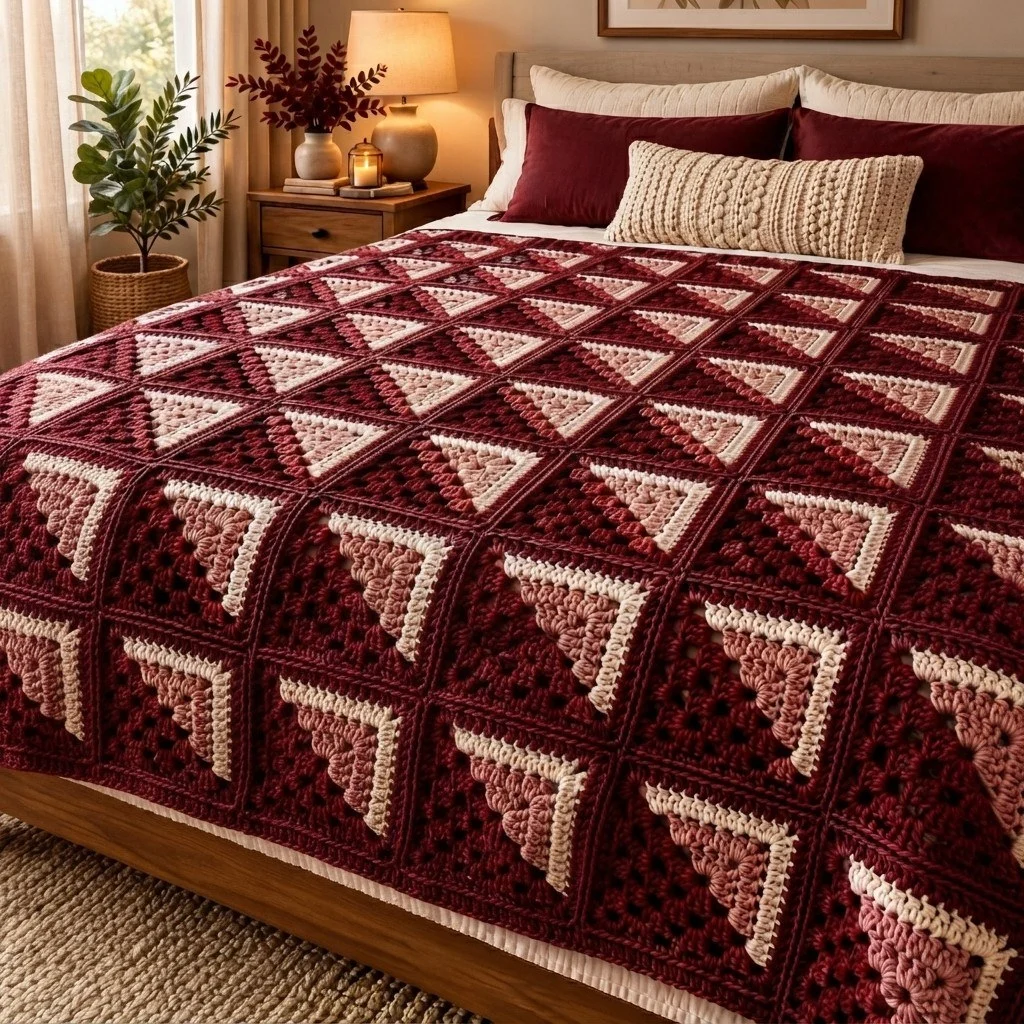
This diagonal granny square blanket pattern takes the most familiar square in crochet and splits it straight down the middle, so every square is half deep colour and half light. Worked that way, the squares stop reading as squares. Laid out in a grid and rotated row by row, the pale halves line up into sawtooth bands of triangles that run across the whole bed, and the burgundy halves close in behind them. Four colourways — burgundy with cream, burgundy with dusty rose, brick red with cream, brick red with dusty rose — keep the surface from going flat, and the diagonal line through each square stays clean because the colour change happens at the same two corners on every single round.
The construction is genuinely advanced, but not because the stitches are hard. Each square carries two balls of yarn at once and changes colour twice per round, intarsia-style, with the two split corners sharing one 3-dc group of each colour. You need to track which corner is the light point and which is the dark point on all 72 squares, block them to a consistent 15 cm, then join them on the right side with slip stitches so the seams stand up as raised burgundy ridges — the ribs you can see running through the photo. The border is four rounds that firm up the edge and stop the granny mesh from stretching out of square.
Plan on 45 to 60 hours across the project. A square takes about 25 minutes once the colour change becomes automatic, joining the grid takes an evening or two, and the border takes two or three hours at 800-plus stitches a round. This is a good project for someone who is comfortable with granny squares and wants a reason to learn mid-round colour work on a big, useful scale — and it is very portable, because for most of the build you are only ever carrying one small square and two balls of yarn.
Materials
- Worsted / aran weight yarn in deep burgundy (MC) approx. 900 g / 1620 m
- Worsted / aran weight yarn in brick red (CC1) approx. 400 g / 720 m
- Worsted / aran weight yarn in dusty rose (CC2) approx. 400 g / 720 m
- Worsted / aran weight yarn in warm cream (CC3) approx. 400 g / 720 m
- 5.0 mm crochet hook main hook for squares, joining and border
- 4.5 mm crochet hook optional, for the final reverse sc round if yours tends to flare
- Blunt tapestry needle size 13 or larger, for ends
- Stitch markers at least 8, to flag the light-point corner on finished squares
- Blocking mats and rust-proof pins or a 15 cm cardboard square template
- Spray bottle or steam iron for blocking
- Scissors and a measuring tape
Abbreviations
MRmagic ringchchainch-spchain spacesl stslip stitchscsingle crochet (US)dcdouble crochet (US)rscreverse single crochet (crab stitch)st(s)stitch(es)spspacereprepeatyoyarn overRS / WSright side / wrong sidebegbeginningL / Dlight colour / dark colour of the squareGauge, Corners and Square Blueprint
- Gauge: Rounds 1–3 of the square measure 8 cm across. The finished 6-round square measures 15 cm square after blocking.
- If your square comes out under 14 cm, go up to a 5.5 mm hook; over 16 cm, drop to 4.5 mm. Adjust before you make 72 of them.
- Corner naming used throughout: corner A is the fully light corner, corner C is the fully dark corner directly opposite it, and corners B and D are the two split corners that sit on the diagonal and hold one 3-dc group of each colour.
- Stitch counts by round (3-dc groups / total dc): Rnd 1 = 4 groups / 12 dc. Rnd 2 = 8 / 24. Rnd 3 = 12 / 36. Rnd 4 = 16 / 48. Rnd 5 = 20 / 60. Rnd 6 = 24 / 72.
- Each colour works exactly half of every round from Rnd 2 onward: 4, 6, 8, 10 and 12 groups respectively.
- Each finished side of the square has 6 groups (18 dc) with 5 ch-1 sps between them — 23 working points per side for joining and for the border.
- Ch 3 counts as the first dc throughout. Every round is joined with a sl st to the top of the beginning ch-3 and the right side always faces you.
Two-Tone Diagonal Square — Master Pattern
- Rnd 1 (L and D): With L make a MR. Ch 3, 2 dc in ring, ch 2 (this ch-2 is corner A sp), 3 dc in ring changing to D on the final yo of the 3rd dc, ch 2 with D (corner B sp), 3 dc in ring, ch 2 (corner C sp), 3 dc in ring changing to L on the final yo, ch 2 with L (corner D sp), sl st to top of beg ch-3. Pull the ring closed. (4 groups, 12 dc, 4 corner ch-2 sps)
- Rnd 2 (L): Sl st into corner D sp. With L: ch 3, 2 dc in corner D sp, ch 1, (3 dc, ch 2, 3 dc) in corner A sp, ch 1, 3 dc in corner B sp changing to D on the final yo. (4 light groups)
- Rnd 2 (D): Ch 2, 3 dc in same corner B sp, ch 1, (3 dc, ch 2, 3 dc) in corner C sp, ch 1, 3 dc in corner D sp changing to L on the final yo, ch 2 with L, sl st to top of beg ch-3. (4 dark groups — 8 groups, 24 dc total)
- Rnd 3 (L): Sl st into corner D sp. With L: ch 3, 2 dc in corner D sp, ch 1, 3 dc in next ch-1 side sp, ch 1, (3 dc, ch 2, 3 dc) in corner A sp, ch 1, 3 dc in next ch-1 side sp, ch 1, 3 dc in corner B sp changing to D. (6 light groups)
- Rnd 3 (D): Ch 2, 3 dc in same corner B sp, ch 1, 3 dc in next side sp, ch 1, (3 dc, ch 2, 3 dc) in corner C sp, ch 1, 3 dc in next side sp, ch 1, 3 dc in corner D sp changing to L, ch 2 with L, sl st to top of beg ch-3. (6 dark groups — 12 groups, 36 dc total)
- Rnd 4 (L): Sl st into corner D sp. With L: ch 3, 2 dc in corner D sp, [ch 1, 3 dc in next side sp] twice, ch 1, (3 dc, ch 2, 3 dc) in corner A sp, [ch 1, 3 dc in next side sp] twice, ch 1, 3 dc in corner B sp changing to D. (8 light groups)
- Rnd 4 (D): Ch 2, 3 dc in same corner B sp, [ch 1, 3 dc in next side sp] twice, ch 1, (3 dc, ch 2, 3 dc) in corner C sp, [ch 1, 3 dc in next side sp] twice, ch 1, 3 dc in corner D sp changing to L, ch 2 with L, sl st to top of beg ch-3. (8 dark groups — 16 groups, 48 dc total)
- Rnd 5 (L): Sl st into corner D sp. With L: ch 3, 2 dc in corner D sp, [ch 1, 3 dc in next side sp] 3 times, ch 1, (3 dc, ch 2, 3 dc) in corner A sp, [ch 1, 3 dc in next side sp] 3 times, ch 1, 3 dc in corner B sp changing to D. (10 light groups)
- Rnd 5 (D): Ch 2, 3 dc in same corner B sp, [ch 1, 3 dc in next side sp] 3 times, ch 1, (3 dc, ch 2, 3 dc) in corner C sp, [ch 1, 3 dc in next side sp] 3 times, ch 1, 3 dc in corner D sp changing to L, ch 2 with L, sl st to top of beg ch-3. (10 dark groups — 20 groups, 60 dc total)
- Rnd 6 (L): Sl st into corner D sp. With L: ch 3, 2 dc in corner D sp, [ch 1, 3 dc in next side sp] 4 times, ch 1, (3 dc, ch 2, 3 dc) in corner A sp, [ch 1, 3 dc in next side sp] 4 times, ch 1, 3 dc in corner B sp changing to D. (12 light groups)
- Rnd 6 (D): Ch 2, 3 dc in same corner B sp, [ch 1, 3 dc in next side sp] 4 times, ch 1, (3 dc, ch 2, 3 dc) in corner C sp, [ch 1, 3 dc in next side sp] 4 times, ch 1, 3 dc in corner D sp, ch 2, sl st to top of beg ch-3. (12 dark groups — 24 groups, 72 dc total)
- Fasten off both colours. Weave in all four ends now, before the square leaves your hands — burying ends into the matching colour block hides them completely.
- Place a stitch marker in corner A (the fully light corner) of every finished square. You will use it to orient the grid later, and it saves a lot of squinting.
The Four Colourways — How Many of Each
- Colourway 1 — 18 squares: D = burgundy (MC), L = warm cream (CC3).
- Colourway 2 — 18 squares: D = burgundy (MC), L = dusty rose (CC2).
- Colourway 3 — 18 squares: D = brick red (CC1), L = warm cream (CC3).
- Colourway 4 — 18 squares: D = brick red (CC1), L = dusty rose (CC2).
- Total: 72 squares for a 8-wide by 9-long grid.
- Make them in rotating batches of four, one of each colourway, rather than 18 of one kind. It keeps the colour mix even and stops you from discovering at square 60 that you are short on cream.
- Keep the four stacks separate as you go, and count each stack before you lay out the grid.
Blocking the Squares
- Block all 72 squares before joining. Granny squares come off the hook slightly lozenge-shaped, and an unblocked grid will not sit straight on a bed.
- Spray each square until evenly damp — do not soak acrylic — and pin all four corners to a 15 cm square on your blocking mat, pushing the ch-2 corner spaces out into true points.
- Pin the middle of each side out to the 15 cm line as well, so the sides stay straight rather than pulling in.
- If you are using acrylic, hover a steam iron 3–5 cm above the pinned squares for 10 seconds, never touching the fabric, then let them dry fully pinned.
- Block in batches of 12 or 16; unpinning too early undoes the whole point.
- Measure a few random squares once dry. They should all be within 3 mm of each other. Re-block any outliers now.
Laying Out the Grid
- Clear a floor space of about 130 x 145 cm and lay out 9 rows of 8 squares, all right side up.
- Odd-numbered rows (1, 3, 5, 7, 9): rotate every square so corner A — the light point — sits at the upper left. The light triangles will all point the same way across the row.
- Even-numbered rows (2, 4, 6, 8): rotate every square 180° so corner A sits at the lower right. The light halves of rows 1 and 2 now meet along their long edges and read as a band of paired triangles.
- Within each row, alternate the dark colour: burgundy, brick, burgundy, brick across all 8 positions.
- Within each row, alternate the light colour on a different cycle: cream, cream, rose, rose, cream, cream, rose, rose. The two cycles running at different lengths is what keeps the layout from looking like a checkerboard.
- Step back and photograph the layout from above before you pick anything up. You will need that photo constantly while joining.
- Stack each row from right to left and pin a numbered scrap of paper to each stack.
Joining the Squares — Raised Ridge Seam
- All joining is done with burgundy (MC) and the 5.0 mm hook, with wrong sides held together so the seam ridge sits proudly on the right side of the blanket. This is the ribbed line you can see between every square.
- Work through both layers at once, inserting the hook under the two matching stitches of the two squares, front square first.
- Joining a single side: hold two squares wrong sides together. Insert the hook through both corner ch-2 sps, pull up a loop of MC, ch 1 to anchor. Sl st 1 in both corner sps. Then sl st in each matching pair along the side: 18 sl sts into the dc pairs and 5 sl sts into the ch-1 sp pairs, taken in order, for 23 sl sts. Finish with 1 sl st through both far corner ch-2 sps. (25 sl sts per seam)
- Keep the slip stitches loose — a slip stitch seam worked tightly will shorten the edge and ripple the squares. If in doubt, use a 5.5 mm hook for the seams only.
- Join rows first: take Row 1 and join squares 1–2, then 2–3, and so on to 7–8. You will work 7 seams per row and 63 seams in total across the 9 rows. Fasten off and weave in after each full row.
- Then join rows to each other: hold Row 1 and Row 2 wrong sides together, line up the vertical seams, and sl st straight across the whole length. Across 8 squares this is 8 x 23 = 184 sl sts along the sides, plus 1 sl st at each of the 9 corner junctions = 193 sl sts per row seam.
- At each corner junction the hook passes through four corner ch-2 spaces at once. Take them one at a time, front to back, and pull the loop through loosely.
- Join Row 2 to Row 3, then 3 to 4, and so on, for 8 row seams. The blanket now measures roughly 120 x 135 cm.
- Weave in every seam end into the ridge itself, running the tail along the back of the slip stitch line for at least 5 cm.
Border
- Rnd 1 (MC, sc): Join MC with a sl st in any corner ch-2 sp of the blanket. Ch 1, then work 1 sc in each dc and 1 sc in each ch-1 sp along each square edge (23 sc per square), plus 1 sc into each seam junction as you pass it. Short edges: 8 x 23 + 7 junctions = 191 sc. Long edges: 9 x 23 + 8 junctions = 215 sc. Ch 2 at each of the four outer corners. Sl st to first sc. (812 sc, 4 corner ch-2 sps)
- Rnd 2 (MC, dc): Ch 3, dc in each sc around, working (2 dc, ch 2, 2 dc) in each corner ch-2 sp. Sl st to top of beg ch-3. (828 dc — 195 per short edge, 219 per long edge)
- Rnd 3 (MC, sc): Ch 1, sc in each dc around, working (sc, ch 2, sc) in each corner ch-2 sp. Sl st to first sc. (836 sc — 197 per short edge, 221 per long edge)
- Rnd 4 (MC, rsc): Ch 1, do not turn. Working backwards, from left to right, rsc in each sc around and 1 rsc into each corner ch-2 sp. Sl st to first rsc. (840 rsc)
- If your reverse sc round flares or ruffles, rip it back and rework it with the 4.5 mm hook.
- Fasten off and weave the final tail into the back of the sc round beneath the crab stitch, where it cannot work its way out.
Finishing
Go over the whole blanket from the wrong side and check every end. A blanket this size gets washed, dragged and slept under, so any tail shorter than 5 cm should be re-threaded and buried further. Pay particular attention to the four ends in each square — they sit right on the diagonal colour line, which is the one place a loose end will show.
Give the finished blanket a final block. Lay it out flat on a clean sheet, spray it evenly damp, and pat it out to roughly 128 x 143 cm, pulling the border straight and squaring up the corners. Let it dry completely flat, which for a piece this heavy means a full day. Blocking at this stage is what turns the slightly wobbly grid into clean straight lines, and it settles the ridge seams so they stand up evenly.
Wash it the way you washed your gauge square: machine wash cold on a gentle cycle, and either tumble low or dry flat. A worsted acrylic blanket this size holds a lot of water, so support the whole weight when you lift it wet or the seams at the centre will stretch.
Tips for Success
- Always make the colour change on the final yarn over of the last stitch in the old colour, not after it. Changing a stitch late leaves a dot of the wrong colour sitting on the diagonal, and on 72 squares those dots are the first thing your eye finds.
- At the two split corners, give the two strands a single twist around each other on the wrong side before continuing. That closes the gap between the two 3-dc groups without a knot and keeps the diagonal line tight.
- Mark corner A with a stitch marker on every finished square. Once a square is off the hook, finding the fully light corner by eye takes longer than you think, and the whole triangle layout depends on getting it right.
- Join your squares into complete rows before joining any rows to each other. If the grid shifts, you only have to undo one straight seam instead of unpicking a cross-shaped join.
- Keep the joining slip stitches noticeably looser than your normal tension. The ridge should sit up off the fabric, not pull the two square edges into a pucker.
Common Mistakes to Avoid
- Both halves of the round ending up the wrong size. From Rnd 2 on, each colour must work exactly half the groups: 4, 6, 8, 10, 12. If your light half has one group too many, you picked up the split corner space with the wrong colour — rip back to that corner and reset.
- The diagonal wandering off course. Every round must start in corner D and change colour at corner B. Starting a round at a different corner shifts the line by a quarter turn and the square can’t be rescued without frogging the round.
- Cutting both yarns at every colour change. This buries 24 ends in each square and makes the colour line lumpy. Drop the strand on the wrong side and leave it; it will be in position when you come back round.
- Joining before blocking. Unblocked granny squares are never quite square, and the errors add up across eight of them. A row that measures 118 cm next to a row that measures 123 cm will never lie flat, no matter how good the border is.
- Working the border too tight. If Rnd 2 of the border pulls the edges in, the blanket will cup along all four sides. Count the stitches — 195 and 219 per edge — and if you are short, you skipped stitches at the seam junctions.
Ways to Customize This Pattern
- Change the size by the square. Each square adds 15 cm. A 6 x 7 grid (42 squares) gives a roughly 98 x 113 cm lap blanket; a 9 x 10 grid (90 squares) gives roughly 143 x 158 cm. Recalculate the border edges as (squares x 23) + (squares − 1).
- Flip the value scheme. Make the light half cream on every square and the dark half a four-colour gradient — burgundy, brick, rust, terracotta — so the triangles stay constant and the background shifts across the bed.
- Point all the triangles the same way. Skip the 180° rotation on even rows and orient every corner A to the upper left. The light halves then form long unbroken diagonal stripes from one corner of the blanket to the other.
- Swap the ridge seam for a flat one. Join with wrong sides together using sc instead of sl st for a wider, softer ridge, or whip stitch through the back loops only for a seam that disappears completely and lets the triangles run edge to edge.
- Make a matching cushion cover. Four squares joined into a 30 cm panel, two panels, three rounds of the same border and an envelope back gives you a pillow that uses up your leftovers.
Frequently asked questions
Because the two 3-dc groups at corners B and D are made by different strands, nothing physically links them unless you link them. Before you start the new colour’s group, twist the two strands around each other once on the wrong side — old yarn over new — then work on. That single twist pulls the two groups together and the gap closes. Do it on every round at both split corners and the diagonal stays as tight as the rest of the fabric.
You can use two. Make all 72 squares burgundy and cream and the layout still works perfectly — the triangle bands come from the rotation, not the colour count. Using four colourways just means the eye keeps finding new combinations instead of settling into a repeat. If you drop to two colours, buy about 1300 g of the dark and 750 g of the light, since the dark is still doing all the joining and the border.
Usually nothing. Granny squares worked in joined rounds that are never turned naturally lean, because the beginning of each round stacks up in the same place. Blocking fixes it, which is why all 72 squares get pinned to a 15 cm template before any joining happens. If a square is still badly skewed after blocking, check that you worked ch 2 and not ch 1 at the four corner spaces — tight corners are the other common cause.
63 vertical seams at 25 sl sts each is 1575 stitches, and 8 horizontal row seams at 193 sl sts each is another 1544, for roughly 3100 slip stitches. It sounds enormous but slip stitches are fast, and it works out to about four to six hours total. Split it across a few sessions, and stop before your hand tires — tension drifts when you are tired, and uneven seams show immediately on a flat grid.
Yes, on the final round of each square, joining the last round’s groups to neighbouring squares with sl sts into the adjacent ch-1 spaces. You lose the raised burgundy ridges that give this blanket its texture, and you have to commit to the layout before you have seen all 72 squares together. If texture matters to you, seam at the end; if you want to avoid a long finishing stage, join as you go and plan your grid on paper first.
The finished Diagonal Granny Square Blanket in Deep Burgundy

