Diamond Fan Stitch Table Runner Crochet Pattern
Beginner Friendly
Perfect for those just starting their crochet journey, with clear instructions and simple techniques
Single-Day Project
A satisfying project you can complete in a single afternoon or evening.
Handmade Gift
A beautiful keepsake — free forever. Read online or print at home.
About This Diamond Fan Stitch Table Runner Crochet Pattern
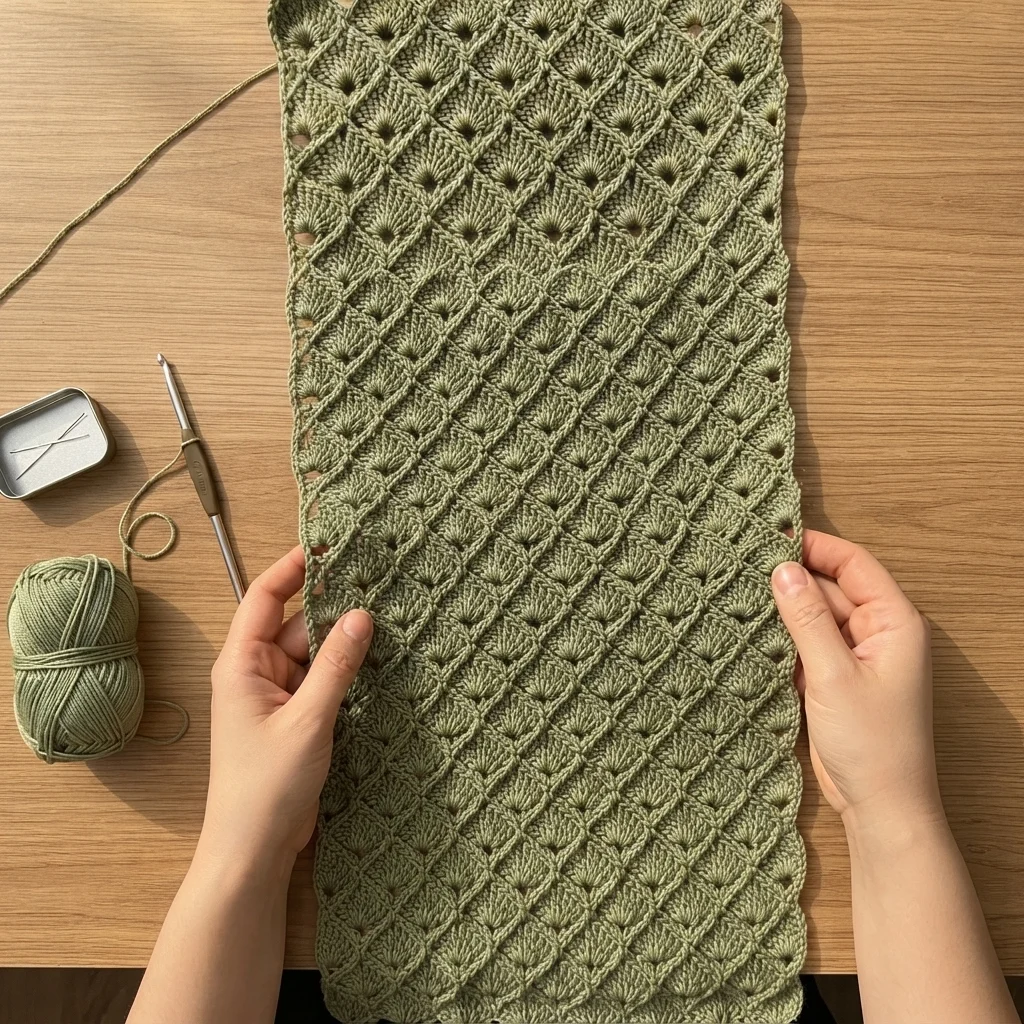
This crochet diamond fan stitch table runner pattern repeats a single, richly textured stitch across the entire panel: rows of diamond-shaped frames, each centered on a small radiating fan of stitches, tile together edge to edge in a continuous lattice. Worked in one sage green yarn with no color changes or applique, the whole visual impact comes from the stitch pattern itself, finished with a matching scalloped edge running around all four sides.
What makes this design distinctive is the diamond lattice construction: taller stitches worked at an angle build the diamond outlines, while a burst of shorter stitches clustered at each diamond’s center creates the small fan detail visible at every intersection. Because the pattern repeats with real precision across a long panel, this is a genuinely technical project even without any motifs, applique, or color changes to manage. Expect to spend 12-16 hours total, most of it in maintaining the diamond repeat consistently down the runner’s length.
This is an advanced pattern, best suited to someone comfortable reading and repeating a multi-row textured stitch pattern with exact placement, rather than someone wanting motif-based or colorwork variety.
Materials
- DK weight cotton yarn, sage green ~280g
- Crochet hook 4 mm (US G/6)
- Tapestry/yarn needle
- Steam iron and pressing cloth, or blocking mat and pins
- Sharp scissors
Abbreviations
chchainsl stslip stitchscsingle crochethdchalf double crochetdcdouble crochettrtreble/triple crochetfan7 dc worked in the same st or space, forming a small radiating clusterch-spchain spacest(s)stitch(es)reprepeatFOfasten offFoundation and Diamond Lattice Setup
- Ch 86 (a multiple of 10 plus 6, to allow for the diamond repeat and edge stitches).
- Row 1: dc in 4th ch from hook and in next 2 ch, *ch 2, skip 2 ch, dc in next ch, ch 2, skip 2 ch, dc in next 5 ch; rep from * across, ending dc in last 3 ch. This begins the diamond outline framework.
- Row 2: ch 3 (counts as first dc), turn, dc in next 2 sts, *ch 2, dc in next ch-2 sp, ch 2, dc in next 5 sts; rep from * across, ending dc in last 3 sts, continuing to build the diamond’s angled sides.
Fan Center Row
- Row 3: ch 3, turn, dc in next 2 sts, *ch 2, work a fan (7 dc) into the ch-2 sp from the row below, ch 2, dc in next 5 sts; rep from * across, ending dc in last 3 sts. This places the small radiating fan at the center point of each diamond.
- Row 4: ch 3, turn, dc in next 2 sts, *ch 2, skip the fan, dc into the center dc of the fan below only, ch 2, dc in next 5 sts; rep from * across, ending dc in last 3 sts, beginning the next diamond point below the fan.
Main Panel Repeat
- Rows 5-6: repeat Row 2’s diamond-building structure, continuing the angled ch-2 diamond outlines downward from the point established in Row 4.
- Row 7: repeat Row 3’s fan placement, working a fresh fan into the newly formed diamond centers.
- Continue alternating this 4-row sequence (2 diamond-outline rows, 1 fan row, 1 transition row) down the entire length of the panel, keeping every diamond and fan aligned directly above the one before it, until the runner measures approximately 115 cm long.
- End on a completed diamond-outline row so the final edge is even and ready for the border.
Scalloped Border
- With sage green, join in one corner of the panel. Round 1: sc evenly around the entire panel, working 3 sc in each corner st to keep it flat and square.
- Round 2 (scallop round): *sk 2 sts, 5 dc in next st, sk 2 sts, sl st in next st; rep from * evenly around all 4 sides, adjusting slightly at the corners so scallops stay even in size.
- Join with sl st to first st and FO. Weave in all ends.
Finishing
Steam-block the entire panel face-down on a towel, gently opening each diamond so the ch-2 spaces sit even and the fan centers spread out fully. Pin all 4 sides straight and square, then let the whole piece dry completely flat. A firm block makes a significant difference in how crisp and open the diamond lattice looks compared to straight off the hook.
Tips for Success
- Count your foundation chain twice before starting Row 1; this pattern is very sensitive to an off-by-a-few starting chain and errors compound across the whole panel.
- Keep every fan directly centered within its diamond, and every diamond directly stacked above the one below it; drift in either direction becomes very visible over a long panel.
- Work all 7 dc of each fan into the exact same stitch or space, fanning your hook slightly with each stitch to keep them evenly spread rather than bunched.
- Use a stitch marker at the start of each row until the 4-row repeat feels automatic, so you always know which row of the sequence you’re on.
- Block firmly and repeatedly if needed; this stitch pattern looks noticeably better and more defined after a firm steam block than straight off the hook.
Common Mistakes to Avoid
- Losing track of which row in the 4-row repeat you’re on causes the diamond and fan placement to drift out of alignment. Fix: mark your row sequence clearly, or use a written tally, until the pattern becomes automatic.
- Working fans with uneven stitch spacing makes some diamonds look fuller than others. Fix: fan your hook slightly with each of the 7 dc so they spread evenly rather than stacking straight.
- Starting with a foundation chain that isn’t an exact multiple of the repeat throws off the whole pattern from Row 1. Fix: recheck the chain count against the stated multiple before working a single stitch of Row 1.
- Skipping blocking leaves the diamonds looking tight and cramped rather than open. Fix: steam firmly and pin the diamonds open before letting the piece dry.
- Working the border’s scallop round with an inconsistent stitch count between scallops leaves uneven bumps around the edge. Fix: count sts between scallops carefully, adjusting only at the corners.
Ways to Customize This Pattern
- Shorten the starting chain and panel length for a matching set of placemats using the same diamond fan repeat.
- Work the panel in a soft cream or dusty blue instead of sage green for a different palette.
- Skip the scalloped border and finish with a simple sc edge for a cleaner, more minimal look.
- Widen the starting chain for a wider table topper instead of a narrow runner.
- Add a row of contrast-color sc along the border for a subtle pop of color against the single-tone panel.
Frequently asked questions
The diamond repeat relies on a fixed number of stitches between each diamond point for the lattice to line up correctly across the whole row. An incorrect chain count will throw off spacing increasingly as you work across the row.
This usually means the 7 dc stitches were worked too close together or at an inconsistent angle. Fan your hook outward slightly with each stitch as you work into the same space, so the cluster spreads into a visible fan shape rather than a tight bundle.
Yes. Add additional multiples of 10 stitches to your foundation chain to widen the panel while keeping the same diamond and fan proportions throughout.
Cotton is recommended because it blocks crisply and holds the open diamond lattice shape well. Acrylic or wool blends will work but may drape more softly and hold the diamond shapes less crisply after blocking.
The finished Diamond Fan Stitch Table Runner Crochet Pattern

