Diamond Lattice Intarsia Maple Leaf Table Runner Pattern
Beginner Friendly
Perfect for those just starting their crochet journey, with clear instructions and simple techniques
Single-Day Project
A satisfying project you can complete in a single afternoon or evening.
Handmade Gift
A beautiful keepsake — free forever. Read online or print at home.
About This Diamond Lattice Intarsia Maple Leaf Table Runner Pattern
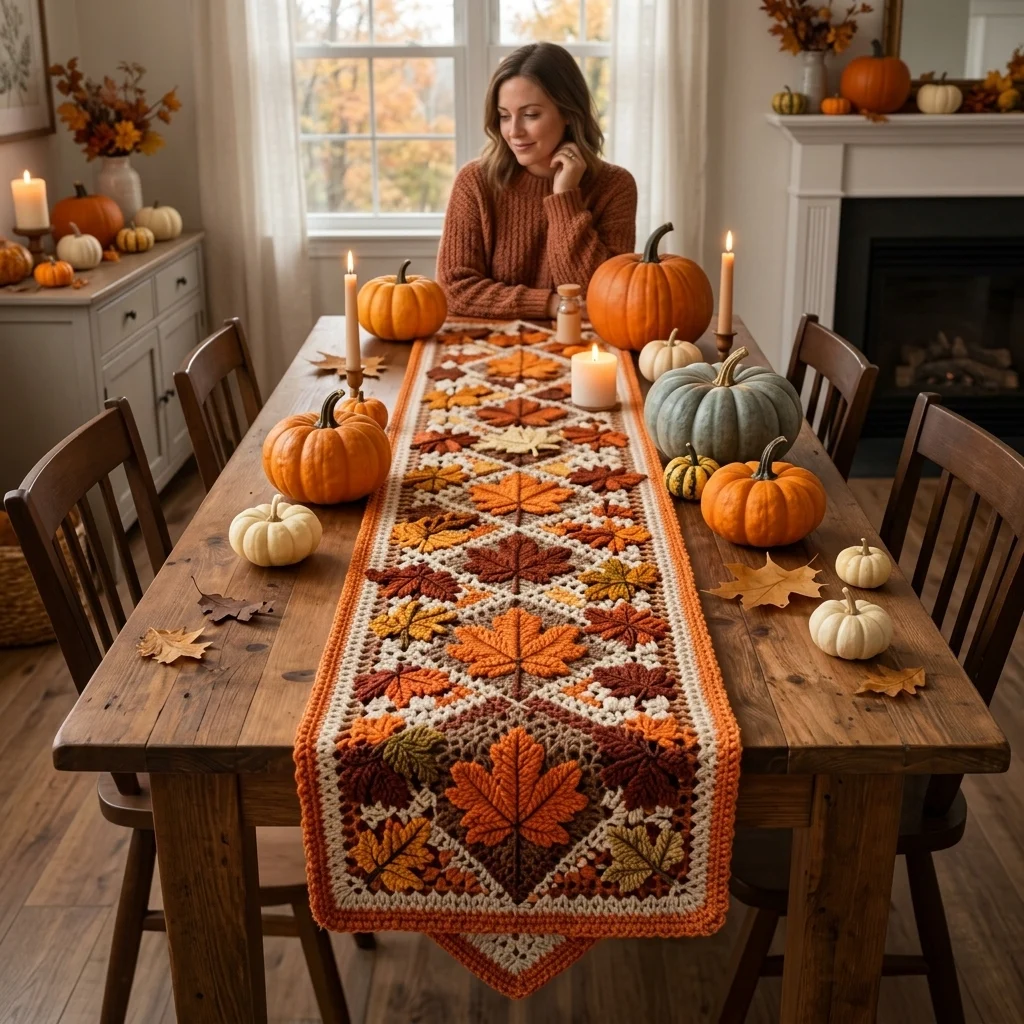
This crochet maple leaf table runner pattern builds a single flat intarsia panel where large diamond shapes, worked in cream, taupe, and brown, each frame one big maple leaf in rust, gold, or burgundy, with tiny accent leaves tucked into the narrow triangle points between diamonds. One short end finishes in a mitered point rather than a straight edge, and the whole runner is trimmed with a solid orange border.
What makes this design distinctive is the combination of large-scale and small-scale leaf motifs within the same intarsia grid: each large diamond carries a full-sized leaf worked at the scale of the diamond itself, while the small triangular gaps between diamonds get miniature leaf accents in different colors, so the background reads as a busy layered field of leaves at two different scales. The pointed mitered end is what sets this runner apart from a plain rectangle, giving it a more tailored, decorative silhouette at one end. Expect to spend 26-32 hours total between the main intarsia panel, the mitered point shaping, and the border.
This is an advanced pattern, best suited to someone experienced with intarsia colorwork and comfortable shaping a mitered point within a colorwork panel, rather than someone attempting their first multi-bobbin project.
Materials
- Worsted weight yarn, cream ~150g, diamond background
- Worsted weight yarn, taupe ~80g, diamond background accents
- Worsted weight yarn, dark brown ~50g, diamond grid lines
- Worsted weight yarn, rust orange ~80g, large leaves
- Worsted weight yarn, amber gold ~60g, large leaves
- Worsted weight yarn, burgundy wine ~60g, large leaves
- Worsted weight yarn, mixed small amounts small accent leaves in gold, olive, and cream
- Worsted weight yarn, orange ~60g, border
- Crochet hook 5 mm (US H/8)
- Bobbins or yarn butterflies for intarsia color management
- Tapestry/yarn needle
- Steam iron and pressing cloth, or blocking mat and pins
- Sharp scissors
Abbreviations
chchainsl stslip stitchscsingle crochetdcdouble crochetdecdecrease (dc2tog)st(s)stitch(es)reprepeatMCmain color (as noted per section)CCcontrast color (leaf color as noted)FOfasten offFoundation and Diamond Grid Setup
- With cream, ch 81. Row 1: dc in 4th ch from hook and in each ch across. 79 sts.
- Row 2 (MC cream): ch 3, turn, dc in each st across. 79 sts.
- Row 3: begin the diamond grid outline in dark brown, working single dc sts in a diagonal line at set intervals across the row to start marking the first diamond edges, keeping the rest of the row in cream MC. 79 sts total maintained.
- Rows 4-8: continue building the diamond grid outlines in brown, widening each diagonal line by 1 st per row on both sides to form the top half of each diamond shape, keeping background sts in cream or taupe as charted.
Large Leaf Intarsia Block (worked into each diamond; repeat per chart for all diamond positions down the panel)
- On the row where a diamond’s leaf begins, work in MC up to the diamond’s left edge, then switch to CC (leaf color for that diamond) on a separate bobbin.
- Work the leaf stem row: dc 2 in CC at the diamond’s center base, twisting the MC bobbin at the color change point to avoid holes.
- Next 4 rows: increase the CC block by 2 sts per side each row to build the widening lower lobes of the leaf, twisting MC and CC together at every join.
- Next 2 rows: work even across the CC block width at its broadest point.
- Final 4 rows: decrease the CC block by 2 sts per side each row to taper the leaf back to a point at the diamond’s top corner, then FO the CC bobbin and weave in.
- Continue MC/taupe diamond grid rows above and around the completed leaf block as charted.
Small Accent Leaf Intarsia Block (worked into each triangle point between diamonds)
- On the row where a triangle point falls, switch to a small accent CC bobbin (gold, olive, or cream as charted) for just 3-4 sts at the point’s center.
- Work 2 rows increasing the accent block by 1 st per side to widen slightly, twisting bobbins at each join.
- Work 1 row even, then decrease back to a point over the next 2 rows, FO the accent bobbin, and continue the surrounding diamond grid color.
Main Panel Repeat and Point Shaping
- Repeat the diamond grid and large leaf block pattern down the length of the runner, alternating rust, gold, and burgundy leaves so no two adjacent diamonds share a color, matching the layout in the photo, and placing small accent leaves in the triangle points between them.
- Continue in this straight rectangular panel until it measures approximately 115 cm long, ending after a completed row of diamonds.
- Begin the mitered point: starting the next row, dec 1 st at each end of every row (2 sts total per row) while continuing the charted diamond and leaf pattern as closely as the narrowing width allows.
- Continue decreasing 2 sts per row until only a few sts remain at the very tip, then FO, leaving a long tail for seaming into the border.
Border
- With orange, join with sl st in a corner st at the straight end of the panel.
- Round 1: ch 1, sc evenly around the entire panel, including along the mitered point’s diagonal edges, working 3 sc in each outer corner and at the very tip of the point to keep everything flat.
- Round 2: ch 1, sc in each st around, working 3 sc in each corner and at the point’s tip. Join with sl st to first sc.
- Round 3: repeat Round 2 once more for a solid double-thick border, join and FO.
Finishing
Weave in every bobbin tail on the wrong side individually, since this panel has a large number of color changes across both leaf scales. Steam-block the finished runner face-down on a towel, pinning the straight end and both long sides square, and pinning the mitered point out to a crisp, even tip. Let it dry fully flat before moving it to the table.
Tips for Success
- Chart the entire layout, including the mitered point transition, before starting; this pattern shifts shape partway through and is much easier to follow from a marked chart than from memory.
- Keep small accent leaf blocks genuinely small, 3-4 sts wide at most, so they read as tiny fillers rather than competing with the large diamond leaves.
- Twist working yarns at every single color change, on both large and small leaf blocks, to avoid holes forming at the many intarsia joins.
- Decrease exactly 2 sts per row once the mitered point begins; skipping a decrease row or doubling one up will pull the point off-center.
- Block the point section with extra care, pinning it out to a fully symmetrical tip before it dries.
Common Mistakes to Avoid
- Forgetting to twist bobbins at the small accent leaf points leaves visible gaps at these tiny, easy-to-rush color changes. Fix: twist yarns at every join regardless of how small the color block is.
- Losing track of which row starts the mitered point shaping throws off the whole taper. Fix: mark the transition row clearly on your chart before you reach it.
- Placing same-color large leaves in adjacent diamonds flattens the pattern. Fix: check your chart in both directions before starting each new leaf block.
- Decreasing unevenly, more on one side than the other, pulls the point off-center. Fix: always decrease exactly 1 st at each end of the row, never both at the same end.
- Skipping blocking on the mitered point leaves it curling rather than lying flat. Fix: pin the point out fully symmetrical while blocking and let it dry completely before handling.
Ways to Customize This Pattern
- Work both short ends as mitered points instead of one straight and one pointed, for a fully symmetrical runner.
- Reduce the panel to 4-5 diamonds total for a shorter dresser-scarf-length version.
- Swap the rust, gold, and burgundy leaves for greens and creams for a spring or everyday version of the same construction.
- Skip the small accent leaves at the triangle points for a simpler, less busy background.
- Use a single leaf color throughout instead of three for a more monochrome, subtle look.
Frequently asked questions
Some prior intarsia experience helps a great deal, since you’re managing color changes and shaping decreases at the same time. If this is your first mitered intarsia section, practice the decrease-and-color-change combination on a small swatch first.
Yes. Continue the straight rectangular panel to your desired length and finish both short ends with the same double sc border instead of shaping a point.
Rows with both a large leaf block and a small accent leaf point active at the same time use around 4 colors: the background, the large leaf, the accent leaf, and sometimes a grid outline color. Most rows use fewer.
This usually means decreases were worked unevenly between the two edges. Recount your decrease rows and confirm exactly 1 st was removed at each end per row, not more at one side than the other.
The finished Diamond Lattice Intarsia Maple Leaf Table Runner Pattern

